Page 335 of 620
Black plate (33,1)Cadillac Escalade/Escalade ESV Owner Manual - 2010
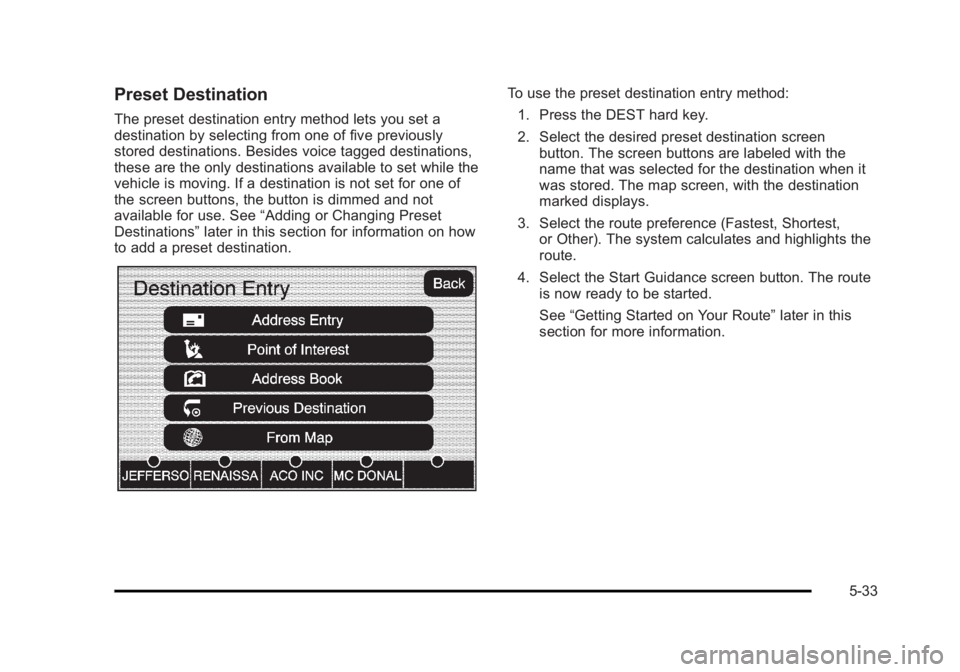
Preset Destination The preset destination entry method lets you set a
destination by selecting from one of five previously
stored destinations. Besides voice tagged destinations,
these are the only destinations available to set while the
vehicle is moving. If a destination is not set for one of
the screen buttons, the button is dimmed and not
available for use. See “ Adding or Changing Preset
Destinations ” later in this section for information on how
to add a preset destination. To use the preset destination entry method:
1. Press the DEST hard key.
2. Select the desired preset destination screen
button. The screen buttons are labeled with the
name that was selected for the destination when it
was stored. The map screen, with the destination
marked displays.
3. Select the route preference (Fastest, Shortest,
or Other). The system calculates and highlights the
route.
4. Select the Start Guidance screen button. The route
is now ready to be started.
See “ Getting Started on Your Route ” later in this
section for more information.
5-33
Page 337 of 620
Black plate (35,1)Cadillac Escalade/Escalade ESV Owner Manual - 2010
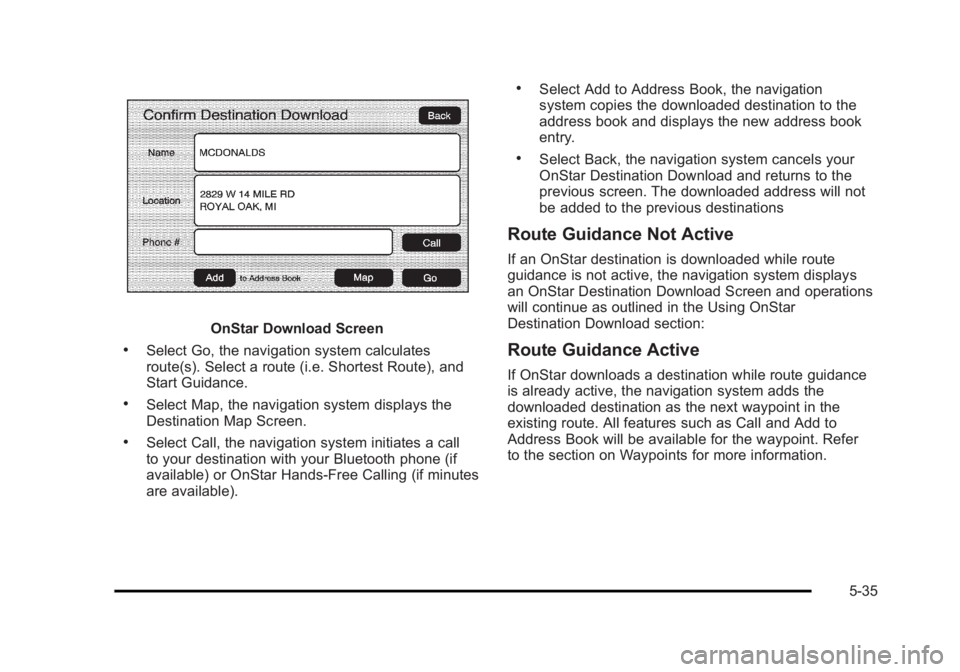
OnStar Download Screen.
Select Go, the navigation system calculates
route(s). Select a route (i.e. Shortest Route), and
Start Guidance. .
Select Map, the navigation system displays the
Destination Map Screen. .
Select Call, the navigation system initiates a call
to your destination with your Bluetooth phone (if
available) or OnStar Hands-Free Calling (if minutes
are available). .
Select Add to Address Book, the navigation
system copies the downloaded destination to the
address book and displays the new address book
entry. .
Select Back, the navigation system cancels your
OnStar Destination Download and returns to the
previous screen. The downloaded address will not
be added to the previous destinations
Route Guidance Not Active If an OnStar destination is downloaded while route
guidance is not active, the navigation system displays
an OnStar Destination Download Screen and operations
will continue as outlined in the Using OnStar
Destination Download section:
Route Guidance Active If OnStar downloads a destination while route guidance
is already active, the navigation system adds the
downloaded destination as the next waypoint in the
existing route. All features such as Call and Add to
Address Book will be available for the waypoint. Refer
to the section on Waypoints for more information.
5-35
Page 338 of 620
Black plate (36,1)Cadillac Escalade/Escalade ESV Owner Manual - 2010
Previous Destinations Previous OnStar Destination Downloads are saved
under Previous Destinations in the navigation system
where they can be accessed or saved to the
address book.
Important Notes regarding OnStar Destination
Download: .
If the navigation system is turned off when the
destination download is attempted, the navigation
system will automatically turn on and display the
OnStar Destination Download Screen. The radio
will remain on after the download occurs. .
If OnStar downloads a destination and the address
is not found in the mapping disc ’ s database and
routing by coordinates is not available, the Go
and Map buttons gray out and routing will not be
available. Press the blue OnStar button for further
assistance. .
The Call button grays out when there is no phone
number available for your destination and while
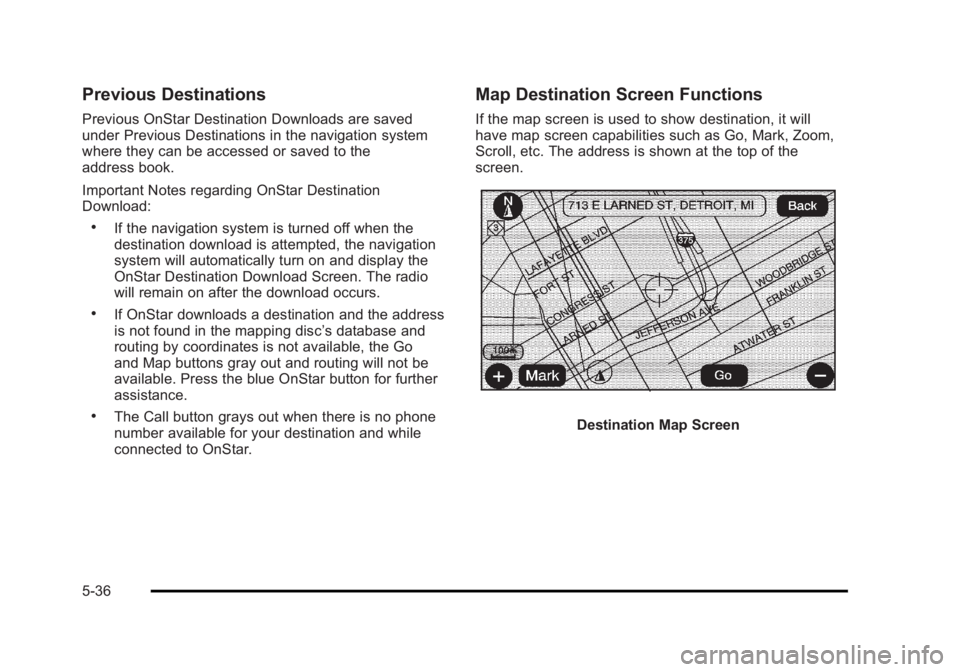
connected to OnStar. Map Destination Screen Functions If the map screen is used to show destination, it will
have map screen capabilities such as Go, Mark, Zoom,
Scroll, etc. The address is shown at the top of the
screen.
Destination Map Screen
5-36
Page 339 of 620
Black plate (37,1)Cadillac Escalade/Escalade ESV Owner Manual - 2010
Getting Started on Your Route Once a destination has been entered, there are several
functions that can be performed. Press the DEST hard
key to access the Route screen.
Turn List Turn List: Touch to view the list of turn maneuvers for
the entire route and to avoid turns on the route.
r /
q (Scroll Arrows): Touch the up and down
arrows to scroll through the list of maneuvers.
Avoid: Touch this screen button, next to the adjacent
street name, to avoid the maneuver.
The map screen displays. The route recalculates
without this maneuver.
5-37
Page 342 of 620
Black plate (40,1)Cadillac Escalade/Escalade ESV Owner Manual - 2010
To delete a stopover from the current route:
1. Press the DEST hard key.
2. Select the Delete screen button for the desired
stopover to delete.
3. The system displays a pop-up confirmation
message. Touch Yes to delete the stopover; touch
No to cancel this operation.
4. Select the route preference (Fastest, Shortest,
or Other). The system calculates and highlights the
route.
5. Select the Start Guidance screen button. The route
is now ready to be started.
Suspend Guidance Press this screen button, from the Route screen, to put
the current route on hold.
Resume Guidance Press this screen button, from the Route screen, to
resume guidance on the current route.
Cancel Guidance Press this screen button, from the Route screen, to
cancel the current route. Adding Destinations to the
Address Book There are two ways to add a destination to the
address book: .
To add the current vehicle position to the address
book, press the Mark screen button from the map
screen. The system automatically saves the
current vehicle information in the address book.
When scrolling on the map the Mark screen button
automatically adds the current scrolled position
information in the address book. .
Press the Add to Address Book screen button
when available on POI information screens,
Destination Entry screens, or POI screens. The
system automatically saves this information in the
address book.
See “ Nav ” under Configure Menu
on page 5 ‑ 42 for
information on editing address book entries.
5-40
Page 343 of 620
Black plate (41,1)Cadillac Escalade/Escalade ESV Owner Manual - 2010
Adding or Changing Preset
Destinations This feature allows additions or changes one of five
preset destinations. When a destination has been
added as a preset destination, it is available to select
from the Destination Entry screen. See “ Preset
Destination ” previously for information on how to select
a preset destination as a final destination.
To store the current vehicle position as a preset
destination:
1. Select the Mark screen button from the map
screen to add the current vehicle position to the
address book. The Address Book screen appears.
2. Select the Name screen button. An alpha-keyboard
displays. Enter the name. Press the OK screen
button then the Back screen button to return to the
address book information screen.
3. Press and hold one of the buttons at the bottom of
the screen until the name appears in that preset
destination screen button. It is now available to
select from the Destination Entry screen. To store an address book entry as a preset destination:
1. Select the CONFIG hard key.
2. Select the Nav screen button or press the CONFIG
key until Nav is selected or touch the Nav screen
button.
3. Select the Edit/View screen button.
4. Select the address book entry to be stored as the
preset destination. Select the Name screen button
to add a name, if needed.
5. Press and hold one of the buttons at the bottom of
the screen until the name appears in that preset
destination screen button. It is now available to
select from the Destination Entry screen.
5-41
Page 344 of 620
Black plate (42,1)Cadillac Escalade/Escalade ESV Owner Manual - 2010
Configure Menu
Press the CONFIG (Configure) hard key to adjust
several of the system's features and preferences.
The last selected CONFIG screen is the screen that
displays: Sound, Radio, Nav (navigation), Display,
or Time. Sound Press the CONFIG key to enter the configure menu
options, then press the CONFIG key repeatedly until
Sound is selected or touch the Sound screen button to
make speaker and DSP (Digital Signal Processing)
adjustments. See “ Sound Menu ” under, Navigation
Audio System on page 5 ‑ 60 for more information.
Radio Press the CONFIG key to enter the configure menu
options, then press the CONFIG key repeatedly until
Radio is selected or touch the Radio screen button to
make changes for radio information displayed, preset
pages, XM ™ categories, and Bose ®
AudioPilot ®
. See
“ Radio Menu ” under, Navigation Audio System on
page 5 ‑ 60 for more information.
5-42
Page 347 of 620
Black plate (45,1)Cadillac Escalade/Escalade ESV Owner Manual - 2010
To add or change the phone number of an address
book entry:
1. Select the CONFIG hard key.
2. Select the NAV screen button.
3. Select the Edit/View Address Book screen button.
4. Select the address book entry to change.
5. Touch the Phone # screen button and use the
numeric keyboard to input or change the phone
number.
6. Touch the OK screen button to save your changes,
then touch the Back screen button to return to the
Address Book information screen.
To change the map icon of an address book entry:
1. Select the CONFIG hard key.
2. Select the NAV screen button.
3. Select the Edit/View Address Book screen button.
4. Select the address book entry to change.
5. Select the Icon screen button.
6. Select an icon from the list.
To add a voice tag to an address book entry:
1. Select the CONFIG hard key.
2. Select the NAV screen button.
3. Select the Edit/View Address Book screen button. 4. Select the Add Voice Tag screen button.
5. The system will ask for you to state the name. You
will have four seconds to state the name. The
system will respond back with the name and
prompt you to repeat the name for confirmation.
To delete an address book entry:
1. Select the CONFIG hard key.
2. Select the NAV screen button.
3. Select the Edit/View Address Book screen button.
4. Select the address book entry to delete.
5. Press the Delete screen button to delete the
address book entry.
6. A confirmation pop-up will display. Select Ok to
delete; select Cancel to cancel the operation.
To delete the entire address book:
1. Select the CONFIG hard key.
2. Select the NAV screen button.
3. Select the Edit/View Address Book screen button.
4. A list of all the address book entries will display.
Press and hold the Clear All screen button.
5. A confirmation pop-up will display. Select Ok to
delete; select Cancel to cancel the operation.
5-45