Page 41 of 120
6-2
Ambient temp./choke position
5. Completely close the throttle lever and start
the engine by pushing the start switch.TIPIf the engine fails to start, release the start switch,
then push it again. Pause a few seconds before
the next attempt. Each cranking should be as short
as possible to preserve battery energy. Do not1. Fully open “ON”
2. Half open (warming up position)
3. Closed “OFF”
4. Choke
0°
30° 10°
20° 30°
50° 70° 90° °F
°C
1
3
TIPThis model is equipped with an ignition circuit cut-
off system. The engine can be started only when
the rear brake lever is applied.4. Use the choke in reference to the figure:
Position (1):Cold engine start with ambient temperature be-
low 30 °C (90 °F).
Position (2):Warming up position.
Position (3):Cold engine start with ambient temperature
above 25 °C (80 °F).
66
1 3
2 4
Page 42 of 120
, the choke should be returned to posi-
tion (2) to warm up the engine. I")
6-3
6
crank the engine more than 10 seconds on eachattempt.6. If the engine is started with the choke in posi- tion (1), the choke should be returned to posi-
tion (2) to warm up the engine. If the engine is
started with the choke in position (2), keep the
choke in this position to warm up the engine.
N O T I C E
For maximum engine life, always warm the en-
gine up before starting off. Never acceleratehard when the engine is cold!
7. Continue warming up the engine until it idles smoothly, then return the choke to position (3)
before riding.TIPThe engine is warm when it responds normally tothe throttle with the choke turned off. Starting a warm engine Follow the same procedure as for starting a cold
engine, with the exception that the choke is not re-
quired when the engine is warm. Instead, start the
engine with the throttle slightly open.
To start out and accelerate1. Squeeze the front brake lever to release the parking brake.
2. Gradually open the throttle while slowly re- leasing the rear brake lever. To decelerate
When slowing down or stopping, release the throt-
tle and apply the brakes smoothly and evenly. Im-
proper use of the brakes can cause the tires to lose
traction, reducing control and increasing the possi-
bility of an accident.
WARNING
Opening the throttle abruptly or releasing the
clutch lever too quickly could make the ATV
wheelie, which would increase the chance ofan accident, including an overturn.
Page 43 of 120
 or 20
hours of riding. For this reason, you should")
Engine break-in There is never a more important period in the life of
your engine than the first 320 km (200 mi) or 20
hours of riding. For this reason, you should read
the following material carefully.
Since the engine is brand new, do not put an ex-
cessive load on it for the first 320 km (200 mi) or 20
hours. The various parts in the engine wear and
N O T I C E Do not tow the ATV for long distances. The
transmission is properly lubricated only when
the engine is running. Inadequate lubrication
may damage the transmission.
160–320 km (100–200 mi) or 10–20 hours
Avoid prolonged operation above 3/4 throttle. Rev
the engine freely, but do not use full throttle at any
time.
N O T I C E
If any engine trouble should occur during the
engine break-in period, immediately have a ParkingWhen parking the ATV, stop the engine, shift the
drive select lever into the drive position, apply the
parking brake, and then turn the fuel cock to “OFF”. Yamaha dealer check the ATV. 320 km (200 mi) or 20 hours and beyond
The ATV can now be operated normally.0–160 km (0–100 mi) or 0–10 hours
Avoid prolonged operation above 1/2 throttle. Vary
the speed of the ATV regularly. Do not operate it at
one set throttle position.
polish themselves to the correct operating clear-
ances. During this period, prolonged full-throttle
operation or any condition that might result in en-
gine overheating must be avoided.
6-4
6
Page 44 of 120
6-5
Parking on a slope1. Bring the ATV to a stop by applying the brakesin the drive position.
2. Stop the engine.
3. Apply the parking brake.
1. Parking brake lock button
1. Locked position
6
1
1
WARNING
Avoid parking on hills or other inclines. Park-
ing on a hill or other incline could cause the
ATV to roll out of control, increasing the
chance of an accident. If you must park on an
incline, place the ATV transversely across the
incline, stop the engine, apply the parking
brake, and then block the front and rear wheels
with rocks or other objects. Do not park the ATV at all on hills that are sosteep you could not walk up them easily.
Page 45 of 120

6-6
Accessories and loading Accessories
Accessories can affect the handling and control of
your ATV. Keep the following in mind when consid-
ering an accessory or operating an ATV which has
accessories.Choose only accessories designed for your
ATV. Your Yamaha dealer has a variety of gen-
uine Yamaha accessories. Other accessories
may also be available on the market. However,
it is not possible for Yamaha to test all non-Yamaha accessories, nor control over their qual-
ity or suitability. Choose a genuine Yamaha ac-
cessory, or one that is equivalent in design and
quality.
Accessories should be rigidly and securely
mounted. An accessory which can shift position
or come off while you are riding could affect your
ability to control the ATV.Do not mount an accessory where it could inter-
fere with your ability to control the ATV. Exam-
ples include (but are not limited to) a heavy or
bulky object attached to the handlebars which
could make steering difficult, an accessory that
limits your ability to move around on the seat, or
one that limits your view.Use extra caution when riding an ATV with ac-
cessories. The ATV may handle differently than
it does without accessories. Loading
As originally equipped, this ATV is not designed to
carry cargo or tow a trailer. If you choose to add ac-
cessories so that you can carry cargo or tow a trail-
er, you must use common sense and good
judgment as the stability and handling of an ATV
can be changed. When adding accessories, keep
6
Page 46 of 120

6-7
the following points in mind:Never exceed the weight limits shown. An over-
loaded ATV can be unstable.If you are carrying cargo and towing a trailer, in-
clude the tongue weight in the maximum ATV
load limit.Load cargo on the carriers as close to the center
of the ATV as possible. Put cargo at the rear of
the front carrier, at the front of the rear carrier,
and center it.Tie down cargo securely to the carriers. Make
sure cargo in the trailer cannot move around. A
shifting load can cause an accident.Make sure the load does not interfere with con-
trols or your ability to see where you are going.Ride more slowly than you would without a load.
The more weight you carry, the slower you
should go.Allow more braking distance. A heavier ATV
takes longer to stop.Avoid making sharp turns unless at very slowspeeds.
Avoid hills and rough terrain. Choose terrain
carefully. Added weight affects the stability and
handling of the ATV.
6
MAXIMUM LOADING LIMIT
ATV loading limit (total weight of rider, cargo,
accessories, and tongue):70.0 kg (154 lb)
WARNING
Never exceed the stated load capacity for this
ATV. Overloading this ATV or carrying or tow-
ing cargo improperly could cause changes in
ATV handling which could lead to an accident.
Cargo should be properly distributed and se-
curely attached. Reduce speed when carrying
cargo or pulling a trailer. Allow greater dis-tance for braking.
Page 47 of 120
Page 48 of 120

7-2
GETTING TO KNOW YOUR ATV
This ATV is for recreation use. This section, Riding
your ATV, provides general ATV riding instructions
for recreational riding. The skills and techniques
described in this section, however, are appropriate
for all types of riding. Riding your ATV requires
special skills acquired through practice over a pe-
riod of time. Take the time to learn the basic tech-
niques well before attempting more difficult
maneuvers.
Riding your new ATV can be a very enjoyable ac-
tivity, providing you with hours of pleasure. But it is
essential to familiarize yourself with the operation
of the ATV to achieve the skill necessary to enjoy
riding safely. Before you begin to ride, be sure you
have read this Owner’s Manual completely and un-
derstand the operation of the controls. Pay partic-
ular attention to the safety information on pages
1-1–1-4. Please also read all notice and warning
labels on your ATV.RIDE WITH CARE AND GOOD JUDGEMENT
Get training if you are inexperienced.
Beginners should get training from a certified in-
structor.
Become familiar with this ATV at slow speeds first,
even if you are an experienced operator. Do not at-
tempt to operate at maximum performance until
you are totally familiar with the ATV’s handling and
performance characteristics.
7
 1
1 2
2 3
3 4
4 5
5 6
6 7
7 8
8 9
9 10
10 11
11 12
12 13
13 14
14 15
15 16
16 17
17 18
18 19
19 20
20 21
21 22
22 23
23 24
24 25
25 26
26 27
27 28
28 29
29 30
30 31
31 32
32 33
33 34
34 35
35 36
36 37
37 38
38 39
39 40
40 41
41 42
42 43
43 44
44 45
45 46
46 47
47 48
48 49
49 50
50 51
51 52
52 53
53 54
54 55
55 56
56 57
57 58
58 59
59 60
60 61
61 62
62 63
63 64
64 65
65 66
66 67
67 68
68 69
69 70
70 71
71 72
72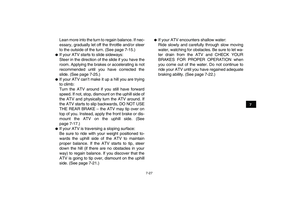 73
73 74
74 75
75 76
76 77
77 78
78 79
79 80
80 81
81 82
82 83
83 84
84 85
85 86
86 87
87 88
88 89
89 90
90 91
91 92
92 93
93 94
94 95
95 96
96 97
97 98
98 99
99 100
100 101
101 102
102 103
103 104
104 105
105 106
106 107
107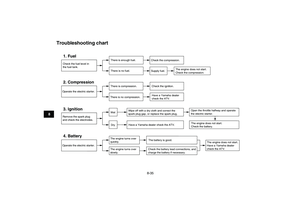 108
108 109
109 110
110 111
111 112
112 113
113 114
114 115
115 116
116 117
117 118
118 119
119

