Page 57 of 68

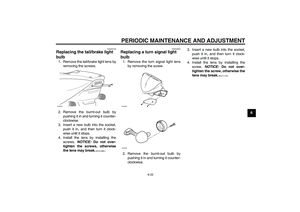
SCOOTER CARE AND STORAGE
7-1
7
EAU26093
Care While the open design of a scooter re-
veals the attractiveness of the technol-
ogy, it also makes it more vulnerable.
Rust and corrosion can develop even if
high-quality components are used. A
rusty exhaust pipe may go unnoticed
on a car, however, it detracts from the
overall appearance of a scooter. Fre-
quent and proper care does not only
comply with the terms of the warranty,
but it will also keep your scooter looking
good, extend its life and optimize its
performance.
Before cleaning
1. Cover the muffler outlet with a
plastic bag after the engine has
cooled down.
2. Make sure that all caps and covers
as well as all electrical couplers
and connectors, including the
spark plug cap, are tightly in-
stalled.
3. Remove extremely stubborn dirt,
like oil burnt onto the crankcase,
with a degreasing agent and a
brush, but never apply such prod-ucts onto seals, gaskets and wheel
axles. Always rinse the dirt and de-
greaser off with water.
Cleaning
NOTICE
ECA10782
�
Avoid using strong acidic wheel
cleaners, especially on spoked
wheels. If such products are
used on hard-to-remove dirt, do
not leave the cleaner on the af-
fected area any longer than in-
structed. Also, thoroughly rinse
the area off with water, immedi-
ately dry it, and then apply a cor-
rosion protection spray.
�
Improper cleaning can damage
plastic parts (such as cowlings,
panels, windshields, headlight
lenses, meter lenses, etc.) and
the mufflers. Use only a soft,
clean cloth or sponge with wa-
ter to clean plastic. However, if
the plastic parts cannot be thor-
oughly cleaned with water, di-
luted mild detergent with water
may be used. Be sure to rinseoff any detergent residue using
plenty of water, as it is harmful
to plastic parts.
�
Do not use any harsh chemical
products on plastic parts. Be
sure to avoid using cloths or
sponges which have been in
contact with strong or abrasive
cleaning products, solvent or
thinner, fuel (gasoline), rust re-
movers or inhibitors, brake flu-
id, antifreeze or electrolyte.
�
Do not use high-pressure wash-
ers or steam-jet cleaners since
they cause water seepage and
deterioration in the following ar-
eas: seals (of wheel and swing-
arm bearings, fork and brakes),
electric components (couplers,
connectors, instruments,
switches and lights), breather
hoses and vents.
�
For scooters equipped with a
windshield: Do not use strong
cleaners or hard sponges as
they will cause dulling or
scratching. Some cleaning com-
pounds for plastic may leave
scratches on the windshield.
U3C6E1E0.book Page 1 Friday, August 8, 2008 10:09 AM
Page 58 of 68

SCOOTER CARE AND STORAGE
7-2
7Test the product on a small hid-
den part of the windshield to
make sure that it does not leave
any marks. If the windshield is
scratched, use a quality plastic
polishing compound after
washing.
After normal use
Remove dirt with warm water, a mild
detergent, and a soft, clean sponge,
and then rinse thoroughly with clean
water. Use a toothbrush or bottlebrush
for hard-to-reach areas. Stubborn dirt
and insects will come off more easily if
the area is covered with a wet cloth for
a few minutes before cleaning.
After riding in the rain, near the sea oron salt-sprayed roadsSince sea salt or salt sprayed on the
roads during winter are extremely cor-
rosive in combination with water, carry
out the following steps after each ride in
the rain, near the sea or on salt-
sprayed roads.
TIPSalt sprayed on roads in the winter mayremain well into spring.
1. Clean the scooter with cold water
and a mild detergent after the en-
gine has cooled down. NOTICE:
Do not use warm water since it
increases the corrosive action
of the salt.
[ECA10791]
2. Apply a corrosion protection spray
on all metal, including chrome- and
nickel-plated, surfaces to prevent
corrosion.
After cleaning
1. Dry the scooter with a chamois or
an absorbing cloth.
2. Use a chrome polish to shine
chrome, aluminum and stainless-
steel parts, including the exhaust
system. (Even the thermally in-
duced discoloring of stainless-
steel exhaust systems can be re-
moved through polishing.)3. To prevent corrosion, it is recom-
mended to apply a corrosion pro-
tection spray on all metal,
including chrome- and nickel-plat-
ed, surfaces.
4. Use spray oil as a universal clean-
er to remove any remaining dirt.
5. Touch up minor paint damage
caused by stones, etc.
6. Wax all painted surfaces.
7. Let the scooter dry completely be-
fore storing or covering it.
WARNING
EWA10941
Contaminants on the brakes or tires
can cause loss of control.�
Make sure that there is no oil or
wax on the brakes or tires. If
necessary, clean the brake
discs and brake linings with a
regular brake disc cleaner or ac-
etone, and wash the tires with
warm water and a mild deter-
gent.
�
Before operating the scooter
test its braking performanceand cornering behavior.
U3C6E1E0.book Page 2 Friday, August 8, 2008 10:09 AM
Page 59 of 68

SCOOTER CARE AND STORAGE
7-3
7
NOTICE
ECA10800
�
Apply spray oil and wax spar-
ingly and make sure to wipe off
any excess.
�
Never apply oil or wax to any
rubber and plastic parts, but
treat them with a suitable care
product.
�
Avoid using abrasive polishing
compounds as they will wearaway the paint.
TIP�
Consult a Yamaha dealer for ad-
vice on what products to use.
�
Washing, rainy weather or humid
climates can cause the headlight
lens to fog. Turning the headlight
on for a short period of time will
help remove the moisture from thelens.
EAU26301
Storage Short-term
Always store your scooter in a cool, dry
place and, if necessary, protect it
against dust with a porous cover.NOTICE
ECA10820
�
Storing the scooter in a poorly
ventilated room or covering it
with a tarp, while it is still wet,
will allow water and humidity to
seep in and cause rust.
�
To prevent corrosion, avoid
damp cellars, stables (because
of the presence of ammonia)
and areas where strong chemi-cals are stored.
Long-term
Before storing your scooter for several
months:
1. Follow all the instructions in the
“Care” section of this chapter.2. Drain the carburetor float chamber
by loosening the drain bolt; this will
prevent fuel deposits from building
up. Pour the drained fuel into the
fuel tank.
3. Fill up the fuel tank and add fuel
stabilizer (if available) to prevent
the fuel tank from rusting and the
fuel from deteriorating.
4. Perform the following steps to pro-
tect the cylinder, piston rings, etc.
from corrosion.
a. Remove the spark plug cap
and spark plug.
b. Pour a teaspoonful of engine oil
into the spark plug bore.
c. Install the spark plug cap onto
the spark plug, and then place
the spark plug on the cylinder
head so that the electrodes are
grounded. (This will limit spark-
ing during the next step.)
d. Turn the engine over several
times with the starter. (This will
coat the cylinder wall with oil.)
WARNING! To prevent dam-
age or injury from sparking,
make sure to ground the
U3C6E1E0.book Page 3 Friday, August 8, 2008 10:09 AM
Page 60 of 68
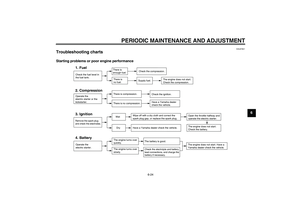
![YAMAHA AEROX50 2009 Owners Manual SCOOTER CARE AND STORAGE
7-4
7spark plug electrodes while
turning the engine over.
[EWA10951]
e. Remove the spark plug cap
from the spark plug, and then
install the spark plug and the
spark plug cap.](/manual-img/51/49336/w960_49336-59.png "YAMAHA AEROX50 2009 Owners Manual SCOOTER CARE AND STORAGE
7-4
7spark plug electrodes while
turning the engine over.
[EWA10951]
e. Remove the spark plug cap
from the spark plug, and then
install the spark plug and the
spark plug cap.")
SCOOTER CARE AND STORAGE
7-4
7spark plug electrodes while
turning the engine over.
[EWA10951]
e. Remove the spark plug cap
from the spark plug, and then
install the spark plug and the
spark plug cap.
5. Lubricate all control cables and the
pivoting points of all levers and
pedals as well as of the side-
stand/centerstand.
6. Check and, if necessary, correct
the tire air pressure, and then lift
the scooter so that both of its
wheels are off the ground. Alterna-
tively, turn the wheels a little every
month in order to prevent the tires
from becoming degraded in one
spot.
7. Cover the muffler outlet with a
plastic bag to prevent moisture
from entering it.
8. Remove the battery and fully
charge it. Store it in a cool, dry
place and charge it once a month.
Do not store the battery in an ex-
cessively cold or warm place [less
than 0 °C (30 °F) or more than 30°C (90 °F)]. For more information
on storing the battery, see page
6-19.
TIPMake any necessary repairs beforestoring the scooter.
U3C6E1E0.book Page 4 Friday, August 8, 2008 10:09 AM
Page 61 of 68

Overall width:
719 mm (28.3 in)
Overall height:
1170 mm (46.1 in)
Seat height:
828 mm (32.6 in)
Wheelbase:
1256 mm (49.4 in)
Ground cl")
SPECIFICATIONS
8-1
8
Dimensions:Overall length:
1818 mm (71.6 in)
Overall width:
719 mm (28.3 in)
Overall height:
1170 mm (46.1 in)
Seat height:
828 mm (32.6 in)
Wheelbase:
1256 mm (49.4 in)
Ground clearance:
148 mm (5.83 in)
Minimum turning radius:
1800 mm (70.9 in)Weight:With oil and fuel:
97.0 kg (214 lb)Engine:Engine type:
Liquid cooled 2-stroke
Cylinder arrangement:
Forward-inclined single cylinder
Displacement:
49.0 cm³
Bore × stroke:
40.0 × 39.2 mm (1.57 × 1.54 in)
Compression ratio:
7.90 :1
Starting system:
Electric starter and kickstarter
Lubrication system:
Separate lubrication (Yamaha autolube)
Engine oil:Type:
YAMALUBE 2 or 2-stroke engine oil (JASO
FC grade) or (ISO EG-C or EG-D grade)
Engine oil quantity:
Quantity:
1.40 L (1.48 US qt, 1.23 Imp.qt)Final transmission oil:Type:
SAE 10W-30 type SE motor oil
Quantity:
0.11 L (0.12 US qt, 0.10 Imp.qt)Cooling system:Coolant reservoir capacity (up to the
maximum level mark):
0.25 L (0.26 US qt, 0.22 Imp.qt)
Radiator capacity (including all routes):
1.20 L (1.27 US qt, 1.06 Imp.qt)Air filter:Air filter element:
Wet elementFuel:Recommended fuel:
Premium unleaded gasoline only
Fuel tank capacity:
7.0 L (1.85 US gal, 1.54 Imp.gal)Carburetor:Manufacturer:
GURTNER
Type × quantity:
PY 12 x 1Spark plug (s):Manufacturer/model:
NGK/BR8HSSpark plug gap:
0.6–0.7 mm (0.024–0.028 in)
Clutch:Clutch type:
Dry, centrifugal automaticTransmission:Primary reduction system:
Helical gear
Primary reduction ratio:
52 × 13 (4.000)
Secondary reduction system:
Spur gear
Secondary reduction ratio:
43 × 14 (3.070)
Transmission type:
V-belt automatic
Operation:
Centrifugal automatic typeChassis:Frame type:
Steel tube underbone
Caster angle:
27.00 °
Trail:
90.0 mm (3.54 in)Front tire:Type:
Tubeless
Size:
130/60-13 53L (MICHELIN), 53P (PIRELLI)
Manufacturer/model:
MICHELIN / PILOT SPORT
Manufacturer/model:
PIRELLI / EVO21
U3C6E1E0.book Page 1 Friday, August 8, 2008 10:09 AM
Page 62 of 68
, 53P (PIRELLI)
Manufacturer/model:
MICHELIN / PILOT SPORT
Manufacturer/model:
PIRELLI / EVO22Loading:Maximum load:
180 kg (")
SPECIFICATIONS
8-2
8
Rear tire:Type:
Tubeless
Size:
140/60-13 57L (MICHELIN), 53P (PIRELLI)
Manufacturer/model:
MICHELIN / PILOT SPORT
Manufacturer/model:
PIRELLI / EVO22Loading:Maximum load:
180 kg (397 lb)
(Total weight of rider, passenger, cargo and
accessories)Tire air pressure (measured on cold
tires):Loading condition:
0–90 kg (0–198 lb)
Front:
150 kPa (1.50 kgf/cm², 22 psi)
Rear:
150 kPa (1.50 kgf/cm², 22 psi)
Loading condition:
90–180 kg (198–397 lb)
Front:
160 kPa (1.60 kgf/cm², 23 psi)
Rear:
170 kPa (1.70 kgf/cm², 25 psi)Front wheel:Wheel type:
Cast wheel
Rim size:
13xMT3.00
Rear wheel:Wheel type:
Cast wheel
Rim size:
13xMT3.50Front brake:Type:
Single disc brake
Operation:
Right hand operation
Recommended fluid:
DOT 3 or 4Rear brake:Type:
Single disc brake
Operation:
Left hand operation
Recommended fluid:
DOT 3 or 4Front suspension:Type:
Telescopic fork
Spring/shock absorber type:
Coil spring/oil damper
Wheel travel:
80.0 mm (3.15 in)Rear suspension:Type:
Unit swing
Spring/shock absorber type:
Coil spring/gas-oil damper
Wheel travel:
70.0 mm (2.76 in)
Electrical system:Ignition system:
DC. CDI
Charging system:
AC magnetoBattery:Model:
CB4-LB(GS), YB4L-B(YUASA)
Voltage, capacity:
12 V, 4.0 AhHeadlight:Bulb type:
IncandescenceBulb voltage, wattage × quantity:Headlight:
12 V, 35 W/35.0 W × 1
Tail/brake light:
12 V, 21.0 W/5.0 W × 1
Front turn signal light:
12 V, 10.0 W × 2
Rear turn signal light:
12 V, 10.0 W × 2
Meter lighting:
12 V, 1.7 W × 2
High beam indicator light:
12 V, 1.7 W × 1
Oil level warning light:
12 V, 1.7 W × 1
Turn signal indicator light:
12 V, 1.7 W × 1
Coolant temperature warning light:
12 V, 1.7 W × 1
U3C6E1E0.book Page 2 Friday, August 8, 2008 10:09 AM
Page 63 of 68
SPECIFICATIONS
8-3
8
Fuses:Main fuse:
7.5 A
U3C6E1E0.book Page 3 Friday, August 8, 2008 10:09 AM
Page 64 of 68
CONSUMER INFORMATION
9-1
9
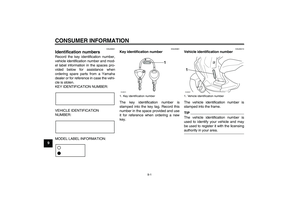
EAU26351
Identification numbers Record the key identification number,
vehicle identification number and mod-
el label information in the spaces pro-
vided below for assistance when
ordering spare parts from a Yamaha
dealer or for reference in case the vehi-
cle is stolen.
KEY IDENTIFICATION NUMBER:
VEHICLE IDENTIFICATION
NUMBER:
MODEL LABEL INFORMATION:
EAU26381
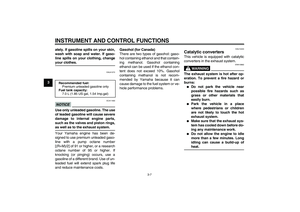
Key identification number
The key identification number is
stamped into the key tag. Record this
number in the space provided and use
it for reference when ordering a new
key.
EAU26410
Vehicle identification number
The vehicle identification number is
stamped into the frame.TIPThe vehicle identification number is
used to identify your vehicle and may
be used to register it with the licensingauthority in your area.
1. Key identification number
1
ZAUM0070
1. Vehicle identification number1ZAUM0287
U3C6E1E0.book Page 1 Friday, August 8, 2008 10:09 AM