2009 PONTIAC G8 tow
[x] Cancel search: towPage 274 of 356

8. Check the air pressure gage (G).
If there is not a pressure reading
while the compressor is running,
check for leaks at the connection
between the tire valve stem and
the sealant/air hose (E).
9. In�ate the tire to the
recommended in�ation pressure,
found on the Tire and Loading
Information label. See
Inflation - Tire Pressure on
page 9-49.
The pressure gage (G) will
initially read high while the
compressor injects the sealant
into the tire. Once the sealant
injection is complete, the
pressure will quickly drop. It will
start to rise again as the tire
in�ates with air.10. Turn the compressor off by
pushing the On/Off button (A)
to the I (off) position.
The pressure gage (G) reads
slightly high while the
compressor is on. Turn the
compressor off to get an
accurate reading. The
compressor may be turned on
and off until the correct pressure
is reached.
Notice:If the recommended
pressure cannot be reached after
approximately 15 minutes, the
vehicle should not be driven. The
tire is too severely damaged and
the tire sealant and compressor kit
cannot in�ate the tire. Remove the
air compressor accessory plug
from the accessory power outlet
and unscrew the sealant/air hose
from the tire valve or tire pressure
monitoring sensor valve. See
Roadside Assistance Program on
page 12-6.The tire is not sealed and will
continue to leak air until
the vehicle is driven and the
sealant is distributed in the tire.
Steps 11 through 19 must be
done right after Step 10.
Be careful while handling the
tire sealant and compressor kit
as they could be hot after
usage.
11. Unplug the air compressor
accessory plug (B) from the
accessory power outlet in
the vehicle.
12. Turn the sealant/air hose (E)
counterclockwise to remove.
13. Replace the tire valve
stem cap.
14. Stow the sealant/air hose (E)
and air compressor accessory
plug (B) in their original
locations.
9-70 Vehicle Service and Care
Page 277 of 356

{CAUTION
Idling the engine in a closed-in
place or with the climate control
system off can cause deadly
carbon monoxide (CO). See
Engine Exhaust on page 8-14.
5. Start the vehicle. The vehicle
must be running while using
the air compressor.
{CAUTION
Overin�ation could cause the tire
to rupture, and you or others could
be injured. Be sure to read the
in�ator instructions, and in�ate the
tire to its recommended pressure.
Do not exceed 36 psi (248 kPa).
6. Push the On/Off switch (G) to
the I (on) position.
Check the pressure gage (F).
If there is not a pressure reading
while the compressor isrunning, check for leaks at the
connection between the
hose and the tire valve stem.
7. In�ate the tire up to the
recommended in�ation pressure
using the air pressure gage (F)
on the top of the unit. See
Inflation - Tire Pressure on
page 9-49.
The pressure gage (F) reads
slightly high while the compressor
is on. Turn the compressor off to
get an accurate reading. The
compressor may be turned on
and off until the correct pressure
is reached.
8. Push the On/Off switch (G) to
the O (off) position.
Be careful while handling the tire
sealant and compressor kit as
they could be hot after usage.
9. Unplug the air compressor
accessory plug (A) from the
accessory power outlet in
the vehicle and stow it in its
original location.10. Disconnect the air-only hose (E)
from the tire valve stem and
stow it back in its original
location.
11. Replace the tire valve
stem cap.
{CAUTION
Storing the tire sealant and
compressor kit or other equipment
in the passenger compartment of
the vehicle could cause injury. In
a sudden stop or collision, loose
equipment could strike someone.
Store the tire sealant and
compressor kit in its original
location.
12. Place the equipment in the
original location in the trunk
of your vehicle.
Vehicle Service and Care 9-73
Page 278 of 356

Removal and Installation of
the Sealant Canister
To remove the sealant canister:
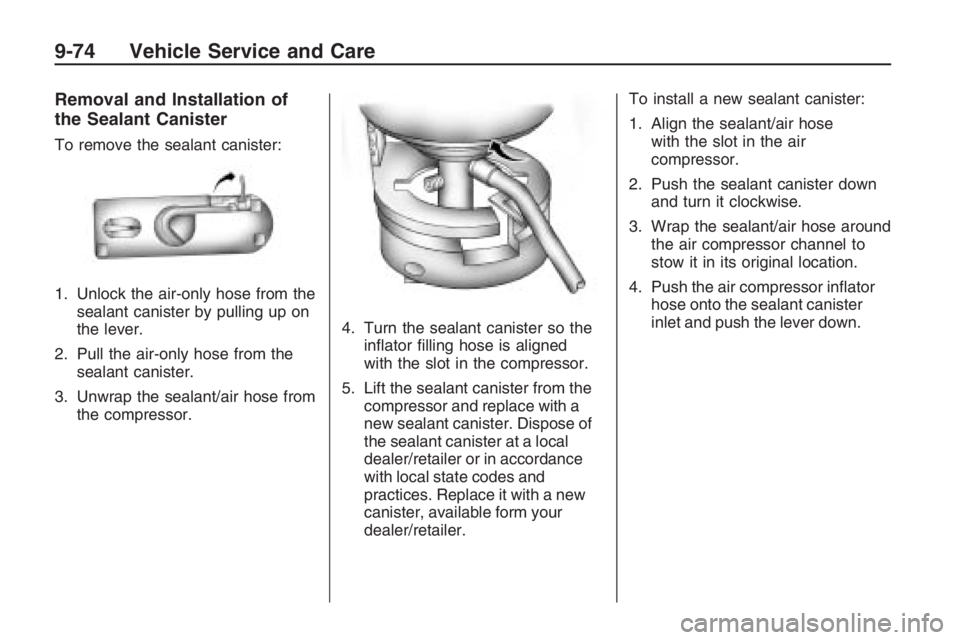
1. Unlock the air-only hose from the
sealant canister by pulling up on
the lever.
2. Pull the air-only hose from the
sealant canister.
3. Unwrap the sealant/air hose from
the compressor.4. Turn the sealant canister so the
in�ator �lling hose is aligned
with the slot in the compressor.
5. Lift the sealant canister from the
compressor and replace with a
new sealant canister. Dispose of
the sealant canister at a local
dealer/retailer or in accordance
with local state codes and
practices. Replace it with a new
canister, available form your
dealer/retailer.To install a new sealant canister:
1. Align the sealant/air hose
with the slot in the air
compressor.
2. Push the sealant canister down
and turn it clockwise.
3. Wrap the sealant/air hose around
the air compressor channel to
stow it in its original location.
4. Push the air compressor in�ator
hose onto the sealant canister
inlet and push the lever down.
9-74 Vehicle Service and Care
Page 283 of 356

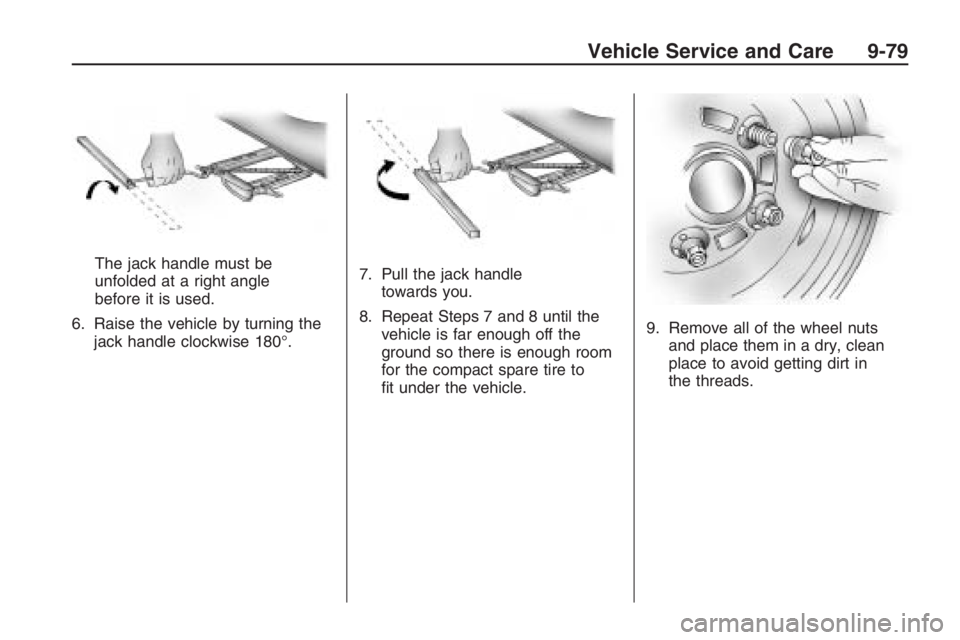
The jack handle must be
unfolded at a right angle
before it is used.
6. Raise the vehicle by turning the
jack handle clockwise 180°.7. Pull the jack handle
towards you.
8. Repeat Steps 7 and 8 until the
vehicle is far enough off the
ground so there is enough room
for the compact spare tire to
�t under the vehicle.9. Remove all of the wheel nuts
and place them in a dry, clean
place to avoid getting dirt in
the threads.
Vehicle Service and Care 9-79
Page 284 of 356

{CAUTION
Rust or dirt on a wheel, or on the
parts to which it is fastened, can
make wheel nuts become loose
after time. The wheel could come
off and cause an accident. When
you change a wheel, remove any
rust or dirt from places where the
wheel attaches to the vehicle. In an
emergency, you can use a cloth or
a paper towel to do this; but be
sure to use a scraper or wire brush
later, if needed, to get all the rust
or dirt off. SeeChanging a Flat Tire
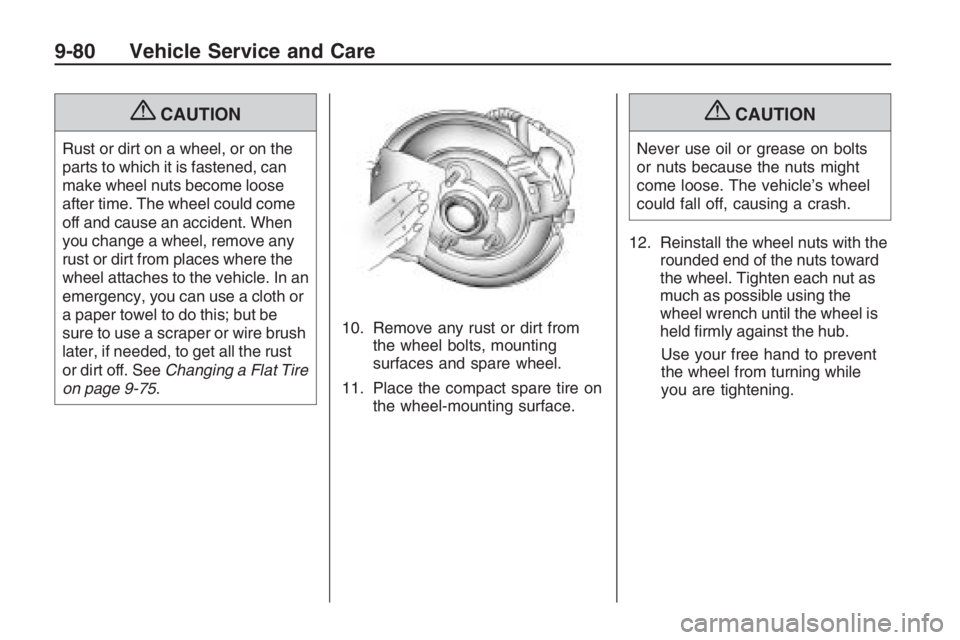
on page 9-75.10. Remove any rust or dirt from
the wheel bolts, mounting
surfaces and spare wheel.
11. Place the compact spare tire on
the wheel-mounting surface.
{CAUTION
Never use oil or grease on bolts
or nuts because the nuts might
come loose. The vehicle’s wheel
could fall off, causing a crash.
12. Reinstall the wheel nuts with the
rounded end of the nuts toward
the wheel. Tighten each nut as
much as possible using the
wheel wrench until the wheel is
held �rmly against the hub.
Use your free hand to prevent
the wheel from turning while
you are tightening.
9-80 Vehicle Service and Care
Page 292 of 356

Towing
Towing Your Vehicle
To avoid damage, the disabled
vehicle should be towed with all four
wheels off the ground. Consult your
dealer/retailer or a professional
towing service if the disabled vehicle
must be towed. SeeRoadside
Assistance Program on page 12-6.
Shift Lock Manual
Release
The transmission has an electric
park lock called a shift lock manual
release. The key must be in the
ON/RUN position, and the brake
pedal pressed so the transmission
gear selector can be moved from the
P (Park) position. If the battery
has lost power, the selector cannot
be moved to neutral for towing
unless the shift lock manual release
is disengaged manually.To access the shift lock manual
release:
1. Apply the park brake.
2. Remove the console trim
panel (A) from the console.
2.1. Gently lift the back corners
of the trim panel directly in
front of the cupholders (C)
until the two clips are
released from the console.
2.2. Gently lift the console trim
panel from the rear until the
four clips around the shift
lever are released.
3. Raise the panel (A) no more
than 2–3 inches (50–75 mm)
to avoid disconnecting the wiring
from the switches (B).
4. With the console trim panel
raised, remove the retainer (E)
and the shift lock manual release
cover plate (D).
5. Push and hold the manual
release lever (F) toward the
passenger side of the vehicle.
9-88 Vehicle Service and Care
Page 293 of 356

6. Press the select button and
move the transmission gear
selector to the N (Neutral)
position (G).
7. Release the lever (F).
8. After the vehicle has been
moved, align the shift lock
manual release cover plate (D)
and install the retainer (E) so the
automatic transmission can
operate properly.
9. Place the trim panel (A) and the
wires in their original position
and gently press down around
the outside until it clicks in place.
10. Check the operation of the
switches (B) before operating
the vehicle.
The transmission selector locks if it
is moved back to the P (Park)
position.Recreational Vehicle
Towing
Notice:Dolly towing or dinghy
towing the vehicle may cause
damage because of reduced
ground clearance. Always put the
vehicle on a �atbed truck.
The vehicle was neither designed
nor intended to be towed with any of
its wheels on the ground. If the
vehicle must be towed, see “Towing
Your Vehicle” earlier in this section.
Towing a Trailer
{CAUTION
The driver can lose control when
pulling a trailer if the correct
equipment is not used or the
vehicle is not driven properly. For
example, if the trailer is too heavy,
the brakes may not work well — or
even at all. The driver and
(Continued)
CAUTION (Continued)
passengers could be seriously
injured. The vehicle may also be
damaged; the resulting repairs
would not be covered by the
vehicle warranty. Pull a trailer only
if all the steps in this section have
been followed. Ask your
dealer/retailer for advice and
information about towing a trailer
with the vehicle.
Your vehicle can tow a trailer if it is
equipped with the proper trailer
towing equipment. To identify the
trailering capacity of your vehicle,
you should read the information
in “Weight of the Trailer” that
appears later in this section.
Trailering is different than just
driving your vehicle by itself.
Trailering means changes in
handling, acceleration, braking,
durability and fuel economy.
Vehicle Service and Care 9-89
Page 294 of 356

Successful, safe trailering takes
correct equipment, and it has
to be used properly.
That is the reason for this part. In it
are many time-tested, important
trailering tips and safety rules. Many
of these are important for your
safety and that of your passengers.
So please read this section
carefully before you pull a trailer.
Load-pulling components such
as the engine, transmission, wheel
assemblies and tires are forced
to work harder against the drag of
the added weight. The engine
is required to operate at relatively
higher speeds and under greater
loads, generating extra heat.
Also, the trailer adds considerably to
wind resistance, increasing the
pulling requirements.If You Do Decide To Pull A
Trailer
If you do, here are some important
points:
There are many different laws,
including speed limit restrictions,
having to do with trailering. Make
sure your rig will be legal, not only
where you live but also where you
will be driving. A good source for
this information can be state or
provincial police.
Consider using a sway control.
You can ask a hitch dealer about
sway controls.
Do not tow a trailer at all during
the �rst 1,000 miles (1 600 km)
your new vehicle is driven. Your
engine, axle or other parts could
be damaged.
Then, during the �rst 500 miles
(800 km) that you tow a trailer, do
not drive over 50 mph (80 km/h)
and do not make starts at fullthrottle. This helps your engine
and other parts of your vehicle
wear in at the heavier loads.
Use the Sport Shift mode and the
cruise control when towing. The
Active Select (A/S) may also be
used under light load conditions.
Obey speed limit restrictions
when towing a trailer. Do not drive
faster than the maximum posted
speed for trailers, or no more than
55 mph (90 km/h), to save wear
on your vehicle’s parts.
Three important considerations have
to do with weight:
The weight of the trailer.
The weight of the trailer tongue.
The total weight on your
vehicle’s tires.
9-90 Vehicle Service and Care