2009 NISSAN QASHQAI air con
[x] Cancel search: air conPage 177 of 297

Downloaded from www.Manualslib.com manuals search engine or the ultra sonic parking sensor (where fitted) will
be activated. For details, see “Rear-view monitor
(where fitted)” in the “4. Display screen, heater and
air conditioner, and audio system” section, “Around
view monitor (where fitted)” in the “4. Display
screen, heater and air conditioner, and audio
system” section or “Ultrasonic Parking Sensor
(where fitted)” later in this section.
If it is difficult to move the gear lever into R (Re-
verse) or 1st. Shift into N (Neutral), then release the
clutch pedal. Fully depress the clutch pedal again
and shift into R (Reverse) or 1st.
DRIVING WITH AUTOMATIC
TRANSMISSION OR WITH
CONTINUOUSLY VARIABLE
TRANSMISSION (Models with manual
shift)
CAUTION
The cold engine idle speed is high, so use
caution when shifting into a forward or re-
verse gear before the engine has warmed up.
Avoid revving up the engine while the vehicle
is stopped. This could cause unexpected ve-
hicle movement.
Driving precautions
Never shift to P (Park) or R (Reverse) while
the vehicle is moving, this could result in dam-
age to the transmission.
Start the engine in the P (Park) or N (Neutral)
position. The engine will not start in any otherselector position. If it does, have your vehicle
checked by a NISSAN dealer or qualified
workshop.
Do not depress the accelerator pedal while
shifting from P (Park) or N (Neutral) to R (Re-
verse), D (Drive) or Manual shift modes posi-
tion. Always depress the brake pedal until
shifting is completed.
On an uphill grade, do not hold the vehicle by
depressing the accelerator pedal. The foot-
brake should be used for this purpose, in or-
der to hold the vehicle in place and to prevent
overheating of the transmission.
Shift into the N (Neutral) position and apply
the handbrake when at a standstill for longer
than a short waiting period.
Keep the engine at idling speed while shifting
from the N (Neutral) position to any driving
position.
CAUTION (when starting the vehicle):
DEPRESS THE FOOTBRAKE PEDAL
When the engine is running, shifting the se-
lector lever into the R (Reverse), D (Drive) or
Manual shift mode position without depress-
ing the brake pedal causes the vehicle to
move slowly. Be sure the brake pedal is fully
depressed and the vehicle is stopped, before
shifting the selector lever.
BE AWARE OF THE SELECTOR LEVER POSI-
TION Make sure that the selector lever is in the
desired position. Use the D (Drive), or Manual
shift mode to move forwards and the R (Re-
verse) to move backwards. Release the hand-
brake lever and the footbrake pedal, then de-
press the accelerator pedal to start the vehicle
in motion and merge with traffic (avoid abrupt
starting and spinning the wheels).
Avoid revving up the engine while the vehicle
is stopped, this could cause unexpected ve-
hicle movement [if the selector lever is in the
R (Reverse), D (Drive), or Manual shift mode
position] or damage the engine [if the selec-
tor lever is in the N (Neutral) or P (Park) posi-
tion].
WARM THE ENGINE UP
Due to the higher idle speeds when the en-
gine is cold, extra caution must be taken when
shifting the selector lever into the driving po-
sition immediately after starting the engine.
PARKING THE VEHICLE
Depress the footbrake pedal and, once the
vehicle stops, move the selector lever into the
P (Park) position, pull the handbrake lever and
release the footbrake pedal.
Starting the vehicle
1. After starting the engine, fully depress the foot-
brake pedal before shifting the selector lever from
P (Park) to R (Reverse), D (Drive) or Manual shift
mode.
5-14Starting and driving
Page 178 of 297

Downloaded from www.Manualslib.com manuals search engine 2. Keep the footbrake pedal depressed and pushthe selector lever button to shift into a driving
gear.
3. Release the handbrake and footbrake, then gradually start the vehicle in motion by pressing
the accelerator pedal.
The automatic transmission or continuously variable
transmission is designed so that the footbrake pedal
MUST be depressed before shifting from P (Park)
to any drive position while the ignition switch is ON.
Shifting
j
A LHD models
jB RHD models
To move the selector lever:
mPush the button while depressing the
brake pedal.
mPush the button to shift.
mShift without depressing the brake
pedal.
Push the button to shift into P (Park) or R (Reverse).
All other positions can be selected without pushing
the button.
P (Park):
Use this position when the vehicle is parked or when
starting the engine. Always make sure that the ve-
hicle is completely stopped before moving the se-
lector lever into the P (Park) position. For maximum
safety, the footbrake pedal must be depressed be-
fore moving the selector lever into the P (Park) posi-
tion. Use this position together with the handbrake.
When parking on a hill, first depress the footbrake
pedal, apply the handbrake and then shift into the P
(Park) position.
R (Reverse):
CAUTION
Shift into this position only after the vehicle has
completely stopped.
Use this position to reverse the vehicle.
When the selector lever is in the R (Reverse) posi-
tion, either the NISSAN Connect monitor (where fit-
ted) or the ultra sonic parking sensor (where fitted)
will be activated. For details, see “Rear-view moni-
tor (where fitted)” in the “4. Display screen, heater and air conditioner, and audio system” section,
“Around view monitor (where fitted)” in the “4. Dis-
play screen, heater and air conditioner, and audio
system” section or “Ultrasonic Parking Sensor
(where fitted)” later in this section.
N (Neutral):
Neither forward nor reverse gear is engaged. The
engine can be started in this position. You may shift
to N and restart a stalled engine while driving the
vehicle.
D (Drive):
Use this position for all normal forward driving.
Gear shift indicator:
The gear shift indicator
jA located in the lower part
of the vehicle information display shows the current
position of the transmission.
It shows the P,R,N,D modes when the transmission
is in auto mode. It shows the gear number when the
transmission is in manual mode.
NSD323Z
NIC1649
Starting and driving5-15
Page 180 of 297
Downloaded from www.Manualslib.com manuals search engine Fail-safe
AT models:
When the fail-safe operation occurs, the AT CHECK
indicator light comes on for 2 seconds and the auto-
matic transmission will be locked in the third gear.
Have a NISSAN dealer or qualified workshop check
and repair the transmission.
CVT models:
When the fail-safe operation occurs, the vehicle
speed will be decreased automatically to reduce the
chance of transmission damage. Vehicle speed can
be controlled with the accelerator pedal, but the
engine power may be limited. Have a NISSAN dealer
or qualified workshop check and repair the trans-
mission.
AT or CVT models:
If the vehicle is driven under extreme conditions,
such as excessive wheel spinning and subse-
quent hard braking, the Fail-safe system may be
activated. This will occur even if all electrical cir-
cuits are functioning properly. In this case, turn
the ignition switch “OFF” and wait for 10 sec-
onds. Then turn the key back to the ON position.
The vehicle should return to its normal operating
condition. If it does not return to its normal oper-
ating condition have your NISSAN dealer or quali-
fied workshop check the transmission and have
the transmission repaired by a NISSAN dealer or
qualified workshop, if necessary.WARNING
When the fail safe operation occurs, the vehicle
speed may be lower than other traffic, which
could increase the chance of a collision. Be es-
pecially careful when driving. If necessary, drive
to the side of the road at a safe place and away
from traffic, to allow the transmission to return to
normal operation, or have the transmission re-
paired by a NISSAN dealer or qualified workshop,
if necessary.
DRIVING WITH CONTINUOUSLY
VARIABLE TRANSMISSION (CVT)
(Models without manual shift)
The Continuously Variable Transmission (CVT) in
your vehicle is electronically controlled to produce
maximum power and smooth operation.
The recommended operating procedures for this
transmission are shown on the following pages. Fol-
low these procedures for maximum vehicle perfor-
mance and driving enjoyment.
WARNING
Do not downshift abruptly on slippery roads. This
may cause a loss of control.
CAUTION
The cold engine idle speed is high, so use
caution when shifting the transmission into a
forward or reverse position before the engine
has warmed up.
Avoid revving up the engine while the vehicle
is stopped. This could cause unexpected ve-
hicle movement.
Never shift to either the P (Park) or R (Re-
verse) position while the vehicle is moving.
This could cause serious damage to the trans-
mission.
Start the engine in either the P (Park) or N
(Neutral) position. The engine will not start in
any other position. If it does, have your ve-
hicle checked by a NISSAN dealer or qualified
workshop.
Shift into the P (Park) position and apply the
handbrake when at a standstill for longer than
a short waiting period.
Keep the engine at idling speed while shifting
from the N (Neutral) position to any driving
position.
When stopping the vehicle on an uphill grade,
do not hold the vehicle by depressing the ac-
celerator pedal. The footbrake pedal should
be depressed in this situation.
Starting vehicle
1. After starting the engine, fully depress the foot- brake pedal before moving the selector lever out
of the P (Park) position.
2. Keep the footbrake pedal depressed and move the selector lever to a driving position.
3. Release the handbrake, the footbrake pedal, and then gradually start the vehicle in motion.
Starting and driving5-17
Page 183 of 297
Downloaded from www.Manualslib.com manuals search engine Shift lock release
j
1LHD models
j2RHD models
jA Shift lock release button
If the battery charge is low or discharged, the selec-
tor lever may not move from the P (Park) position
even with the brake pedal depressed and the selec-
tor lever button pushed.
To move the selector lever, perform the following
procedure:
1. Models with Intelligent Key system:
Place the ignition switch in the “OFF” or LOCK
position.
Models without Intelligent Key system:
Place the ignition switch in the LOCK position,
and remove the key if it is inserted.
2. Apply the handbrake.
3. Push down the shift lock release button
jA.Use
a suitable tool.
4. Push and hold the selector lever button and move the selector lever to the N (Neutral) position while
holding down the shift lock release button.
Place the ignition switch in the ON position to un-
lock the steering wheel. The vehicle may be moved
to the desired location. For models with Intelligent Key system: If the battery
is discharged completely, the steering wheel cannot
be unlocked. Do not move the vehicle with the steer-
ing wheel locked.
If the selector lever cannot be moved out of the P
(Park) position, have a NISSAN dealer or qualified
workshop check the CVT system as soon as pos-
sible.
WARNING
If the selector lever cannot be moved from the P
(Park) position while the engine is running and
the brake pedal is depressed, the stop lights may
not work. Malfunctioning stop lights could cause
an accident injuring yourself and others.
High fluid temperature protection mode
This transmission has a high fluid temperature pro-
tection mode. If the fluid temperature becomes too
high (for example, when climbing steep grades in
high temperature with heavy loads, such as when
towing a trailer), engine power and, under some
conditions, vehicle speed will be decreased auto-
matically to reduce the chance of transmission dam-
age. Vehicle speed can be controlled with the ac-
celerator pedal, but engine and vehicle speed may
be limited.
Fail-safe
When the fail-safe operation occurs, the CVT will
not be shifted to the selected driving position.
If the vehicle is driven under extreme conditions,
such as excessive wheel spinning and subse- quent hard braking, the fail-safe system may be
activated. This will occur even if all electrical cir-
cuits are functioning properly. In this case, place
the ignition switch in the “OFF” position and wait
for 10 seconds. Then turn the ignition switch back
to the ON position. The vehicle should return to
its normal operating condition. If it does not re-
turn to its normal operating condition, have a
NISSAN dealer or qualified workshop check the
transmission and repair it if necessary.
WARNING
When the fail-safe operation occurs, vehicle
speed may be gradually reduced. The reduced
speed may be lower than other traffic, which
could increase the chance of a collision. Be es-
pecially careful when driving. If necessary, pull to
the side of the road at a safe place and allow the
transmission to return to normal operation, or
have it repaired if necessary.
5-20Starting and driving
Page 184 of 297
Downloaded from www.Manualslib.com manuals search engine NISSAN GREEN PROGRAM
The Stop/Start System is designed to prevent un-
necessary fuel consumption, exhaust emissions,
and noise during a journey:
When the vehicle comes to rest the engine is
automatically stopped*.
The engine is then automatically restarted before
you are ready to drive away**.
CAUTION
At the end of the journey the engine must be
stopped and ignition turned OFF. Lock the ve-
hicle as normal. Turning the ignition OFF will shut
down all electrical systems. Failure to do this may
result in a flat battery.
NORMAL OPERATION
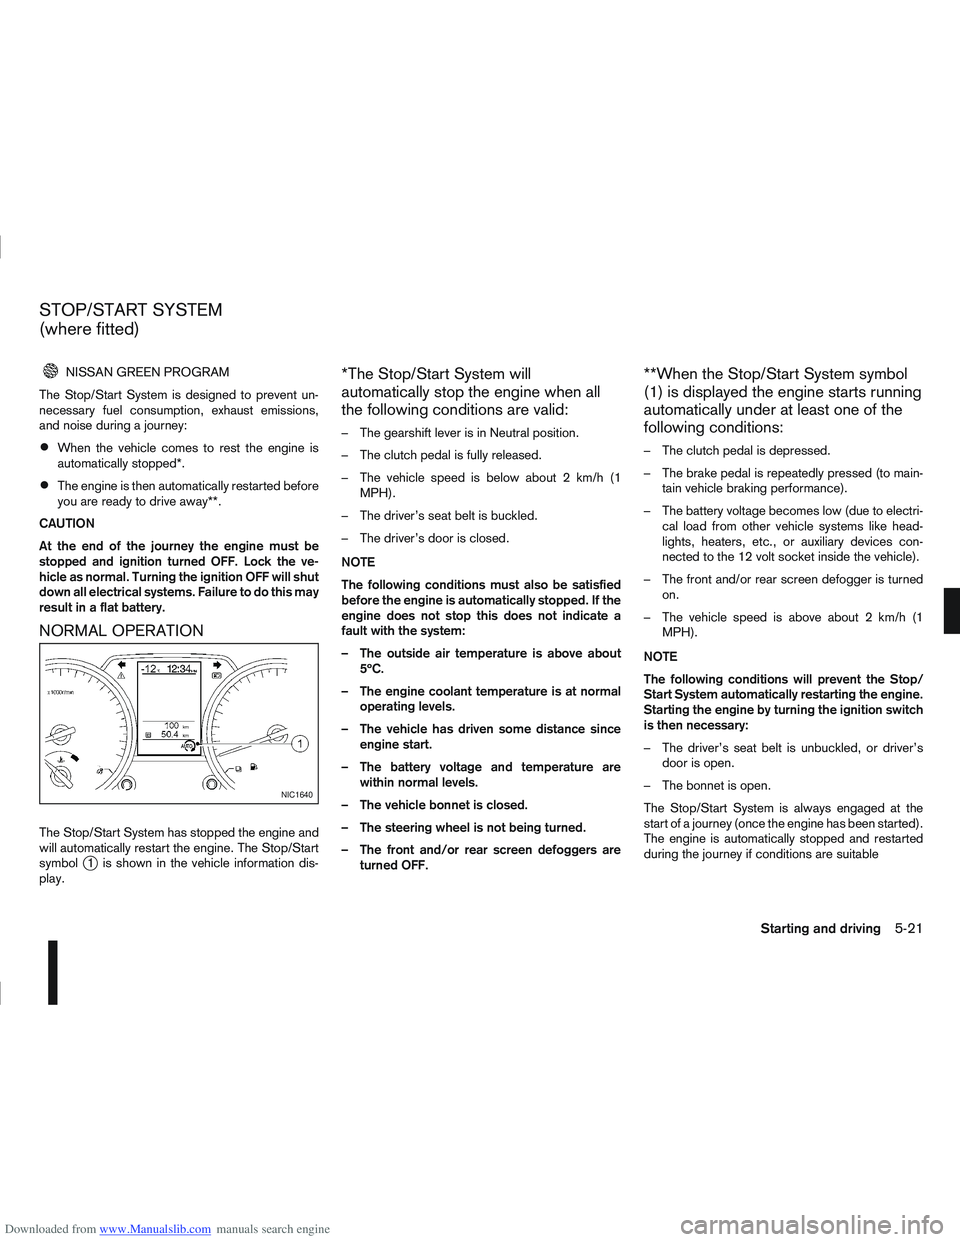
The Stop/Start System has stopped the engine and
will automatically restart the engine. The Stop/Start
symbol
j1 is shown in the vehicle information dis-
play.
*The Stop/Start System will
automatically stop the engine when all
the following conditions are valid:
– The gearshift lever is in Neutral position.
– The clutch pedal is fully released.
– The vehicle speed is below about 2 km/h (1 MPH).
– The driver’s seat belt is buckled.
– The driver’s door is closed.
NOTE
The following conditions must also be satisfied
before the engine is automatically stopped. If the
engine does not stop this does not indicate a
fault with the system:
– The outside air temperature is above about 5ºC.
– The engine coolant temperature is at normal operating levels.
– The vehicle has driven some distance since engine start.
– The battery voltage and temperature are within normal levels.
– The vehicle bonnet is closed.
– The steering wheel is not being turned.
– The front and/or rear screen defoggers are turned OFF.
**When the Stop/Start System symbol
(1) is displayed the engine starts running
automatically under at least one of the
following conditions:
– The clutch pedal is depressed.
– The brake pedal is repeatedly pressed (to main-tain vehicle braking performance).
– The battery voltage becomes low (due to electri- cal load from other vehicle systems like head-
lights, heaters, etc., or auxiliary devices con-
nected to the 12 volt socket inside the vehicle).
– The front and/or rear screen defogger is turned on.
– The vehicle speed is above about 2 km/h (1 MPH).
NOTE
The following conditions will prevent the Stop/
Start System automatically restarting the engine.
Starting the engine by turning the ignition switch
is then necessary:
– The driver’s seat belt is unbuckled, or driver’s door is open.
– The bonnet is open.
The Stop/Start System is always engaged at the
start of a journey (once the engine has been started).
The engine is automatically stopped and restarted
during the journey if conditions are suitable
NIC1640
STOP/START SYSTEM
(where fitted)
Starting and driving5-21
Page 214 of 297
Downloaded from www.Manualslib.com manuals search engine 2. Store the subwoofer (where fitted) as it was origi-nally installed.
3. Install the retainer and replace the floor cover.
7–seater
1. Store the tools in the specified areas.
2. Firmly pull down the third row seat and make sure it locks into the locking latches on both sides
under the seat.
3. Place the seatback of the third row seat in the upright position
j1 . For details, see “Folding 3rd
row (7-seater)” in the “1. Safety — seats, seat
belts and supplemental restraint system” section.
4. Store the wheel with flat tyre vertically in the boot
j2.
5. Store the other items in following order: Tonneau cover (where fitted)
j3→ Floor coverj4→ Centre floor board and the two side floor
boardsj5.
Wheel lock nuts (where fitted)
In order to prevent theft, the specially designed
wheel lock nut is installed to each wheel. The wheel
lock nut cannot be removed with the commonly used
tools.
When removing tyres, use the lock key provided
with your vehicle.
Removing the wheel lock nut:
1. Insert the wheel lock key
j1 to the wheel lock
nut.
2. To remove the wheel lock nut, turn the wheel lock key anticlockwise using the wheel wrench.
CAUTION
Do not use a power tool to remove the wheel
lock nuts.
When installing the wheel, tighten the wheel
lock nuts to the same tightening torque as the normal wheel nuts. For details, see “Chang-
ing flat tyre (Models with spare wheel, where
fitted)” earlier in this section.
NOTE
The wheel lock nut has an individual code.
A wheel lock key with other than the indi-
vidual code cannot remove the wheel lock
nut. If you lose the wheel lock key, contact
a NISSAN dealer for a duplicate with the
original wheel lock key code.
Record the key number as shown on the
key code card on the “Security informa-
tion” page at the end of this manual and
keep it in a safe place, not in the vehicle.
When you ask for a service at a NISSAN
dealer or qualified workshop, make sure
to keep the lock key in the vehicle. Other-
wise, wheels cannot be removed and the
service cannot be performed.
REPAIRING FLAT TYRE (Models with
emergency tyre puncture repair kit,
where fitted)
The emergency tyre puncture repair kit is supplied
with the vehicle instead of a spare tyre. This repair
kit must be used for temporarily fixing a minor tyre
puncture. After using the repair kit, see a NISSAN
dealer or qualified workshop as soon as possible for
tyre inspection and repair/replacement.
NCE306
NCE143Z
In case of emergency6-7
Page 215 of 297
Downloaded from www.Manualslib.com manuals search engine CAUTION
Do not use the emergency tyre puncture repair
kit under the following conditions. Contact a
NISSAN dealer or qualified workshop or profes-
sional road assistance.
when the sealant has passed its expiration
date (shown on the label attached to the
bottle)
when the cut or the puncture is approximately
4 mm (0.16 in) or longer
when the side of the tyre is damaged
when the vehicle has been driven with a con-
siderable loss of air from the tyre
when the tyre is completely displaced inside
or outside the rim
when the tyre rim is damaged
when two or more tyres are flat
Getting emergency tyre puncture repair
kit
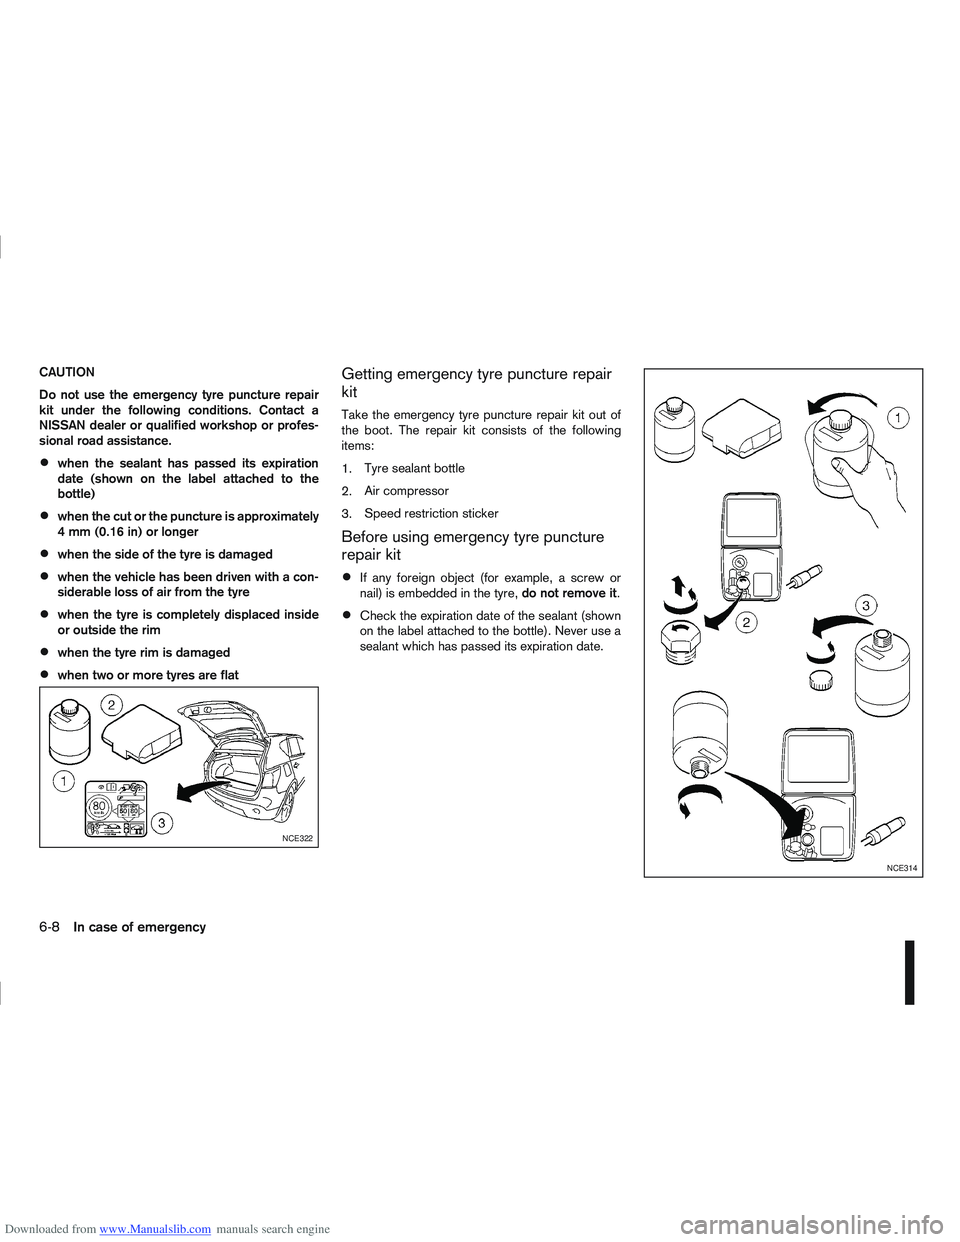
Take the emergency tyre puncture repair kit out of
the boot. The repair kit consists of the following
items:
1.Tyre sealant bottle
2. Air compressor
3. Speed restriction sticker
Before using emergency tyre puncture
repair kit
If any foreign object (for example, a screw or
nail) is embedded in the tyre,
do not remove it.
Check the expiration date of the sealant (shown
on the label attached to the bottle). Never use a
sealant which has passed its expiration date.
NCE322
NCE314
6-8In case of emergency
Page 216 of 297
Downloaded from www.Manualslib.com manuals search engine Repairing tyre
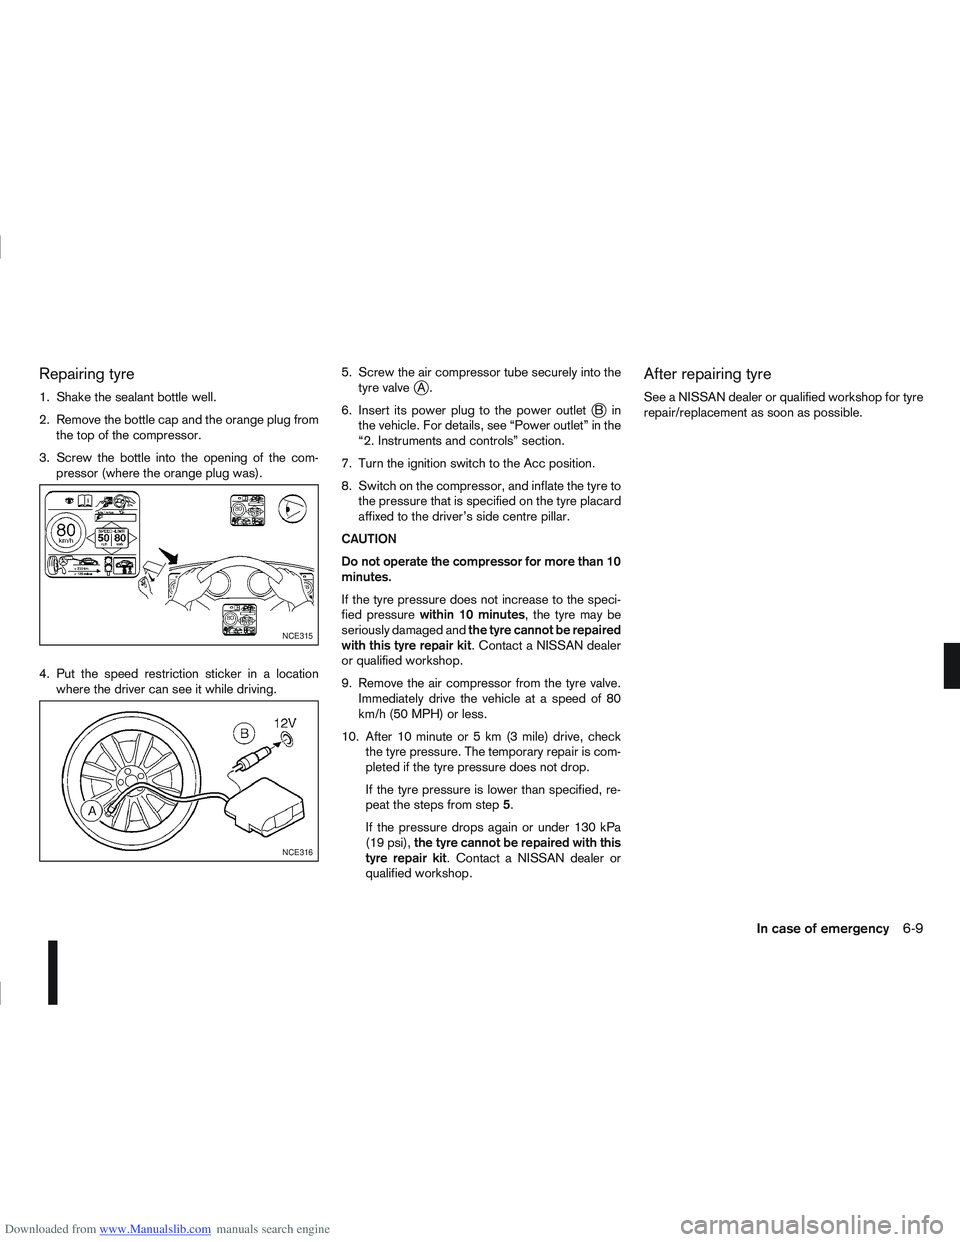
1. Shake the sealant bottle well.
2. Remove the bottle cap and the orange plug fromthe top of the compressor.
3. Screw the bottle into the opening of the com- pressor (where the orange plug was).
4. Put the speed restriction sticker in a location where the driver can see it while driving. 5. Screw the air compressor tube securely into the
tyre valvejA.
6. Insert its power plug to the power outlet
jBin
the vehicle. For details, see “Power outlet” in the
“2. Instruments and controls” section.
7. Turn the ignition switch to the Acc position.
8. Switch on the compressor, and inflate the tyre to the pressure that is specified on the tyre placard
affixed to the driver’s side centre pillar.
CAUTION
Do not operate the compressor for more than 10
minutes.
If the tyre pressure does not increase to the speci-
fied pressure within 10 minutes , the tyre may be
seriously damaged and the tyre cannot be repaired
with this tyre repair kit . Contact a NISSAN dealer
or qualified workshop.
9. Remove the air compressor from the tyre valve. Immediately drive the vehicle at a speed of 80
km/h (50 MPH) or less.
10. After 10 minute or 5 km (3 mile) drive, check the tyre pressure. The temporary repair is com-
pleted if the tyre pressure does not drop.
If the tyre pressure is lower than specified, re-
peat the steps from step 5.
If the pressure drops again or under 130 kPa
(19 psi), the tyre cannot be repaired with this
tyre repair kit. Contact a NISSAN dealer or
qualified workshop.
After repairing tyre
See a NISSAN dealer or qualified workshop for tyre
repair/replacement as soon as possible.
NCE315
NCE316
In case of emergency6-9