2009 NISSAN QASHQAI air con
[x] Cancel search: air conPage 148 of 297

Downloaded from www.Manualslib.com manuals search engine
To operate the Bluetooth audio streaming use one
of the following methods:
Press the
Press
lighted, then press
The type of display,
jAorjB , shown on the audio
system can vary depending on the Bluetooth® ver-
sion of the device.
Fast Forward (Cue), Fast
Reverse (Review) buttons:
When the
(Cue) or(Review) button is
pressed continuously, the track will be played at
high speed. When the button is released, the track
will be played at normal playing speed.
Track up/down buttons:
Pressing the
orbutton once, the track will
be skipped forward to the next track or backward to
the beginning of the current played track. Press the
orbutton more than once to skip through
the tracks.
Play/Pause:
Press the
press
mbuttonj5 (Type B display screen
only)
If the song contains music information tags (ID3–
tags), the title of the played song will be displayed.
If tags are not provided then the display will not
show any messages.
When the
j5 button is pressed repeatedly fur-
ther information about the song can be displayed
along with the song title.
A long press on
j5 will turn the display into a
detailed overview which after a few seconds returns
to the main display; or press
j5 briefly.
Bluetooth®mobile phone feature
This system offers a hands-free facility for your mo-
bile telephone with Bluetooth® to enhance driving
safety, and comfort.
For details, see “Mobile phone integration for FM
AM radio with CD player” later in this section.
Display screen, heater and air conditioner, and audio system4-41
Page 149 of 297

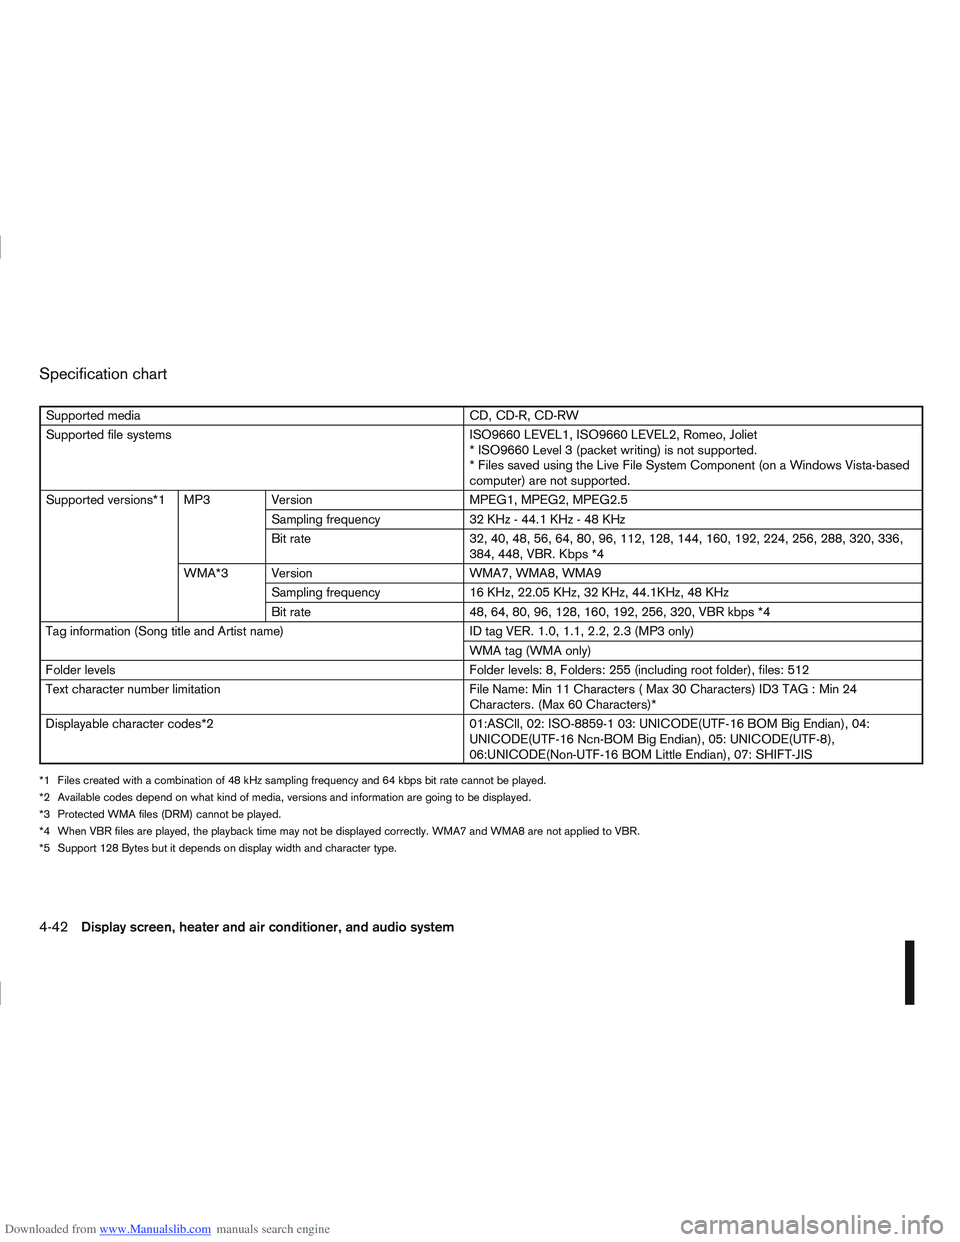
Downloaded from www.Manualslib.com manuals search engine Specification chart
Supported mediaCD, CD-R, CD-RW
Supported file systems ISO9660 LEVEL1, ISO9660 LEVEL2, Romeo, Joliet
* ISO9660 Level 3 (packet writing) is not supported.
* Files saved using the Live File System Component (on a Windows Vista-based
computer) are not supported.
Supported versions*1 MP3 Version MPEG1, MPEG2, MPEG2.5
Sampling frequency 32 KHz - 44.1 KHz - 48 KHz
Bit rate 32, 40, 48, 56, 64, 80, 96, 112, 128, 144, 160, 192, 224, 256, 288, 320, 336,
384, 448, VBR. Kbps *4
WMA*3 Version WMA7, WMA8, WMA9
Sampling frequency 16 KHz, 22.05 KHz, 32 KHz, 44.1KHz, 48 KHz
Bit rate 48, 64, 80, 96, 128, 160, 192, 256, 320, VBR kbps *4
Tag information (Song title and Artist name) ID tag VER. 1.0, 1.1, 2.2, 2.3 (MP3 only)
WMA tag (WMA only)
Folder levels Folder levels: 8, Folders: 255 (including root folder), files: 512
Text character number limitation File Name: Min 11 Characters ( Max 30 Characters) ID3 TAG : Min 24
Characters. (Max 60 Characters)*
Displayable character codes*2 01:ASCll, 02: ISO-8859-1 03: UNICODE(UTF-16 BOM Big Endian), 04:
UNICODE(UTF-16 Ncn-BOM Big Endian), 05: UNICODE(UTF-8),
06:UNICODE(Non-UTF-16 BOM Little Endian), 07: SHIFT-JIS
*1 Files created with a combination of 48 kHz sampling frequency and 64 kbps bit rate cannot be played.
*2 Available codes depend on what kind of media, versions and information are going to be displayed.
*3 Protected WMA files (DRM) cannot be played.
*4 When VBR files are played, the playback time may not be displayed correctly. WMA7 and WMA8 are not applied to VBR.
*5 Support 128 Bytes but it depends on display width and character type.
4-42Display screen, heater and air conditioner, and audio system
Page 150 of 297

Downloaded from www.Manualslib.com manuals search engine For details, see the separately provided NISSAN
Connect Owner’s Manual.
MAIN OPERATION
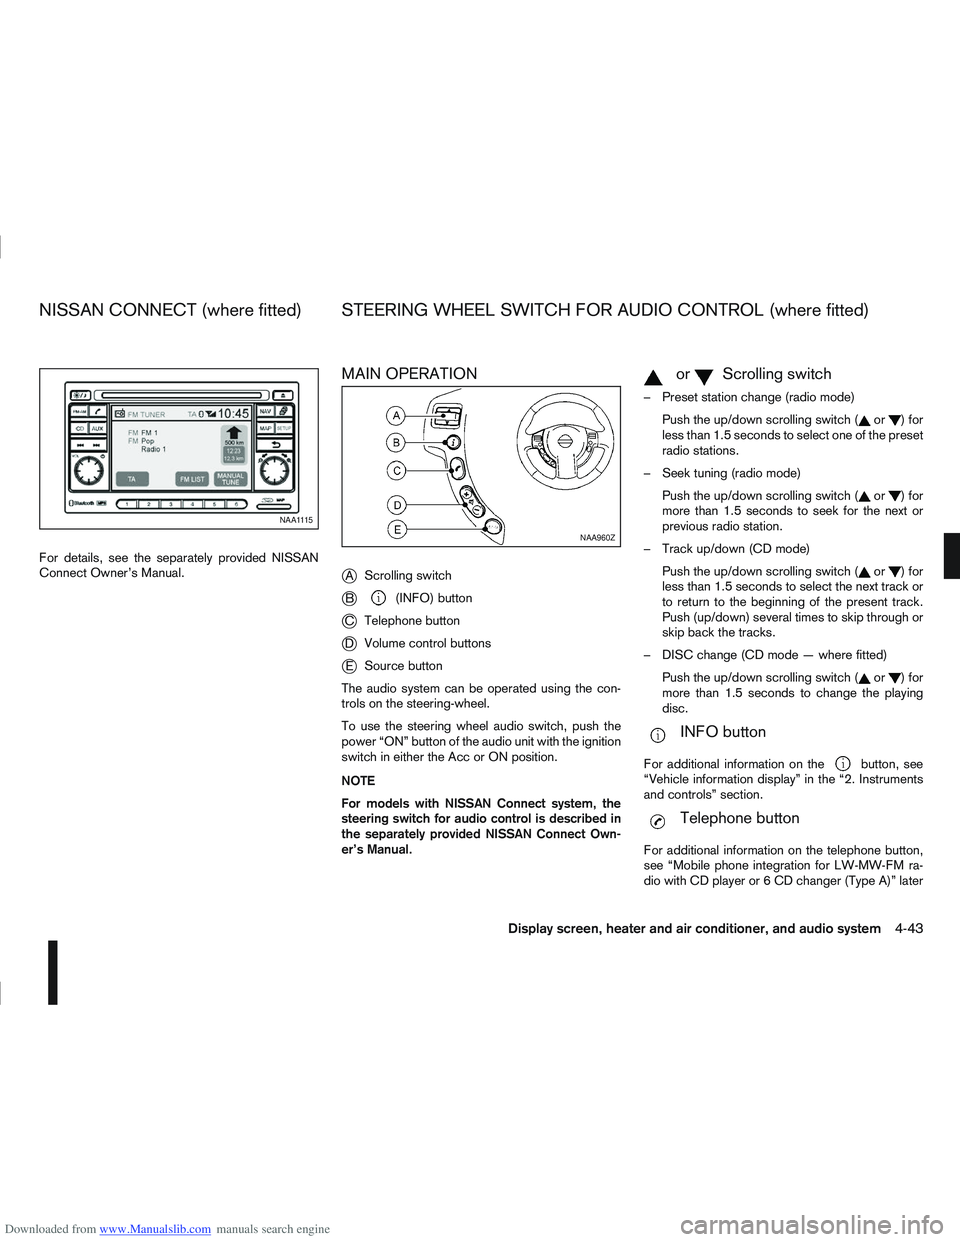
j
AScrolling switch
jB(INFO) button
jC Telephone button
jDVolume control buttons
jESource button
The audio system can be operated using the con-
trols on the steering-wheel.
To use the steering wheel audio switch, push the
power “ON” button of the audio unit with the ignition
switch in either the Acc or ON position.
NOTE
For models with NISSAN Connect system, the
steering switch for audio control is described in
the separately provided NISSAN Connect Own-
er’s Manual.
mormScrolling switch
– Preset station change (radio mode) Push the up/down scrolling switch (
or)for
less than 1.5 seconds to select one of the preset
radio stations.
– Seek tuning (radio mode) Push the up/down scrolling switch (
or)for
more than 1.5 seconds to seek for the next or
previous radio station.
– Track up/down (CD mode) Push the up/down scrolling switch (
or)for
less than 1.5 seconds to select the next track or
to return to the beginning of the present track.
Push (up/down) several times to skip through or
skip back the tracks.
– DISC change (CD mode — where fitted) Push the up/down scrolling switch (
or)for
more than 1.5 seconds to change the playing
disc.
mINFO button
For additional information on thebutton, see
“Vehicle information display” in the “2. Instruments
and controls” section.
mTelephone button
For additional information on the telephone button,
see “Mobile phone integration for LW-MW-FM ra-
dio with CD player or 6 CD changer (Type A)” later
NAA1115
NAA960Z
NISSAN CONNECT (where fitted) STEERING WHEEL SWITCH FOR AUDIO CONTROL (where fitted)
Display screen, heater and air conditioner, and audio system4-43
Page 151 of 297

Downloaded from www.Manualslib.com manuals search engine in this section or “Mobile phone integration for FM
AM radio with CD player” later in this section.
SOURCE button
Repeatedly press the SOURCE button to select a
source.
mVolume control buttons
Press the + or — button to adjust the volume.When installing large capacity wireless equipment
or a car phone in your NISSAN, be sure to observe
the following as it may adversely affect the Engine
control system and other electronic parts depend-
ing on its installation location.
CAUTION
Keep the antenna as far as possible away from
the Electric Control Module.
Also keep the antenna wire more than 20 cm
(8 inches) away from the Electro Injection har-
ness. Do not route the antenna wire next to
any harness.
Adjust the antenna standing-wave ratio as rec-
ommended by the manufacturer.
Connect the ground wire from the radio chas-
sis to the body.
NOTE
For further information, visit the NISSAN web site:
www.nissan-europe.com. Select your country
from the list and go to the “SERVICES” menu. If
not available on the web site, contact a NISSAN
dealer or qualified workshop.
BLUETOOTH®MOBILE PHONE
FEATURE
WARNING
Whilst driving, using the mobile phone is ex-
tremely dangerous because it significantly im-
pairs your concentration and diminishes your re-
action capabilities to sudden changes on the
road, and it may lead to a fatal accident. This
applies to all phone call situations such as when
receiving an incoming call, during a phone con-
versation, when calling through the phone book
search, etc.
CAUTION
Certain country jurisdictions prohibit the use of
the mobile phone in the car without hands-free
support.
This chapter provides information about the NISSAN
hands-free phone system using a Bluetooth
®con-
nection.
NAA1125
CAR PHONE OR CB RADIOMOBILE PHONE INTEGRATION FOR
LW-MW-FM RADIO WITH CD
PLAYER OR 6 CD CHANGER (Type A)
4-44Display screen, heater and air conditioner, and audio system
Page 152 of 297

Downloaded from www.Manualslib.com manuals search engine Bluetooth®is a wireless radio communication stan-
dard. This system offers a hands-free facility for your
mobile telephone to enhance driving comfort.
NOTE
For models with NISSAN Connect system, see
the separately provided Owner’s Manual.
In order to use your mobile phone with the Blue-
tooth
®of the audio system, the mobile phone must
first be set-up. For details, see “Hands-free tele-
phone setup” later in this section. Once it has been
set-up, the hands-free mode is automatically acti-
vated on the registered mobile phone (via Blue-
tooth
®) when it comes into range.
A notification message on the audio display comes
on when the phone is connected, when an incoming
call is being received as well as when a call is initi-
ated.
When a call is active, the audio system, microphone
(located in the ceiling in front of the rear view mirror)
and the steering wheel switches enable hands-free
communication.
If the audio system is being used at the time, the
radio or CD mode will be muted and will stay muted
until the active call has ended.
If the Bluetooth
®system is unable to connect with
your mobile phone, this may occur because:
The mobile phone is too far away from the ve-
hicle.
The Bluetooth®mode on your mobile phone has
not been activated.
Your mobile phone has not been paired with the
Bluetooth®system of the audio unit.
The mobile phone does not support Bluetooth®
technology (BT Core v1.2, Hands Free Profile
v1.0 and Object Push Profile v1.0).
NOTE
For details, see your mobile phone’s Owner’s
Manual.
For assistance with your mobile phone inte-
gration, please visit your local NISSAN dealer.
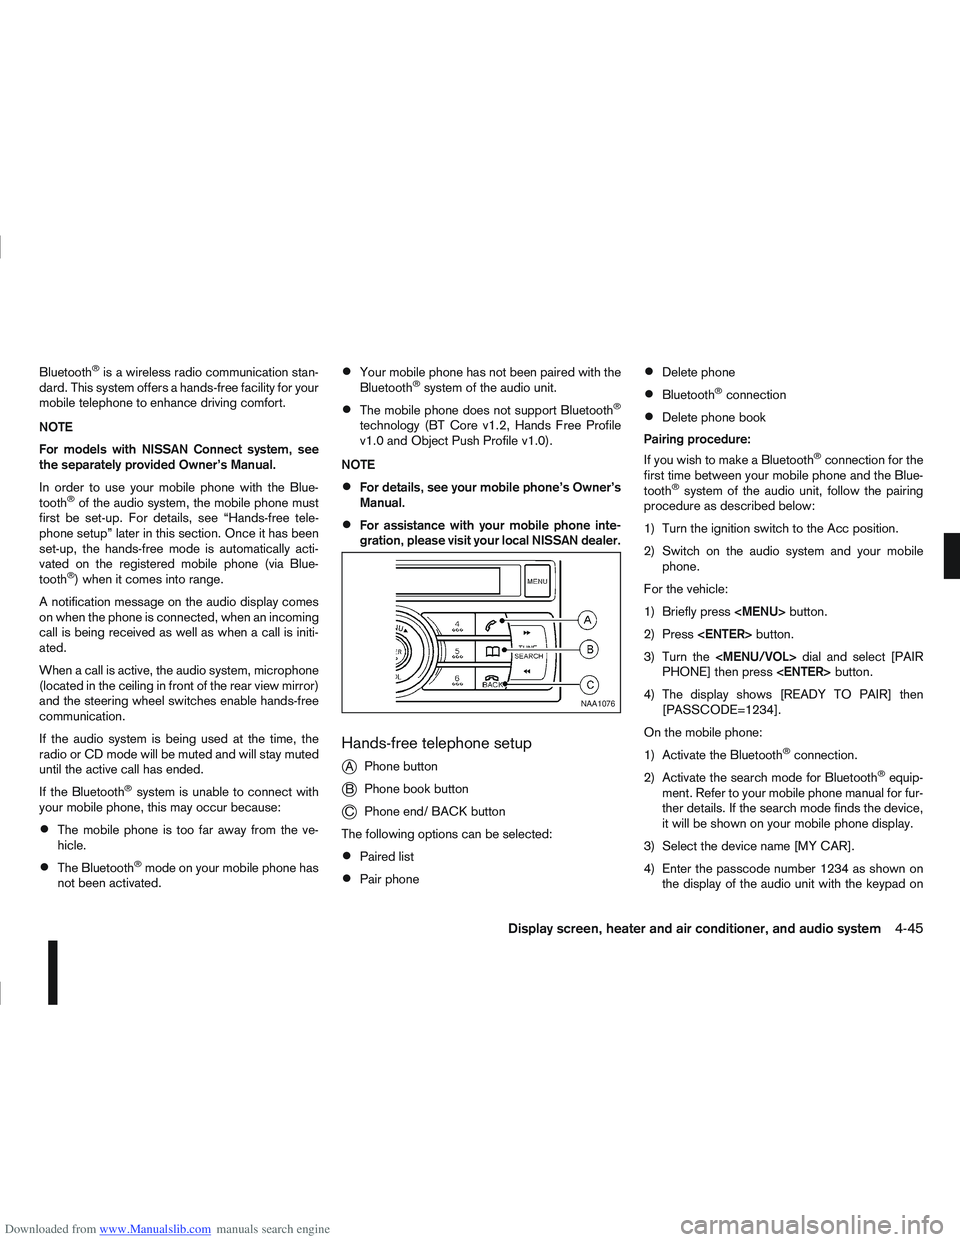
Hands-free telephone setup
j
A Phone button
jB Phone book button
jC Phone end/ BACK button
The following options can be selected:
Paired list
Pair phone
Delete phone
Bluetooth®connection
Delete phone book
Pairing procedure:
If you wish to make a Bluetooth
®connection for the
first time between your mobile phone and the Blue-
tooth
®system of the audio unit, follow the pairing
procedure as described below:
1) Turn the ignition switch to the Acc position.
2) Switch on the audio system and your mobile phone.
For the vehicle:
1) Briefly press
Page 153 of 297
![NISSAN QASHQAI 2009 Owners Manual Downloaded from www.Manualslib.com manuals search engine your mobile phone then press the confirmation
button on your mobile phone.
ActionScreen display
Press briefly <MENU>
button
↓ [PHONE SETUP]
P NISSAN QASHQAI 2009 Owners Manual Downloaded from www.Manualslib.com manuals search engine your mobile phone then press the confirmation
button on your mobile phone.
ActionScreen display
Press briefly <MENU>
button
↓ [PHONE SETUP]
P](/manual-img/5/56767/w960_56767-152.png)
Downloaded from www.Manualslib.com manuals search engine your mobile phone then press the confirmation
button on your mobile phone.
ActionScreen display
Press briefly
button
↓ [PHONE SETUP]
Press
↓ [PAIRED LIST]
Turn
↓
Press
↓ [PASSCODE=1234]
Your mobile phone setup:
select MY CAR then enter
1234 ↓
If successful [PAIRING OK]
↓ [
mCONNECT OK]
Mobile 1 *1
[PAIR PHONE]
Press
mbutton repeat-
edly for the main screen.
*1 Mobile name
Once the connection is finalised, the audio unit will
automatically register the mobile phone and the au-
dio unit display shows [PAIRING OK] and [
CON-
NECT OK]. If it fails to register [PAIRING FAIL]
then start the procedure, previously described,
again or consult your mobile phone manual. You can register up to 5 different Bluetooth
®mobile
phones. However, you can only use one mobile
phone at a time. If you have 5 different Bluetooth
®
mobile phones registered, a new mobile phone can
only replace one of the 5 existing paired mobile
phones. Use [DEL PHONE] to delete one of the
existing paired mobile phones.
Paired phone list:
The paired phone list shows which mobile phones
have been paired or registered with the Bluetooth
®
system. If the list contains multiple mobile phones
then you can select the appropriate mobile phone to
connect with the Bluetooth
®system.
Action Screen display
Briefly press
↓ [PHONE SETUP]
Press
button
↓ [PAIRED LIST]
Press
button
↓ Mobile 1
Turn
↓
Press
button [PLEASE WAIT]
↓ [
mCONNECT
OK [mCONNECT
FAIL]
[PAIRED LIST]
Press
mbut-
ton repeatedly
for the main
screen.
In the above example procedure, “Mobile 2” will be
connected.
4-46Display screen, heater and air conditioner, and audio system
Page 154 of 297

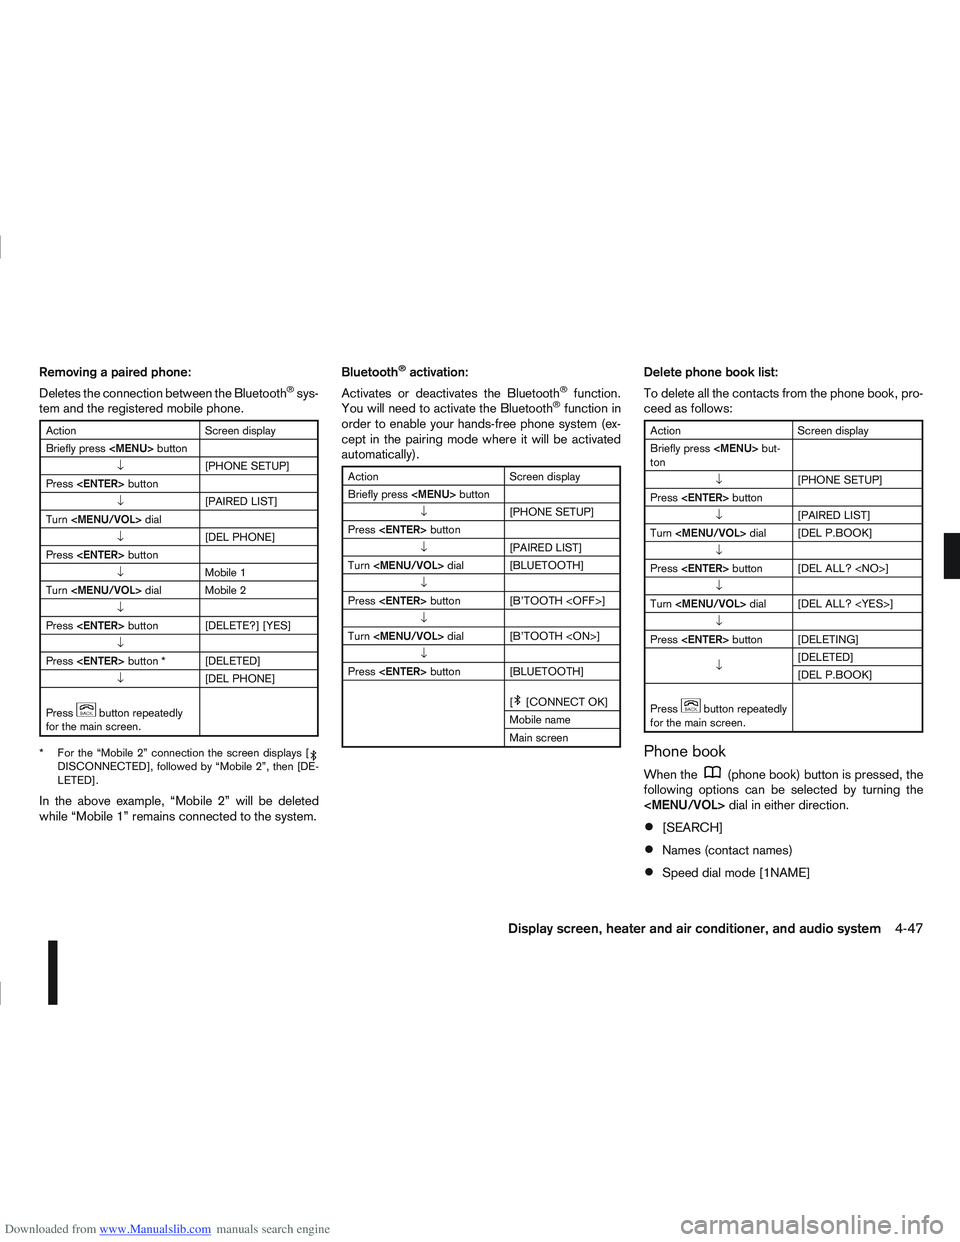
Downloaded from www.Manualslib.com manuals search engine Removing a paired phone:
Deletes the connection between the Bluetooth®sys-
tem and the registered mobile phone.
Action Screen display
Briefly press
↓ [PHONE SETUP]
Press
↓ [PAIRED LIST]
Turn
↓ [DEL PHONE]
Press
↓ Mobile 1
Turn
↓
Press
↓
Press
↓ [DEL PHONE]
Press
mbutton repeatedly
for the main screen.
* For the “Mobile 2” connection the screen displays [
DISCONNECTED], followed by “Mobile 2”, then [DE-
LETED].
In the above example, “Mobile 2” will be deleted
while “Mobile 1” remains connected to the system. Bluetooth
®activation:
Activates or deactivates the Bluetooth®function.
You will need to activate the Bluetooth®function in
order to enable your hands-free phone system (ex-
cept in the pairing mode where it will be activated
automatically).
Action Screen display
Briefly press
↓ [PHONE SETUP]
Press
↓ [PAIRED LIST]
Turn
↓
Press
↓
Turn
↓
Press
[
m[CONNECT OK]
Mobile name
Main screen
Delete phone book list:
To delete all the contacts from the phone book, pro-
ceed as follows:
Action Screen display
Briefly press
ton
↓ [PHONE SETUP]
Press
↓ [PAIRED LIST]
Turn
↓
Press
↓
Turn
↓
Press
↓ [DELETED]
[DEL P.BOOK]
Press
mbutton repeatedly
for the main screen.
Phone book
When the(phone book) button is pressed, the
following options can be selected by turning the
[SEARCH]
Names (contact names)
Speed dial mode [1NAME]
Display screen, heater and air conditioner, and audio system4-47
Page 155 of 297
![NISSAN QASHQAI 2009 Owners Manual Downloaded from www.Manualslib.com manuals search engine [DELETE NAME]
[EDIT NAME]
[ADD NAME]
Send name using Bluetooth®technology [ADD NAME]
The phone book can store up to 100 names with
numbers and NISSAN QASHQAI 2009 Owners Manual Downloaded from www.Manualslib.com manuals search engine [DELETE NAME]
[EDIT NAME]
[ADD NAME]
Send name using Bluetooth®technology [ADD NAME]
The phone book can store up to 100 names with
numbers and](/manual-img/5/56767/w960_56767-154.png)
Downloaded from www.Manualslib.com manuals search engine [DELETE NAME]
[EDIT NAME]
[ADD NAME]
Send name using Bluetooth®technology [ADD NAME]
The phone book can store up to 100 names with
numbers and can be selected for calling. To add a
contact to the phone book proceed as follows:
Action Screen display
Press with a long press the
mbutton ↓ [ADD NAME]
Press
↓ [ENTER NAME]
Turn
↓ Focus on “J” [IJK]
Press
↓
Turn
Focus on “O” [NOP]
↓
Press
↓*1 *3 [JO]
Turn
↓
Press
↓ [ENTER NUMBER]
Press
↓ *2 *3
Press
↓
Turn
↓ [OK <@OK0>]
Action Screen display
↓ [OK <@OK0>]
Press
Press
mbutton for the main
screen.
NOTE
In the above example the contact name JO and
phone number 123456789 will be added.
*1 To insert special characters select the following char-
acter options A: Alphabetic characters, 1/2: Numerical
characters, Ä: Latin characters and @: Symbol charac-
ters.
*2 Select the number then confirm your selection by press- ing the
ery number.
*3 To correct an entry, briefly press the
(back) button
then enter the correct details. To delete all characters
press the
(back) button for more than 1 second.
NOTE
You can also store the name and the phone
number in one of the six preset buttons on the
audio unit for frequent use phone numbers.
Transferring an entry to the Phone book:
You can also send a name (contact) from a con-
nected mobile phone to the phone book using Blue-
tooth
®technology.
4-48Display screen, heater and air conditioner, and audio system