2009 NISSAN QASHQAI air con
[x] Cancel search: air conPage 238 of 297
Downloaded from www.Manualslib.com manuals search engine HR16DE, MR20DE, M9R or R9M
engine
1. Set the heater or air conditioner temperaturecontrol to the maximum “HOT” position.
2. Open the bonnet. For details, see “Bonnet release” in the “3. Pre-driving checks and
adjustments” section.
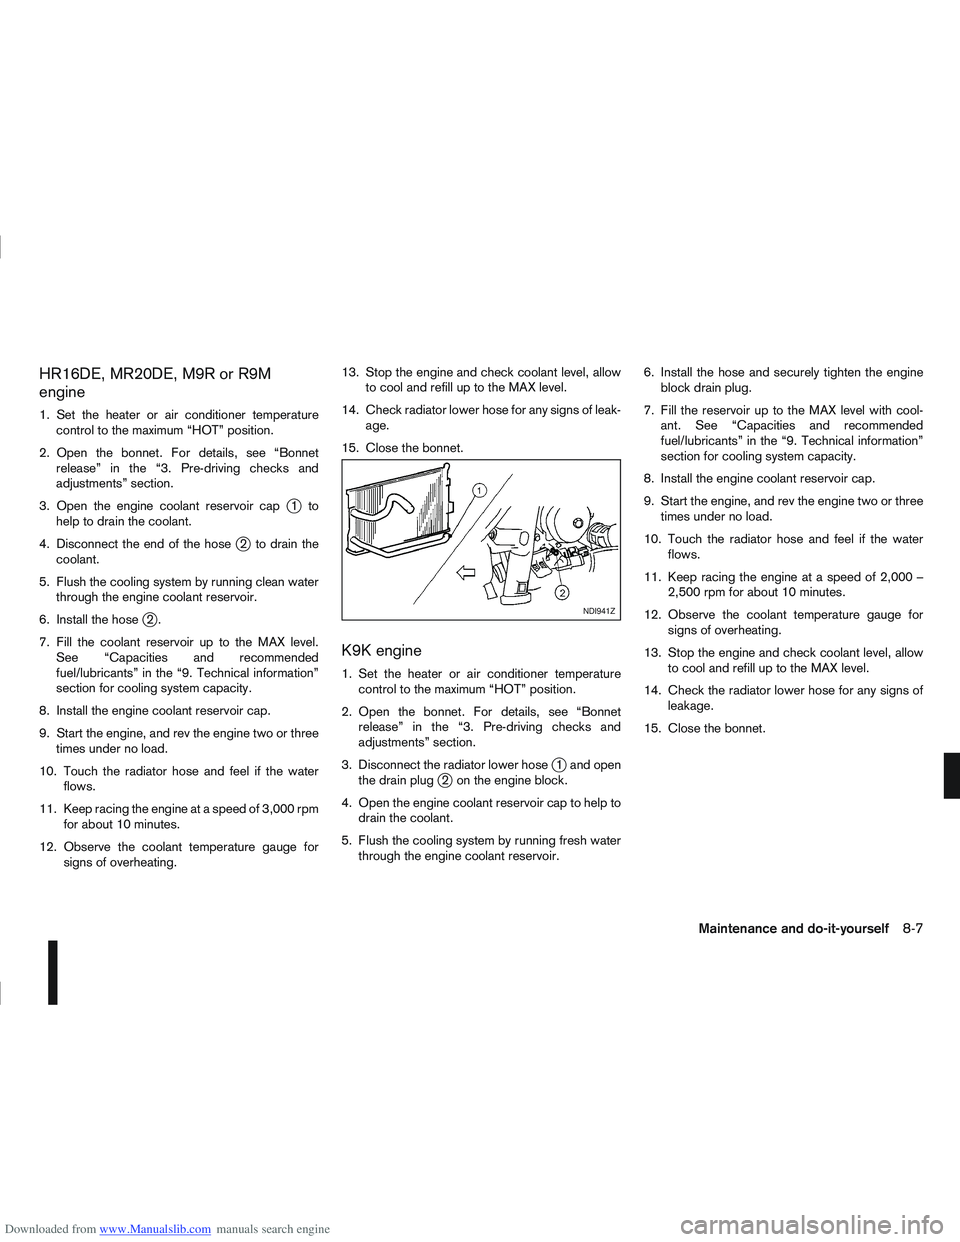
3. Open the engine coolant reservoir cap
j1to
help to drain the coolant.
4. Disconnect the end of the hose
j2 to drain the
coolant.
5. Flush the cooling system by running clean water through the engine coolant reservoir.
6. Install the hose
j2.
7. Fill the coolant reservoir up to the MAX level. See “Capacities and recommended
fuel/lubricants” in the “9. Technical information”
section for cooling system capacity.
8. Install the engine coolant reservoir cap.
9. Start the engine, and rev the engine two or three times under no load.
10. Touch the radiator hose and feel if the water flows.
11. Keep racing the engine at a speed of 3,000 rpm for about 10 minutes.
12. Observe the coolant temperature gauge for signs of overheating. 13. Stop the engine and check coolant level, allow
to cool and refill up to the MAX level.
14. Check radiator lower hose for any signs of leak- age.
15. Close the bonnet.
K9K engine
1. Set the heater or air conditioner temperature control to the maximum “HOT” position.
2. Open the bonnet. For details, see “Bonnet release” in the “3. Pre-driving checks and
adjustments” section.
3. Disconnect the radiator lower hose
j1 and open
the drain plugj2 on the engine block.
4. Open the engine coolant reservoir cap to help to drain the coolant.
5. Flush the cooling system by running fresh water through the engine coolant reservoir. 6. Install the hose and securely tighten the engine
block drain plug.
7. Fill the reservoir up to the MAX level with cool- ant. See “Capacities and recommended
fuel/lubricants” in the “9. Technical information”
section for cooling system capacity.
8. Install the engine coolant reservoir cap.
9. Start the engine, and rev the engine two or three times under no load.
10. Touch the radiator hose and feel if the water flows.
11. Keep racing the engine at a speed of 2,000 – 2,500 rpm for about 10 minutes.
12. Observe the coolant temperature gauge for signs of overheating.
13. Stop the engine and check coolant level, allow to cool and refill up to the MAX level.
14. Check the radiator lower hose for any signs of leakage.
15. Close the bonnet.
NDI941Z
Maintenance and do-it-yourself8-7
Page 244 of 297

Downloaded from www.Manualslib.com manuals search engine 12. Lower the vehicle carefully to the ground.
13. Close the bonnet.
PROTECT THE ENVIRONMENT
NISSAN GREEN PROGRAM
It is illegal to pollute drains, water courses and soil.
Use authorised waste collection facilities, including
civic amenity sites and garages providing facilities
for the disposal of used oil and used oil filters. If in
doubt, contact your local authority for advice on dis-
posal.
The regulations concerning the pollution of the
environment will vary from country to country.
DRAINING WATER
Drain the water from the fuel filter:
– Every time you perform an engine oil change.
– When the water in fuel filter warning light
(orange) comes on or flashes irregularly.
Except for models with R9M diesel engine.
Proceed as follows:
1. Connect a suitable drain hose
j1 to the drain
plugj2.
2. Place a drain pan
j3 under the hosej1.
3. Loosen manually the drain plug
j2 with4to5
turns and operate the priming pumpj4 to drain
the water out of the fuel filter.
CAUTION
The water from the fuel filter is drained
with fuel. Prepare a larger capacity pan
than the volume of the fuel filter.
Drained water is mixed with fuel and take
precautions to prevent the fuel from ad-
hering to rubber parts such as engine
mounting insulator.
4. After draining, close the drain plug manually. CAUTION
If the drain plug is tightened excessively, it
can be damaged and as a result, fuel will
leak.
Do not use tools to tighten the drain plug.
5. Bleed air from the fuel system. For details, see “Bleeding the fuel system” later in this section.
6. Start the engine and make sure there is no fuel leakage. Correct as required.
For models with R9M diesel engine
Contact a NISSAN dealer or qualified workshop.
NDI916Z
Except for models with R9M diesel engine
FUEL FILTER (Diesel engine
models)
Maintenance and do-it-yourself8-13
Page 245 of 297
Downloaded from www.Manualslib.com manuals search engine BLEEDING THE FUEL SYSTEM
Except for models with R9M diesel engine:
Bleed the air out of the fuel system after refilling
an empty fuel tank by the following procedure:
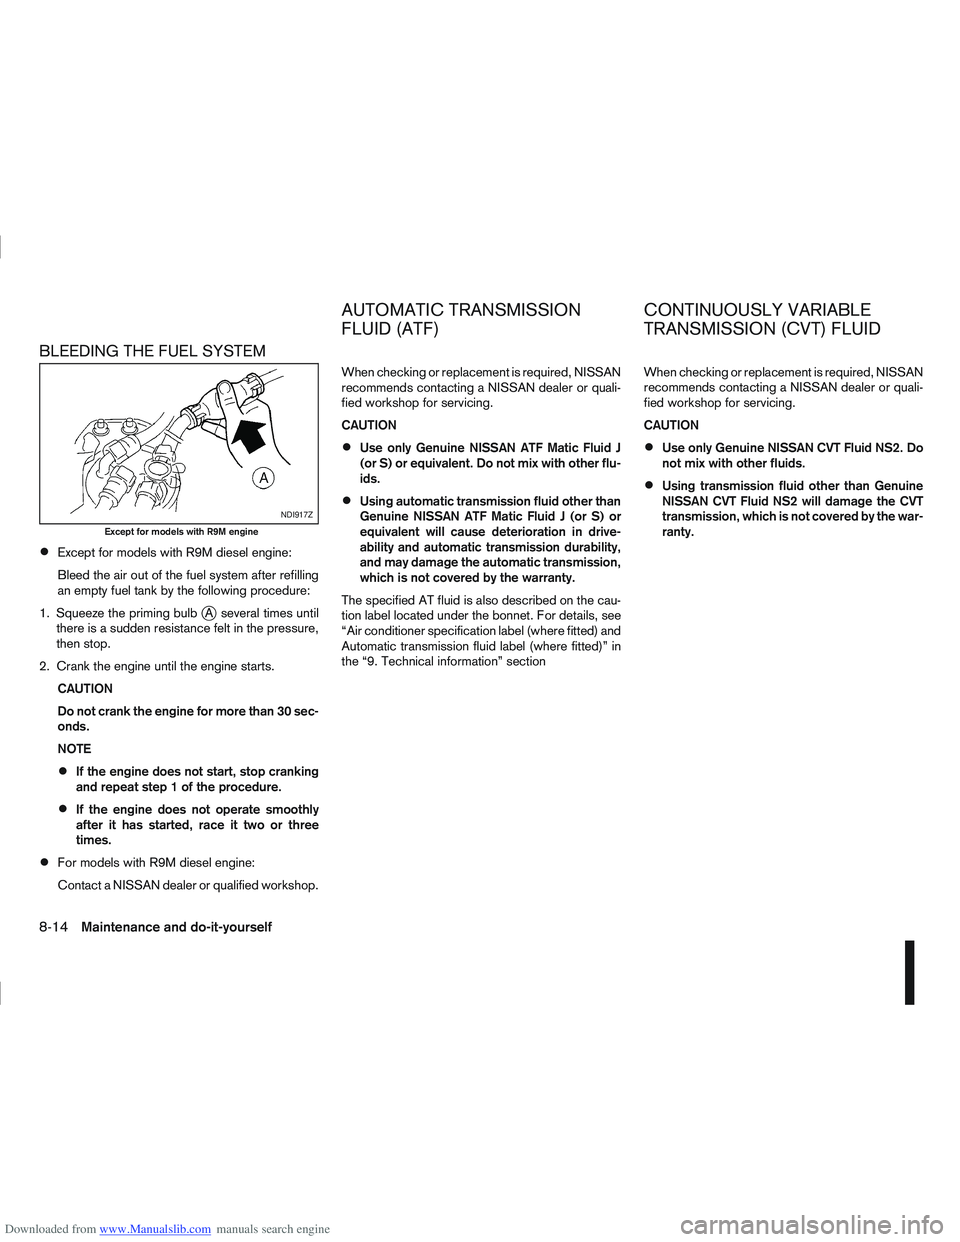
1. Squeeze the priming bulb
jA several times until
there is a sudden resistance felt in the pressure,
then stop.
2. Crank the engine until the engine starts. CAUTION
Do not crank the engine for more than 30 sec-
onds.
NOTE
If the engine does not start, stop cranking
and repeat step 1 of the procedure.
If the engine does not operate smoothly
after it has started, race it two or three
times.
For models with R9M diesel engine:
Contact a NISSAN dealer or qualified workshop. When checking or replacement is required, NISSAN
recommends contacting a NISSAN dealer or quali-
fied workshop for servicing.
CAUTION
Use only Genuine NISSAN ATF Matic Fluid J
(or S) or equivalent. Do not mix with other flu-
ids.
Using automatic transmission fluid other than
Genuine NISSAN ATF Matic Fluid J (or S) or
equivalent will cause deterioration in drive-
ability and automatic transmission durability,
and may damage the automatic transmission,
which is not covered by the warranty.
The specified AT fluid is also described on the cau-
tion label located under the bonnet. For details, see
“Air conditioner specification label (where fitted) and
Automatic transmission fluid label (where fitted)” in
the “9. Technical information” section When checking or replacement is required, NISSAN
recommends contacting a NISSAN dealer or quali-
fied workshop for servicing.
CAUTION
Use only Genuine NISSAN CVT Fluid NS2. Do
not mix with other fluids.
Using transmission fluid other than Genuine
NISSAN CVT Fluid NS2 will damage the CVT
transmission, which is not covered by the war-
ranty.
NDI917Z
Except for models with R9M engine
AUTOMATIC TRANSMISSION
FLUID (ATF)
CONTINUOUSLY VARIABLE
TRANSMISSION (CVT) FLUID
8-14Maintenance and do-it-yourself
Page 252 of 297

Downloaded from www.Manualslib.com manuals search engine WARNING
Be sure the ignition switch is in the “OFF” or
LOCK position. Otherwise the cooling fan or the
engine may start to operate suddenly.
1. Visually inspect each belt for signs of unusual wear, cuts, fraying or looseness. If the belt is in
poor condition or loose, have it replaced or ad-
justed by a NISSAN dealer or qualified work-
shop.
2. Have the belts checked regularly for condition and tension in accordance with the maintenance
schedule as shown in a separately provided War-
ranty Information and Maintenance booklet.WARNING
Be sure the engine and ignition switch are off
and that the handbrake is engaged securely.
CAUTION
Be sure to use the correct socket to remove
the spark plugs. An incorrect socket can
cause damage to the spark plugs.
Always replace spark plugs with recom-
mended or equivalent ones.
Replace spark plugs according to the maintenance
schedule shown in the separately provided War-
ranty Information & Maintenance Booklet.
If replacement is required, see a NISSAN dealer or
qualified workshop for servicing.
WARNING
Operating the engine without the air cleaner
filter, can cause you or others to be burned.
The air cleaner filter not only cleans the intake
air, it also stops flame if the engine backfires.
If the air cleaner filter is not installed and the
engine backfires, you could be burned.
Do not drive without the air cleaner filter.
NDI921Z
Type A
NDI922Z
Type B
DRIVE BELTS SPARK PLUGS (Petrol engine
models) AIR CLEANER FILTER
Maintenance and do-it-yourself8-21
Page 253 of 297
Downloaded from www.Manualslib.com manuals search engine Be careful when working on the engine with-
out the air cleaner filter.
VISCOUS PAPER TYPE
The filter elementjA should not be cleaned and
reused.
Replace it according to the maintenance schedule
shown in the separately provided Warranty Informa-
tion & Maintenance Booklet. When replacing the fil-
ter, wipe the inside of the air cleaner housing and
the cover with a damp cloth.
DRY PAPER TYPE (where fitted)
Check the filter elementjA to see if it is dirty. If it is
dirty, shake the element to remove dust.
Clean or replace it according to the maintenance
schedule shown in the separately provided War-
ranty Information & Maintenance Booklet. When
cleaning or replacing the filter, wipe the inside of the
air cleaner housing and the cover with a damp cloth.
CLEANING
If the windscreen or back door window is not clear
after using the window washer or if a wiper blade
chatters when running, wax or other material may be
on the blade or windscreen.
Clean the outside of the windscreen or back door
window with a washer solution or a mild detergent.
The windscreen or back door window is clean if
beads do not form when rinsing with clear water.
Clean the blade by wiping it with a cloth soaked in a
washer solution or a mild detergent. Then rinse the
blade with clear water. If the windscreen or back
door window is still not clear after cleaning the
blades and using the wiper, replace the blades.
CAUTION
After wiper blade replacement, return the
wiper arm to its original position. Otherwise it
may be damaged when the bonnet is opened.
Make sure the wiper blade contacts the glass.
Otherwise, the arm may be damaged from
wind pressure.
Do not open the bonnet when the front wiper
is in the servicing position other wise it can
damage the paint surface of the bonnet.
FRONT WINDOW WIPER
REPLACEMENT
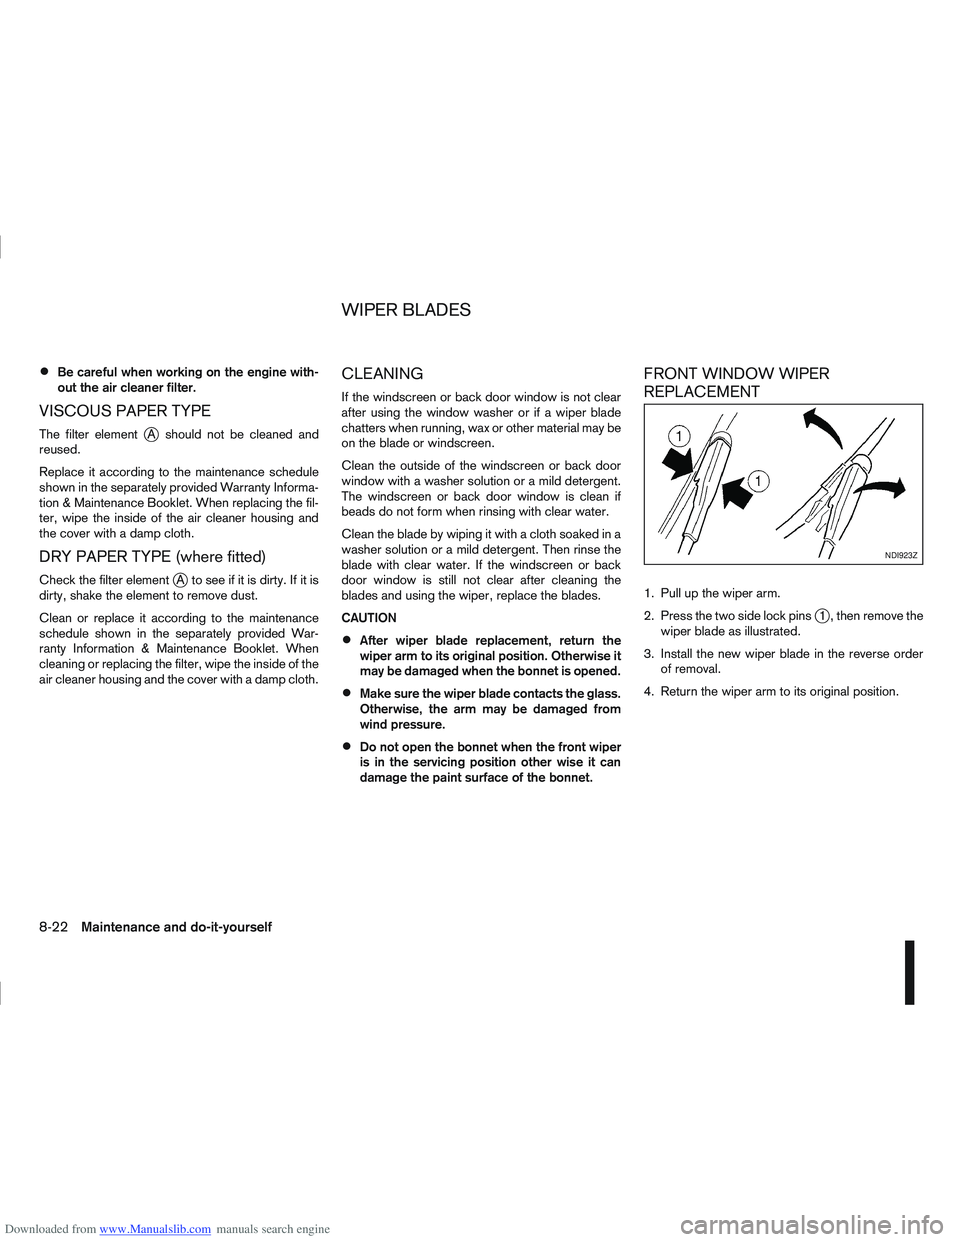
1. Pull up the wiper arm.
2. Press the two side lock pins
j1 , then remove the
wiper blade as illustrated.
3. Install the new wiper blade in the reverse order of removal.
4. Return the wiper arm to its original position.
NDI923Z
WIPER BLADES
8-22Maintenance and do-it-yourself
Page 255 of 297
Downloaded from www.Manualslib.com manuals search engine Be careful not to damage the connector sup-
port bracket when disconnecting the connec-
tor.
If any electrical equipment does not operate, check
for an open fuse.
The fuse box is located in the lower part of the
instrument panel at the driver’s side.
The affected circuits
j2 are shown on the back of
the fuse box lidj1.
1. Make sure the ignition switch and the headlight switch are in the “OFF” position.
2. Open the fuse box lid.
3. Locate and remove the fuse with the fuse puller (where fitted).
NOTE
The fuse puller is stored in the fuse box.
4. If the fuse is open
jA , replace it with a new fusejB.
5. Close the fuse box lid. NOTE
If the new fuse opens again, after installing,
have the electrical system checked and re-
paired by a NISSAN dealer or qualified work-
shop.
ENGINE COMPARTMENT
CAUTION
Never use a fuse of higher or lower amperage
rating than that specified on the fuse box cover.
If any electrical equipment does not operate, check
for an open fuse. 1. Make sure the ignition switch and the headlight
switch are in the “OFF” position.
2. Open the bonnet. For details, see “Bonnet release” in the “3. Pre-driving checks and
adjustments” section.
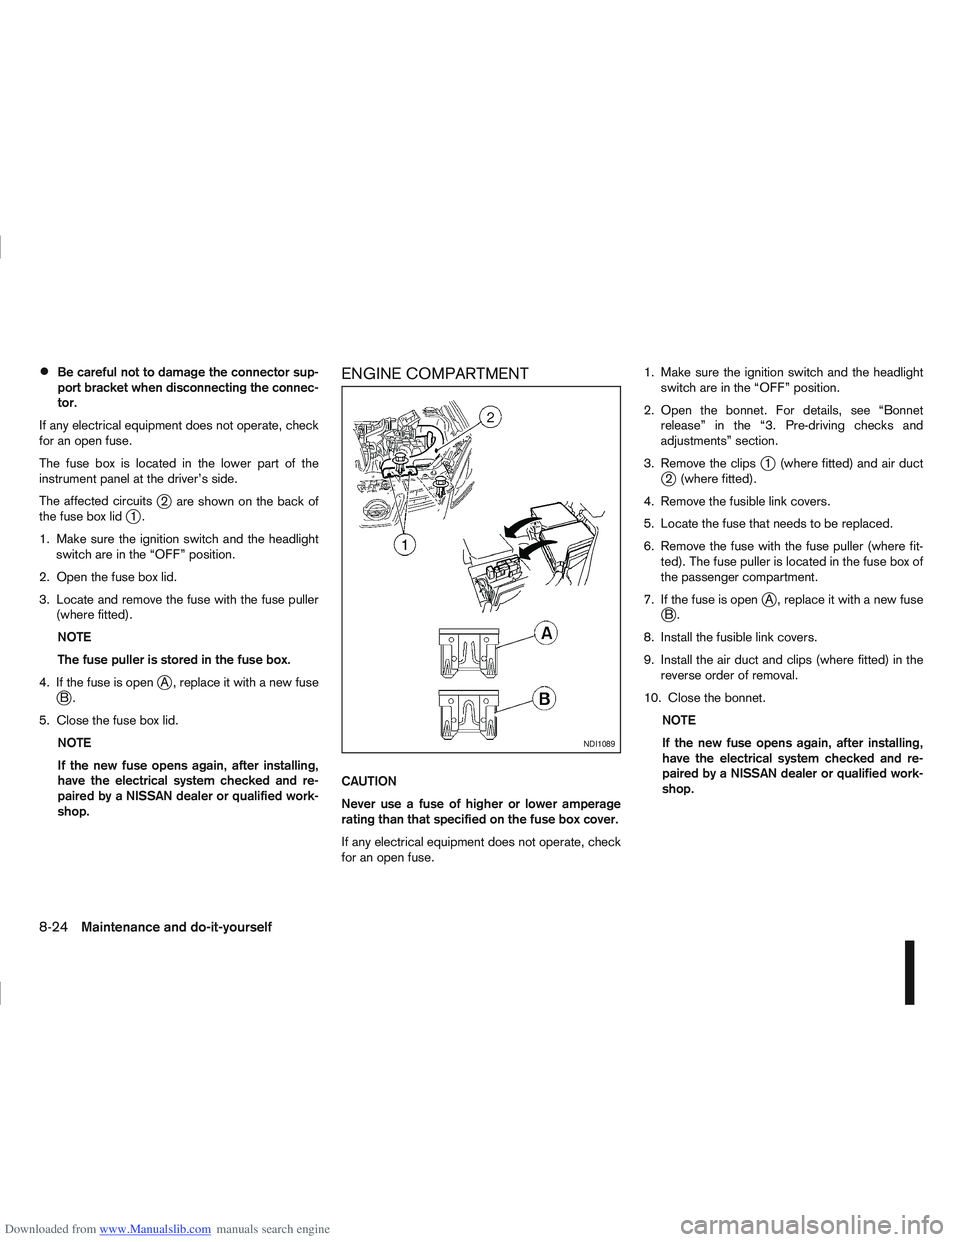
3. Remove the clips
j1 (where fitted) and air ductj2 (where fitted).
4. Remove the fusible link covers.
5. Locate the fuse that needs to be replaced.
6. Remove the fuse with the fuse puller (where fit- ted). The fuse puller is located in the fuse box of
the passenger compartment.
7. If the fuse is open
jA , replace it with a new fusejB.
8. Install the fusible link covers.
9. Install the air duct and clips (where fitted) in the reverse order of removal.
10. Close the bonnet. NOTE
If the new fuse opens again, after installing,
have the electrical system checked and re-
paired by a NISSAN dealer or qualified work-
shop.
NDI1089
8-24Maintenance and do-it-yourself
Page 257 of 297
Downloaded from www.Manualslib.com manuals search engine Only hold the xenon headlight bulb by the
base.
The bulb is manufactured from high-quality
quartz and is under high pressure.
Damage, soiling, and fingerprints should be
avoided and, if necessary, removed with alco-
hol before installing the bulb.
When the headlights are switched on, the
bulbs produce a certain amount of UV radia-
tion. In order to avoid any impairment of health
(burning and conjunctivitis), the bulb should
only be used in closed headlights with appro-
priate UV–absorbing front glass.
Due to the risk of burning, the bulb should be
left to cool down for 3 minutes after switching
off before touching.
Due to the use of mercury and various salts,
the bulb should be treated as special waste
when discarded.
The bulb may only be operated with a suitable
ballast which produces very high voltages
when switched on and during operation.
Contact with bulb and wires should therefore
be avoided and a safe distance of at least 30
mm should be maintained.
Replacing the halogen headlight bulb
CAUTION
High pressure halogen gas is sealed inside
the halogen bulb. The bulb may break if the
glass envelope is scratched or the bulb is
dropped.
When handling the bulb, DO NOT TOUCH THE
GLASS ENVELOPE.
Use the same number type and wattage as
originally installed.
Aiming is usually not necessary after replac-
ing the bulb. When aiming adjustment is nec-
essary, contact a NISSAN dealer or qualified
workshop.
Do not leave the bulb out of the headlight
reflector for a long period of time as dust,
moisture or smoke may enter the headlight
body and affect the performance of the head-
light.
The headlight is a semi-sealed beam type which
uses a replaceable headlight (halogen) bulb. A bulb
can be replaced from inside the engine compart-
ment without removing the headlight assembly.
Contact a NISSAN dealer or qualified workshop, if
you need assistance for bulb replacement.
1. Open the bonnet. For details, see “Bonnet release” in the “3. Pre-driving checks and
adjustments” section.
2. Disconnect the negative (—) battery cable. 3. When the broken bulb is located in the headlight
assembly under the air duct, carefully remove the
clips and rotate the air duct
jc clockwise a 1/4
of a turn.
4. Remove the cap (
jAorjB ) of the headlight as-
sembly.
5. Turn the connector 1/4 of a turn in the anti clock- wise direction and remove the headlight bulb.
6. Install the new bulb in the reverse order of re- moval and make sure that the cap is securely
sealed with the headlight body.
7. Where removed (step 3.), re-install the air duct
jc and clips in the order of removal.
8. Reconnect the negative (—) battery cable and close the bonnet.
NOTE
Fog may temporarily form inside the lens of the
exterior lights in the rain or in a car wash. The fog
is caused by a temperature difference between
the inside and the outside of the lens. This is not
a malfunction. If large droplets can be seen, then
contact a NISSAN dealer or qualified workshop.
8-26Maintenance and do-it-yourself
Page 264 of 297
Downloaded from www.Manualslib.com manuals search engine Incorrect tyre selection, fitting, care or main-
tenance can affect vehicle safety with risk of
accident and injury. If in doubt, consult a
NISSAN dealer or the tyre manufacturer.
TYRE WEAR AND DAMAGE
Tyres should be periodically inspected for wear,
cracking, bulging or objects caught in the tread. If
excessive wear, cracks, bulging or deep cuts are
found, the tyre should be replaced.
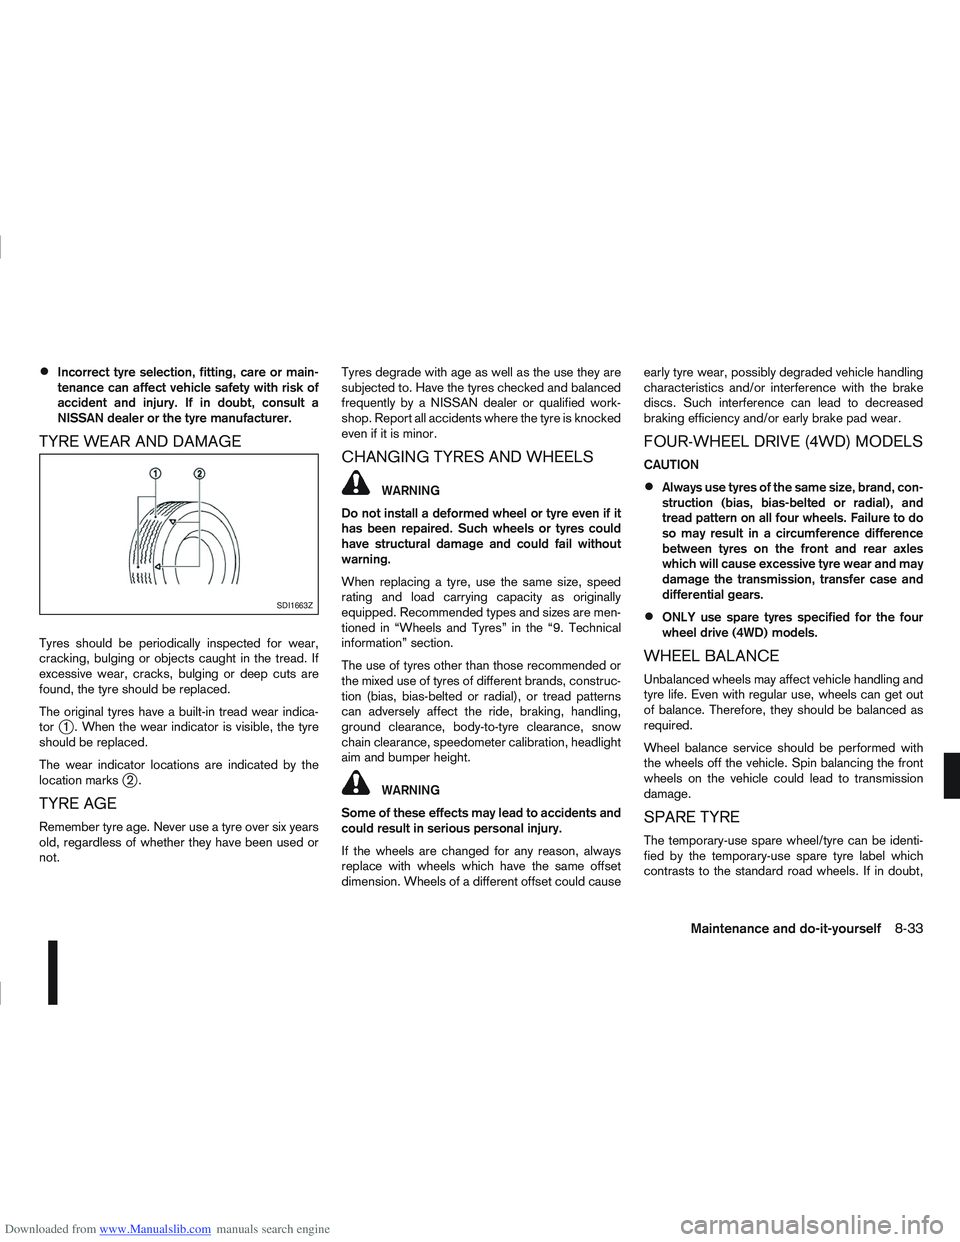
The original tyres have a built-in tread wear indica-
tor
j1 . When the wear indicator is visible, the tyre
should be replaced.
The wear indicator locations are indicated by the
location marks
j2.
TYRE AGE
Remember tyre age. Never use a tyre over six years
old, regardless of whether they have been used or
not. Tyres degrade with age as well as the use they are
subjected to. Have the tyres checked and balanced
frequently by a NISSAN dealer or qualified work-
shop. Report all accidents where the tyre is knocked
even if it is minor.
CHANGING TYRES AND WHEELS
WARNING
Do not install a deformed wheel or tyre even if it
has been repaired. Such wheels or tyres could
have structural damage and could fail without
warning.
When replacing a tyre, use the same size, speed
rating and load carrying capacity as originally
equipped. Recommended types and sizes are men-
tioned in “Wheels and Tyres” in the “9. Technical
information” section.
The use of tyres other than those recommended or
the mixed use of tyres of different brands, construc-
tion (bias, bias-belted or radial), or tread patterns
can adversely affect the ride, braking, handling,
ground clearance, body-to-tyre clearance, snow
chain clearance, speedometer calibration, headlight
aim and bumper height.
WARNING
Some of these effects may lead to accidents and
could result in serious personal injury.
If the wheels are changed for any reason, always
replace with wheels which have the same offset
dimension. Wheels of a different offset could cause early tyre wear, possibly degraded vehicle handling
characteristics and/or interference with the brake
discs. Such interference can lead to decreased
braking efficiency and/or early brake pad wear.
FOUR-WHEEL DRIVE (4WD) MODELS
CAUTION
Always use tyres of the same size, brand, con-
struction (bias, bias-belted or radial), and
tread pattern on all four wheels. Failure to do
so may result in a circumference difference
between tyres on the front and rear axles
which will cause excessive tyre wear and may
damage the transmission, transfer case and
differential gears.
ONLY use spare tyres specified for the four
wheel drive (4WD) models.
WHEEL BALANCE
Unbalanced wheels may affect vehicle handling and
tyre life. Even with regular use, wheels can get out
of balance. Therefore, they should be balanced as
required.
Wheel balance service should be performed with
the wheels off the vehicle. Spin balancing the front
wheels on the vehicle could lead to transmission
damage.
SPARE TYRE
The temporary-use spare wheel/tyre can be identi-
fied by the temporary-use spare tyre label which
contrasts to the standard road wheels. If in doubt,
SDI1663Z
Maintenance and do-it-yourself8-33