2009 NISSAN QASHQAI towing
[x] Cancel search: towingPage 8 of 297

Downloaded from www.Manualslib.com manuals search engine j1Towing eye (P. 6-15)
j2Bonnet (P. 3-14)
j3Headlights, front side lights, turn signal lights
(Switch P. 2-24, Location and bulb replace-
ment P. 8-25)
j4Windscreen (Wiper and washer switch P. 2-21, Wiper replacement P. 8-22, Washer
fluid P. 8-16)
j5
Side turn signal light (P. 2-24, Location and
bulb replacement P. 8-27)
j6C-View® (Glass roof)* (P. 2-36)
j7Power windows (P. 2-34)
j8Roof rail* (P. 2-32)
j9Tyres (Tyres and wheels P. 8-31, P. 9-7, Flat
tyre P. 6-2)
j10Front view camera* (Around view monitor,
P. 4-4)
j11Back door (Door locks P. 3-12, Remote key-
less entry system P. 3-3)
j12Rear view camera* (Rear-view monitor, P. 4-2,
around view monitor, P. 4-4)
j13Rear window (Defogger switch P. 2-23, Wiper
and washer switch P. 2-21, Wiper replace-
ment P. 8-23, Washer fluid P. 8-16)
j14Rear combination light (Switch P. 2-24, Loca-
tion and bulb replacement P. 8-25)
j15Fuel filler lid (P. 3-15)
j16Doors (Keys P. 3-2, Door locks P. 3-9,
Remote keyless entry system P. 3-3)
j17Outside rear-view mirrors (P. 3-17)
Side view camera* (Around view monitor,
P. 4-4)
* where fitted
NPA1091
EXTERIOR FRONT AND REAR
Illustrated table of contents0-3
Page 58 of 297
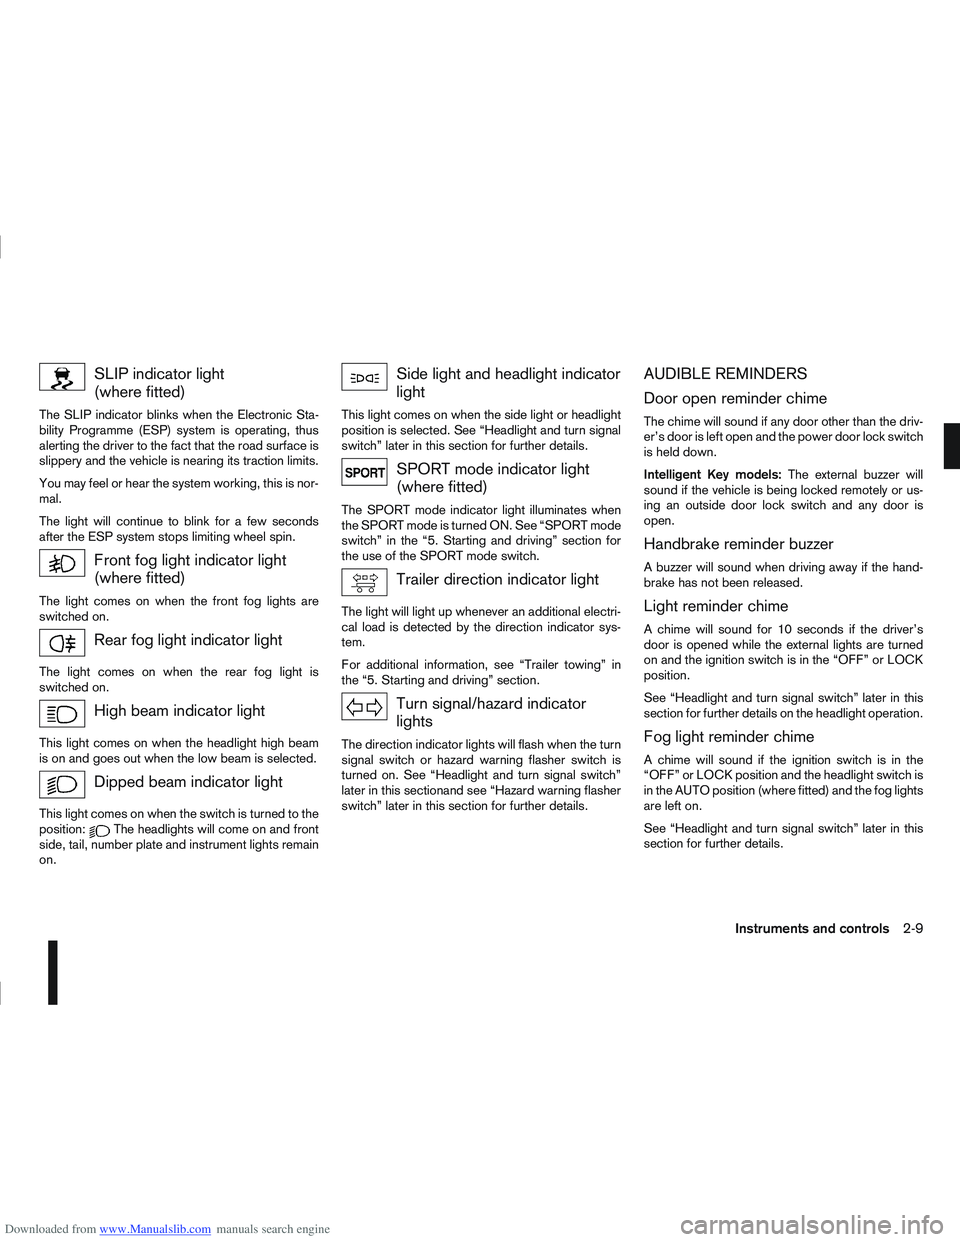
Downloaded from www.Manualslib.com manuals search engine SLIP indicator light
(where fitted)
The SLIP indicator blinks when the Electronic Sta-
bility Programme (ESP) system is operating, thus
alerting the driver to the fact that the road surface is
slippery and the vehicle is nearing its traction limits.
You may feel or hear the system working, this is nor-
mal.
The light will continue to blink for a few seconds
after the ESP system stops limiting wheel spin.
Front fog light indicator light
(where fitted)
The light comes on when the front fog lights are
switched on.
Rear fog light indicator light
The light comes on when the rear fog light is
switched on.
High beam indicator light
This light comes on when the headlight high beam
is on and goes out when the low beam is selected.
Dipped beam indicator light
This light comes on when the switch is turned to the
position:The headlights will come on and front
side, tail, number plate and instrument lights remain
on.
Side light and headlight indicator
light
This light comes on when the side light or headlight
position is selected. See “Headlight and turn signal
switch” later in this section for further details.
SPORT mode indicator light
(where fitted)
The SPORT mode indicator light illuminates when
the SPORT mode is turned ON. See “SPORT mode
switch” in the “5. Starting and driving” section for
the use of the SPORT mode switch.
Trailer direction indicator light
The light will light up whenever an additional electri-
cal load is detected by the direction indicator sys-
tem.
For additional information, see “Trailer towing” in
the “5. Starting and driving” section.
Turn signal/hazard indicator
lights
The direction indicator lights will flash when the turn
signal switch or hazard warning flasher switch is
turned on. See “Headlight and turn signal switch”
later in this sectionand see “Hazard warning flasher
switch” later in this section for further details.
AUDIBLE REMINDERS
Door open reminder chime
The chime will sound if any door other than the driv-
er’s door is left open and the power door lock switch
is held down.
Intelligent Key models: The external buzzer will
sound if the vehicle is being locked remotely or us-
ing an outside door lock switch and any door is
open.
Handbrake reminder buzzer
A buzzer will sound when driving away if the hand-
brake has not been released.
Light reminder chime
A chime will sound for 10 seconds if the driver’s
door is opened while the external lights are turned
on and the ignition switch is in the “OFF” or LOCK
position.
See “Headlight and turn signal switch” later in this
section for further details on the headlight operation.
Fog light reminder chime
A chime will sound if the ignition switch is in the
“OFF” or LOCK position and the headlight switch is
in the AUTO position (where fitted) and the fog lights
are left on.
See “Headlight and turn signal switch” later in this
section for further details.
Instruments and controls2-9
Page 163 of 297

Downloaded from www.Manualslib.com manuals search engine 5Starting and driving
Starting and driving
Running-in schedule ................................................ 5-2
Before starting the engine ........................................ 5-2
Precautions when starting and driving ...................... 5-3
Exhaust gas (Carbon Monoxide) ......................... 5-3
On-pavement and off-road driving precautions ......... 5-4
Three-way catalyst (Petrol engine models)................ 5-4 To help prevent damage ..................................... 5-4
Turbocharger system (Diesel engine models) ........... 5-5
Diesel Particulate Filter (DPF) (where fitted) ............. 5-5 Regeneration restrictions .................................... 5-5
If regeneration fails ............................................. 5-5
Care when driving ................................................... 5-6 Engine cold start period ...................................... 5-6
Loading luggage ................................................. 5-6
Driving on wet roads ........................................... 5-6
Driving under winter conditions ........................... 5-6
Ignition switch.......................................................... 5-6 Manual transmission ........................................... 5-6
Automatic transmission or Continuously
variable transmission........................................... 5-7
Steering lock ...................................................... 5-7
Key positions ...................................................... 5-7
NISSAN Anti-Theft System (NATS)..................... 5-7
Ignition knob (where fitted)....................................... 5-8 Manual transmission ........................................... 5-8
Automatic transmission or Continuously
variable transmission........................................... 5-9
Steering lock ...................................................... 5-9
Ignition knob position .......................................... 5-9 Emergency key – Intelligent Key dead battery
situation .............................................................. 5-10
NISSAN Anti-Theft System (NATS)..................... 5-10
Starting the engine................................................... 5-11
Driving the vehicle.................................................... 5-12 Driving with manual transmission......................... 5-12
Driving with automatic transmission or with
continuously variable transmission (Models
with manual shift) ................................................ 5-14
Driving with Continuously Variable Transmis-
sion (CVT) (Models without manual shift) ............ 5-17
Stop/Start System (where fitted) .............................. 5-21 Normal operation ................................................ 5-21
Precautions ........................................................ 5-22
Stop/Start System OFF switch ........................... 5-23
Environmental savings ........................................ 5-23
Ultrasonic Parking Sensor (where fitted) .................. 5-24
Four-wheel Drive (4WD) (where fitted)..................... 5-24 4WD mode operations........................................ 5-25
4WD shift tips .................................................... 5-25
4WD Warning light ............................................. 5-26
4WD Mode indicator lights ................................. 5-27
Driving four-wheel drive (4WD) safely ................. 5-27
Cruise control (where fitted) .................................... 5-29 Precautions on cruise control .............................. 5-29
Cruise control system operations ........................ 5-30
Speed limiter ........................................................... 5-31 Speed limiter operations ..................................... 5-32
Parking .................................................................... 5-33
Trailer towing ........................................................... 5-35
Page 183 of 297
Downloaded from www.Manualslib.com manuals search engine Shift lock release
j
1LHD models
j2RHD models
jA Shift lock release button
If the battery charge is low or discharged, the selec-
tor lever may not move from the P (Park) position
even with the brake pedal depressed and the selec-
tor lever button pushed.
To move the selector lever, perform the following
procedure:
1. Models with Intelligent Key system:
Place the ignition switch in the “OFF” or LOCK
position.
Models without Intelligent Key system:
Place the ignition switch in the LOCK position,
and remove the key if it is inserted.
2. Apply the handbrake.
3. Push down the shift lock release button
jA.Use
a suitable tool.
4. Push and hold the selector lever button and move the selector lever to the N (Neutral) position while
holding down the shift lock release button.
Place the ignition switch in the ON position to un-
lock the steering wheel. The vehicle may be moved
to the desired location. For models with Intelligent Key system: If the battery
is discharged completely, the steering wheel cannot
be unlocked. Do not move the vehicle with the steer-
ing wheel locked.
If the selector lever cannot be moved out of the P
(Park) position, have a NISSAN dealer or qualified
workshop check the CVT system as soon as pos-
sible.
WARNING
If the selector lever cannot be moved from the P
(Park) position while the engine is running and
the brake pedal is depressed, the stop lights may
not work. Malfunctioning stop lights could cause
an accident injuring yourself and others.
High fluid temperature protection mode
This transmission has a high fluid temperature pro-
tection mode. If the fluid temperature becomes too
high (for example, when climbing steep grades in
high temperature with heavy loads, such as when
towing a trailer), engine power and, under some
conditions, vehicle speed will be decreased auto-
matically to reduce the chance of transmission dam-
age. Vehicle speed can be controlled with the ac-
celerator pedal, but engine and vehicle speed may
be limited.
Fail-safe
When the fail-safe operation occurs, the CVT will
not be shifted to the selected driving position.
If the vehicle is driven under extreme conditions,
such as excessive wheel spinning and subse- quent hard braking, the fail-safe system may be
activated. This will occur even if all electrical cir-
cuits are functioning properly. In this case, place
the ignition switch in the “OFF” position and wait
for 10 seconds. Then turn the ignition switch back
to the ON position. The vehicle should return to
its normal operating condition. If it does not re-
turn to its normal operating condition, have a
NISSAN dealer or qualified workshop check the
transmission and repair it if necessary.
WARNING
When the fail-safe operation occurs, vehicle
speed may be gradually reduced. The reduced
speed may be lower than other traffic, which
could increase the chance of a collision. Be es-
pecially careful when driving. If necessary, pull to
the side of the road at a safe place and allow the
transmission to return to normal operation, or
have it repaired if necessary.
5-20Starting and driving
Page 188 of 297
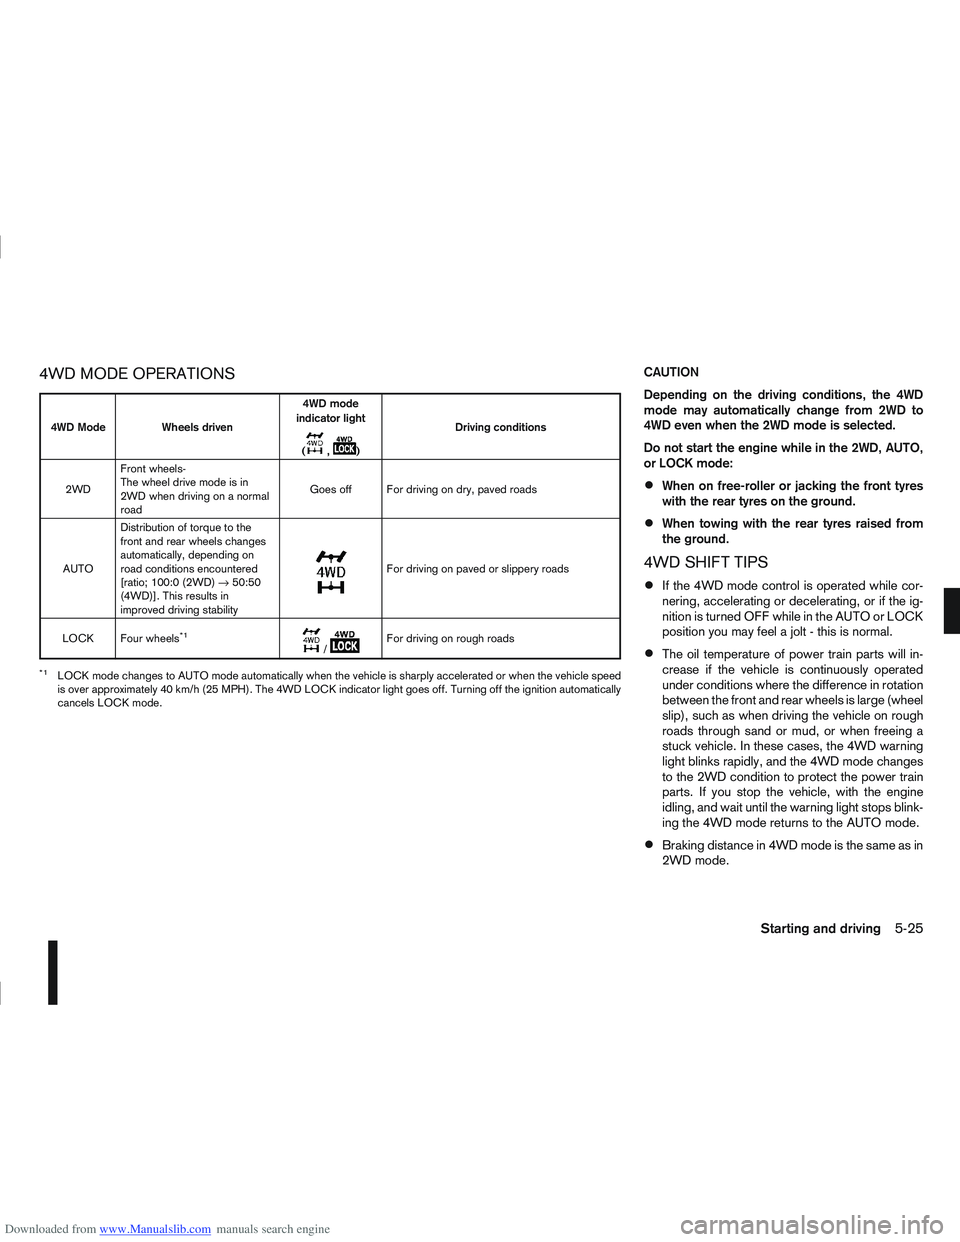
Downloaded from www.Manualslib.com manuals search engine 4WD MODE OPERATIONSCAUTION
Depending on the driving conditions, the 4WD
mode may automatically change from 2WD to
4WD even when the 2WD mode is selected.
Do not start the engine while in the 2WD, AUTO,
or LOCK mode:
When on free-roller or jacking the front tyres
with the rear tyres on the ground.
When towing with the rear tyres raised from
the ground.
4WD SHIFT TIPS
If the 4WD mode control is operated while cor-
nering, accelerating or decelerating, or if the ig-
nition is turned OFF while in the AUTO or LOCK
position you may feel a jolt - this is normal.
The oil temperature of power train parts will in-
crease if the vehicle is continuously operated
under conditions where the difference in rotation
between the front and rear wheels is large (wheel
slip), such as when driving the vehicle on rough
roads through sand or mud, or when freeing a
stuck vehicle. In these cases, the 4WD warning
light blinks rapidly, and the 4WD mode changes
to the 2WD condition to protect the power train
parts. If you stop the vehicle, with the engine
idling, and wait until the warning light stops blink-
ing the 4WD mode returns to the AUTO mode.
Braking distance in 4WD mode is the same as in
2WD mode.
4WD Mode Wheels driven4WD mode
indicator light
(
m,m) Driving conditions
2WD Front wheels-
The wheel drive mode is in
2WD when driving on a normal
road Goes off For driving on dry, paved roads
AUTO Distribution of torque to the
front and rear wheels changes
automatically, depending on
road conditions encountered
[ratio; 100:0 (2WD)
→50:50
(4WD)]. This results in
improved driving stability
m
For driving on paved or slippery roads
LOCK Four wheels
*1m/mFor driving on rough roads
*1LOCK mode changes to AUTO mode automatically when the vehicle is sharply accelerated or when the vehicle speed
is over approximately 40 km/h (25 MPH). The 4WD LOCK indicator light goes off. Turning off the ignition automatically
cancels LOCK mode.
Starting and driving5-25
Page 198 of 297
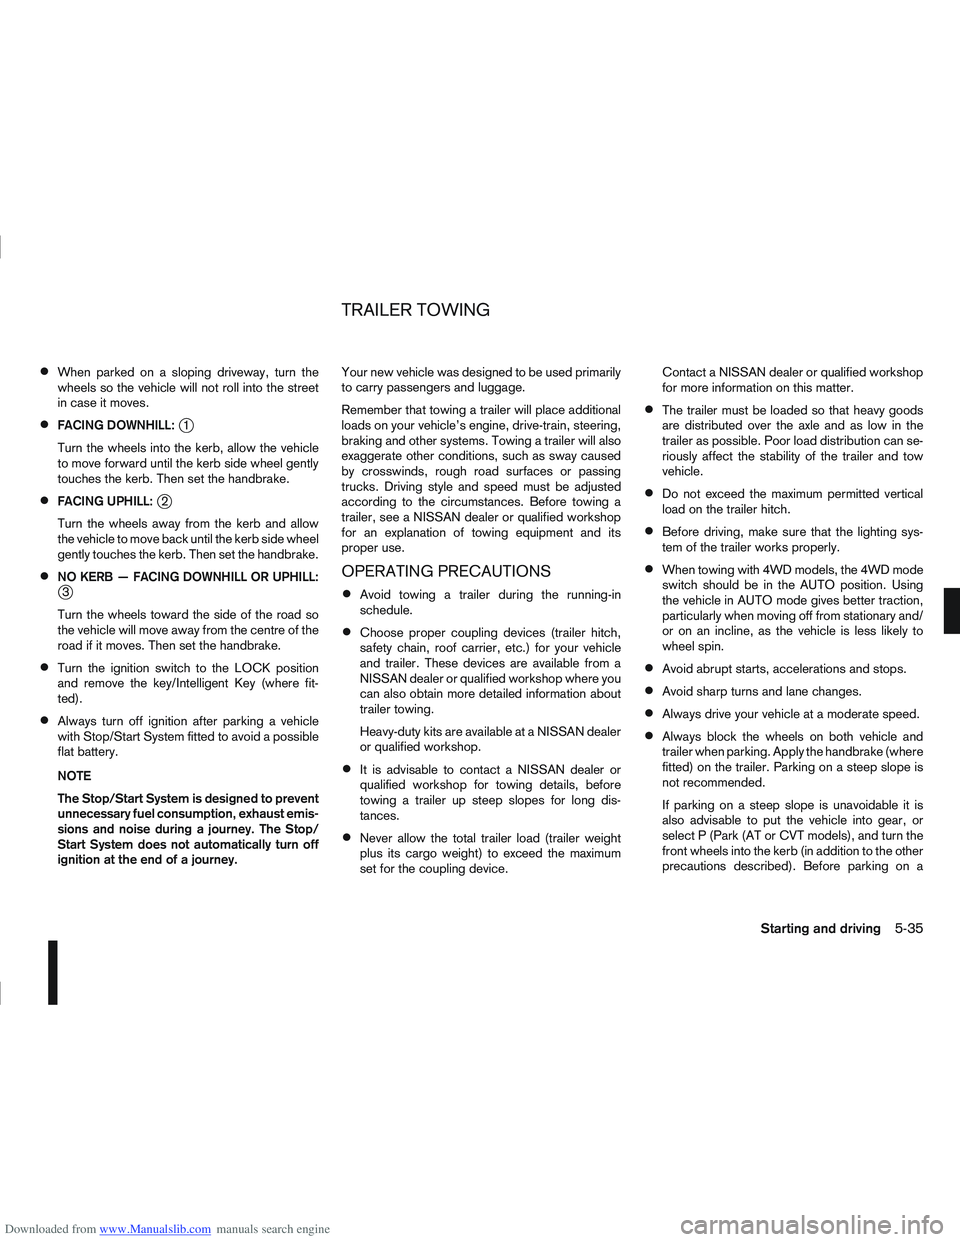
Downloaded from www.Manualslib.com manuals search engine When parked on a sloping driveway, turn the
wheels so the vehicle will not roll into the street
in case it moves.
FACING DOWNHILL:j1
Turn the wheels into the kerb, allow the vehicle
to move forward until the kerb side wheel gently
touches the kerb. Then set the handbrake.
FACING UPHILL:j2
Turn the wheels away from the kerb and allow
the vehicle to move back until the kerb side wheel
gently touches the kerb. Then set the handbrake.
NO KERB — FACING DOWNHILL OR UPHILL:j3
Turn the wheels toward the side of the road so
the vehicle will move away from the centre of the
road if it moves. Then set the handbrake.
Turn the ignition switch to the LOCK position
and remove the key/Intelligent Key (where fit-
ted).
Always turn off ignition after parking a vehicle
with Stop/Start System fitted to avoid a possible
flat battery.
NOTE
The Stop/Start System is designed to prevent
unnecessary fuel consumption, exhaust emis-
sions and noise during a journey. The Stop/
Start System does not automatically turn off
ignition at the end of a journey. Your new vehicle was designed to be used primarily
to carry passengers and luggage.
Remember that towing a trailer will place additional
loads on your vehicle’s engine, drive-train, steering,
braking and other systems. Towing a trailer will also
exaggerate other conditions, such as sway caused
by crosswinds, rough road surfaces or passing
trucks. Driving style and speed must be adjusted
according to the circumstances. Before towing a
trailer, see a NISSAN dealer or qualified workshop
for an explanation of towing equipment and its
proper use.
OPERATING PRECAUTIONS
Avoid towing a trailer during the running-in
schedule.
Choose proper coupling devices (trailer hitch,
safety chain, roof carrier, etc.) for your vehicle
and trailer. These devices are available from a
NISSAN dealer or qualified workshop where you
can also obtain more detailed information about
trailer towing.
Heavy-duty kits are available at a NISSAN dealer
or qualified workshop.
It is advisable to contact a NISSAN dealer or
qualified workshop for towing details, before
towing a trailer up steep slopes for long dis-
tances.
Never allow the total trailer load (trailer weight
plus its cargo weight) to exceed the maximum
set for the coupling device. Contact a NISSAN dealer or qualified workshop
for more information on this matter.
The trailer must be loaded so that heavy goods
are distributed over the axle and as low in the
trailer as possible. Poor load distribution can se-
riously affect the stability of the trailer and tow
vehicle.
Do not exceed the maximum permitted vertical
load on the trailer hitch.
Before driving, make sure that the lighting sys-
tem of the trailer works properly.
When towing with 4WD models, the 4WD mode
switch should be in the AUTO position. Using
the vehicle in AUTO mode gives better traction,
particularly when moving off from stationary and/
or on an incline, as the vehicle is less likely to
wheel spin.
Avoid abrupt starts, accelerations and stops.
Avoid sharp turns and lane changes.
Always drive your vehicle at a moderate speed.
Always block the wheels on both vehicle and
trailer when parking. Apply the handbrake (where
fitted) on the trailer. Parking on a steep slope is
not recommended.
If parking on a steep slope is unavoidable it is
also advisable to put the vehicle into gear, or
select P (Park (AT or CVT models), and turn the
front wheels into the kerb (in addition to the other
precautions described). Before parking on a
TRAILER TOWING
Starting and driving5-35
Page 199 of 297

Downloaded from www.Manualslib.com manuals search engine steep slope consider the incline (the towing
weights quoted are for a 12% slope).
Follow the trailer manufacturer’s instructions.
Have your vehicle serviced more often than at
the intervals specified in the separately provided
Warranty Information and Maintenance booklet.
Trailer towing requires more fuel than under nor-
mal circumstances because of a considerable
increase in traction power required and resis-
tance.
When towing a trailer, observe the following re-
stricted towing speed:
Speed: below 100 km/h (62 MPH)
CAUTION
While towing a trailer, check the engine coolant
temperature gauge regularly to prevent engine
overheating.
TYRE PRESSURE
When towing a trailer, inflate the vehicle tyres to the
maximum recommended COLD tyre pressure, as
indicated on the tyre placard (for full loading). Make
sure the trailer tyre pressures are correct.
CAUTION
Do not tow a trailer when the vehicle is installed
with a temporary-use spare tyre.
SAFETY CHAINS
Always use a suitable chain between the vehicle
and trailer. The chain should be attached to the hitch
and not to the vehicle bumper or axle. Be sure to
leave enough slack in the chain to permit turning
corners. The chain should not drag on the ground:
passing the chain across the trailer hitch may be the
best practice depending on your trailer.
TRAILER BRAKES
Ensure that trailer brakes are installed as required
by local regulations. Also check that all other trailer
equipment conforms to local regulations.
TRAILER DETECTION (where fitted)
When towing a trailer and the turn signal switch is
used, the electrical system of the vehicle will detect
an additional electrical load of the trailer lighting. As
a result, the trailer direction indicator light comes
on.
INSTALLATION OF COUPLING
DEVICE
NISSAN recommends that the coupling device for
trailer towing be installed under the following condi-
tions:
Maximum permissible vertical load on the cou-
pling device: 736 N (75 kg, 165 lb)
The coupling device, mounting points and instal-
lation parts on your vehicle: as shown as an ex-
ample in the illustration. Follow all of the coupling device manufacturer’s in-
structions for installation and use.
5-36Starting and driving
Page 208 of 297
Downloaded from www.Manualslib.com manuals search engine 6In case of emergency
In case of emergency
Spare tyre................................................................ 6-2
Temporary-use spare tyre ................................... 6-2
Flat tyre ................................................................... 6-2 Stopping the vehicle ........................................... 6-2
Changing flat tyre (Models with spare wheel,
where fitted) ....................................................... 6-3
Repairing flat tyre (Models with emergency
tyre puncture repair kit, where fitted) ................... 6-7
Jump-starting ........................................................... 6-10
Push-starting ........................................................... 6-12 Engine overheat ....................................................... 6-12
Tow truck towing ..................................................... 6-13
Towing precautions ............................................ 6-13
Recommended towing for two-wheel drive
(2WD) models .................................................... 6-14
Recommended towing for four-wheel drive
(4WD) models .................................................... 6-14
Towing eye ......................................................... 6-15
Freeing the vehicle from sand, snow or mud ....... 6-15