2009 NISSAN LATIO wheel torque
[x] Cancel search: wheel torquePage 4123 of 4331

On-
Vehicle Service " .
3. Remove wheel sensor and wheel sensor harness from wheel hub and bearing assembly and rear suspen-
sion beam. Refer to BRC-32, " Removal and Installation " .
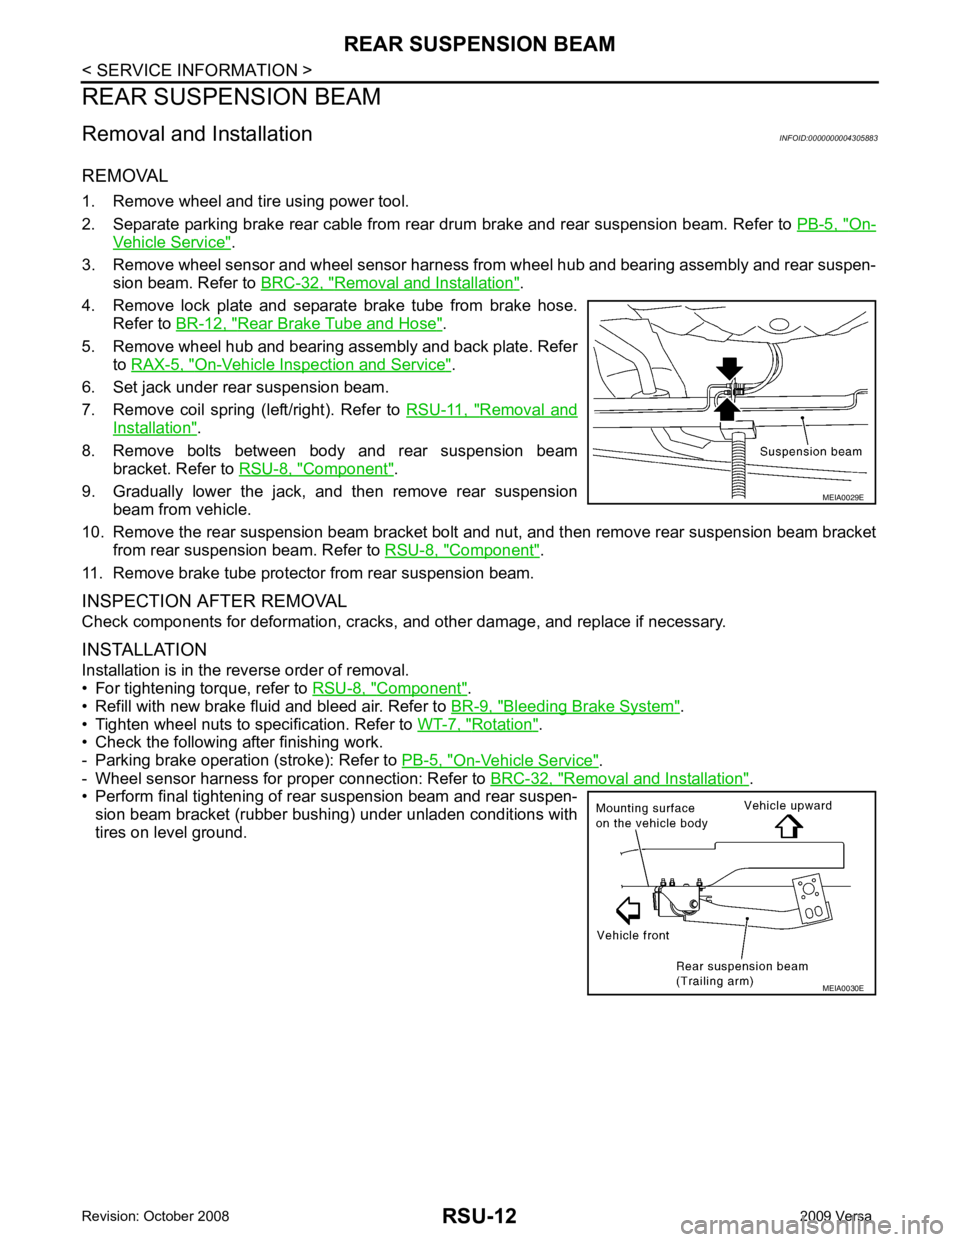
4. Remove lock plate and separate brake tube from brake hose. Refer to BR-12, " Rear Brake Tube and Hose " .
5. Remove wheel hub and bearing assembly and back plate. Refer to RAX-5, " On-Vehicle Inspection and Service " .
6. Set jack under rear suspension beam.
7. Remove coil spring (left/right). Refer to RSU-11, " Removal and
Installation " .
8. Remove bolts between body and rear suspension beam bracket. Refer to RSU-8, " Component " .
9. Gradually lower the jack, and then remove rear suspension beam from vehicle.
10. Remove the rear suspension beam bracket bolt and nut, and then remove rear suspension beam bracket
from rear suspension beam. Refer to RSU-8, " Component " .
11. Remove brake tube protector from rear suspension beam.
INSPECTION AFTER REMOVAL
Check components for deformation, cracks, and other damage, and replace if necessary.
INSTALLATION
Installation is in the reverse order of removal.
• For tightening torque, refer to RSU-8, " Component " .
• Refill with new brake fluid and bleed air. Refer to BR-9, " Bleeding Brake System " .
• Tighten wheel nuts to specification. Refer to WT-7, " Rotation " .
• Check the following after finishing work.
- Parking brake operation (stroke): Refer to PB-5, " On-Vehicle Service " .
- Wheel sensor harness for proper connection: Refer to BRC-32, " Removal and Installation " .
• Perform final tightening of rear suspension beam and rear suspen-
sion beam bracket (rubber bushing) under unladen conditions with
tires on level ground. MEIA0030E
Page 4241 of 4331

STC
N
O P
CONTENTS
STEERING CONTROL SYSTEM
EPS
SERVICE INFORMATION .. ..........................
2
PRECAUTIONS .............................................. .....2
Precaution for Supplemental Restraint System
(SRS) "AIR BAG" and "SEAT BELT PRE-TEN-
SIONER" ............................................................. ......
2
Precaution Necessary fo r Steering Wheel Rota-
tion After Battery Disconnect ............................... ......
2
Service Notice or Precau tion for EPS System ..........3
EPS SYSTEM ... .............................................. .....4
System Description ............................................. ......4
Schematic ........................................................... ......5
CAN Communication ........................................... ......5
TROUBLE DIAGNOSIS ................................. .....6
Fail-Safe Function ............................................... ......6
How to Perform Trouble Diagnosis ..................... ......6
Component Parts Location .................................. ......7
Wiring Diagram - EPS - ... ..........................................8
EPS Control Unit Input/O utput Signal Reference
Value ................................................................... ......
9 EPS Terminal and Reference Value ....................
....10
CONSULT-III Function ( EPS) ..................................11
Symptom Chart .................................................... ....13
TROUBLE DIAGNOSIS FOR SYSTEM ............ 14
DTC C1601 BATTERY VOLT .............................. ....14
DTC C1604 TORQUE SENSOR ......................... ....15
DTC C1606 EPS MOTOR ................................... ....16
DTC C1607 EEPROM ......................................... ....17
DTC C1608 CONTROL UNIT .............................. ....17
DTC C1609 CAN VHCL SPEED ......................... ....18
DTC C1610 CAN ENG RPM ............................... ....19
DTC U1000 CAN COMM CIRCUIT ..................... ....19
Component Inspection ......................................... ....19
TROUBLE DIAGNOSIS FOR SYMPTOMS ...... 21
EPS Warning Lamp Does Not Turn ON ..................21
EPS Warning Lamp Does Not Turn OFF ................21
Steering Wheel Turning Force Is Heavy or Light . ....22
Unbalance Steering Wheel Turning Force and Re-
turn Between Right and Left ................................ ....
23
Unbalance Steering Wheel Turning Force (Torque
Variation) ............................................................. ....
24
Page 4251 of 4331

STC
N
O P
Data are reference values and are
measured between each terminal and ground.
CAUTION:
When using a circuit tester to measure voltage for inspection , be sure not to extend forcibly any connector terminals.
CONSULT-III Function (EPS) INFOID:0000000004307296
FUNCTION CONSULT-III can display each diagnostic item using the diagnostic test modes shown following.
SELF-DIAG RESULTS MODE
Display Item List Terminal
Wire
color Item Condition Data (Approx.)
4 V Torque sensor sub Engine running Steering wheel: Not steering
(There in no steering force) 2.5 V
Steering wheel: Steering 1.7 V – 3.3 V
(The value is changed accord- ing to steering left or right)
5 BR Torque sensor power supply Ignition switch: ON 8 V
Ignition switch: OFF 0 V
6 G Torque sensor main Engine running Steering wheel: Not steering
(There is no steering force) 2.5 V
Steering wheel: Steering 1.7 V – 3.3 V
(The value is changed accord- ing to steering left or right)
7 R Torque sensor ground Always 0 V
9 L CAN-H — —
10 O Power supply Ignition switch: ON Battery voltage
Ignition switch: OFF 0 V
16 P CAN-L — —
17 R Power supply (Memory back-up) Ignition switch: ON Battery voltage
Ignition switch: OFF Battery voltage
18 B Ground Always 0 V
19 — Motor (+) — —
20 — Motor (–) — — Diagnostic test mode Function Reference page
Self-diagnostic results • Self-diagnostic results can be read and erased quickly. "SELF-DIAG
RESULTS MODE"
Data monitor • Inpu t/Output data in the EPS control unit can be read. "DATA MONI-
TOR"
CAN diagnostic support monitor • The results of transmit/receive diagnosis of CAN communication can be read. LAN-8ECU part number • EPS control unit
part number can be read. "EPS CON-
TROL UNIT
PART NUM- BER"
Page 4252 of 4331
![NISSAN LATIO 2009 Service Repair Manual DTC C1601
BATTERY VOLT "
TORQUE SENSOR
[C1604] When the torque sensor malfunction assembled in steering column
assembly is detected. STC-15, " DTC C1604
TORQUE SENSOR "
EPS MOTOR
[C1606] When the NISSAN LATIO 2009 Service Repair Manual DTC C1601
BATTERY VOLT "
TORQUE SENSOR
[C1604] When the torque sensor malfunction assembled in steering column
assembly is detected. STC-15, " DTC C1604
TORQUE SENSOR "
EPS MOTOR
[C1606] When the](/manual-img/5/57359/w960_57359-4251.png)
DTC C1601
BATTERY VOLT "
TORQUE SENSOR
[C1604] When the torque sensor malfunction assembled in steering column
assembly is detected. STC-15, " DTC C1604
TORQUE SENSOR "
EPS MOTOR
[C1606] When the motor driver
malfunction of EPS control unit or EPS motor
malfunction is detected. STC-16, " DTC C1606
EPS MOTOR "
EEPROM
[C1607] When the memory (EEPROM) system malfunction is detected in
EPS control unit. STC-17, " DTC C1607
EEPROM "
CONTROL UNIT
[C1608] When the internal malfunction is detected in EPS control unit. STC-17, " DTC C1608
CONTROL UNIT "
CAN VHCL SPEED
[C1609] When the malfunction is detected in vehicle speed signal received
with CAN communication. STC-18, " DTC C1609
CAN VHCL SPEED "
CAN ENG RPM
[C1610] When the malfunction is detected in engine status signal received
with CAN communication. STC-19, " DTC C1610
CAN ENG RPM "
CAN COMM CIRCUIT
[U1000] When EPS control unit is
not transmitting or receiving CAN commu-
nication signal 2 seconds or more. STC-19, " DTC U1000
CAN COMM CIRCUIT "
NO DTC IS DETECTED.
FURTHER TESTING MAY BE RE-
QUIRED. No NG item has been detected. —Monitor item (Unit) Remarks
MOTOR VOL (V) Power supply voltage for EPS control unit is displayed
TORQUE SENSOR (Nm) Steering wheel turning force detected by torque sensor is displayed
MOTOR SIG (A) Current commanded value to EPS motor is displayed
MOTOR CURRENT (A) Current value cons umed by EPS motor is displayed
VEHICLE SPEED (km/h) or (mph) Vehicle speed is displayed from vehicle speed signal with CAN communication
WARNING LAMP (ON/OFF) EPS warning la mp control status is displayed
DERATING STAT (ON/OFF) Protect overload status is displayed
ENGINE STATUS (STOP/RUN) Engine spee d is displayed from engine status signal with CAN communication
Page 4253 of 4331

STC
N
O P
Symptom Chart
INFOID:0000000004307297
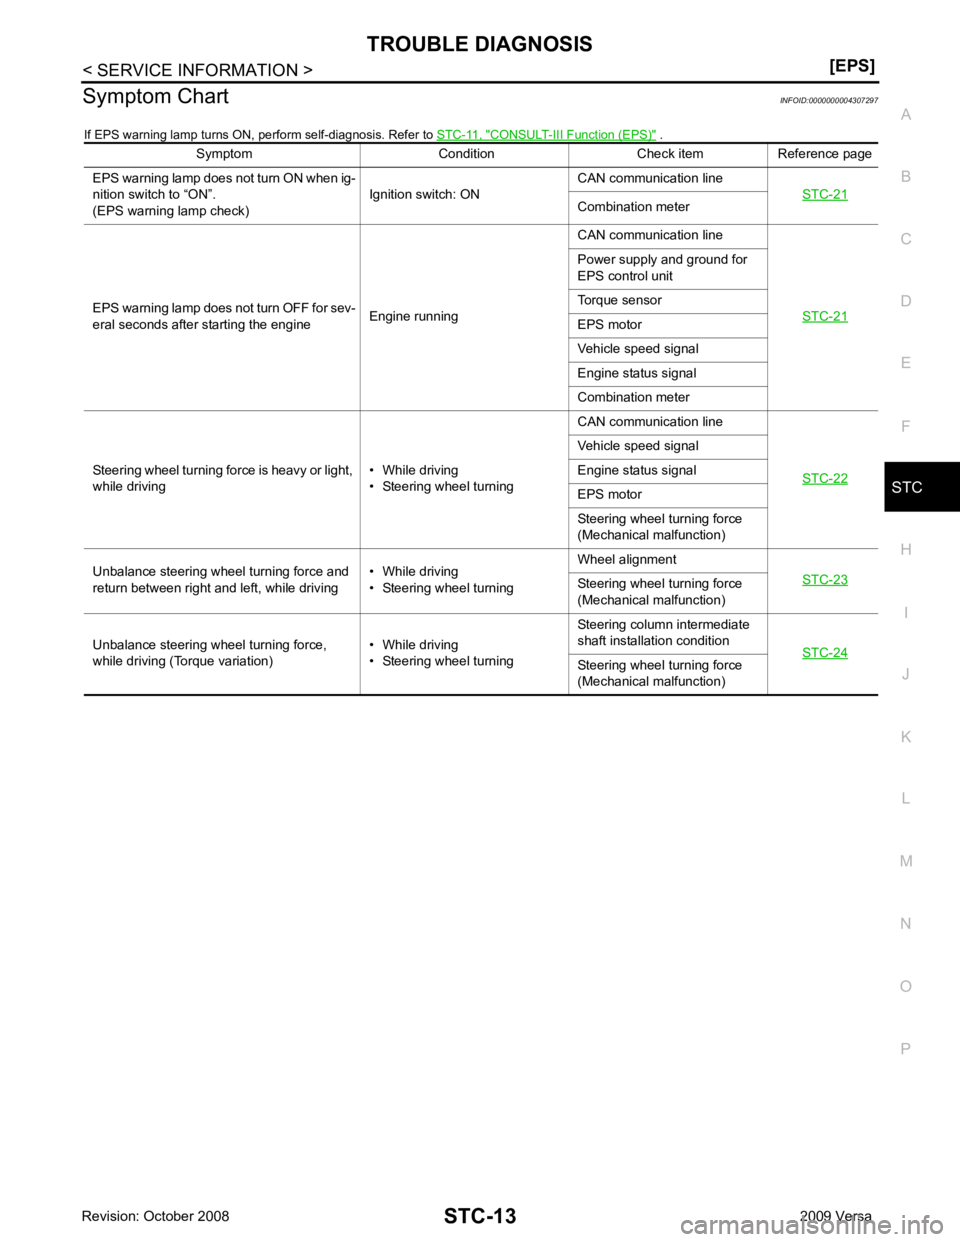
If EPS warning lamp turns ON, perform self-diagnosis. Refer to STC-11, " CONSULT-III Function (EPS) " .
Symptom Condition Check item Reference page
EPS warning lamp does not turn ON when ig-
nition switch to “ON”.
(EPS warning lamp check) Ignition switch: ONCAN communication line
STC-21 Combination meter
EPS warning lamp does not turn OFF for sev-
eral seconds after starting the engine Engine runningCAN communication line
STC-21 Power supply and ground for
EPS control unit
Torque sensor
EPS motor
Vehicle speed signal
Engine status signal
Combination meter
Steering wheel turning force is heavy or light,
while driving • While driving
• Steering wheel turning CAN communication line
STC-22 Vehicle speed signal
Engine status signal
EPS motor
Steering wheel turning force
(Mechanical malfunction)
Unbalance steering wheel turning force and
return between right and left, while driving • While driving
• Steering wheel turning Wheel alignment
STC-23 Steering wheel
turning force
(Mechanical malfunction)
Unbalance steering wheel turning force,
while driving (Torque variation) • While driving
• Steering wheel turning Steering column intermediate
shaft installation condition STC-24 Steering wheel
turning force
(Mechanical malfunction)
Page 4264 of 4331

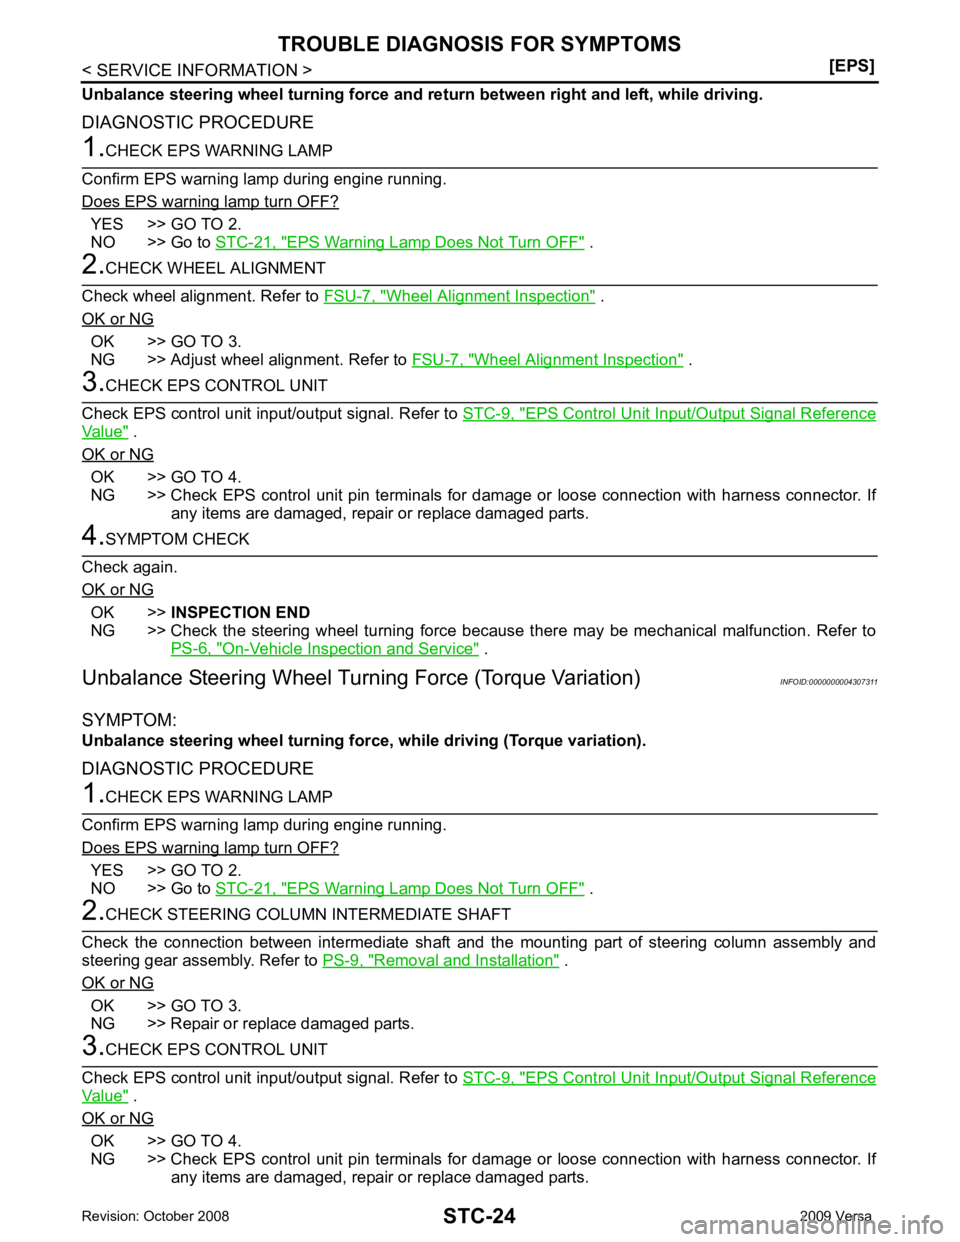
YES >> GO TO 2.
NO >> Go to STC-21, " EPS Warning Lamp Does Not Turn OFF " .
Wheel Alignment Inspection " .
OK or NG OK >> GO TO 3.
NG >> Adjust wheel alignment. Refer to FSU-7, " Wheel Alignment Inspection " .
EPS Control Unit Input/Output Signal Reference
Value " .
OK or NG OK >> GO TO 4.
NG >> Check EPS control unit pin terminals for dam age or loose connection with harness connector. If
any items are damaged, repair or replace damaged parts. OK >>
INSPECTION END
NG >> Check the steering wheel turning force because there may be mechanical malfunction. Refer to
PS-6, " On-Vehicle Inspection and Service " .
Unbalance Steering Wheel Turn ing Force (Torque Variation) INFOID:0000000004307311
SYMPTOM:
Unbalance steering wheel turning for ce, while driving (Torque variation).
DIAGNOSTIC PROCEDURE YES >> GO TO 2.
NO >> Go to STC-21, " EPS Warning Lamp Does Not Turn OFF " .
Removal and Installation " .
OK or NG OK >> GO TO 3.
NG >> Repair or replace damaged parts. EPS Control Unit Input/Output Signal Reference
Value " .
OK or NG OK >> GO TO 4.
NG >> Check EPS control unit pin terminals for dam age or loose connection with harness connector. If
any items are damaged, repair or replace damaged parts.
Page 4272 of 4331

ROAD WHEEL TIRE ASSEMBLY
WT-7
< SERVICE INFORMATION >
C
D
F
G H
I
J
K L
M A
B WT
N
O P
ROAD WHEEL TIRE ASSEMBLY
Balancing Wheels INFOID:0000000004307317
Adjust wheel balance using road wheel center.
CAUTION:
• Be careful not to scratch th e road wheel during removal.
• Use clip-on type wheel balance weights only.
Wheel balance (Maximum allowable unbalance):
Rotation INFOID:0000000004307318
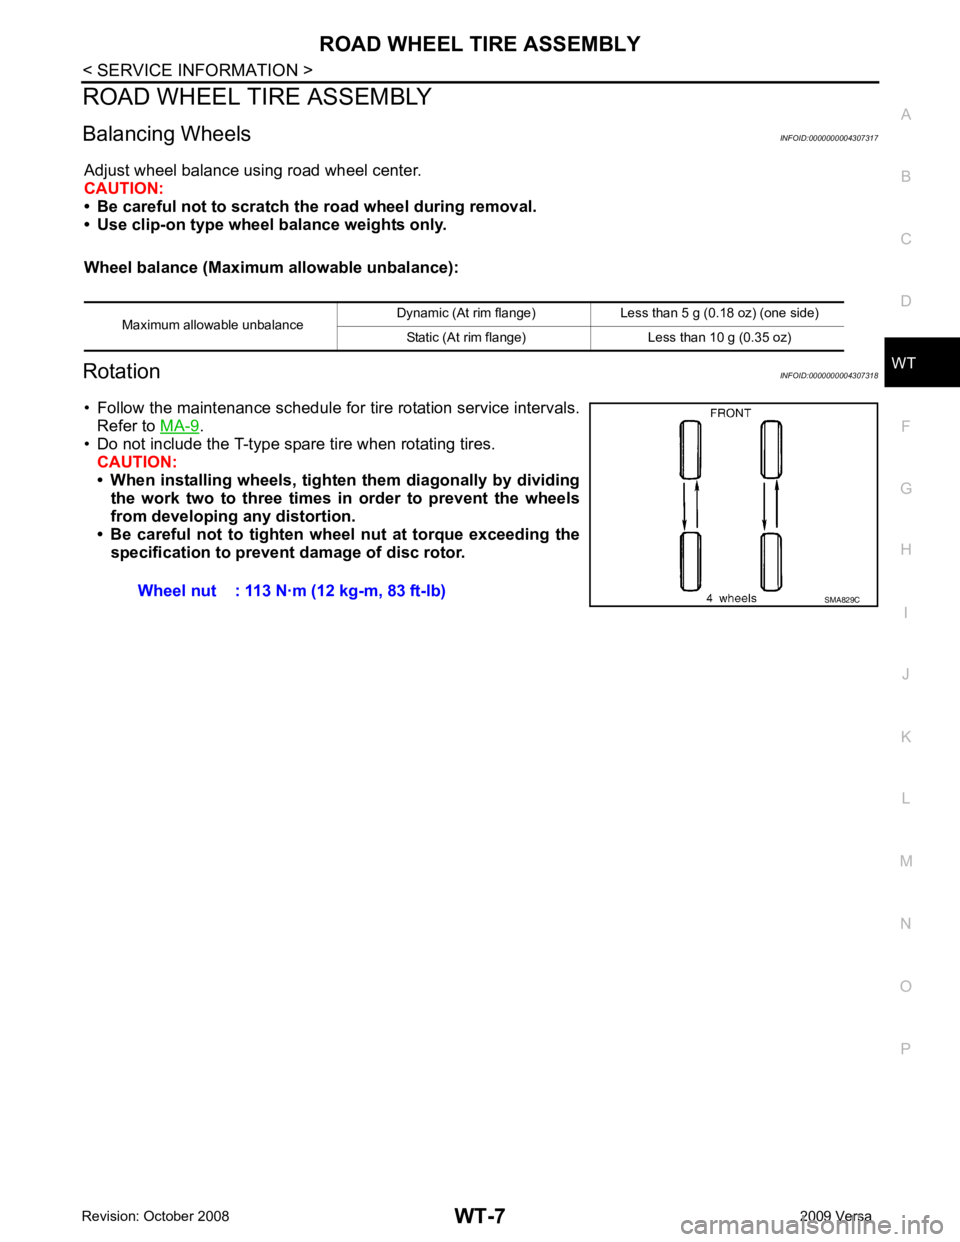
• Follow the maintenance schedule for tire rotation service intervals. Refer to MA-9 .
• Do not include the T-type spare tire when rotating tires. CAUTION:
• When installing wheels, tighte n them diagonally by dividing
the work two to three times in order to prevent the wheels
from developing any distortion.
• Be careful not to tighten wh eel nut at torque exceeding the
specification to prevent damage of disc rotor.
Maximum allowable unbalance
Dynamic (At rim flange) Less than 5 g (0.18 oz) (one side)
Static (At rim flange) Less than 10 g (0.35 oz) Wheel nut : 113 N·m (12 kg-m, 83 ft-lb)
SMA829C