2009 NISSAN LATIO steering wheel
[x] Cancel search: steering wheelPage 4069 of 4331
PS
N
O P
INSPECTION AFTER INSTALLATION
Rotate steering wheel to check for decentered conditi on, binding, noise or excessive steering effort.
Disassembly and Assembly INFOID:0000000004305935
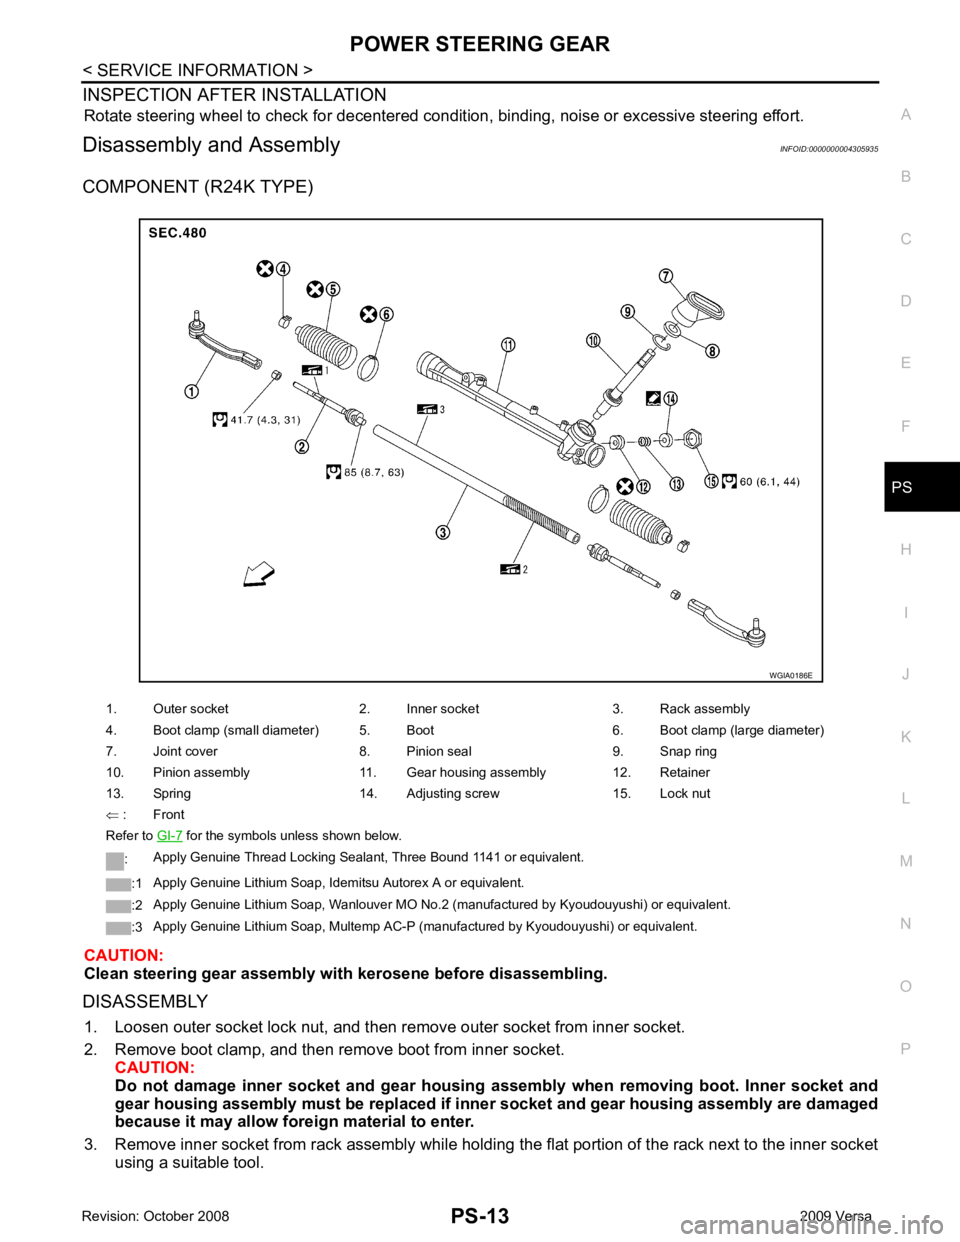
COMPONENT (R24K TYPE)
CAUTION:
Clean steering gear assembly with kerosene before disassembling.
DISASSEMBLY 1. Loosen outer socket lock nut, and then re move outer socket from inner socket.
2. Remove boot clamp, and then re move boot from inner socket.
CAUTION:
Do not damage inner socket an d gear housing assembly when re moving boot. Inner socket and
gear housing assembly must be replaced if inne r socket and gear housing assembly are damaged
because it may allow fore ign material to enter.
3. Remove inner socket from rack assembly while holdi ng the flat portion of the rack next to the inner socket
using a suitable tool.
1. Outer socket 2. Inner socket 3. Rack assembly
4. Boot clamp (small diameter) 5. Boot 6. Boot clamp (large diameter)
7. Joint cover 8. Pinion seal 9. Snap ring
10. Pinion assembly 11. Gear housing assembly 12. Retainer
13. Spring 14. Adjusting screw 15. Lock nut
⇐ : Front
Refer to GI-7 for the symbols unless shown below.
: Apply Genuine Thread Locking Sealant, Three Bound 1141 or equivalent.
:1 Apply Genuine Lithium Soap, Idemitsu Autorex A or equivalent.
:2 Apply Genuine Lithium Soap, Wanlouver MO No.2 (manufactured by Kyoudouyushi) or equivalent.
:3 Apply Genuine Lithium Soap, Multemp AC-P (manufactured by Kyoudouyushi) or equivalent.
Page 4071 of 4331
PS
N
O P
1. Apply recommended grease to teeth part and bush part of rack assembly, if necessary.
2. Apply recommended grease to back of rack assembly, if necessary.
3. Install inner socket to rack assembly. Torque to specified value while holding the flat portion of the rack next to the inner socket using a suitable tool.
4. Apply recommended grease to inner socket.
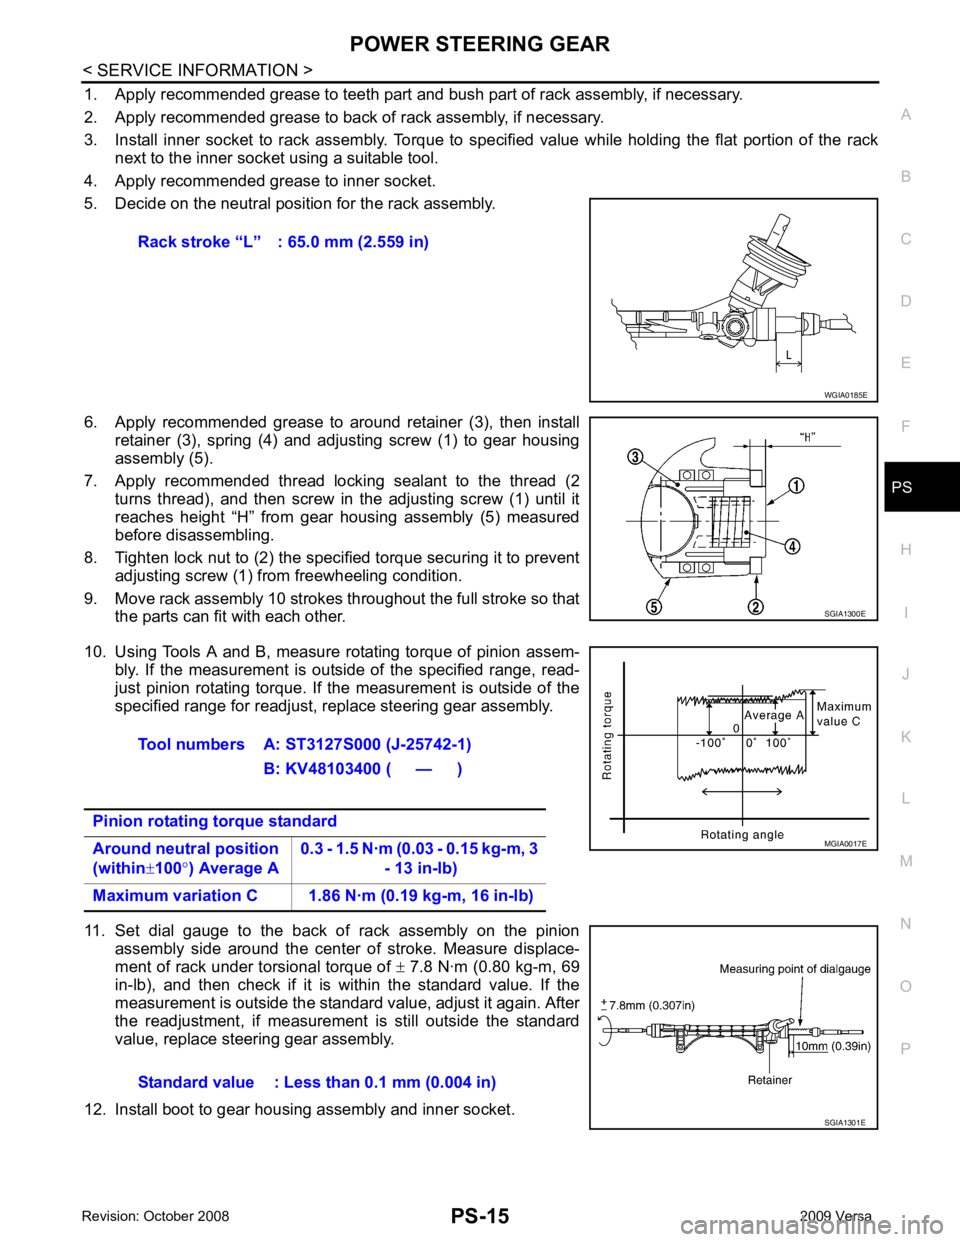
5. Decide on the neutral position for the rack assembly.
6. Apply recommended grease to around retainer (3), then install retainer (3), spring (4) and adjusting screw (1) to gear housing
assembly (5).
7. Apply recommended thread locking sealant to the thread (2 turns thread), and then screw in the adjusting screw (1) until it
reaches height “H” from gear housing assembly (5) measured
before disassembling.
8. Tighten lock nut to (2) the specified torque securing it to prevent adjusting screw (1) from freewheeling condition.
9. Move rack assembly 10 strokes throughout the full stroke so that the parts can fit with each other.
10. Using Tools A and B, measure rotating torque of pinion assem- bly. If the measurement is outside of the specified range, read-
just pinion rotating torque. If the measurement is outside of the
specified range for readjust, replace steering gear assembly.
11. Set dial gauge to the back of rack assembly on the pinion assembly side around the center of stroke. Measure displace-
ment of rack under torsional torque of ± 7.8 N·m (0.80 kg-m, 69
in-lb), and then check if it is within the standard value. If the
measurement is outside the standard value, adjust it again. After
the readjustment, if measurement is still outside the standard
value, replace steering gear assembly.
12. Install boot to gear housing assembly and inner socket. Rack stroke “L” : 65.0 mm (2.559 in)
Page 4073 of 4331
SERVICE DATA AND SPECIFICATIONS (SDS)
PS-17
< SERVICE INFORMATION >
C
D E
F
H I
J
K L
M A
B PS
N
O
P
SERVICE DATA AND SPECIFICATIONS (SDS)
Steering Wheel INFOID:0000000004305936
Steering Angle INFOID:0000000004305937
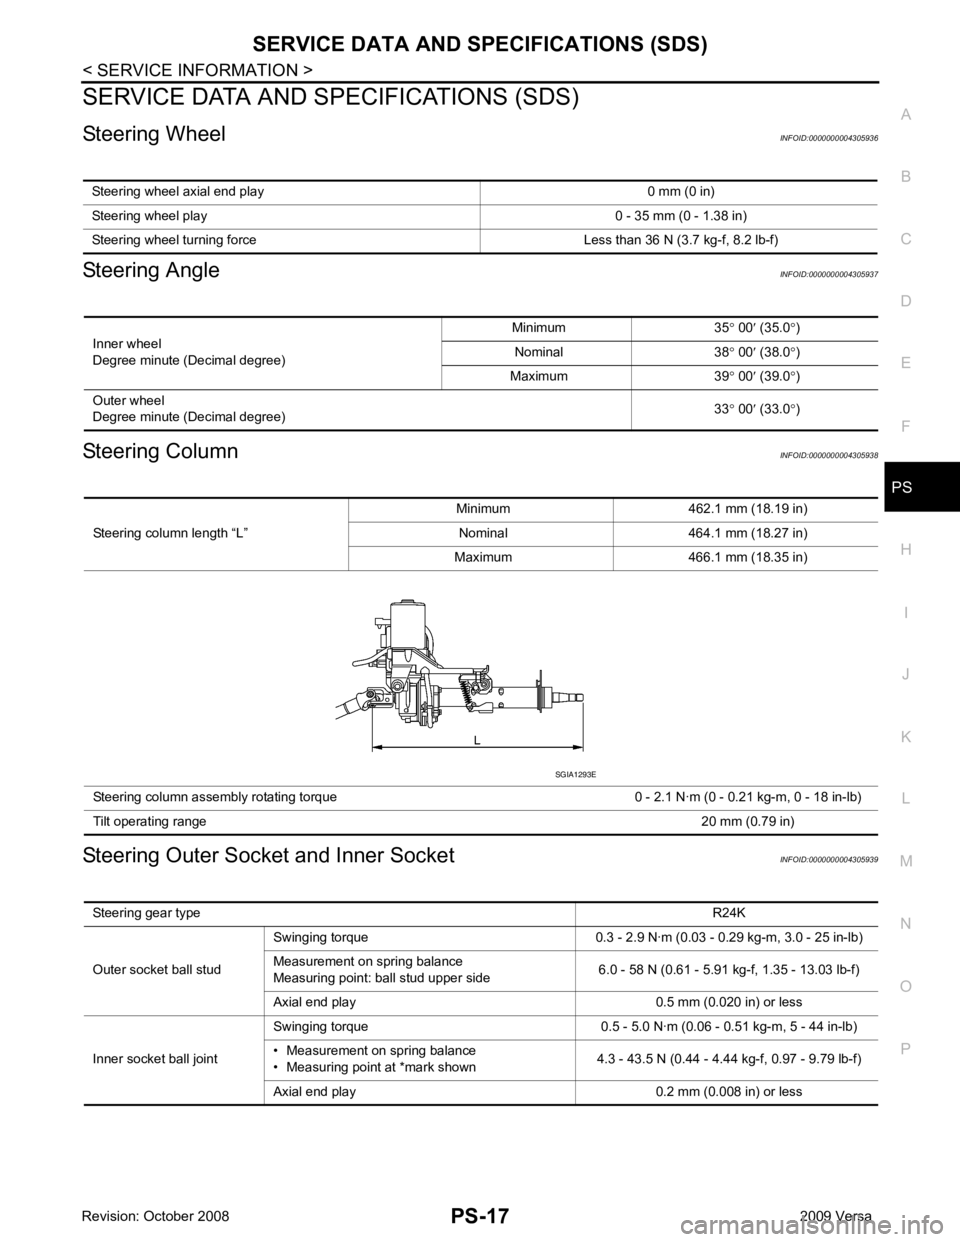
Steering Column INFOID:0000000004305938
Steering Outer Socket and Inner Socket INFOID:0000000004305939
Steering wheel axial end play 0 mm (0 in)
Steering wheel play 0 - 35 mm (0 - 1.38 in)
Steering wheel turning force Less than 36 N (3.7 kg-f, 8.2 lb-f) Inner wheel
Degree minute (Decimal degree) Minimum 35
° 00 ′ (35.0 °)
Nominal 38 ° 00 ′ (38.0 °)
Maximum 39 ° 00 ′ (39.0 °)
Outer wheel
Degree minute (Decimal degree) 33
° 00 ′ (33.0 °) Steering column length “L”
Minimum 462.1 mm (18.19 in)
Nominal 464.1 mm (18.27 in)
Maximum 466.1 mm (18.35 in)
Steering column assembly rotating torque 0 - 2.1 N·m (0 - 0.21 kg-m, 0 - 18 in-lb)
Tilt operating range 20 mm (0.79 in)SGIA1293E
Steering gear type R24K
Outer socket ball stud Swinging torque 0.3 - 2.9 N·m (0.03 - 0.29 kg-m, 3.0 - 25 in-lb)
Measurement on spring balance
Measuring point: ball stud upper side 6.0 - 58 N (0.61 - 5.91 kg-f, 1.35 - 13.03 lb-f)
Axial end play 0.5 mm (0.020 in) or less
Inner socket ball joint Swinging torque 0.5 - 5.0 N·m (0.06 - 0.51 kg-m, 5 - 44 in-lb)
• Measurement on spring balance
• Measuring point at *mark shown 4.3 - 43.5 N (0.44 - 4.44 kg-f, 0.97 - 9.79 lb-f)
Axial end play 0.2 mm (0.008 in) or less
Page 4075 of 4331
RAX
N
O P
CONTENTS
REAR AXLE
SERVICE INFORMATION .. ..........................2
PRECAUTIONS .............................................. .....2
Precaution for Supplemental Restraint System
(SRS) "AIR BAG" and "SEAT BELT PRE-TEN-
SIONER" ............................................................. ......
2
Precaution Necessary fo r Steering Wheel Rota-
tion After Battery Disconnect ............................... ......
2
PREPARATION .............................................. .....3
Commercial Service Tool .................................... ......3 NOISE, VIBRATION AND HARSHNESS
(NVH) TROUBLESHOOTING ............................ 4
NVH Troubleshooting Chart ................................ .....4
WHEEL HUB ...................................................... 5
On-Vehicle Inspection and Service ..................... .....5
Removal and Installation ..................................... .....5
SERVICE DATA AND SPECIFICATIONS
(SDS) .................................................................. 7
Wheel Bearing ..................................................... .....7
Page 4078 of 4331
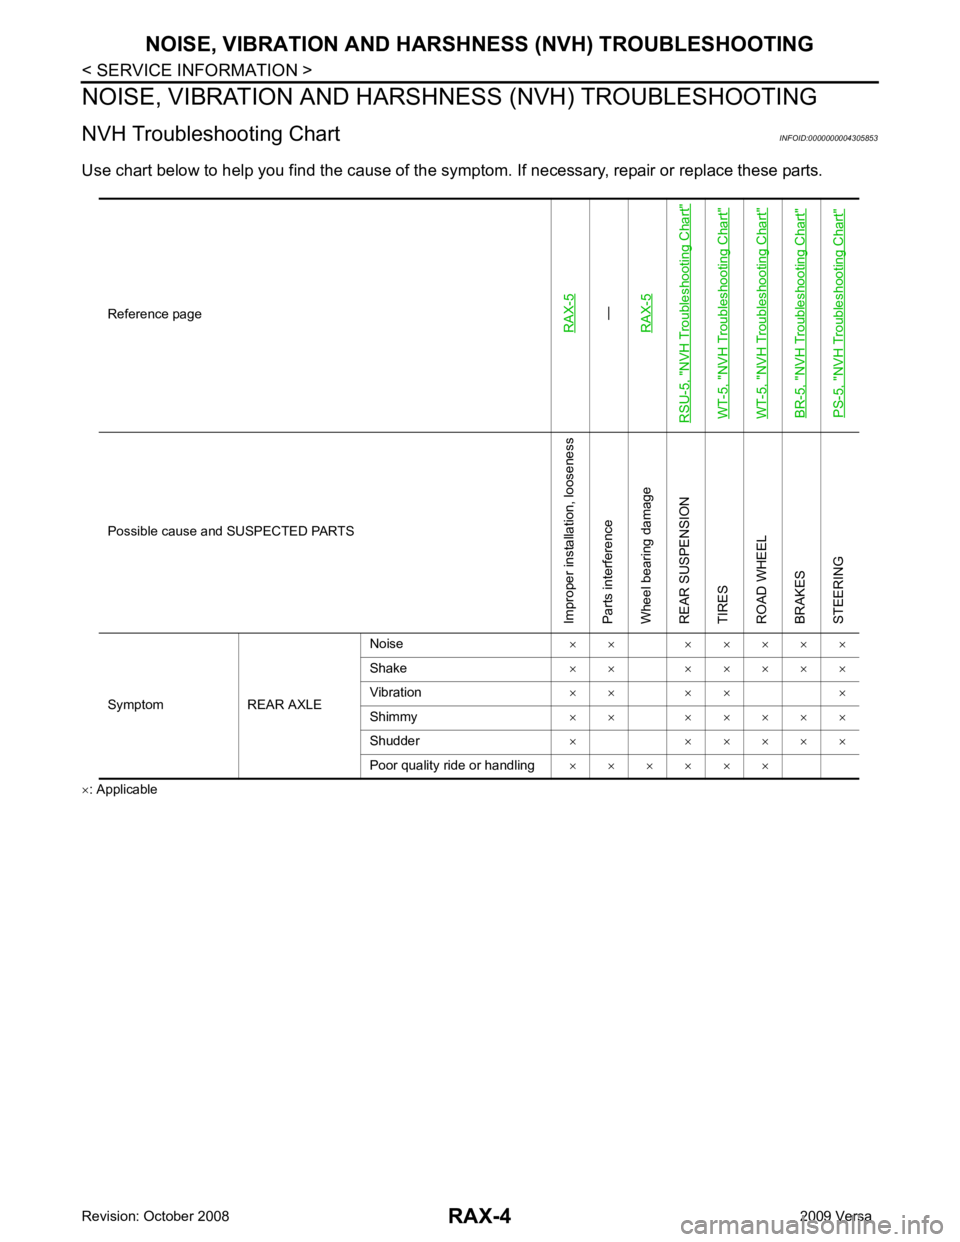
—
RAX-5
RSU-5, "
NVH Troubleshooting Chart
"
WT-5, "
NVH Troubleshooting Chart
"
WT-5, "
NVH Troubleshooting Chart
"
BR-5, "
NVH Troubleshooting Chart
"
PS-5, "
NVH Troubleshooting Chart
" Possible cause and SUSPECTED PARTS
Improper installation, looseness
Parts interference
Wheel bearing damage
REAR SUSPENSION
TIRES
ROAD WHEEL
BRAKES
STEERING
Symptom REAR AXLE Noise
× × × × × × ×
Shake × × × × × × ×
Vibration × × × × ×
Shimmy × × × × × × ×
Shudder × × × × × ×
Poor quality ride or handling × × × × × ×
Page 4082 of 4331

RF
N
O P
CONTENTS
ROOF
PRECAUTION ....... ........................................2
PRECAUTIONS .............................................. .....2
Precaution for Supplemental Restraint System
(SRS) "AIR BAG" and "SEAT BELT PRE-TEN-
SIONER" ............................................................. ......
2
Precaution Necessary fo r Steering Wheel Rota-
tion After Battery Disconnect ............................... ......
2
Precaution ........................................................... ......2
PREPARATION .... ........................................4
PREPARATION .............................................. .....4
Commercial Service Tool .................................... ......4
SYMPTOM DIAGNOSIS ..... ..........................5
SQUEAK AND RATTLE TROUBLE DIAG-
NOSES ........................ ........................................5
Work Flow ........................................................... ......5
Generic Squeak and Rattle Troubleshooting ...... ......7
Diagnostic Worksheet ......................................... ......9
FUNCTION DIAGNOSIS .. ............................11
TROUBLE DIAGNOSIS ................................. ....11 Component Parts and Harness Connector Loca-
tion ....................................................................... ....
11
System Description .............................................. ....11
CAN Communication System Description ........... ....13
Wiring Diagram - SROOF - .................................. ....14
Terminal and Reference Value for BCM ..................15
Terminal and Reference Value for Sunroof Motor
Assembly ............................................................. ....
16
Work Flow ............................................................ ....16
CONSULT-III Function (B CM) .................................16
Work Support ....................................................... ....17
Active Test ........................................................... ....17
Data Monitor ........................................................ ....17
Trouble Diagnosis Chart by Symptom ................. ....17
BCM Power Supply and Ground Circuit Inspection ....17
Sunroof Switch System Inspection ...................... ....17
Sunroof Motor Assembly Power Supply and
Ground Circuit Inspection .................................... ....
19
Door Switch Check .............................................. ....20
ON-VEHICLE REPAIR ..... ............................22
SUNROOF ......................................................... 22
Removal and Installation ..................................... ....22
Fitting Adjustment ................................................ ....27
Inspection ............................................................ ....28
Page 4112 of 4331
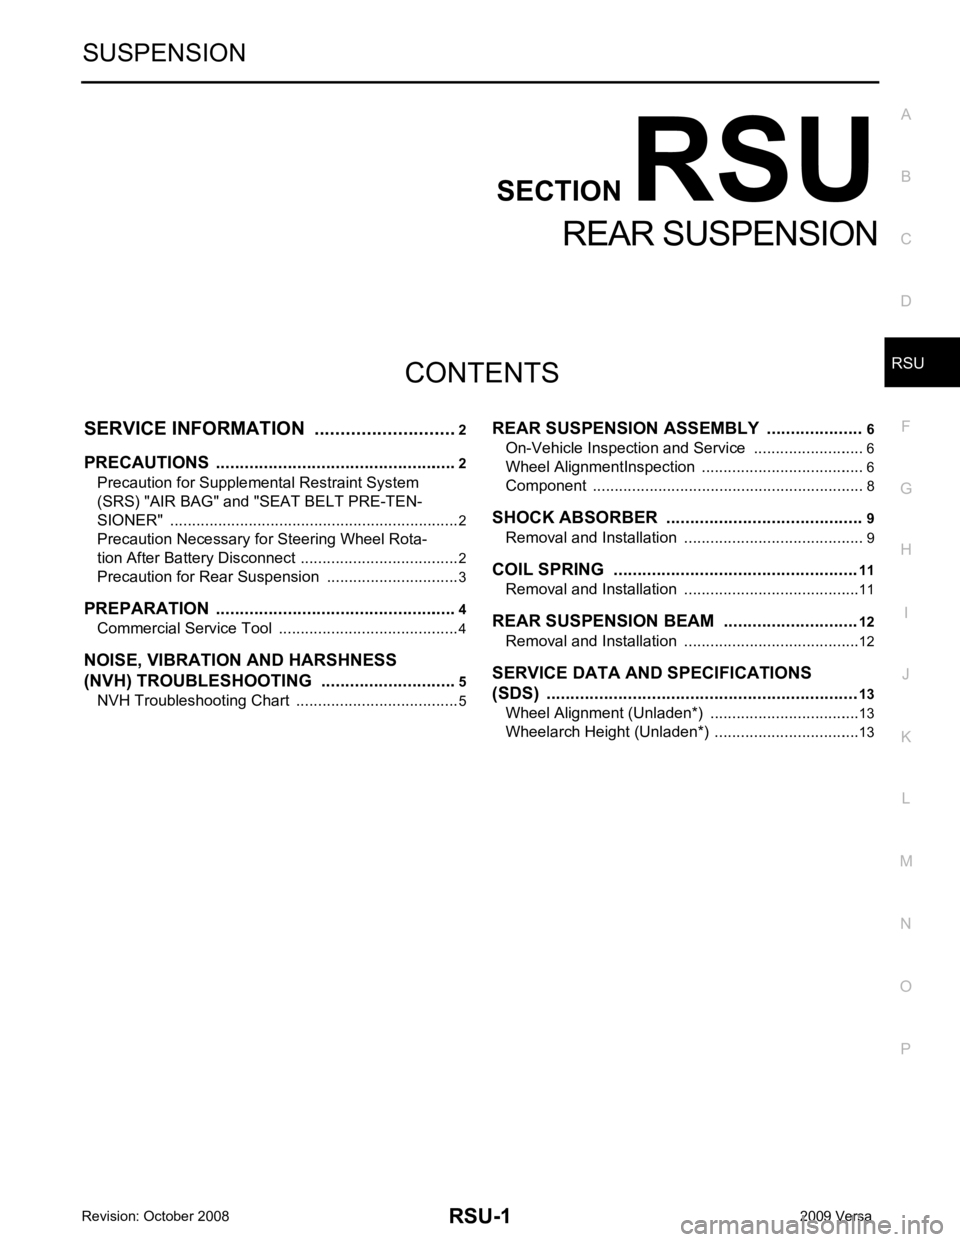
RSU
N
O P
CONTENTS
REAR SUSPENSION
SERVICE INFORMATION .. ..........................2
PRECAUTIONS .............................................. .....2
Precaution for Supplemental Restraint System
(SRS) "AIR BAG" and "SEAT BELT PRE-TEN-
SIONER" ............................................................. ......
2
Precaution Necessary fo r Steering Wheel Rota-
tion After Battery Disconnect ............................... ......
2
Precaution for Rear Su spension ......................... ......3
PREPARATION .............................................. .....4
Commercial Service Tool .................................... ......4
NOISE, VIBRATION AND HARSHNESS
(NVH) TROUBLESHOOTING ........................ .....5
NVH Troubleshooting Chart ................................ ......5 REAR SUSPENSION
ASSEMBLY .................... 6
On-Vehicle Inspection and Service ..................... .....6
Wheel AlignmentInspection ................................. .....6
Component .......................................................... .....8
SHOCK ABSORBER ......................................... 9
Removal and Installation ..................................... .....9
COIL SPRING ................................................... 11
Removal and Installation ..................................... ....11
REAR SUSPENSION BEAM ............................ 12
Removal and Installation ..................................... ....12
SERVICE DATA AND SPECIFICATIONS
(SDS) ................................................................. 13
Wheel Alignment (Unladen*) ............................... ....13
Wheelarch Height (Unladen*) .............................. ....13
Page 4114 of 4331
RSU
N
O P
5. When the repair work is completed, return the ignition switch to the
″LOCK ″ position before connecting
the battery cables. (At this time, the steering lock mechanism will engage.)
6. Perform a self-diagnosis check of al l control units using CONSULT-III.
Precaution for Rear Suspension INFOID:0000000004305875
• When installing the rubber bushings, the final tightening must be done under unladen condition and with the tires on level ground. Oil will shorten the life of the rubber bushings, so wipe off any spilled oil immediately.
• Unladen condition means the fuel tank, engine coolant and l ubricants are at the full specification. The spare
tire, jack, hand tools, and mats are in their designated positions.
• After installing suspension components, check the wheel alignment.
• Caulking nuts are not reusable. Always use new caulking nuts for installation. New caulking nuts are pre-
oiled, do not apply any additional lubrication.