Page 134 of 426
�
Move the selection marker with button
æ orç to the
Time
submenu.
�
Press buttonj ork repeatedly
until you see this message in the left")
134 Controls in detailControl systemSetting time (minutes)�
Move the selection marker with button
æ orç to the
Time
submenu.
�
Press buttonj ork repeatedly
until you see this message in the left
multifunction display:
Set Time
Minute(s)
.
The selection marker is on the minute
setting.
�
Press buttonæ orç to set the
minutes.Setting time (hours)
�
Move the selection marker with button
æ orç to the
Time
submenu.
�
Press buttonj ork repeatedly
until you see this message in the left
multifunction display:
Set Time Hour
.
The selection marker is on the hour
setting.
�
Press buttonæ orç to set the
hour.Lighting submenu
Access the
Lighting
submenu via the
Settings
menu. Use the
Lighting
sub-
menu to change the lamp and lighting
settings on your vehicle.
The following functions are available:
Function
Page
Setting daytime running lamp
mode (USA only)
135
Setting locator lighting
135
Setting night security illumina-
tion (Headlamps delayed
switch-off)
136
Setting interior lighting delayed
switch-off
137
Page 135 of 426
�
Move the selection marker with button
æ or ç to the
Lighting
sub-
menu.
�
Press button j or k repeatedly
unti")
135 Controls in detail
Control system
Setting daytime running lamp mode
(USA only)�
Move the selection marker with button
æ or ç to the
Lighting
sub-
menu.
�
Press button j or k repeatedly
until you see this message in the left
multifunction display:
Light Circuit
Headlamp Mode
.
The selection marker is on the current
setting.
�
Press buttonæ orç to select
manual operation (
Manual
) or daytime
running lamp mode (
Constant
)
activated.With daytime running lamp mode activated
and the exterior lamp switch in
positionM orU, the low-beam
headlamps are switched on when the
engine is running.
In low ambient light conditions the
following lamps will switch on additionally:
�
Parking lamps
�
Tail lamps
�
License plate lamps
�
Side marker lamps
For more information on the daytime
running lamp mode, see “Daytime running
lamp mode” (
�page 108).Setting locator lighting
With the locator lighting feature activated
and the exterior lamp switch in
positionU, the following lamps will
switch on during darkness when the
vehicle is unlocked with the SmartKey:
�
Parking lamps
�
Tail lamps
�
License plate lamps
�
Side marker lamps
�
Front fog lamps
The locator lighting switches off when the
driver’s door is opened.
If you do not open a door after unlocking
the vehicle with the SmartKey the lamps
will switch off automatically after approxi-
mately 40 seconds.
i
This function is not available in countries
where the daytime running lamp mode is manda-
tory and therefore in a constant mode.
i
For safety reasons, resetting the
Lighting
submenu to factory settings while driving
(
�page 129) will not deactivate the daytime
running lamp mode.
You see the following message in the right multi-
function display:
Cannot be fully reset to
factory settings while driving
.
Page 136 of 426

136 Controls in detailControl system�
Move the selection marker with button
æ or ç to the
Lighting
submenu.
�
Press button j or k repeatedly
until you see this message in the left
multifunction display: Locator Lighting
.
The selection marker is on the current
setting.
�
Press button æ or ç to switch
the locator lighting feature
On
or
Off
.
�
Turn the exterior lamp switch to
positionU when exiting the vehicle
(�page 106).
The locator lighting feature is
activated.Setting night security illumination
(Headlamps delayed switch-off)
Use this function to set whether you would
like the exterior lamps to remain on for
15 seconds during darkness after exiting
the vehicle and closing the doors.
With the delayed shut-off feature activated
and the exterior lamp switch in
positionU before the engine is turned
off, the following lamps will switch on
when the engine is turned off:
�
Parking lamps
�
Tail lamps
�
License plate lamps
�
Side marker lamps
�
Front fog lamps
If, after turning off the engine, you do not
open a door or do not close an opened
door, the lamps will automatically switch
off after 60 seconds.
�
Move the selection marker with button
æ or ç to the
Lighting
sub-
menu.
�
Press button j or k repeatedly
until you see this message in the left
multifunction display: Headlamps Delayed Switch-off
.
The selection marker is on the current
setting.
�
Press button æ or ç to switch
the headlamps delayed shut-off feature On or
Off
.
�
Turn the exterior lamp switch to
positionU before turning off the
engine (
�page 106).
The headlamps delayed switch-off
feature is activated.
Page 137 of 426
137 Controls in detail
Control system
You can temporarily deactivate the
headlamps delayed switch-off feature:�
Before leaving the vehicle turn the
SmartKey in the starter switch to
position0.
�
Then turn it to position2 and back
to0.
The delayed switch-off feature is deac-
tivated. It will reactivate as soon as you
reinsert the SmartKey in the starter
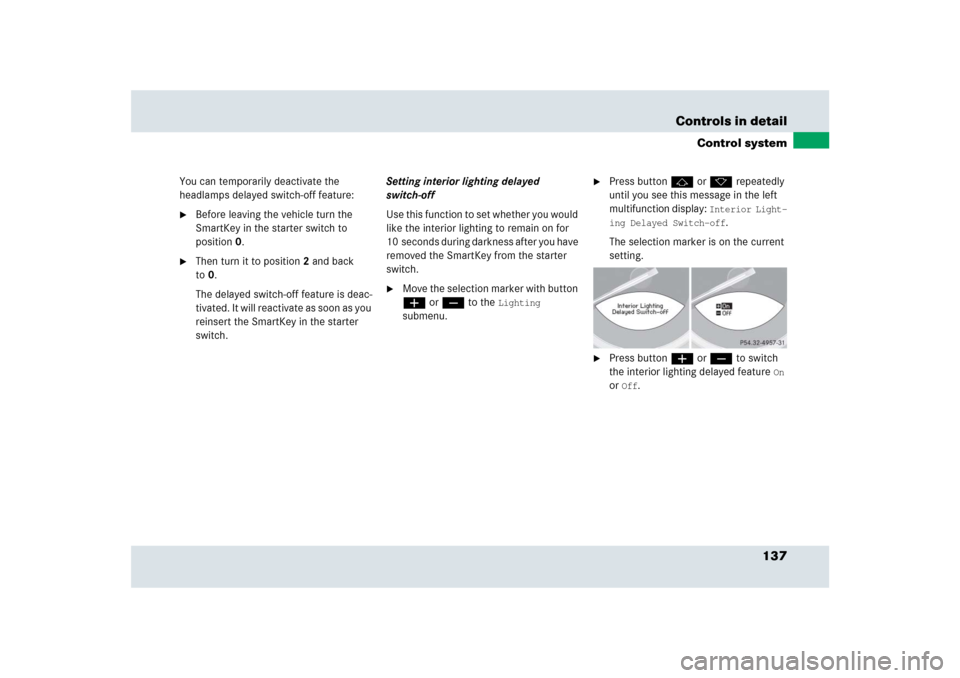
switch.Setting interior lighting delayed
switch-off
Use this function to set whether you would
like the interior lighting to remain on for
10 seconds during darkness after you have
removed the SmartKey from the starter
switch.
�
Move the selection marker with button
æ or ç to the
Lighting
submenu.
�
Press button j or k repeatedly
until you see this message in the left
multifunction display:
Interior Light-
ing Delayed Switch-off
.
The selection marker is on the current
setting.
�
Press button æ or ç to switch
the interior lighting delayed feature
On
or
Off
.
Page 147 of 426
147 Controls in detail
Audio system
Item
Page
1
CD mode selector
158
2
Manual tuning
(radio)
151
Fast forward/reverse
(cassette, CD)
156, 160
Speed dialing memory
(telephone)
165
3
Radio mode selector
151
4
Display panelCassette compartment
behind display panel
Item
Page
5
Alpha-numeric keypadBand selection,
station buttons (radio)
151
CD selection (CD)
160
Telephone number entry,
retrieving speed dialing
memory (telephone)
163
6
Scanning
(radio, cassette, CD)
153,
156,
160
7
Function button
152
8
Light-emitting diode
Item
Page
9
Function keys
a
Cassette eject
155
b
Cassette mode selector
154
c
Telephone mode selector
162
d
Seek tuning (radio)
152
Track search (cassette, CD)
155,
160
Speed dialing memory
(telephone)
165
e
On/off
148
Volume
148
Page 153 of 426

153 Controls in detail
Audio system
Scan tuning�
Starting scan tuning�
Select desired frequency band.
�
Press2 button.SC will appear in the display. The ra-
dio briefly tunes in all receivable
stations on the band selected. The
first scan cycle will tune in only the
stations with a strong signal. The
second scan cycle will tune in every
receivable station.
�
Ending scan tuning�
Press2 button ord, c,
f or ebutton.SC disappears from the display.Manual station memory (Presets)
You can store ten AM and ten FM stations.
�
Storing stations�
Tune in the desired station.
�
Press and hold desired station
button4 toM until a brief
signal tone is heard.
The frequency is stored on the
selected station button.
The frequency band and station
button number are shown in the up-
per left-hand corner of the display.
�
Retrieving a station from memory�
Press desired station button4
toM.Automatic station memory (Autostore)
The Autostore memory function provides
an additional memory level. The station
memory for manually stored stations is not
overwritten.
�
Calling up Autostore memory level�
Briefly press the
AS key.
AS is highlighted in the display.
The radio finds the ten stations with
the strongest signals. These
stations are stored on the station
buttons4 toM in order of
signal strength.
�
Retrieving a station from memory�
Press desired station button4
toM.
�
Leaving the Autostore memory level�
Press the
AS key.
The highlighted
AS in the display
disappears.
Page 157 of 426

Switching on the skip blank function�
Press the
SB key.
SB is highlighted in the display.
If the system does not detect a sound")
157 Controls in detail
Audio system
Skipping blank sections (skip blank)
Switching on the skip blank function�
Press the
SB key.
SB is highlighted in the display.
If the system does not detect a sound
signal, the cassette will automatically
fast forward to the next sound signal.
Switching off the skip blank function
�
Press the
SB key.
The highlighted
SB in the display
disappears.Dolby NR
1 (noise reduction system)
To enable optimum sound reproduction of
cassettes recorded using Dolby B NR, the
Dolby NR system should be switched on.Switching on
�
Press the
NR key.
NR is highlighted in the display.
Switching off
�
Press the
NR key.
The highlighted
NR in the display
disappears.
1DOLBY and the double-D symbolÙ are trade-
marks of Dolby Laboratories Licensing Corpora-
tion.
The Dolby noise reduction system is manufactured
under license from Dolby Laboratories Licensing
Corporation.i
The Dolby NR function should be switched
off when playing cassettes not recorded with
Dolby B NR.
Page 158 of 426

158 Controls in detailAudio systemCD changer operation
General notes
Should excessively high temperatures oc-
cur while in CD mode,
CD TEMP HIGH
will
appear in the display and the CD will be
muted. The unit will then switch back to
the last operating mode used until the tem-
perature has decreased to a safe operating
level.
Should excessively low temperatures
occur while in CD mode,
CD TEMP LOW
will
appear in the display, but the CD will
continue to play.
Handle CDs carefully to prevent interfer-
ence during playback. Avoid fingerprints
and dust on CDs. Do not write on CDs or
apply any labels or other material to them.Only use original CDs. Using copied CDs
may create problems during playback.
Clean CDs from time to time with a com-
mercially available cleaning cloth. Do not
use solvents, anti-static sprays, etc. for
cleaning. Replace the CD in its case after
use. Protect CDs from heat and direct
sunlight.
Only use CDs, which bear the label shown
and that conform to the compact disc
digital audio standard (IEC 60908). You
can therefore only use CDs with a
maximum thickness of 1.3 mm.
i
Use of CDs which do not meet this standard
may cause damage to the CD changer. Do not
play single-CDs (80 mm) with an adapter.
Your CD drive has been designed to play CDs
which correspond to the IEC 60908 standard.
If you insert thicker data carriers, e.g. ones that
have data on both sides (one side with DVD data,
the other side with audio data), they cannot be
ejected and will damage the drive.Warning!
G
The CD changer is a Class 1 laser product.
There is a danger of invisible laser radiation
if the cover is opened or damaged.
Do not remove the cover. The CD changer
does not contain any parts which can be ser-
viced by the user. For safety reasons, have
any service work which may be necessary
performed only by qualified personnel.

151
Fast forward/reverse
(cassette, CD)
156, 160
Speed dialing memory
(telephone)
165
3
Radio mode select")