2009 MERCEDES-BENZ GL SUV engine
[x] Cancel search: enginePage 131 of 309
Making adjustments in 1 km/h incre-
ments X
Briefly press the cruise control lever to the
pressure point, up :for a higher speed or
down ?for a lower speed.
or
X Keep the cruise control lever pressed to the
pressure point until the desired speed is
set. Press the cruise control lever, up :
for a higher speed or down ?for a lower
speed.
Adjustment in 10 km/h increments X
Briefly press the cruise control lever
beyond the pressure point, up :for a
higher speed or down ?for a lower speed.
or
X Keep the cruise control lever pressed
beyond the pressure point until the desired
speed is set. Press the cruise control lever,
up : for a higher speed or down ?for a
lower speed.
Deactivating variable Speedtronic There are several ways to deactivate variable
Speedtronic:
X
Briefly press the cruise control lever for-
wards B.
The LIM indicator lamp in the instrument
cluster goes out.
or
X Briefly press the cruise control lever in the
direction of arrow A.
LIM indicator lamp ;in the cruise control
lever goes out. Variable Speedtronic is
deactivated.
Cruise control or Distronic* is selected.
Variable Speedtronic is deactivated automat-
ically when you depress the accelerator pedal
beyond the pressure point (kickdown), but
only if your current speed does not differ by
more than 20 km/h from the stored speed.
You will hear a warning tone if this is the case. G
Risk of accident
It is not possible to deactivate variable Speed-
tronic by braking.
i The last speed stored is cleared when you
switch off the engine.
Permanent Speedtronic i
Permanent Speedtronic is only available
in certain countries.
You can use the on-board computer to limit
the speed permanently to a value between
160 km/h (e.g. for driving with winter tyres)
and the maximum speed.
Just before the stored speed is reached, it
appears in the multi-function display.
Permanent Speedtronic remains active, even
if variable Speedtronic is deactivated.
You cannot exceed the stored limit speed,
even if you depress the accelerator pedal
beyond the pressure point (kickdown).
Setting permanent Speedtronic
X Press the VorU button to select the
Settings menu (Ypage 103).
X Press the &button to call up the selec-
tion of submenus.
X Press the WorX button to select the
Vehicle submenu.
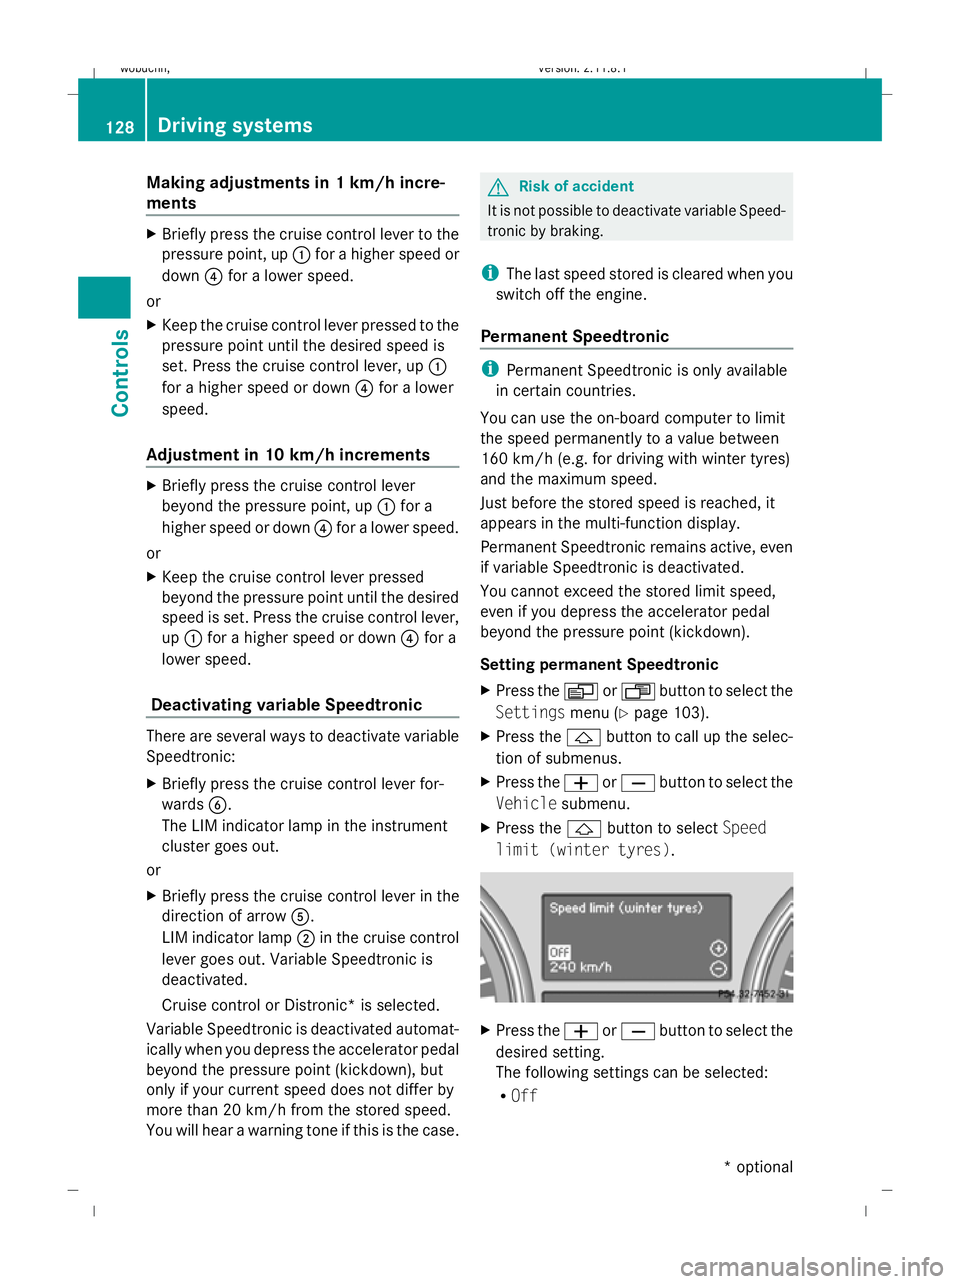
X Press the &button to select Speed
limit (winter tyres). X
Press the WorX button to select the
desired setting.
The following settings can be selected:
R Off 128
Driving systemsControls
* optional
X164_AKB; 2; 3, en-GB
wobuchh,
Version: 2.11.8.1 2009-03-31T14:14:58+02:00 - Seite 128
Dateiname: 6515431202_buchblock.pdf; erzeugt am 01. Apr 2009 00:17:23; WK
Page 132 of 309
Permanent Speedtronic is deactivated.
R A limit speed between 240 km/hand
160 km/h in increments of 10 km/h. ADS (Adaptive Damping System)
ADS adapts the damping characteristics to
the current operating and driving situation.
How this is adjusted depends on:
R your driving style
R the road surface conditions
R the ADS setting
R the vehicle level setting
Your selection remains stored even if you
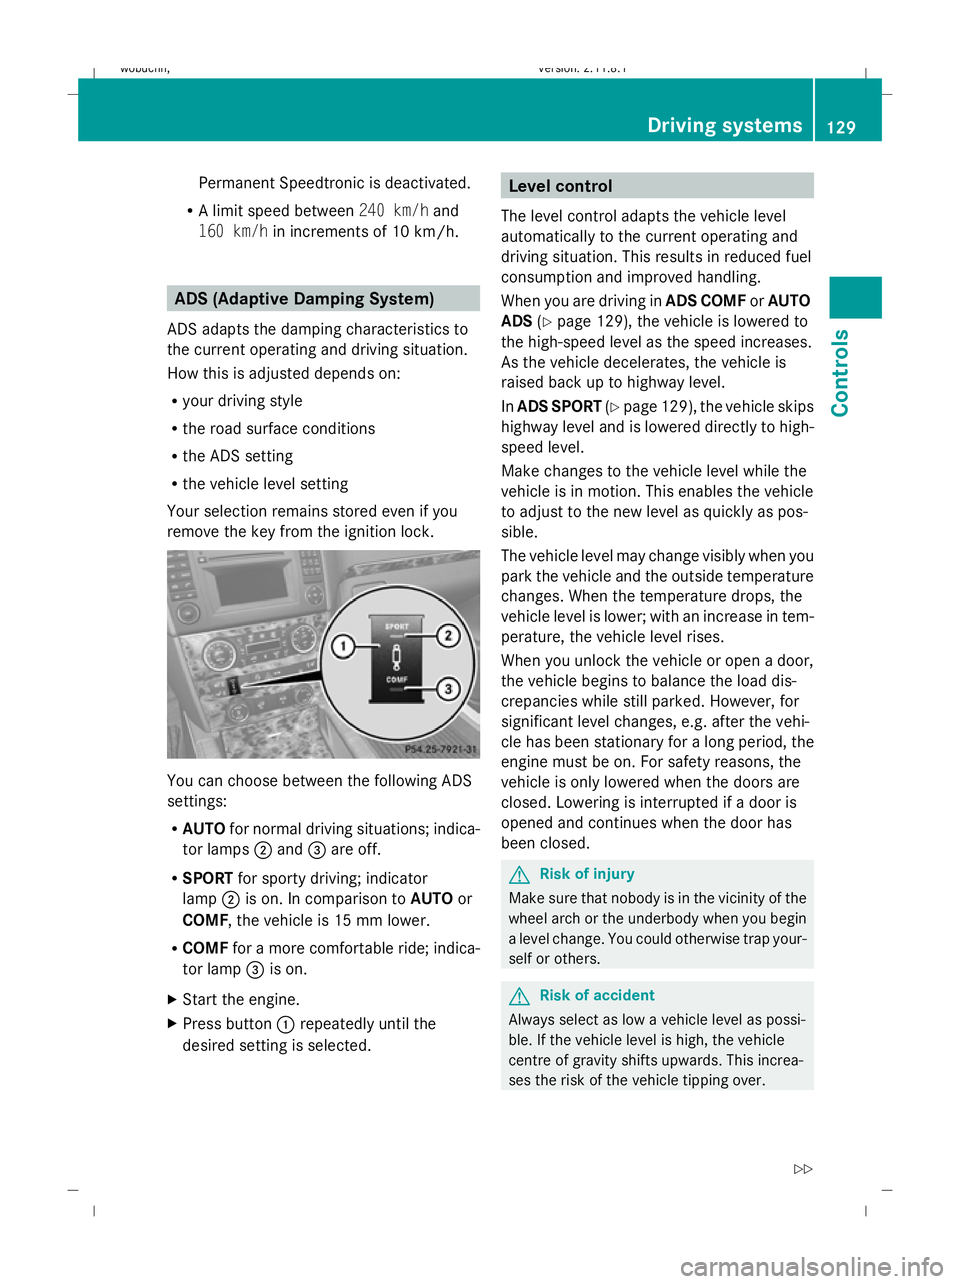
remove the key from the ignition lock. You can choose between the following ADS
settings:
R
AUTO for normal driving situations; indica-
tor lamps ;and =are off.
R SPORT for sporty driving; indicator
lamp ;is on. In comparison to AUTOor
COMF, the vehicle is 15 mm lower.
R COMF for a more comfortable ride; indica-
tor lamp =is on.
X Start the engine.
X Press button :repeatedly until the
desired setting is selected. Level control
The level control adapts the vehicle level
automatically to the current operating and
driving situation. This results in reduced fuel
consumption and improved handling.
When you are driving in ADS COMForAUTO
ADS (Ypage 129), the vehicle is lowered to
the high-speed level as the speed increases.
As the vehicle decelerates, the vehicle is
raised back up to highway level.
In ADS SPORT (Ypage 129), the vehicle skips
highway level and is lowered directly to high-
speed level.
Make changes to the vehicle level while the
vehicle is in motion. This enables the vehicle
to adjust to the new level as quickly as pos-
sible.
The vehicle level may change visibly when you
park the vehicle and the outside temperature
changes. When the temperature drops, the
vehicle level is lower; with an increase in tem-
perature, the vehicle level rises.
When you unlock the vehicle or open a door,
the vehicle begins to balance the load dis-
crepancies while still parked. However, for
significant level changes, e.g. after the vehi-
cle has been stationary for a long period, the
engine must be on. For safety reasons, the
vehicle is only lowered when the doors are
closed. Lowering is interrupted if a door is
opened and continues when the door has
been closed. G
Risk of injury
Make sure that nobody is in the vicinity of the
wheel arch or the underbody when you begin
a level change. You could otherwise trap your-
self or others. G
Risk of accident
Always select as low a vehicle level as possi-
ble. If the vehicle level is high, the vehicle
centre of gravity shifts upwards. This increa-
ses the risk of the vehicle tipping over. Driving systems
129Controls
X164_AKB; 2; 3, en-GB
wobuchh, Version: 2.11.8.1 2009-03-31T14:14:58+02:00 - Seite 129 Z
Dateiname: 6515431202_buchblock.pdf; erzeugt am 01. Apr 2009 00:17:24; WK
Page 134 of 309
X
Start the engine.
X Turn selector wheel :clockwise.
The vehicle is raised.
or
X Turn selector wheel ;anti-clockwise.
The vehicle is lowered.
Indicator lamps =for the desired off-road
level flash:
R Off-road level 1: the lower indicator lamp
flashes
R Off-road level 2: the lower and centre indi-
cator lamps flash
R Off-road level 3: all three indicator lamps
flash
The vehicle is being adjusted to the off-road
level selected. As soon as an off-road level is
reached, the corresponding indicator lamp
stops flashing and lights up constantly.
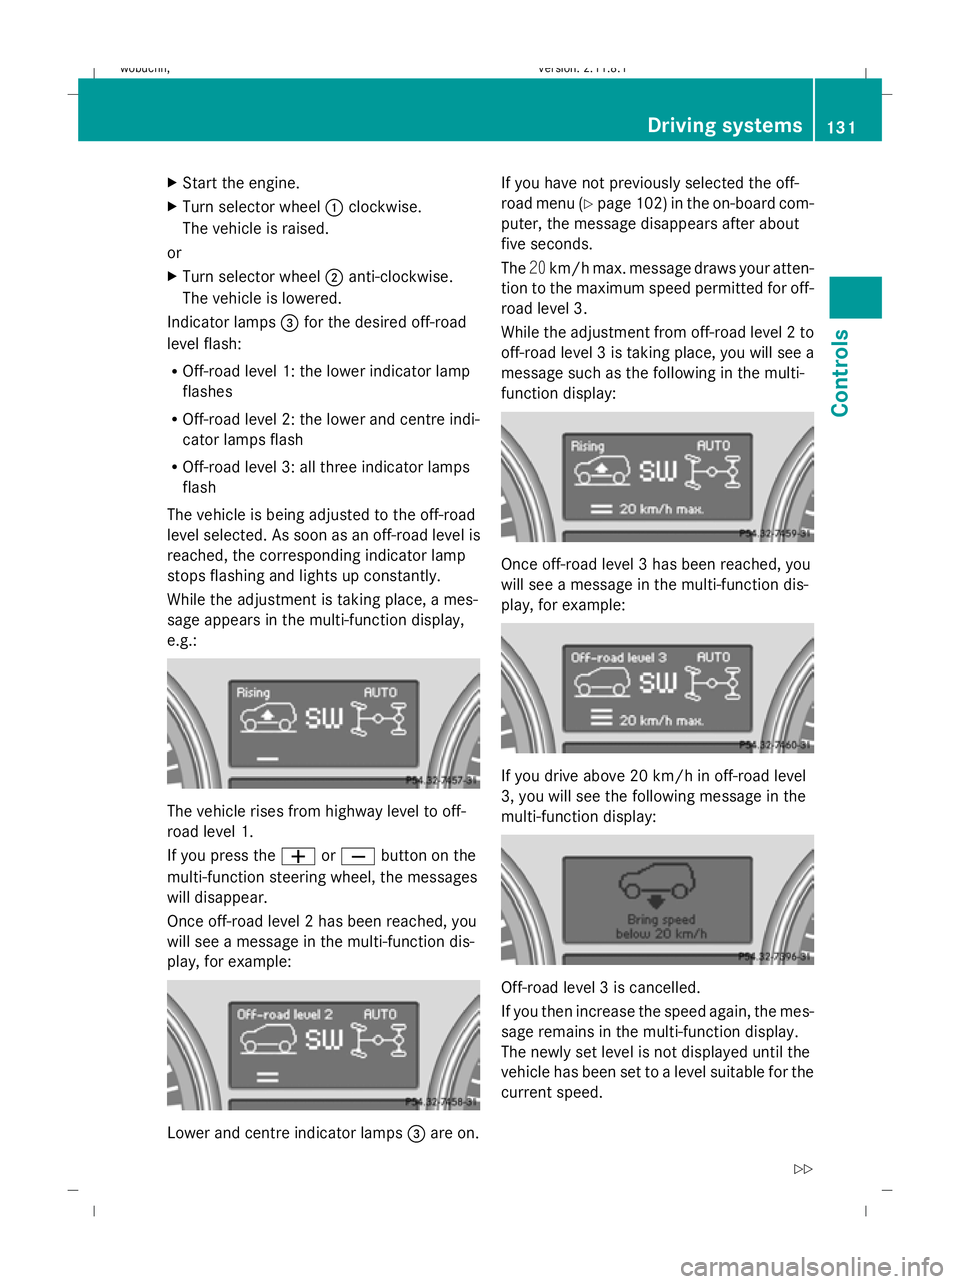
While the adjustment is taking place, a mes-
sage appears in the multi-function display,
e.g.: The vehicle rises from highway level to off-
road level 1.
If you press the
WorX button on the
multi-function steering wheel, the messages
will disappear.
Once off-road level 2 has been reached, you
will see a message in the multi-function dis-
play, for example: Lower and centre indicator lamps
=are on. If you have not previously selected the off-
road menu (Y
page 102) in the on-board com-
puter, the message disappears after about
five seconds.
The 20km/h max. message draws your atten-
tion to the maximum speed permitted for off-
road level 3.
While the adjustment from off-road level 2 to
off-road level 3 is taking place, you will see a
message such as the following in the multi-
function display: Once off-road level 3 has been reached, you
will see a message in the multi-function dis-
play, for example:
If you drive above 20 km/h in off-road level
3, you will see the following message in the
multi-function display:
Off-road level 3 is cancelled.
If you then increase the speed again, the mes-
sage remains in the multi-function display.
The newly set level is not displayed until the
vehicle has been set to a level suitable for the
current speed. Driving systems
131Controls
X164_AKB; 2; 3, en-GB
wobuchh, Version: 2.11.8.1 2009-03-31T14:14:58+02:00 - Seite 131 Z
Dateiname: 6515431202_buchblock.pdf; erzeugt am 01. Apr 2009 00:17:25; WK
Page 135 of 309
If you maintain or reduce your speed, you will
see a message such as the following in the
display while the vehicle is being lowered: The vehicle is lowered to off-road level 2.
Once off-road level 2 has been reached, you
will see a message in the multi-function dis-
play, for example: If you select an off-road level when driving at
too high a speed, the Level selection
not permitted message appears in the
multi-function display.
You can select the following:
R Off-road level 1 at speeds up to
100 km/h
R Off-road level 2 at speeds up to 70 km/h
R Off-road level 3 at speeds up to 20 km/h
If you are driving above 90 km/h or drive
between 70 km/h and 90 km/h for longer
than 20 seconds, off-road level 2 will be can-
celled. The vehicle is lowered to off-road
level 1.
You will see a message in the multi-function
display, for example: If you are driving above 115 km/h or drive
between 100 km/h and 115 km/h for longer
than 20 seconds, off-road level 1 will be can-
celled. The vehicle is lowered to highway
level.
You will see a message in the multi-function
display, for example:
Depending on the ADS basic setting
(Y
page 129), the vehicle is lowered to high-
speed level at high speeds. The vehicle auto-
matically selects highway level when you are
driving at speeds below 40 km/h again or if
you drive at between 40 km/h and 70 km/h
for around 20 seconds.
Highway/high-speed level !
Make sure there is enough ground clear-
ance when the vehicle is being lowered. It
could otherwise hit the ground, damaging
the underbody. :
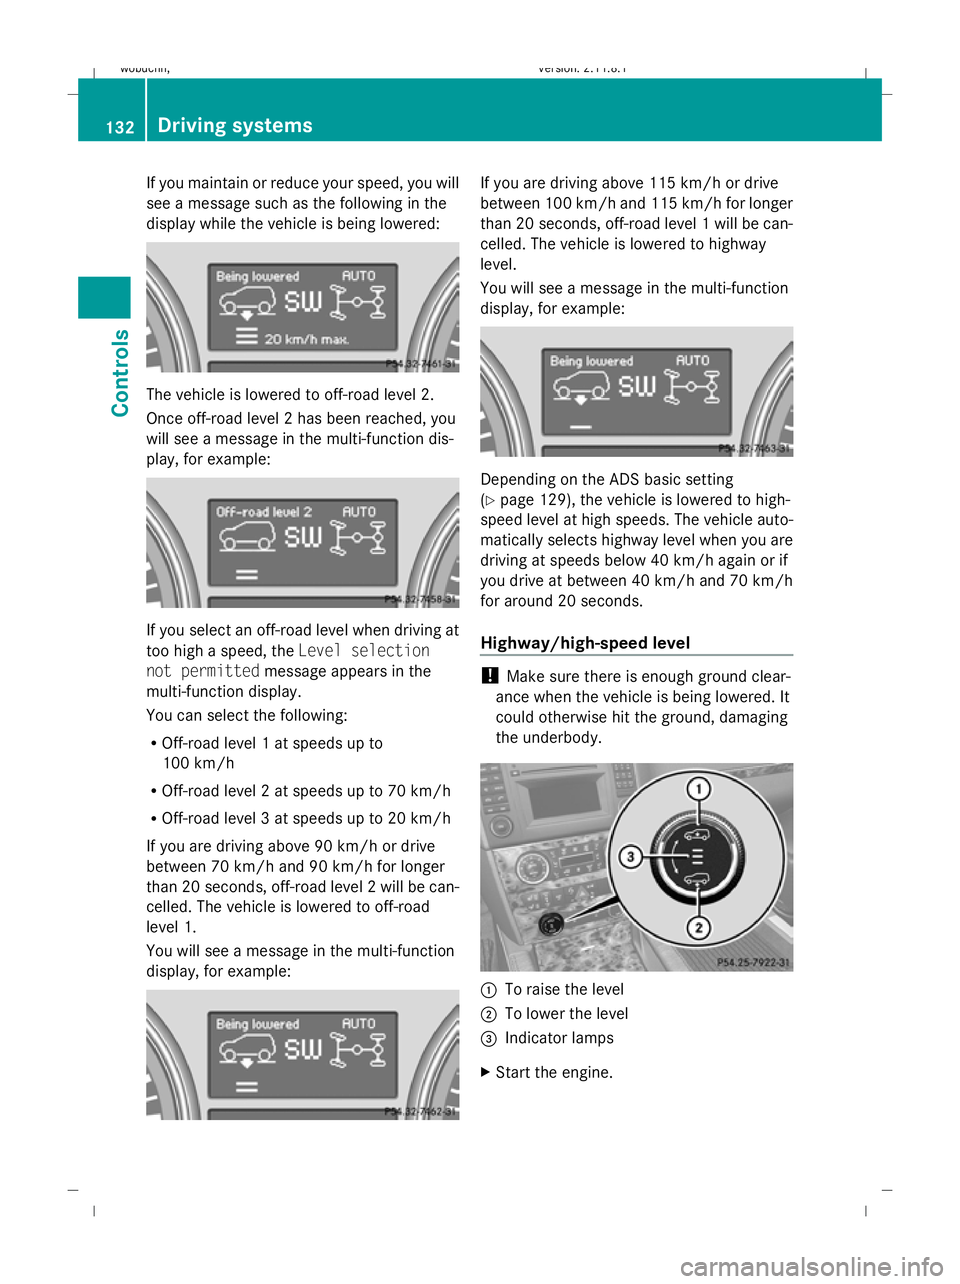
To raise the level
; To lower the level
= Indicator lamps
X Start the engine. 132
Driving systemsControls
X164_AKB; 2; 3, en-GB
wobuchh,
Version: 2.11.8.1 2009-03-31T14:14:58+02:00 - Seite 132
Dateiname: 6515431202_buchblock.pdf; erzeugt am 01. Apr 2009 00:17:25; WK
Page 138 of 309
The automatic transmission position deter-
mines which warning display is active when
the engine is running:
Automatic trans-
mission position Warning display
D
Front area activated
R
or N Rear and front areas
activated
P
No areas activated
One or more segments light up as the vehicle
approaches an obstacle, depending on the
vehicle's distance to the obstacle.
From the:
R sixth segment onwards, you will hear an
intermittent warning tone for approx-
imately two seconds.
R seventh segment onwards, you will hear a
warning tone for approximately two sec-
onds. You have reached the minimum dis-
tance.
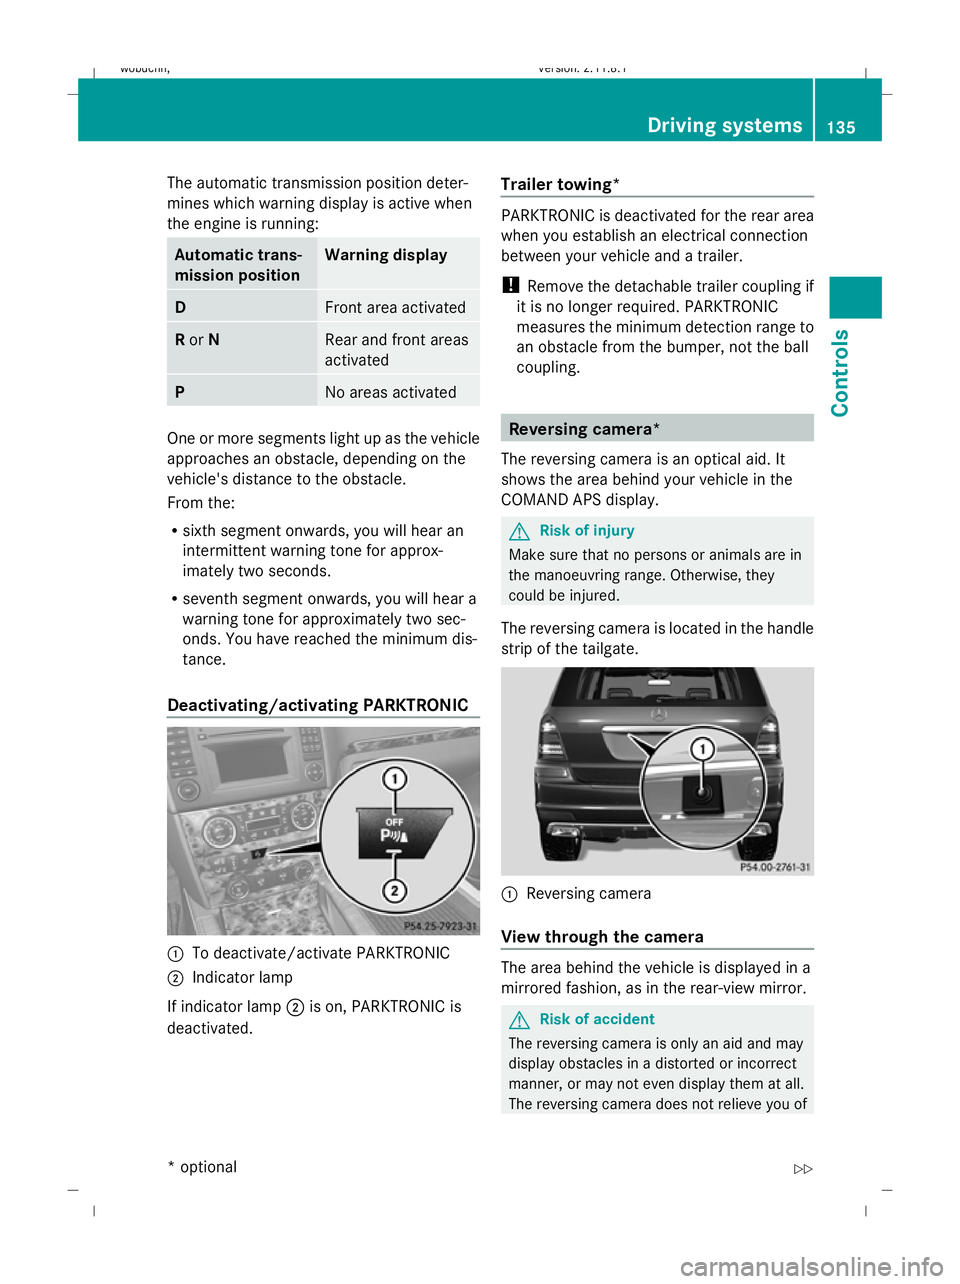
Deactivating/activating PARKTRONIC :
To deactivate/activate PARKTRONIC
; Indicator lamp
If indicator lamp ;is on, PARKTRONIC is
deactivated. Trailer towing* PARKTRONIC is deactivated for the rear area
when you establish an electrical connection
between your vehicle and a trailer.
!
Remove the detachable trailer coupling if
it is no longer required. PARKTRONIC
measures the minimum detection range to
an obstacle from the bumper, not the ball
coupling. Reversing camera*
The reversing camera is an optical aid. It
shows the area behind your vehicle in the
COMAND APS display. G
Risk of injury
Make sure that no persons or animals are in
the manoeuvring range. Otherwise, they
could be injured.
The reversing camera is located in the handle
strip of the tailgate. :
Reversing camera
View through the camera The area behind the vehicle is displayed in a
mirrored fashion, as in the rear-view mirror.
G
Risk of accident
The reversing camera is only an aid and may
display obstacles in a distorted or incorrect
manner, or may not even display them at all.
The reversing camera does not relieve you of Driving systems
135Controls
* optional
X164_AKB; 2; 3, en-GB
wobuchh,
Version: 2.11.8.1 2009-03-31T14:14:58+02:00 - Seite 135 Z
Dateiname: 6515431202_buchblock.pdf; erzeugt am 01. Apr 2009 00:17:27; WK
Page 140 of 309
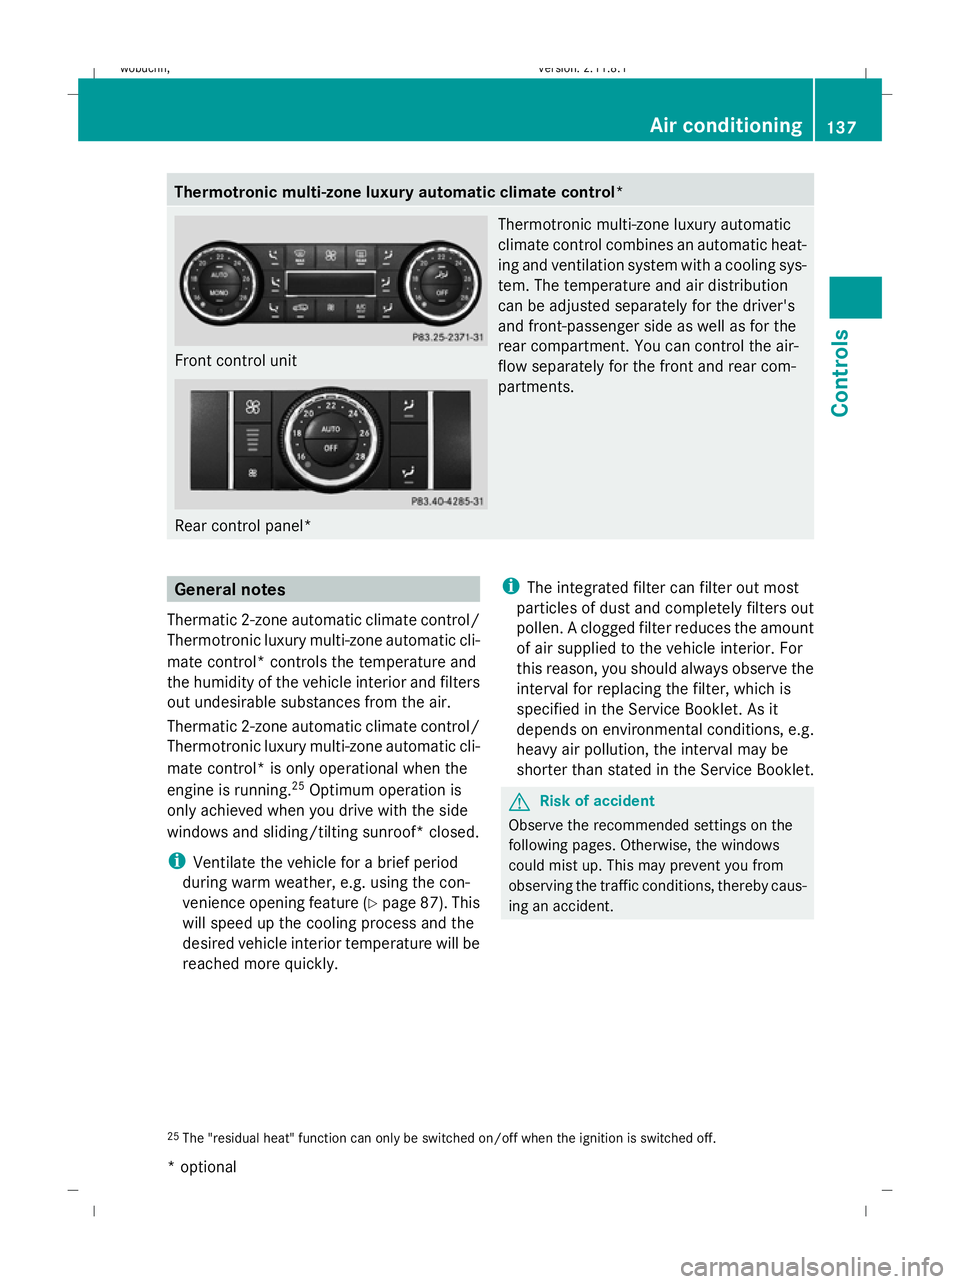
Thermotronic multi-zone luxury automatic climate control*
Front control unit
Rear control panel* Thermotronic multi-zone luxury automatic
climate control combines an automatic heat-
ing and ventilation system with a cooling sys-
tem. The temperature and air distribution
can be adjusted separately for the driver's
and front-passenger side as well as for the
rear compartment. You can control the air-
flow separately for the front and rear com-
partments. General notes
Thermatic 2-zone automatic climate control/
Thermotronic luxury multi-zone automatic cli-
mate control* controls the temperature and
the humidity of the vehicle interior and filters
out undesirable substances from the air.
Thermatic 2-zone automatic climate control/
Thermotronic luxury multi-zone automatic cli-
mate control* is only operational when the
engine is running. 25
Optimum operation is
only achieved when you drive with the side
windows and sliding/tilting sunroof* closed.
i Ventilate the vehicle for a brief period
during warm weather, e.g. using the con-
venience opening feature (Y page 87). This
will speed up the cooling process and the
desired vehicle interior temperature will be
reached more quickly. i
The integrated filter can filter out most
particles of dust and completely filters out
pollen. A clogged filter reduces the amount
of air supplied to the vehicle interior. For
this reason, you should always observe the
interval for replacing the filter, which is
specified in the Service Booklet. As it
depends on environmental conditions, e.g.
heavy air pollution, the interval may be
shorter than stated in the Service Booklet. G
Risk of accident
Observe the recommended settings on the
following pages. Otherwise, the windows
could mist up. This may prevent you from
observing the traffic conditions, thereby caus-
ing an accident.
25 The "residual heat" function can only be switched on/off when the ignition is switched off. Air conditioning
137Controls
* optional
X164_AKB; 2; 3, en-GB
wobuchh
,V ersion: 2.11.8.1
2009-03-31T14:14:58+02:00 - Seite 137 Z
Dateiname: 6515431202_buchblock.pdf; erzeugt am 01. Apr 2009 00:17:28; WK
Page 144 of 309
Activating/deactivating the rear-com-
partment air conditioning via the front
control unit* (Thermotronic multi-zone
luxury automatic climate control*)
X
Turn the key to position 2in the ignition
lock.
X To switch on: press theYbutton
(Y page 139).
ON and MODE are shown in the Thermotronic
multi-zone luxury automatic climate con-
trol* display behind the Ysymbol. The
MODE display goes out after three seconds.
The display switches back to the standard
display.
X To deactivate: press theYbutton
(Y page 139).
MODE is shown in the display behind the
Y symbol.
X Press the ^button (Y page 139).
OFF is shown in the display behind the
Y symbol.
Activating/deactivating the rear-com-
partment air conditioning via the rear
control unit* (Thermotronic multi-zone
luxury automatic climate control*) X
Turn the key to position 2in the ignition
lock.
X Activate Thermotronic multi-zone luxury
automatic climate control*.
X To activate: press theÃbutton.
The indicator lamp in the Ãbutton lights
up.
X To switch off: press the^button.
The indicator lamp in the ^button lights
up. Switching cooling with air dehumidi-
fication on/off
The "cooling with air dehumidification" func-
tion is only available when the engine is run-
ning. The air inside the vehicle is cooled and dehumidified according to the temperature
selected. G
Risk of accident
If you switch off the "Cooling with air dehu-
midification" function, the air inside the vehi-
cle will not be cooled (in warm weather) or
dehumidified. The windows could mist up
more quickly. This may prevent you from
observing the traffic conditions, thereby caus-
ing an accident.
Condensation may drip from the underside of
the vehicle when Thermatic is in cooling
mode.
X To activate: press theÁbutton.
The indicator lamp in the Ábutton
comes on.
X To switch off: press theÁbutton.
The indicator lamp in the Ábutton goes
out. The cooling with air dehumidification
function has a delayed switch-off feature. Controlling the air conditioning auto-
matically
In automatic mode, the set temperature is
maintained automatically at a constant level.
The system automatically regulates the tem-
perature of the dispensed air, the airflow and
the air distribution.
The automatic air conditioning will achieve
optimal operation if "cooling with air dehu-
midification" is also activated. If necessary,
cooling with air dehumidification can be deac-
tivated.
Controlling the front-compartment air
conditioning via the front control unit X
Turn the key to position 2in the ignition
lock.
X Set the desired temperature.
X To switch on: press theÃbutton.
The indicator lamp in the Ãbutton lights
up. Automatic air distribution and airflow
are activated. Air conditioning
141Controls
* optional
X164_AKB; 2; 3, en-GB
wobuchh,
Version: 2.11.8.1 2009-03-31T14:14:58+02:00 - Seite 141 Z
Dateiname: 6515431202_buchblock.pdf; erzeugt am 01. Apr 2009 00:17:29; WK
Page 150 of 309
Convenience opening/closing
G
Risk of injury
Make sure that nobody can become trapped
between the side window and the door frame
as the side windows are opened and closed.
Do not place objects or lean against the side
windows when they are being opened or
closed. You or the objects could be drawn in
or become trapped between the side window
and the door frame as the window moves. If
there is a risk of entrapment, press the
d button again. Press the button for stop-
ping, opening or closing the side windows in
the opposite direction as appropriate.
Make sure that nobody can become trapped
when you are opening or closing the sliding/
tilting sunroof*. If there is a risk of entrap-
ment, press the dbutton again. Press the
button to stop, open or close the panorama
sliding/tilting sunroof* in the opposite direc-
tion as appropriate.
X Convenience closing: press and hold
the d button until the side windows and
the sliding/tilting sunroof* are closed.
The indicator lamp in the dbutton lights
up. Air-recirculation mode is activated.
X Convenience opening: press and hold the
d button until the side windows and the
sliding/tilting sunroof* have reached their
original position.
The indicator lamp in the dbutton goes
out. Air-recirculation mode is deactivated.
i If you open the side windows or the slid-
ing/tilting sunroof* manually after closing
with the convenience closing feature, they
will remain in this position when opened
using the convenience opening feature. Switching the residual heat on/off
It is possible to make use of the residual heat
of the engine to continue heating the station-
ary vehicle for up to 30 minutes after the engine has been switched off. The heating
time depends on the temperature that has
been set.
i
The blower will run at a low speed regard-
less of the airflow setting.
i If you activate the "residual heat" function
at high temperatures, only the ventilation
will be activated. The blower runs at
medium speed.
X Turn the key to position 0in the ignition
lock or remove it.
X To activate: press theÁbutton.
The indicator lamp in the Ábutton
comes on.
X To switch off: press theÁbutton.
The indicator lamp in the Ábutton goes
out.
i The residual heat automatically switches
off after around 30 minutes or if:
R the ignition is switched on
R the battery voltage drops Auxiliary heating/ventilation*
Notes on the auxiliary heating/ventila-
tion system G
Risk of poisoning
Exhaust fumes are produced when the auxili-
ary heating is in operation. Inhaling these
exhaust fumes can be poisonous. You should
therefore switch off the auxiliary heating in
confined spaces without an extraction sys-
tem, e.g. a garage. G
Risk of fire
When operating the auxiliary heating, parts of
the vehicle may become very hot, and highly
inflammable material such as fuels could be
ignited. Operating the auxiliary heating is thus
prohibited at filling stations or when your vehi-
cle is being refuelled. You must therefore Air conditioning
147Controls
* optional
X164_AKB; 2; 3, en-GB
wobuchh,
Version: 2.11.8.1 2009-03-31T14:14:58+02:00 - Seite 147 Z
Dateiname: 6515431202_buchblock.pdf; erzeugt am 01. Apr 2009 00:17:31; WK