2009 MERCEDES-BENZ GL SUV engine
[x] Cancel search: enginePage 100 of 309
Speedometer with segments
The segments in the speedometer indicate
which speed range is available.
Distronic* mode:
One or two segments around the stored
speed light up. Rev counter
The red band in the rev counter indicates the
engine's overrevving range. The fuel supply is
interrupted to protect the engine when the
red band is reached.
! Do not drive in the overrevving range.
Doing so will damage the engine. Outside temperature display
G
Risk of accident
At temperatures just above freezing point, the
road could be icy, particularly in wooded areas
or on bridges. The vehicle could start skidding
if you fail to adapt your driving style. You
should therefore always adapt your driving
style and speed to suit the weather condi-
tions.
Changes in the outside temperature are dis-
played after a short delay. On-board computer
Points to remember
The on-board computer is activated as soon
as you turn the key to position 1in the ignition
lock. G
Risk of accident
Only use the on-board computer when road
and traffic conditions permit. You would oth-
erwise be distracted and unable to concen-
trate properly on driving, and could cause an
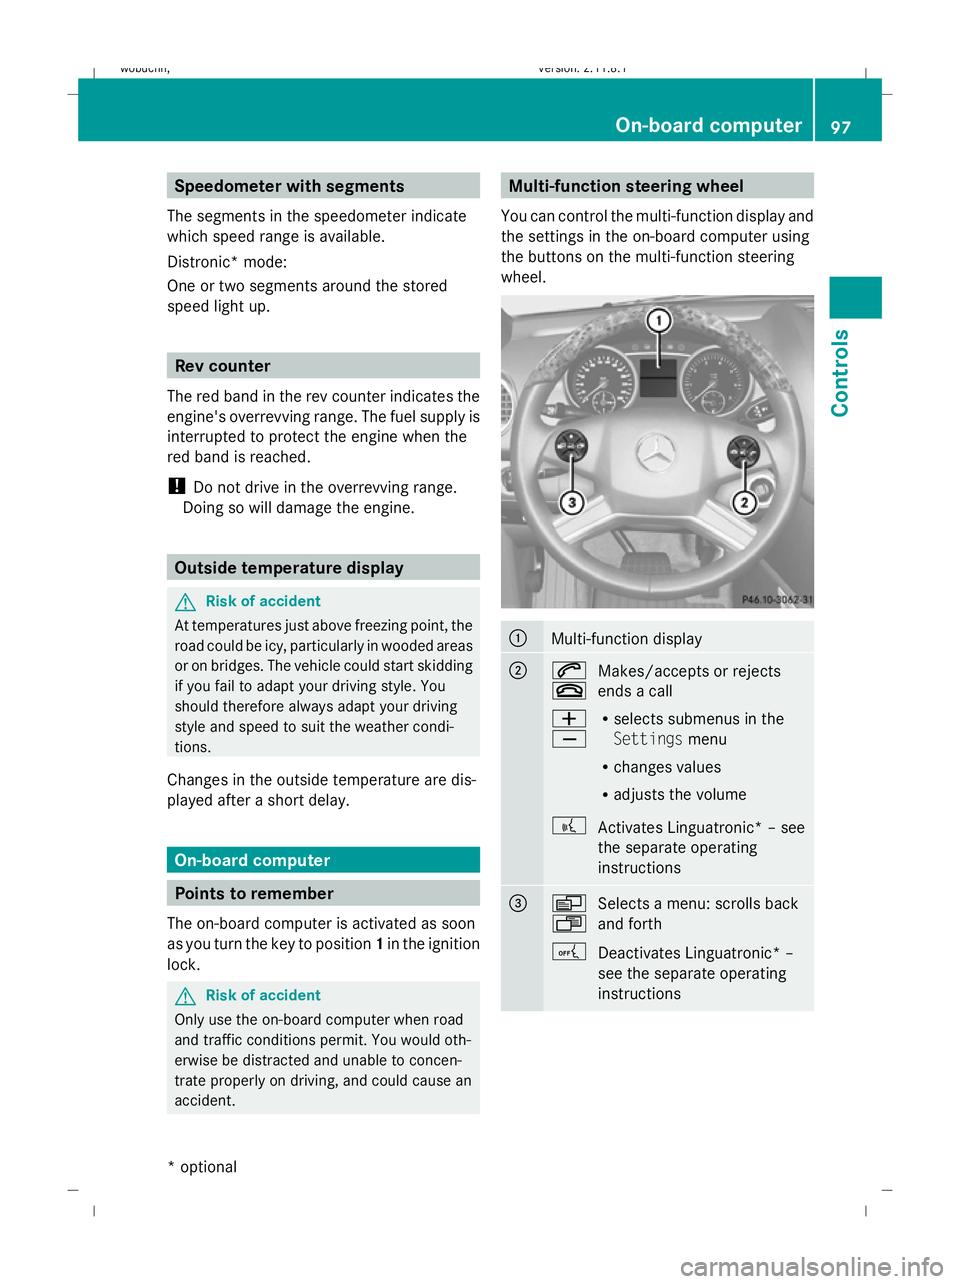
accident. Multi-function steering wheel
You can control the multi-function display and
the settings in the on-board computer using
the buttons on the multi-function steering
wheel. :
Multi-function display
;
6
~
Makes/accepts or rejects
ends a call
W
X R
selects submenus in the
Settings menu
R changes values
R adjusts the volume
? Activates Linguatronic* – see
the separate operating
instructions =
V
U
Selects a menu: scrolls back
and forth
A Deactivates Linguatronic* –
see the separate operating
instructions On-board computer
97Controls
* optional
X164_AKB; 2; 3, en-GB
wobuchh,
Version: 2.11.8.1 2009-03-31T14:14:58+02:00 - Seite 97 Z
Dateiname: 6515431202_buchblock.pdf; erzeugt am 01. Apr 2009 00:17:14; WK
Page 102 of 309

Menus and submenus
Function
:
Standard display
menu
(Y page 99)
R tyre pressure loss warning
(Y page 182) or tyre pressure mon-
itor* (Y page 183)
R ASSYST PLUS service interval dis-
play
R checking engine oil level*
(Y page 176) ;
Audio/TV*/DVD*
menu
(Y page 100) =
Navigation*
menu (Ypage 102) ?
Off-road*
menu (Ypage 102)
R off-road level (Y page 129)
R compass display (Y page 166)
R differential locks (status indicator)
(Y page 116) A
Distronic*
menu (Ypage 119) Function
B
Message memory
menu19
(Y page 211) C
Settings
menu (Ypage 103) D
Additional functions
menu
(Y page 109) E
Trip computer
menu (Ypage 110) F
Telephone
menu (Ypage 111) The number of menus shown depends on the
optional equipment in the vehicle.
Depending on the audio system fitted, the
Audio, Navigation* and Telephonemenus
are slightly different. The examples given in
this Owner's Manual apply to vehicles equip-
ped with COMAND APS*. Standard display menu
Use the buttons on the multi-function steer-
ing wheel.
19 The menu is only visible when there is a display message. On-board computer
99Controls
* optional
X164_AKB; 2; 3, en-GB
wobuchh,
Version: 2.11.8.1 2009-03-31T14:14:58+02:00 - Seite 99 Z
Dateiname: 6515431202_buchblock.pdf; erzeugt am 01. Apr 2009 00:17:15; WK
Page 103 of 309

X
Press the VorU button to select the
standard display. Standard display
:
Trip meter
; Total distance
You can select the following functions in the
Standard display menu using the&or
* button:
R tyre pressure loss warning (Y page 182) or
tyre pressure monitor* (Y page 183)
R coolant temperature (Y page 100)
R digital speedometer or outside tempera-
ture (Y page 104)
R ASSYST PLUS service interval display
R engine oil level* (Y page 176)
X To reset the trip meter: press and hold
the .reset button in the instrument clus-
ter until the trip meter is reset.
Displaying the coolant temperature X
Press the VorU button to select the
standard display.
X Press the &or* button to select the
coolant temperature. Under normal driving conditions, with the cor-
rect anti-corrosion and antifreeze additive concentration, the reading may rise to
120 †.
Displaying the digital speedometer or
outside temperature If you have selected the digital speedometer
as the status line (Y
page 104), select the
outside temperature display here 20
.
X Press the VorU button to select the
standard display.
X Press the &or* button to select
digital speedometer or the outside temper-
ature. Digital speedometer
Outside temperature
Audio/TV*/DVD* menu
Use the functions in the Audio/TV/DVD
menu to operate the audio equipment or
COMAND APS*.
Selecting a radio station You can only store new stations using the
audio system or COMAND APS* (see the sep-
arate operating instructions).
20 Vehicles for the United Kingdom: the outside temperature is always displayed. 100
On-board computerControls
* optional
X164_AKB; 2; 3, en-GB
wobuchh,
Version: 2.11.8.1 2009-03-31T14:14:58+02:00 - Seite 100
Dateiname: 6515431202_buchblock.pdf; erzeugt am 01. Apr 2009 00:17:15; WK
Page 108 of 309
Setting the time
X
Press &to select Time set Hours (or
time set Minutes).
X Press the WorX button to set a
value.
Setting the date
X Press the &button to select Date Set
day (orDate Set month orDate set
year).
X Press the WorX button to set the
date.
X Press the &,VorU button to
select a different display.
Lighting submenu Setting the daytime driving lights
If you set the daytime driving lights and the
light switch is set to
$orÃ, the day-
time driving lights are switched on automati-
cally when the engine is running. When it is
dark, the side lamps and dipped-beam head-
lights are switched on automatically.
In countries in which daytime driving lights
are a legal requirement, Onis the factory set-
ting.
X Press VorU on the steering wheel
to select the Settings... menu.
X Press the &button to select submenus.
X Press the WorX button to select the
Lighting submenu.
X Press &to select Daytime driving
lamps.
X Press WorX to set daytime driving
lights to onoroff.
X Press the &,VorU button to
select a different display. Switching the surround lighting on/off
If the surround lighting is switched on, the
following lights will be switched on automat-
ically in the dark after you have unlocked the
vehicle using the key:
R
the side lamps
R the licence plate lighting
R the front foglamps
The surround lighting switches off automati-
cally after 40 seconds or when the driver's
door is opened.
X Press VorU on the steering wheel
to select the Settings... menu.
X Press the &button to select submenus.
X Press the WorX button to select the
Lighting submenu.
X Press the &button to select the Sur‐
round lighting function.
X Press the WorX button to switch
the Surround lighting function on or
off.
X Press the &,VorU button to
select a different display.
Activating or deactivating the exterior
lighting delayed switch-off
When you activate the Headlamp delayed
shut off function, the exterior lighting
remains on for another 15 seconds after clos-
ing the doors when it is dark. If the engine is
switched off and then none of the doors are
opened, or if an open door is not closed, the
exterior lighting goes out after 60 seconds.
If you have activated the delayed switch-off
function and switched off the engine, the fol-
lowing remain lit:
R the side lamps
R the licence plate lighting
R the front foglamps
X Press VorU on the steering wheel
to select the Settings... menu.
X Press the &button to select submenus. On-board computer
105Controls
X164_AKB; 2; 3, en-GB
wobuchh, Version: 2.11.8.1 2009-03-31T14:14:58+02:00 - Seite 105 Z
Dateiname: 6515431202_buchblock.pdf; erzeugt am 01. Apr 2009 00:17:17; WK
Page 109 of 309
X
Press the WorX button to select the
Lighting submenu.
X Press the &button to select Head‐
lamps delayed switch-off.
X Press the WorX button to activate
or deactivate the Headlamps delayed
switch-off function.
X Press the &,VorU button to
select a different display.
Deactivating the delayed switch-off tempora-
rily:
X Before leaving the vehicle, turn the key to
position 0in the ignition lock.
X Turn the key to position 2in the ignition
lock and back to position 0.
Delayed switch-off is deactivated.
Delayed switch-off is deactivated the next
time you start the engine.
Activating/deactivating the interior light-
ing delayed switch-off
If you remove the key from the ignition lock
while the Interior lighting delayed
switch off function is activated, the interior
lighting remains on for 10 seconds if it is dark.
X Press VorU on the steering wheel
to select the Settings... menu.
X Press the &button to select submenus.
X Press the WorX button to select the
Lighting submenu.
X Press the &button to select Interior
lighting delayed switch-off.
X Press the WorX button to activate
or deactivate Interior lighting
delayed switch-off.
X Press the &,VorU button to
select a different display.
Activating/deactivating the Intelligent
Light System*
When you activate the Intelligent Light
System you activate the following functions: R
motorway mode
R active light function
R extended range foglamps
X Press VorU on the steering wheel
to select the Settings... menu.
X Press the &button to select submenus.
X Press WorX to select the Light‐
ing submenu.
X Press &to select Intelligent Light
System.
X Press the WorX button to activate
or deactivate the Intelligent Light
System.
X Press the &,VorU button to
select a different display.
Setting the ambient lighting*
X Press VorU on the steering wheel
to select the Settings... menu.
X Press the &button to select submenus.
X Press the WorX button to select the
Lighting submenu.
X Press the &button to select Ambient
light.
X Press WorX to adjust the bright-
ness to any level from Level 0(off) to
Level 5 (bright).
X Press &, VorU to select a dif-
ferent display.
Vehicle submenu In the
Vehicle submenu, you can call up the
following functions:
R compass* (Y page 166)
R display when the ignition is switched off
(Y page 107)
R permanent Speedtronic (Y page 126)
R automatic locking feature (Y page 107)106
On-board computerControls
* optional
X164_AKB; 2; 3, en-GB
wobuchh,
Version: 2.11.8.1 2009-03-31T14:14:58+02:00 - Seite 106
Dateiname: 6515431202_buchblock.pdf; erzeugt am 01. Apr 2009 00:17:17; WK
Page 117 of 309
Deactivating
X
Press button :.
Indicator lamp ;goes out.
The DSR symbol appears in the multi-func-
tion display with the Offmessage.
DSR switches off automatically if you drive
faster than 35 km/h. The DSR symbol
appears in the multi-function display with the
Off message. You also hear a warning tone.
Changing the set speed while the vehi-
cle is in motion When DSR is activated, you can change the
set speed to a value between 4 km/h and
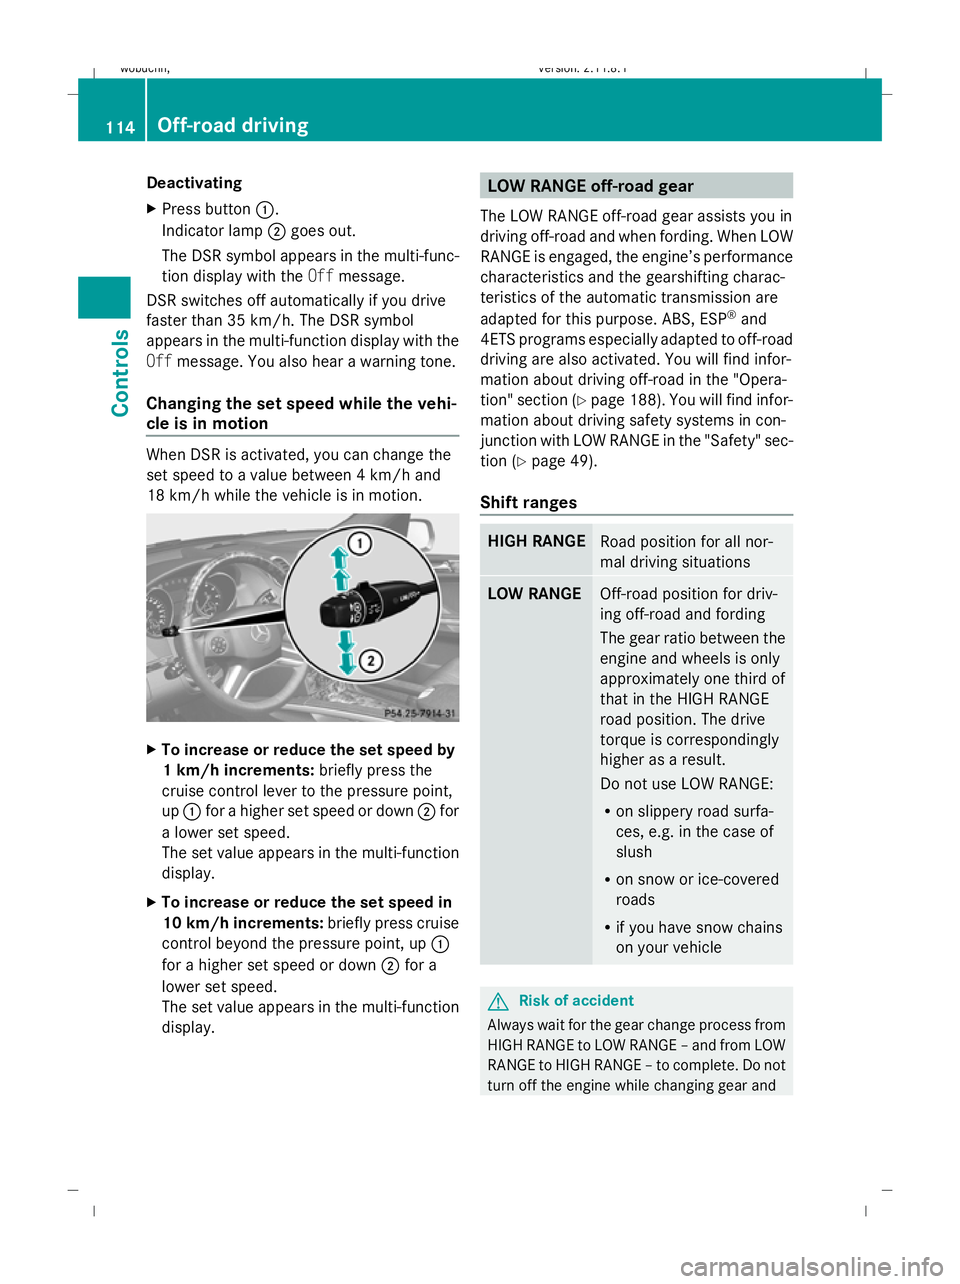
18 km/h while the vehicle is in motion. X
To increase or reduce the set speed by
1 km/h increments: briefly press the
cruise control lever to the pressure point,
up : for a higher set speed or down ;for
a lower set speed.
The set value appears in the multi-function
display.
X To increase or reduce the set speed in
10 km/h increments: briefly press cruise
control beyond the pressure point, up :
for a higher set speed or down ;for a
lower set speed.
The set value appears in the multi-function
display. LOW RANGE off-road gear
The LOW RANGE off-road gear assists you in
driving off-road and when fording. When LOW
RANGE is engaged, the engine’s performance
characteristics and the gearshifting charac-
teristics of the automatic transmission are
adapted for this purpose. ABS, ESP ®
and
4ETS programs especially adapted to off-road
driving are also activated. You will find infor-
mation about driving off-road in the "Opera-
tion" section (Y page 188). You will find infor-
mation about driving safety systems in con-
junction with LOW RANGE in the "Safety" sec-
tion (Y page 49).
Shift ranges HIGH RANGE
Road position for all nor-
mal driving situations
LOW RANGE
Off-road position for driv-
ing off-road and fording
The gear ratio between the
engine and wheels is only
approximately one third of
that in the HIGH RANGE
road position. The drive
torque is correspondingly
higher as a result.
Do not use LOW RANGE:
R on slippery road surfa-
ces, e.g. in the case of
slush
R on snow or ice-covered
roads
R if you have snow chains
on your vehicle G
Risk of accident
Always wait for the gear change process from
HIGH RANGE to LOW RANGE – and from LOW
RANGE to HIGH RANGE – to complete. Do not
turn off the engine while changing gear and 114
Off-road drivingCont
rols
X164_AKB; 2; 3, en-GB
wobuchh, Version: 2.11.8.1 2009-03-31T14:14:58+02:00 - Seite 114
Dateiname: 6515431202_buchblock.pdf; erzeugt am 01. Apr 2009 00:17:19; WK
Page 118 of 309
do not switch the automatic transmission to
another gear.
If you do not wait for the gear change process
to complete, it may not be correctly imple-
mented. The transfer case may then be in
neutral and the connection between the
engine and the drive axles may be disen-
gaged. The vehicle could then move freely,
even if a gear is engaged, and could inadver-
tently start moving, particularly if it is on a
slope.
Observe the messages in the multi-function
display.
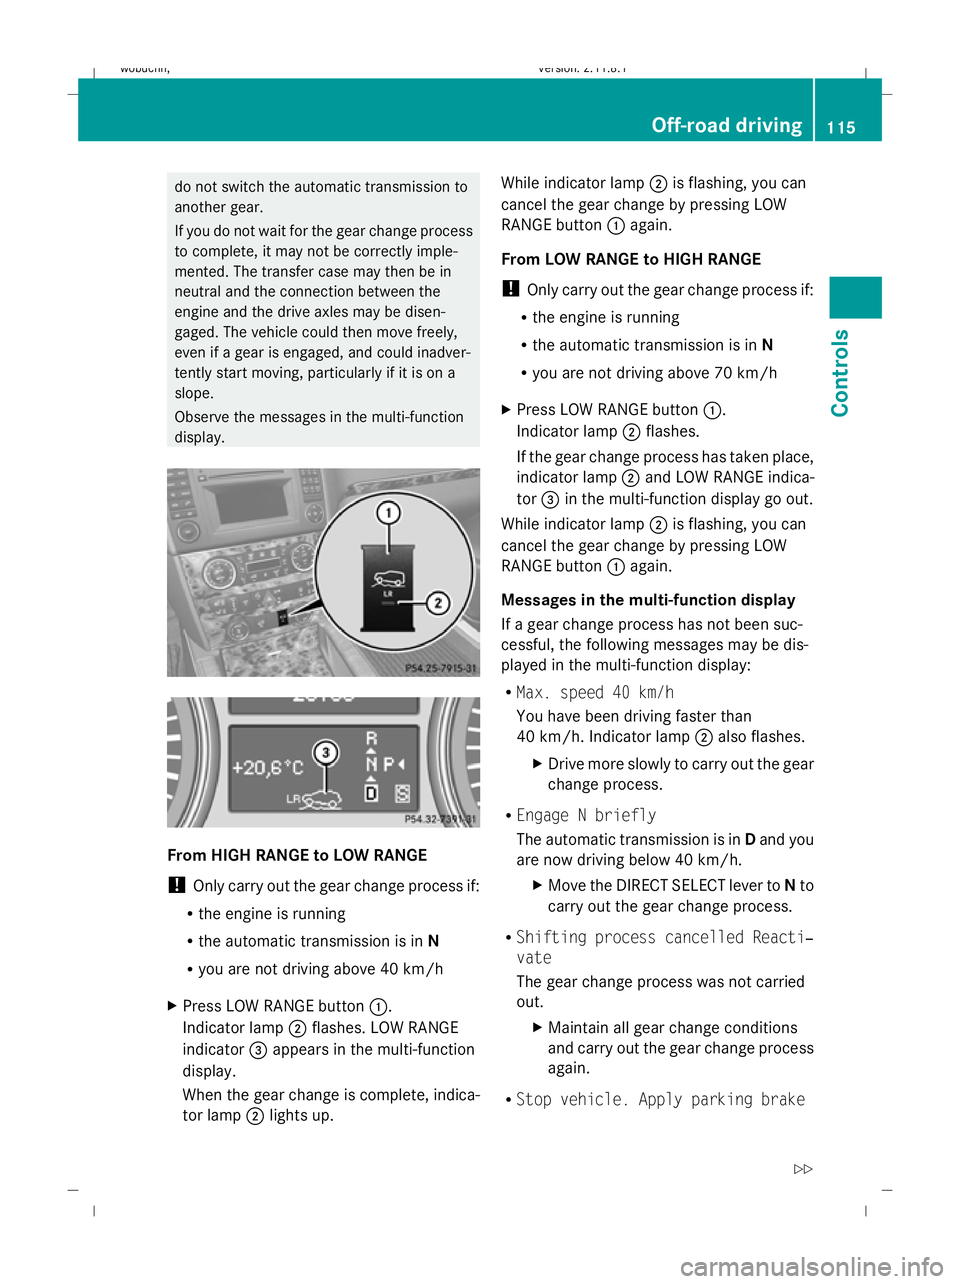
From HIGH RANGE to LOW RANGE
! Only carry out the gear change process if:
R the engine is running
R the automatic transmission is in N
R you are not driving above 40 km/h
X Press LOW RANGE button :.
Indicator lamp ;flashes. LOW RANGE
indicator =appears in the multi-function
display.
When the gear change is complete, indica-
tor lamp ;lights up. While indicator lamp
;is flashing, you can
cancel the gear change by pressing LOW
RANGE button :again.
From LOW RANGE to HIGH RANGE
! Only carry out the gear change process if:
R the engine is running
R the automatic transmission is in N
R you are not driving above 70 km/h
X Press LOW RANGE button :.
Indicator lamp ;flashes.
If the gear change process has taken place,
indicator lamp ;and LOW RANGE indica-
tor =in the multi-function display go out.
While indicator lamp ;is flashing, you can
cancel the gear change by pressing LOW
RANGE button :again.
Messages in the multi-function display
If a gear change process has not been suc-
cessful, the following messages may be dis-
played in the multi-function display:
R Max. speed 40 km/h
You have been driving faster than
40 km/h. Indicator lamp ;also flashes.
X Drive more slowly to carry out the gear
change process.
R Engage N briefly
The automatic transmission is in Dand you
are now driving below 40 km/h.
XMove the DIRECT SELECT lever to Nto
carry out the gear change process.
R Shifting process cancelled Reacti‐
vate
The gear change process was not carried
out.
XMaintain all gear change conditions
and carry out the gear change process
again.
R Stop vehicle. Apply parking brake Off-road driving
115Controls
X164_AKB; 2; 3, en-GB
wobuchh, Version: 2.11.8.1 2009-03-31T14:14:58+02:00 - Seite 115 Z
Dateiname: 6515431202_buchblock.pdf; erzeugt am 01. Apr 2009 00:17:19; WK
Page 119 of 309

An acoustic warning will also sound. The
gear change process has not been comple-
ted. LOW RANGE is in the neutral position.
There is no connection between the engine
and the drive wheels.
! Do not drive any further, otherwise you
could damage the vehicle's drive train.
XStop the vehicle. Take into account the
road and traffic conditions when doing
this.
X Depress the parking brake.
X Carry out the gear change process
again.
If the gear change process has been
carried out, the Stop vehicle. Apply
parking brake message disappears. Differential locks
Differential locks improve the vehicle’s trac-
tion.
Your vehicle is equipped with the following:
R A differential lock for the transfer box: this
controls the balance between the front and
rear axles.
R A differential lock for the rear axle: this
controls the balance between the wheels
and the rear axle.
4ETS (Y page 53) controls the compensation
between the wheels and the front axle.
Engaging the differential locks Automatic mode
Use automatic mode
;for all driving situa-
tions, including driving off-road or when ford-
ing.
In automatic mode, the differential locks are
engaged and disengaged according to driving
requirements. This guarantees sufficient trac-
tion for most driving situations with unrestric-
ted vehicle steerability.
X Start the engine.
The differential locks are in automatic
mode. The indicator lamp in selector
wheel :lights up above symbol for auto-
matic mode ;.
Engaging manually G
Risk of accident
When driving on a firm road surface, only drive
in automatic mode, never with manually
engaged differential locks. If differential locks
have been engaged manually, the vehicle's
steerability is greatly impaired and the risk of
an accident thereby increased.
Do not manually engage or disengage the dif-
ferential locks while cornering. The vehicle
motion could otherwise be jerky. You could
lose control of the vehicle as a result and
cause an accident.
Only engage the differential locks manually if
traction in automatic mode is insufficient.
At speeds of up to 30 km/h, you can engage
the differential locks by hand.
X Start the engine.
X Turn selector wheel :to desired position
= or?.
The indicator lamp in selector wheel :
lights up at the corresponding symbol. 116
Off-road drivingControls
X164_AKB; 2; 3, en-GB
wobuchh
,V ersion: 2.11.8.1
2009-03-31T14:14:58+02:00 - Seite 116
Dateiname: 6515431202_buchblock.pdf; erzeugt am 01. Apr 2009 00:17:20; WK