2009 MERCEDES-BENZ GL SUV ESP
[x] Cancel search: ESPPage 139 of 309
the responsibility to pay attention. The cam-
era cannot show objects:
R very near to the rear bumper
R below the rear bumper
R that are located above the tailgate handle
recess
You are always responsible for safety and
must continue to pay attention to your imme-
diate surroundings when parking and
manoeuvring. This applies to the areas
behind, in front of and next to the vehicle. You
could otherwise endanger yourself and oth-
ers. G
Risk of accident
Under the following circumstances, the
reversing camera will not function, or function
in a limited manner:
R if the tailgate is open
R in heavy rain, snow or fog
R at night or in very dark places
R if the camera is exposed to very bright light R
if the area is lit by fluorescent light (the dis-
play may flicker)
R if there is a sudden change in temperature,
e.g. when driving into a heated garage in
winter
R if the camera lens is dirty or obstructed
R if the rear of your vehicle is damaged. In this
event have the camera position and setting
checked at a qualified specialist workshop.
Mercedes-Benz recommends that you use
a Mercedes-Benz Service Centre for this
purpose.
Do not use the reversing camera in these
types of situation. You could, otherwise,
injure others or damage objects and your
vehicle while you are parking.
Activating the reversing camera X
Make sure that the key is in position 2in
the ignition lock.
X Engage reverse gear.
The area behind the vehicle is shown in the
COMAND APS display. Air conditioning
Overview of air-conditioning systems
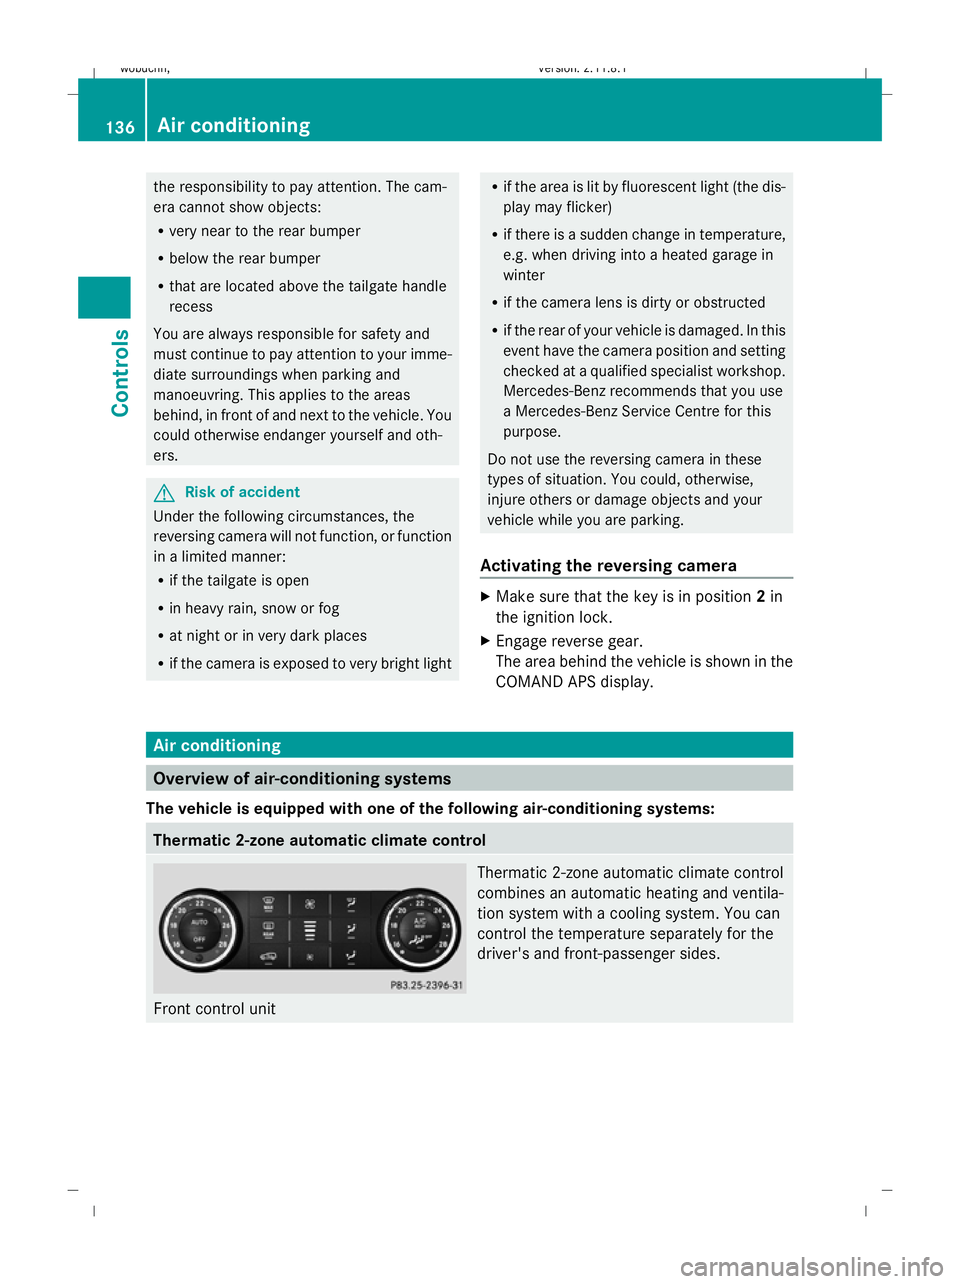
The vehicle is equipped with one of the following air-conditioning systems: Thermatic 2-zone automatic climate control
Front control unit Thermatic 2-zone automatic climate control
combines an automatic heating and ventila-
tion system with a cooling system. You can
control the temperature separately for the
driver's and front-passenger sides.136
Air conditioningControls
X164_AKB; 2; 3, en-GB
wobuchh
,V ersion: 2.11.8.1
2009-03-31T14:14:58+02:00 - Seite 136
Dateiname: 6515431202_buchblock.pdf; erzeugt am 01. Apr 2009 00:17:27; WK
Page 153 of 309
G
Risk of injury
Children could injure themselves if they oper-
ate the sliding sunroof.
Never leave children unsupervised in the vehi-
cle. Always take the key with you when leaving
the vehicle, even if you are only leaving it for
a short time. G
Risk of injury
The glass in the panorama sunroof could
break in an accident. If you are not wearing a
seat belt, there is a risk that you could be
thrown through the opening in the event of the
vehicle overturning. Therefore, always wear a
seat belt to reduce the risk of injuries.
! Only open the panorama sliding sunroof
if it is free of snow and ice. Otherwise, mal-
functions may occur.
Do not allow anything to protrude from the
sliding sunroof. The seals could otherwise
be damaged.
i When the sliding sunroof is open, apart
from the normal airflow noises resonance
noises may also occur. They are caused by
minor pressure fluctuations in the vehicle
interior. Change the position of the sliding
sunroof or open a side window slightly to
reduce or eliminate these noises.
i Related topics:
R convenience opening from the out-
side (Y page 87) or from the inside
(Y page 147)
R convenience closing from the out-
side (Y page 87) or from the inside
(Y page 147)
R automatic closing of the sliding sunroof
(PRE-SAFE*) (Y page 40) Sliding/tilting sunroof*
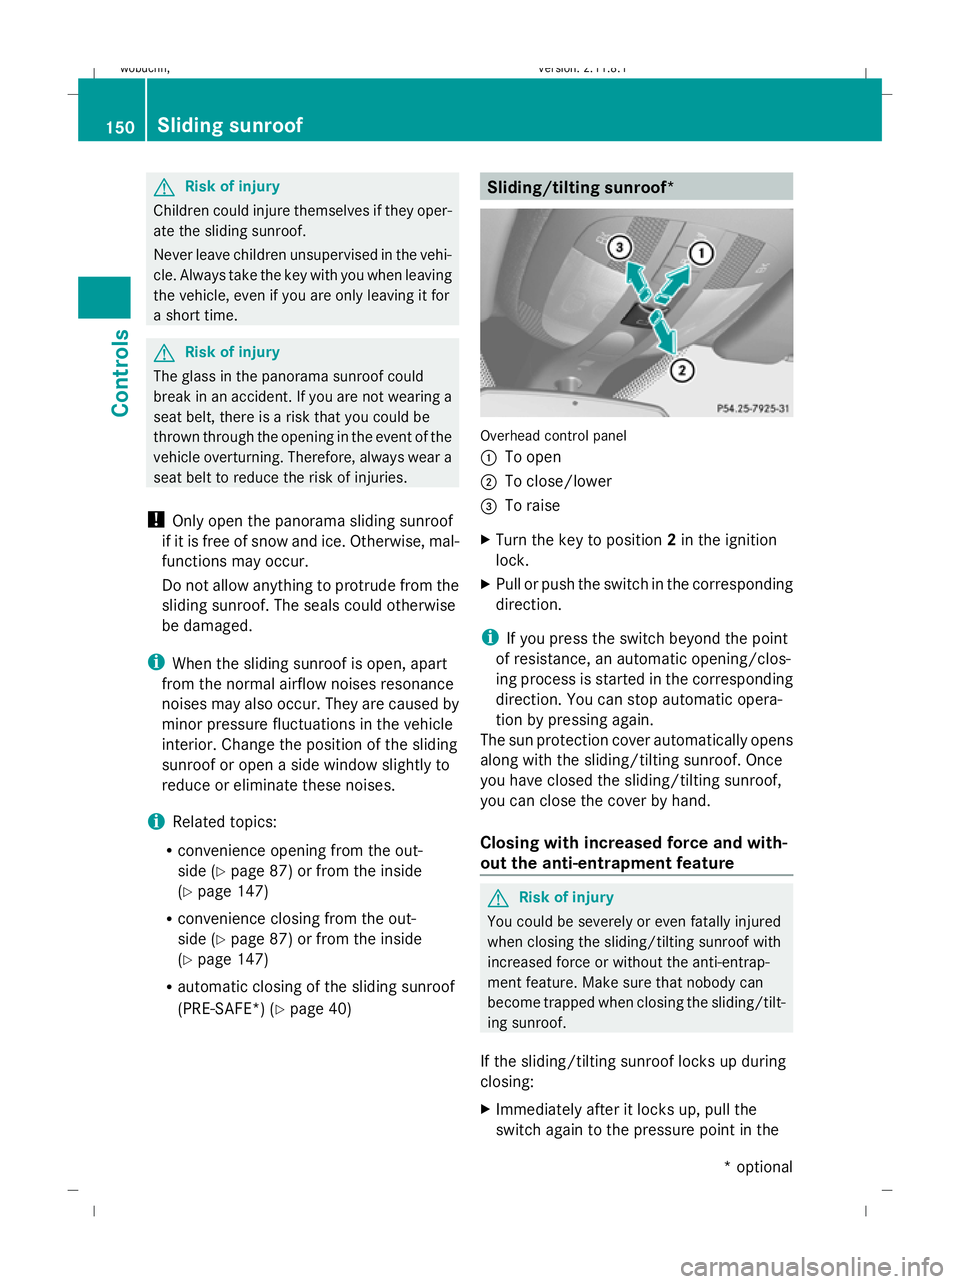
Overhead control panel
:
To open
; To close/lower
= To raise
X Turn the key to position 2in the ignition
lock.
X Pull or push the switch in the corresponding
direction.
i If you press the switch beyond the point
of resistance, an automatic opening/clos-
ing process is started in the corresponding
direction. You can stop automatic opera-
tion by pressing again.
The sun protection cover automatically opens
along with the sliding/tilting sunroof. Once
you have closed the sliding/tilting sunroof,
you can close the cover by hand.
Closing with increased force and with-
out the anti-entrapment feature G
Risk of injury
You could be severely or even fatally injured
when closing the sliding/tilting sunroof with
increased force or without the anti-entrap-
ment feature. Make sure that nobody can
become trapped when closing the sliding/tilt-
ing sunroof.
If the sliding/tilting sunroof locks up during
closing:
X Immediately after it locks up, pull the
switch again to the pressure point in the 150
Sliding sunroofControls
* optional
X164_AKB; 2; 3, en-GB
wobuchh,
Version: 2.11.8.1 2009-03-31T14:14:58+02:00 - Seite 150
Dateiname: 6515431202_buchblock.pdf; erzeugt am 01. Apr 2009 00:17:32; WK
Page 158 of 309
fold down the respective backrests and
attach the safety net.
G
Risk of poisoning
Always drive with the tailgate closed. Exhaust
fumes could otherwise enter the vehicle inte-
rior.
Folding the rear bench seat forwards G
Risk of accident and injury
Do not fold the backrest onto the folded-down
seat cushions. If the seat cushions are folded
down, luggage can be thrown over the back-
rest into the passenger compartment during,
for instance, heavy braking, sudden changes
of direction or in the event of an accident. You
could cause an accident or cause injury to
yourself and others. !
When the rear bench seat is folded for-
wards, the front seats cannot be moved to
their rearmost position, as otherwise, the
seats and the rear seat bench could be
damaged.
i If the driver's or front-passenger seat has
been adjusted for a tall person, it may be
necessary to move the seats forwards
slightly to fold the backrests forwards.
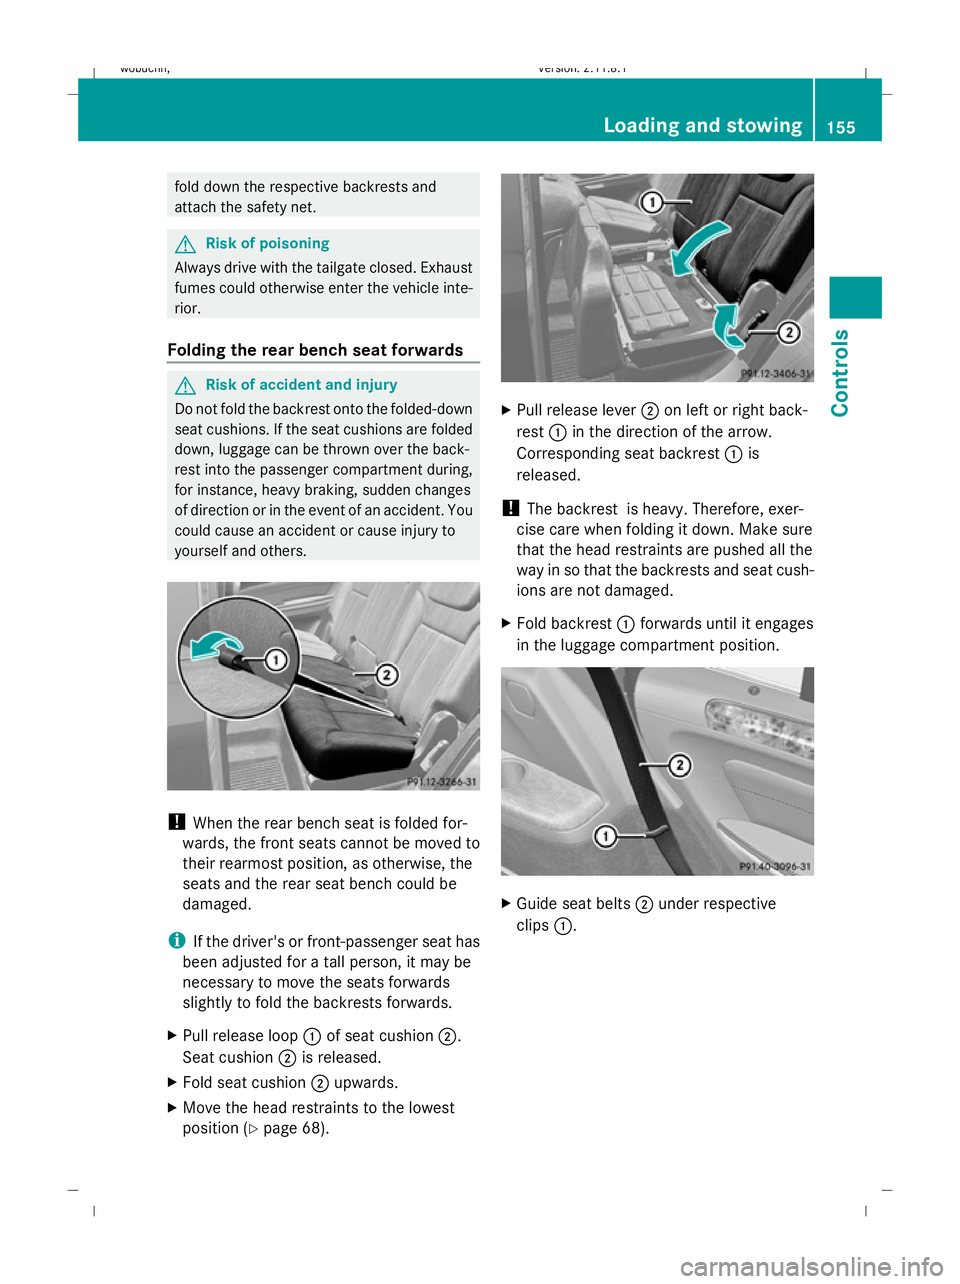
X Pull release loop :of seat cushion ;.
Seat cushion ;is released.
X Fold seat cushion ;upwards.
X Move the head restraints to the lowest
position (Y page 68). X
Pull release lever ;on left or right back-
rest :in the direction of the arrow.
Corresponding seat backrest :is
released.
! The backrest is heavy. Therefore, exer-
cise care when folding it down. Make sure
that the head restraints are pushed all the
way in so that the backrests and seat cush-
ions are not damaged.
X Fold backrest :forwards until it engages
in the luggage compartment position. X
Guide seat belts ;under respective
clips :. Loading and stowing
155Controls
X164_AKB; 2; 3, en-GB
wobuchh, Version: 2.11.8.1 2009-03-31T14:14:58+02:00 - Seite 155 Z
Dateiname: 6515431202_buchblock.pdf; erzeugt am 01. Apr 2009 00:17:36; WK
Page 161 of 309
Safety net
G
Risk of injury
You must make sure that the safety net is
correctly secured at the top and bottom.
Do not use a damaged safety net.
The safety net cannot restrain heavy loads.
For this reason, you should always secure the
load.
Otherwise, objects that have not been
secured sufficiently might be thrown around
if you brake suddenly, change direction sud-
denly or are involved in an accident, and could
cause you an injury.
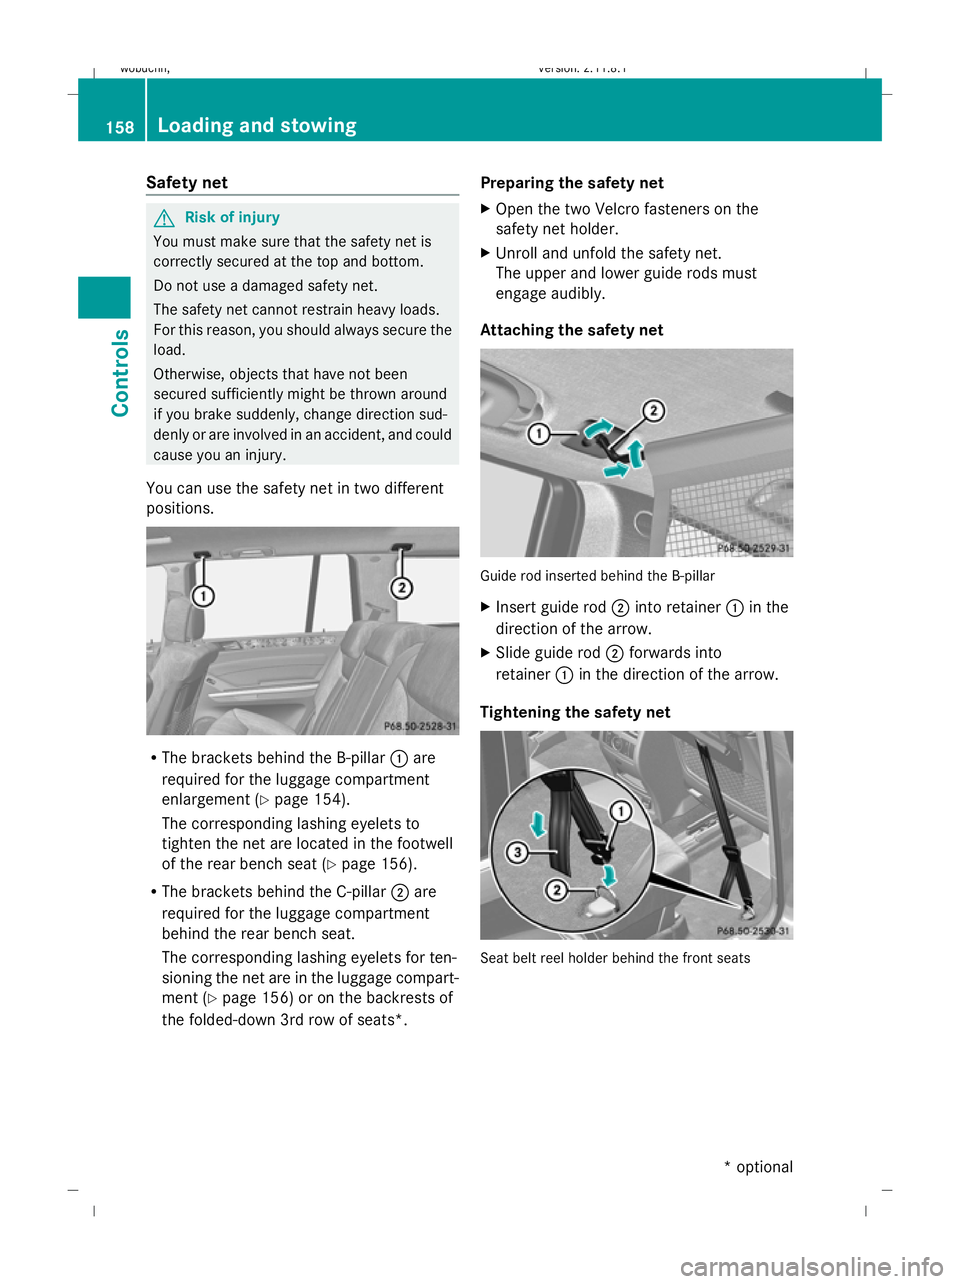
You can use the safety net in two different
positions. R
The brackets behind the B-pillar :are
required for the luggage compartment
enlargement (Y page 154).
The corresponding lashing eyelets to
tighten the net are located in the footwell
of the rear bench seat (Y page 156).
R The brackets behind the C-pillar ;are
required for the luggage compartment
behind the rear bench seat.
The corresponding lashing eyelets for ten-
sioning the net are in the luggage compart-
ment (Y page 156) or on the backrests of
the folded-down 3rd row of seats*. Preparing the safety net
X
Open the two Velcro fasteners on the
safety net holder.
X Unroll and unfold the safety net.
The upper and lower guide rods must
engage audibly.
Attaching the safety net Guide rod inserted behind the B-pillar
X
Insert guide rod ;into retainer :in the
direction of the arrow.
X Slide guide rod ;forwards into
retainer :in the direction of the arrow.
Tightening the safety net Seat belt reel holder behind the front seats158
Loading and stowingControls
* optional
X164_AKB; 2; 3, en-GB
wobuchh,
Version: 2.11.8.1 2009-03-31T14:14:58+02:00 - Seite 158
Dateiname: 6515431202_buchblock.pdf; erzeugt am 01. Apr 2009 00:17:39; WK
Page 172 of 309
outside the vehicle by observing the light
reflected off the windscreen.
Retrofitted anti-glare film
Anti-glare film retrofitted to the insides of the
windows could interfere with radio or mobile
phone reception, especially if it is conductive
or metal-coated film. Information about anti-
glare film can be obtained from any
Mercedes-Benz Service Centre. Features
169Controls
X164_AKB; 2; 3, en-GB
wobuchh, Version: 2.11.8.1 2009-03-31T14:14:58+02:00 - Seite 169 Z
Dateiname: 6515431202_buchblock.pdf; erzeugt am 01. Apr 2009 00:17:44; WK
Page 182 of 309
Tyres and wheels
Points to remember
! For safety reasons, Mercedes-Benz rec-
ommends that you only use tyres, wheels
and accessories which have been approved
by Mercedes-Benz specifically for your
vehicle. These tyres have been specially
adapted for use with the control systems,
such as ABS or ESP ®
, and are marked as
follows:
R MO = Mercedes-Benz Original
R MOE = Mercedes-Benz Original Exten-
ded* (tyres with run-flat characteristics)
Only use Mercedes-Benz Original Extended
tyres* on wheels that have been specifi-
cally approved by Mercedes-Benz.
If you use other tyres, wheels and acces-
sories, Mercedes-Benz cannot accept any
responsibility for damage that may result
from this. Further information about tyres,
wheels and approved combinations can be
obtained from any Mercedes-Benz Service
Centre.
! If you fit tyres other than those tested and
recommended by Mercedes-Benz, charac-
teristics such as handling, noise levels and
fuel consumption, etc. may be adversely
affected. In addition, when driving with a
load, tyre dimensional variations could
cause the tyres to come into contact with
the bodywork and axle components. This
could result in damage to the tyres or the
vehicle.
! Retreaded tyres are neither tested nor
recommended by Mercedes-Benz, since
previous damage cannot always be detec-
ted on retreaded tyres. As a result,
Mercedes-Benz cannot guarantee vehicle
safety if retreaded tyres are fitted. Do not
fit used tyres if you have no information
about their previous usage. G
Risk of accident
Tyres, wheels or accessories which have not
been approved by Mercedes-Benz for your
vehicle or are not used as they should be, can
impair driving safety. As a result, you could
cause an accident. Before purchasing and
using them, enquire about their suitability,
legal stipulations and factory recommenda-
tions at a Mercedes-Benz Service Centre.
Modification work on the brake system and
wheels is not permitted, nor is the use of
spacer plates or brake dust shields. This inva-
lidates the General Operating Permit for the
vehicle.
Notes on selecting, fitting and replac-
ing tyres R
Only fit tyres and wheels of the same type
and make.
R Only fit tyres of the correct size onto the
wheels.
R After fitting new tyres, run them in at mod-
erate speeds for the first 100 km as they
only reach their full performance after this
distance.
R Fit new tyres on the front wheels first if
tyres of the same size are required on the
front and rear wheels.
R Replace the tyres after six years at the lat-
est, regardless of wear. This also applies to
the spare wheel*.
R Do not drive with tyres which have too little
tread depth, as this significantly reduces
the traction on wet roads (aquaplaning).
! Store tyres that are not being used in a
cool, dry and preferably dark place. Protect
the tyres against oil, grease, petrol and die-
sel.
Notes on regularly inspecting wheels
and tyres R
Regularly check the wheels and tyres of
your vehicle for damage (e.g. cuts, punctu- Tyres and
wheels
179Operation
* optional
X164_AKB; 2; 3, en-GB
wobuchh
,V ersion: 2.11.8.1
2009-03-31T14:14:58+02:00 - Seite 179 Z
Dateiname: 6515431202_buchblock.pdf; erzeugt am 01. Apr 2009 00:17:47; WK
Page 185 of 309
it is too low for the current operating condi-
tions.
Driving with tyre pressure that is too high or
too low can:
R shorten the service life of the tyres
R increase the likelihood of tyre damage
R have a negative effect on handling charac-
teristics (e.g. by causing aquaplaning)
i The tyre pressure values given for low
loads are minimum values which offer you
good ride comfort characteristics.
However, you can also use the values given
for higher loads. These are permissible and
will not adversely affect the running of the
vehicle.
Also check the tyre pressure of the spare
wheel* or "Minispare" emergency spare
wheel*. H
Environmental note
Check the tyre pressure regularly, at least
every 14 days. Tyre pressure loss warning
While the vehicle is in motion, the tyre pres-
sure loss warning system monitors the set
tyre pressure using the rotational speed of
the wheels. This enables the system to detect
significant pressure loss in a tyre. If the speed
of rotation of a wheel changes as a result of
a loss of pressure, a corresponding warning
message will appear in the multi-function dis-
play. G
Risk of accident
The tyre pressure loss warning system does
not warn you of an incorrectly set tyre pres-
sure. The table on the inside of the fuel filler
flap will help you decide whether the tyre
pressures should be corrected.
The tyre pressure loss warning system does
not replace the need to regularly check your
vehicle's tyre pressures, since an even loss of pressure on several tyres at the same time
cannot be detected by the tyre pressure loss
warning system.
The tyre pressure monitor is not able to warn
you of a sudden loss of pressure, e.g. if the
tyre is penetrated by a foreign object.
In the event of a sudden loss of pressure, bring
the vehicle to a halt by braking carefully. Do
not make any sudden steering movements
when doing so.
The function of the tyre pressure loss warning
system is limited or delayed if:
R snow chains are fitted to your vehicle's
tyres.
R road conditions are wintry.
R you are driving on sand or gravel.
R you adopt a very sporty driving style (cor-
nering at high speeds or driving with high
rates of acceleration).
R you are towing a very heavy or large trailer.
R you are driving with a heavy load (in the
vehicle or on the roof).
Restarting the tyre pressure loss warn-
ing system Restart the tyre pressure loss warning system
if you have:
R
changed the tyre pressure
R changed the wheels or tyres
R fitted new wheels or tyres
X Before restarting, consult the table of tyre
pressures on the inside of the fuel filler flap
to ensure that the tyre pressure in all four
tyres is set correctly for the respective
operating conditions.
X Observe the notes in the section on tyre
pressures (Y page 180). 182
Tyres and wheelsOperation
* optional
X164_AKB; 2; 3, en-GB
wobuchh,
Version: 2.11.8.1 2009-03-31T14:14:58+02:00 - Seite 182
Dateiname: 6515431202_buchblock.pdf; erzeugt am 01. Apr 2009 00:17:48; WK
Page 188 of 309
Mercedes-Benz Service Centre for this pur-
pose. In particular, work relevant to safety or
on safety-related systems must be carried out
at a qualified specialist workshop.
The wheels could work loose if they are not
tightened to a torque of 150 Nm.
For safety reasons, Mercedes-Benz recom-
mends that you only use wheel bolts of the
correct size which have been approved for
Mercedes-Benz vehicles.
The wear patterns on the front and rear tyres
differ, depending on the operating conditions.
Interchange the wheels before a clear wear
pattern has formed on the tyres. Front tyres
typically wear more on the shoulders and the
rear tyres in the centre.
On vehicles that have the same size front and
rear wheels you can interchange the wheels
every 5,000 km to 10,000 km depending on
the degree of tyre wear. Do not reverse the
direction of tyre rotation.
Clean the contact surfaces of the wheel and
the brake disc thoroughly every time a wheel
is interchanged. Check the tyre pressure and,
if necessary, restart the tyre pressure loss
warning system or the tyre pressure moni-
tor*.
! On vehicles fitted with a tyre pressure
monitor*, electronic components are loca-
ted in the wheel.
Tyre-fitting tools should not be applied in
the area of the valve, as this could damage
the electronic components.
Always have the wheels interchanged/
changed at a qualified specialist workshop,
e.g. a Mercedes-Benz Service Centre.
i Vehicles with a tyre pressure monitor*
If the positions of the wheels on the vehicle
are changed, the tyre pressure may be tem-
porarily displayed in the wrong position.
This is rectified after a few minutes of driv-
ing; the tyre pressures are then displayed
in the correct positions. Winter driving
Points to remember
Have your vehicle winterproofed at a qualified
specialist workshop, e.g. at a Mercedes-Benz
Service Centre, at the onset of winter.
Observe the notes in the "Changing a wheel"
section (Y page 184). Winter tyres
At temperatures below +7 ˚C always use all-
weather tyres or winter tyres and always use
winter tyres in winter road conditions. Only
winter tyres displaying the isnowflake
symbol in addition to the M+S marking pro-
vide optimum grip in wintry road conditions.
Only these tyres will allow the ABS and
ESP ®
driving systems to function optimally in
winter, as these tyres have been designed
specifically for driving in snow.
Use winter tyres of the same make and tread
on all wheels to maintain safe handling char-
acteristics. G
Risk of accident
Winter tyres with a tread depth of less than
4 mm must be replaced immediately. They are
no longer suitable for winter use and can no
longer provide sufficient grip. This could
cause you to lose control of your vehicle and
cause an accident.
Always observe the maximum permissible
speed specified for the winter tyres you have
fitted. If you fit winter tyres which have a
lower maximum permissible speed than that
of the vehicle, affix an appropriate warning
sign in the driver's field of vision. This can be
obtained at a qualified specialist workshop,
e.g. from a Mercedes-Benz Service Centre.
Under these circumstances, you should also
restrict the maximum speed of the vehicle
using permanent Speedtronic 27
to the maxi-
27 Only available for certain countries. Winter driving
185Operation
* optional
X164_AKB; 2; 3, en-GB
wobuchh,
Version: 2.11.8.1 2009-03-31T14:14:58+02:00 - Seite 185 Z
Dateiname: 6515431202_buchblock.pdf; erzeugt am 01. Apr 2009 00:17:48; WK