2009 MERCEDES-BENZ GL SUV transmission
[x] Cancel search: transmissionPage 122 of 309
Storing the current speed or calling up
the last stored speed
G
Risk of accident
Only select a stored speed if you know what
that speed is and whether it is suitable for the
current situation. Otherwise, sudden acceler-
ation or braking could endanger you or others.
X Briefly pull the cruise control lever towards
you =.
X Remove your foot from the accelerator
pedal.
The first time cruise control is activated, it
stores the current speed or regulates the
speed of the vehicle to the previously
stored speed.
Setting a speed X
Press the cruise control lever to the pres-
sure point, up :for a higher speed or
down ?for a lower speed.
X Keep the cruise control lever pressed until
the desired speed is reached.
X Release the cruise control lever.
The new speed is stored.
i Cruise control is not deactivated if you
depress the accelerator pedal. For exam-
ple, if you accelerate briefly to overtake,
cruise control adjusts the vehicle's speed
to the last speed stored after you have fin-
ished overtaking.
Making fine adjustments in 1 km/h
increments X
Briefly press the cruise control lever to the
pressure point, up :for a higher speed or
down ?for a lower speed.
The last speed stored is increased or
reduced. Adjustment in 10 km/h increments X
Briefly press the cruise control lever
beyond the pressure point, up :for a
higher speed or down ?for a lower speed.
The last speed stored is increased or
reduced.
Deactivating cruise control There are several ways to deactivate cruise
control:
X
Briefly press the cruise control lever for-
wards B.
or
X Brake.
or
X Briefly press the cruise control lever in the
direction of arrow A.
Variable Speedtronic is selected. LIM indi-
cator lamp ;in the cruise control lever
lights up.
Cruise control is automatically deactivated if:
R you depress the parking brake.
R you drive at less than 30 km/h
R ESP ®
intervenes or you deactivate ESP ®
R you shift the automatic transmission to N
while driving
If cruise control is deactivated, you will hear
a warning tone. You will see the Cruise
control Off message in the multi-function
display for approximately five seconds.
i The last speed stored is cleared when you
switch off the engine. Distronic*
i Distronic is not available in all countries.
Distronic regulates the speed and automati-
cally maintains the distance to the vehicle in
front. It brakes automatically in order to avoid
exceeding the set speed. On long and steep
downhill gradients, especially if the vehicle is Driving systems
119Controls
* optional
X164_AKB; 2; 3, en-GB
wobuchh,
Version: 2.11.8.1 2009-03-31T14:14:58+02:00 - Seite 119 Z
Dateiname: 6515431202_buchblock.pdf; erzeugt am 01. Apr 2009 00:17:21; WK
Page 124 of 309

G
Risk of accident
Distronic brakes your vehicle at a maximum
of 4m /s2
, depending on its speed. This cor-
responds to approximately 40% of your vehi-
cle's maximum brake force. You must also
apply the brakes yourself if this braking power
is not sufficient.
If Distronic detects a risk of collision with a
vehicle in front, an intermittent warning tone
sounds. In addition, the ·distance warn-
ing lamp in the instrument cluster lights up.
Brake to avoid a collision.
Cruise control lever You can operate Distronic and variable
Speedtronic with the cruise control lever.
The LIM indicator lamp on the cruise control
lever indicates which system you have selec-
ted:
R LIM indicator lamp off:
Distronic is selected.
R LIM indicator lamp lit:
Variable Speedtronic is selected. :
To store the current speed or a higher
speed
; To adjust the specified distance
= LIM indicator lamp
? To store the current speed or call up the
last stored speed
A To store the current speed or a lower
speed B
To switch between Distronic and variable
Speedtronic
C To deactivate Distronic
Selecting Distronic X
Check whether LIM indicator lamp =is off.
If it is off, Distronic is already selected.
If it is not, press the cruise control lever in
the direction of arrow B.
LIM indicator lamp =in the cruise control
lever goes off. Distronic is selected.
Switching on Distronic, storing and
maintaining the current speed G
Risk of accident
The vehicle can be braked when Distronic is
activated. For this reason, deactivate Dis-
tronic if the vehicle is to be set in motion by
other means (e.g. in a car wash or by towing).
You can activate Distronic in the following
circumstances:
R for about two minutes after the engine is
started
R when the engine is running
R if you do not brake during the journey
R when the parking brake is not applied
R if ESP ®
is activated
R if the automatic transmission is in position
D
R if the bonnet is closed
Activating while driving
When driving at speeds below 30 km/h, you
can only activate Distronic if the vehicle in
front has been detected and is shown in the
multi-function display. If the vehicle in front is
not shown in the multi-function display and is
no longer being detected, because it has
changed lanes, for example, Distronic is
deactivated and you hear a warning tone. Driving systems
121Controls
X164_AKB; 2; 3, en-GB
wobuchh,V ersion: 2.11.8.1
2009-03-31T14:14:58+02:00 - Seite 121 Z
Dateiname: 6515431202_buchblock.pdf; erzeugt am 01. Apr 2009 00:17:21; WK
Page 128 of 309
i
Distronic is not deactivated if you depress
the accelerator pedal. If you accelerate
briefly to overtake, Distronic adjusts the
vehicle's speed to the last speed stored
after you have finished overtaking.
Distronic is automatically deactivated if:
R you depress the parking brake
R you are driving slower than 25 km/h and
there is no vehicle in front, or the vehicle in
front is no longer detected
R ESP ®
intervenes or you deactivate ESP ®
R you shift the automatic transmission to N,
P or R
If Distronic is deactivated, you will hear a
warning tone. You will see the DISTRONIC
Off message in the multi-function display for
approximately five seconds.
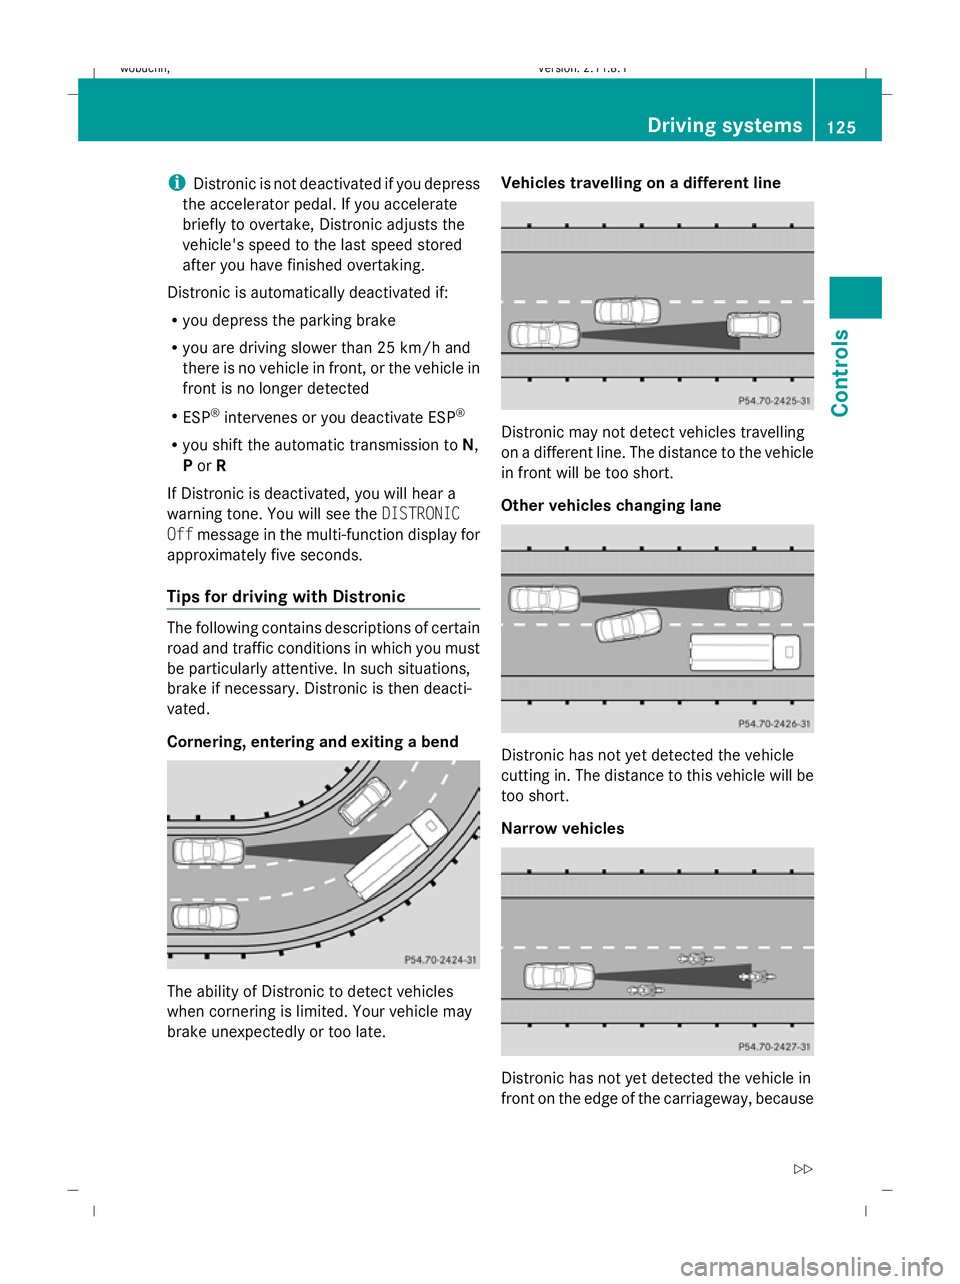
Tips for driving with Distronic The following contains descriptions of certain
road and traffic conditions in which you must
be particularly attentive. In such situations,
brake if necessary. Distronic is then deacti-
vated.
Cornering, entering and exiting a bend
The ability of Distronic to detect vehicles
when cornering is limited. Your vehicle may
brake unexpectedly or too late. Vehicles travelling on a different line
Distronic may not detect vehicles travelling
on a different line. The distance to the vehicle
in front will be too short.
Other vehicles changing lane
Distronic has not yet detected the vehicle
cutting in. The distance to this vehicle will be
too short.
Narrow vehicles Distronic has not yet detected the vehicle in
front on the edge of the carriageway, because Driving systems
125Controls
X164_AKB; 2; 3, en-GB
wobuchh, Version: 2.11.8.1 2009-03-31T14:14:58+02:00 - Seite 125 Z
Dateiname: 6515431202_buchblock.pdf; erzeugt am 01. Apr 2009 00:17:23; WK
Page 136 of 309

If one or more indicator lamps
=are on:
X Turn the selector wheel anti-clockwise ;
until all indicator lamps =that are lit start
to flash.
The vehicle is lowered to highway level. As
soon as the next lowest level is reached,
the indicator lamp stops flashing and goes
out.
While the adjustment is taking place, a mes-
sage appears in the multi-function display,
e.g.: If you press the
WorX button on the
multi-function steering wheel, the messages
will disappear.
Once highway level has been reached, all indi-
cator lamps =go out. You will see a message
in the multi-function display, for example: If you have not previously selected the off-
road menu (Y
page 102) in the on-board com-
puter, the message disappears after about
five seconds.
The vehicle automatically selects highway
level if you are driving at a speed above
115 km/h or if you drive at between
100 km/h and 115 km/h for around 20 sec-
onds. Depending on the ADS basic setting
(Y page 129), the vehicle is lowered to high-
speed level at high speeds. PARKTRONIC*
G
Risk of accident
PARKTRONIC is only an aid and may not
detect all obstacles. It is not a substitute for
attentive driving.
You are always responsible for safety and
must continue to pay attention to your imme-
diate surroundings when parking and
manoeuvring. You could otherwise endanger
yourself and others. G
Risk of injury
Make sure that no persons or animals are in
the manoeuvring range. Otherwise, they
could be injured.
PARKTRONIC is an electronic parking aid
using ultrasound. It indicates visually and
audibly the distance between your vehicle
and an object.
PARKTRONIC is activated automatically when
you:
R switch on the ignition
R release the parking brake
R shift the automatic transmission to D,Ror
N
PARKTRONIC is deactivated at speeds above
18 km/h. It is reactivated at lower speeds.
PARKTRONIC monitors the area around your
vehicle using six sensors in the front bumper
and four sensors in the rear bumper. :
Example: sensors in the front bumper,
left-hand side Driving systems
133Controls
* optional
X164_AKB; 2; 3, en-GB
wobuchh,
Version: 2.11.8.1 2009-03-31T14:14:58+02:00 - Seite 133 Z
Dateiname: 6515431202_buchblock.pdf; erzeugt am 01. Apr 2009 00:17:26; WK
Page 138 of 309
The automatic transmission position deter-
mines which warning display is active when
the engine is running:
Automatic trans-
mission position Warning display
D
Front area activated
R
or N Rear and front areas
activated
P
No areas activated
One or more segments light up as the vehicle
approaches an obstacle, depending on the
vehicle's distance to the obstacle.
From the:
R sixth segment onwards, you will hear an
intermittent warning tone for approx-
imately two seconds.
R seventh segment onwards, you will hear a
warning tone for approximately two sec-
onds. You have reached the minimum dis-
tance.
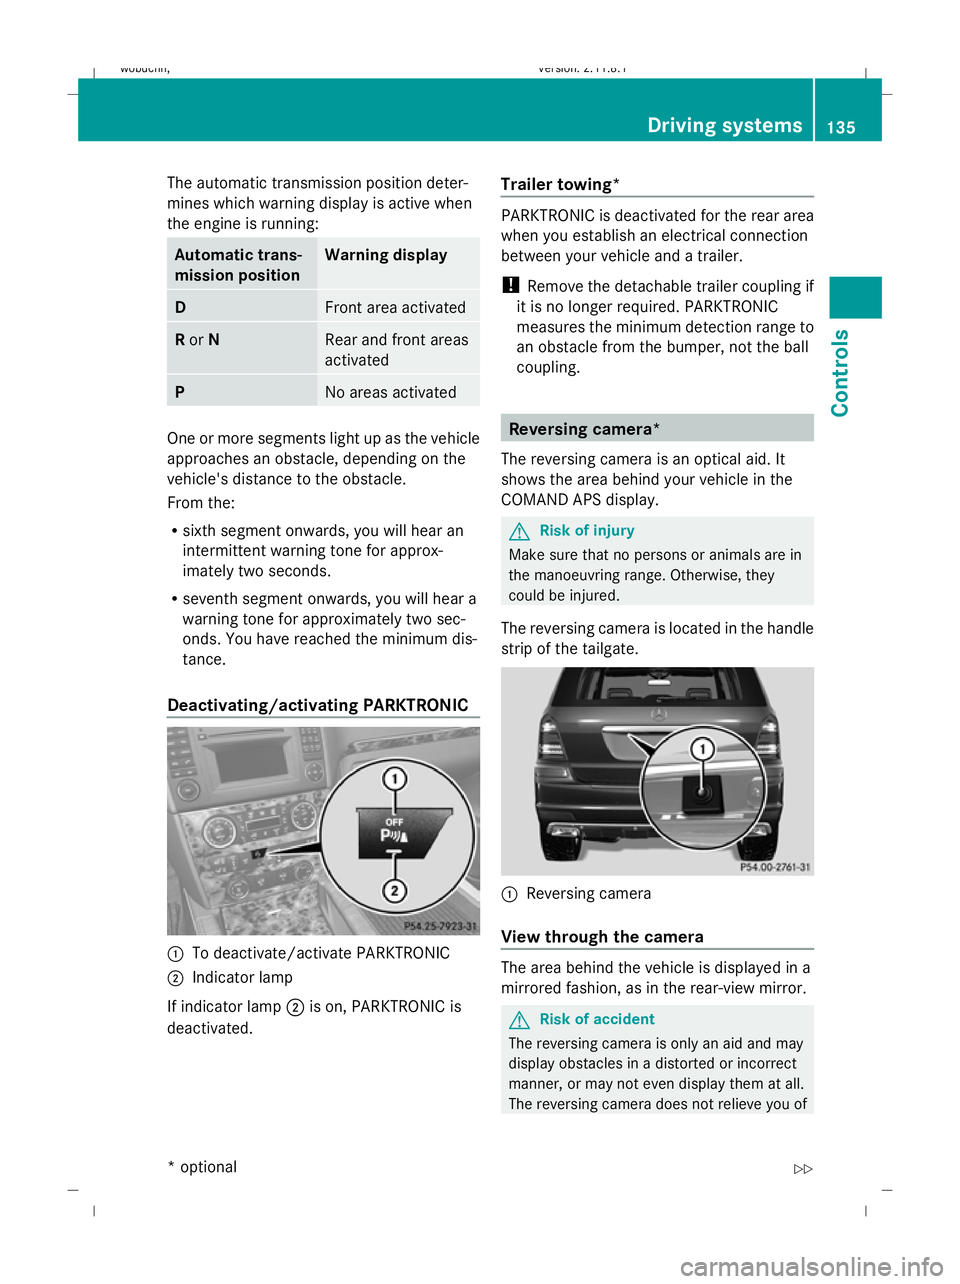
Deactivating/activating PARKTRONIC :
To deactivate/activate PARKTRONIC
; Indicator lamp
If indicator lamp ;is on, PARKTRONIC is
deactivated. Trailer towing* PARKTRONIC is deactivated for the rear area
when you establish an electrical connection
between your vehicle and a trailer.
!
Remove the detachable trailer coupling if
it is no longer required. PARKTRONIC
measures the minimum detection range to
an obstacle from the bumper, not the ball
coupling. Reversing camera*
The reversing camera is an optical aid. It
shows the area behind your vehicle in the
COMAND APS display. G
Risk of injury
Make sure that no persons or animals are in
the manoeuvring range. Otherwise, they
could be injured.
The reversing camera is located in the handle
strip of the tailgate. :
Reversing camera
View through the camera The area behind the vehicle is displayed in a
mirrored fashion, as in the rear-view mirror.
G
Risk of accident
The reversing camera is only an aid and may
display obstacles in a distorted or incorrect
manner, or may not even display them at all.
The reversing camera does not relieve you of Driving systems
135Controls
* optional
X164_AKB; 2; 3, en-GB
wobuchh,
Version: 2.11.8.1 2009-03-31T14:14:58+02:00 - Seite 135 Z
Dateiname: 6515431202_buchblock.pdf; erzeugt am 01. Apr 2009 00:17:27; WK
Page 169 of 309
grammed. If this transmitter button has
already been programmed, indicator
lamp
:will only start flashing at a rate of
once a second after 20 seconds have
elapsed.
X Keep the transmitter buttons depressed.
X Point the garage door's remote control with
the transmitter towards the left-hand side
of the rear-view mirror from a distance of 5
to 20 cm.
i The distance between the garage door's
remote control and the integrated garage
door opener depends on the system of the
garage door drive. You might require sev-
eral attempts. You should test every posi-
tion for at least 20 seconds before trying
another position.
X Keep the transmitter button on the garage
door's remote control depressed until indi-
cator lamp :starts to flash rapidly.
The programming was successful if indica-
tor lamp :flashes rapidly.
X Release the transmitter buttons on the
garage door's remote control and the inte-
grated remote control.
If indicator lamp :goes out after approx-
imately 20 seconds and did not flash rapidly
before this:
X Release the transmitter buttons on the
integrated and portable remote controls.
X Repeat the programming procedure. When
doing so, change the distance between the
garage door's remote control and the trans-
mitter buttons in the rear-view mirror.
i If the garage door system works with a
rolling code, after programming you must
synchronise the remote control integrated
in the rear-view mirror with the garage door
system receiver.
You will find further information in the
garage door opening system's operating
instructions, e.g. the sections on "Synchro-
nising the transmitter" or "Registering a new transmitter". You can also call the hot-
line mentioned above.
Opening or closing the garage door Once programmed, the integrated remote
control will assume the function of the garage
door system's remote control. Please read
the operating instructions for the garage door
system.
X
Turn the key to position 2in the ignition
lock.
X Press the transmitter button on the rear-
view mirror that you have programmed to
operate the garage door.
Garage door system with fixed code: indi-
cator lamp :lights up continuously.
Garage door system with rolling code: indi-
cator lamp :flashes briefly and then lights
up for approximately two seconds. This is
repeated for up to 20 seconds.
i The transmitter will transmit a signal for
as long as the transmitter button is being
pressed. The transmission will be halted
after a maximum of 20 seconds and indi-
cator lamp :will flash. Press the trans-
mitter button again, if necessary.
Clearing the remote control memory X
Turn the key to position 2in the ignition
lock.
X Press and hold transmitter buttons ;
and ?for approximately 20 seconds until
indicator lamp :flashes rapidly.
The memory is cleared.
i You should clear the remote control mem-
ory before selling the vehicle. Compass*
In the Off-road menu* (Y page 102), the
compass displays the compass bearing of
your direction of travel. You will see N,NE, E,
SE, S,SW, Wor NW in the multi-function display. 166
FeaturesControls
* optional
X164_AKB; 2; 3, en-GB
wobuchh,
Version: 2.11.8.1 2009-03-31T14:14:58+02:00 - Seite 166
Dateiname: 6515431202_buchblock.pdf; erzeugt am 01. Apr 2009 00:17:43; WK
Page 170 of 309
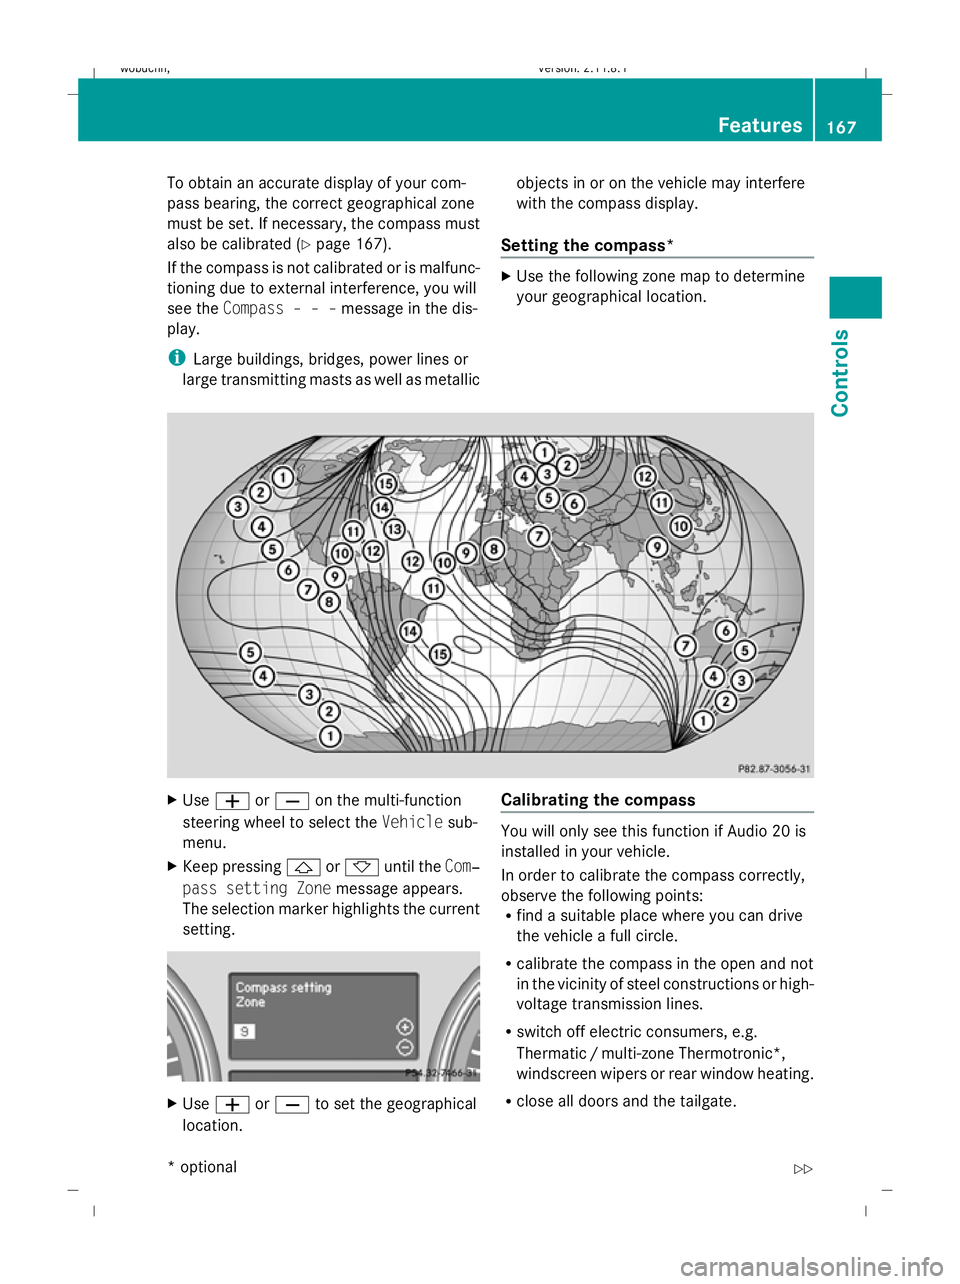
To obtain an accurate display of your com-
pass bearing, the correct geographical zone
must be set. If necessary, the compass must
also be calibrated (Y page 167).
If the compass is not calibrated or is malfunc-
tioning due to external interference, you will
see the Compass – – – message in the dis-
play.
i Large buildings, bridges, power lines or
large transmitting masts as well as metallic objects in or on the vehicle may interfere
with the compass display.
Setting the compass* X
Use the following zone map to determine
your geographical location. X
Use W orX on the multi-function
steering wheel to select the Vehiclesub-
menu.
X Keep pressing &or* until the Com‐
pass setting Zone message appears.
The selection marker highlights the current
setting. X
Use W orX to set the geographical
location. Calibrating the compass You will only see this function if Audio 20 is
installed in your vehicle.
In order to calibrate the compass correctly,
observe the following points:
R
find a suitable place where you can drive
the vehicle a full circle.
R calibrate the compass in the open and not
in the vicinity of steel constructions or high-
voltage transmission lines.
R switch off electric consumers, e.g.
Thermatic /multi-zone Thermotronic*,
windscreen wipers or rear window heating.
R close all doors and the tailgate. Features
167Controls
* optional
X164_AKB; 2; 3, en-GB
wobuchh,
Version: 2.11.8.1 2009-03-31T14:14:58+02:00 - Seite 167 Z
Dateiname: 6515431202_buchblock.pdf; erzeugt am 01. Apr 2009 00:17:43; WK
Page 191 of 309
New brake pads/linings
For safety reasons, Mercedes-Benz recom-
mends that you only have brake pads/linings
fitted to your vehicle which have been
approved for Mercedes-Benz vehicles or
which correspond to an equivalent quality
standard. Brake pads/linings which have not
been approved for Mercedes-Benz vehicles or
which are not of an equivalent quality could
affect your vehicle's operating safety. G
Risk of accident
New brake pads/linings only reach their opti-
mum braking effect after several hundred kil-
ometres of driving. Before this optimum brak-
ing effect is reached, you should compensate
for the reduced braking effect by applying
greater pressure when braking. This also
applies after the brake discs or the brake
pads/linings have been replaced. Tyre grip
G
Risk of accident
While the vehicle can be fully controlled at a
certain speed on dry roads, you must reduce
your speed on wet or icy roads to achieve the
same road safety. Otherwise, you could cause
an accident.
Pay particular attention to the road conditions
at temperatures around freezing point.
If ice has formed on the road surface (e.g.
from fog), a thin film of water rapidly forms on
the ice when you brake, considerably reduc-
ing tyre grip. Drive with particular care in such
weather conditions. Driving on wet roads
If water has accumulated to a certain depth
on the road surface, there is a danger of aqua-
planing occurring, even if:
R you drive at low speeds
R the tyres have adequate tread depth For this reason, do not drive in tyre ruts, and
brake carefully. Driving on flooded roads
If you have to drive on stretches of road on
which water has collected, please bear in
mind that:
R the maximum permitted still water depth
depends on the vehicle equipment
(Y page 192).
R you should drive no faster than at walking
pace.
! Bear in mind that vehicles travelling in
front or in the opposite direction create
waves. This may cause the maximum per-
missible water depth to be exceeded.
Failure to observe these notes may result
in damage to the engine, electrical systems
and transmission. Off-road driving
Points to remember
G
Risk of accident
Drive slowly in rough terrain with which you
are unfamiliar. This will allow you to detect
unexpected obstacles more easily and, there-
fore, to reduce the risk of an accident.
Do not make U-turns on mountain roads. Oth-
erwise, the vehicle could tip over. If a slope is
too steep for the vehicle, drive back in reverse
gear.
Do not drive at an angle up steep inclines.
Otherwise, the vehicle could tip over. If you
drive up a steep incline at an angle and the
vehicle threatens to overturn, steer into the
line of fall immediately.
Never allow the vehicle to roll backwards. The
braking effect of the engine cannot be utilised
in neutral. If you only use the service brake,
you could lose control of the vehicle. 188
Off-road drivingOperation
X164_AKB; 2; 3, en-GB
wobuchh
,V ersion: 2.11.8.1
2009-03-31T14:14:58+02:00 - Seite 188
Dateiname: 6515431202_buchblock.pdf; erzeugt am 01. Apr 2009 00:17:49; WK