2009 MERCEDES-BENZ GL SUV light
[x] Cancel search: lightPage 55 of 309
the trailer from swerving and will thus be
unable to reduce the risk of an accident. Trail-
ers with a high centre of gravity can tip over
before ESP ®
can detect this.
Trailer stabilisation does not work if ESP ®
is
deactivated or disabled because of a mal-
function.
Activating/deactivating ESP ®ESP
®
is activated automatically when the
engine is running.
It may be best to deactivate ESP ®
in the fol-
lowing situations:
R when using snow chains
R in deep snow
R on sand or gravel G
Risk of accident
Activate ESP ®
as soon as the situations
described above no longer apply. ESP ®
will
otherwise not be able to stabilise the vehicle
if the vehicle starts to skid or a wheel starts
to spin.
If you deactivate ESP ®
:
R ESP ®
no longer improves driving stability.
R the engine's torque is no longer limited and
the drive wheels can spin. Spinning of the
wheels results in a cutting action, which
provides better grip.
R traction control is still activated.
R ESP ®
still provides support when you
brake.
i If ESP ®
is deactivated and one or more
wheels start to spin, the dwarning lamp
in the instrument cluster flashes. In such
situations, ESP ®
will not stabilise the vehi-
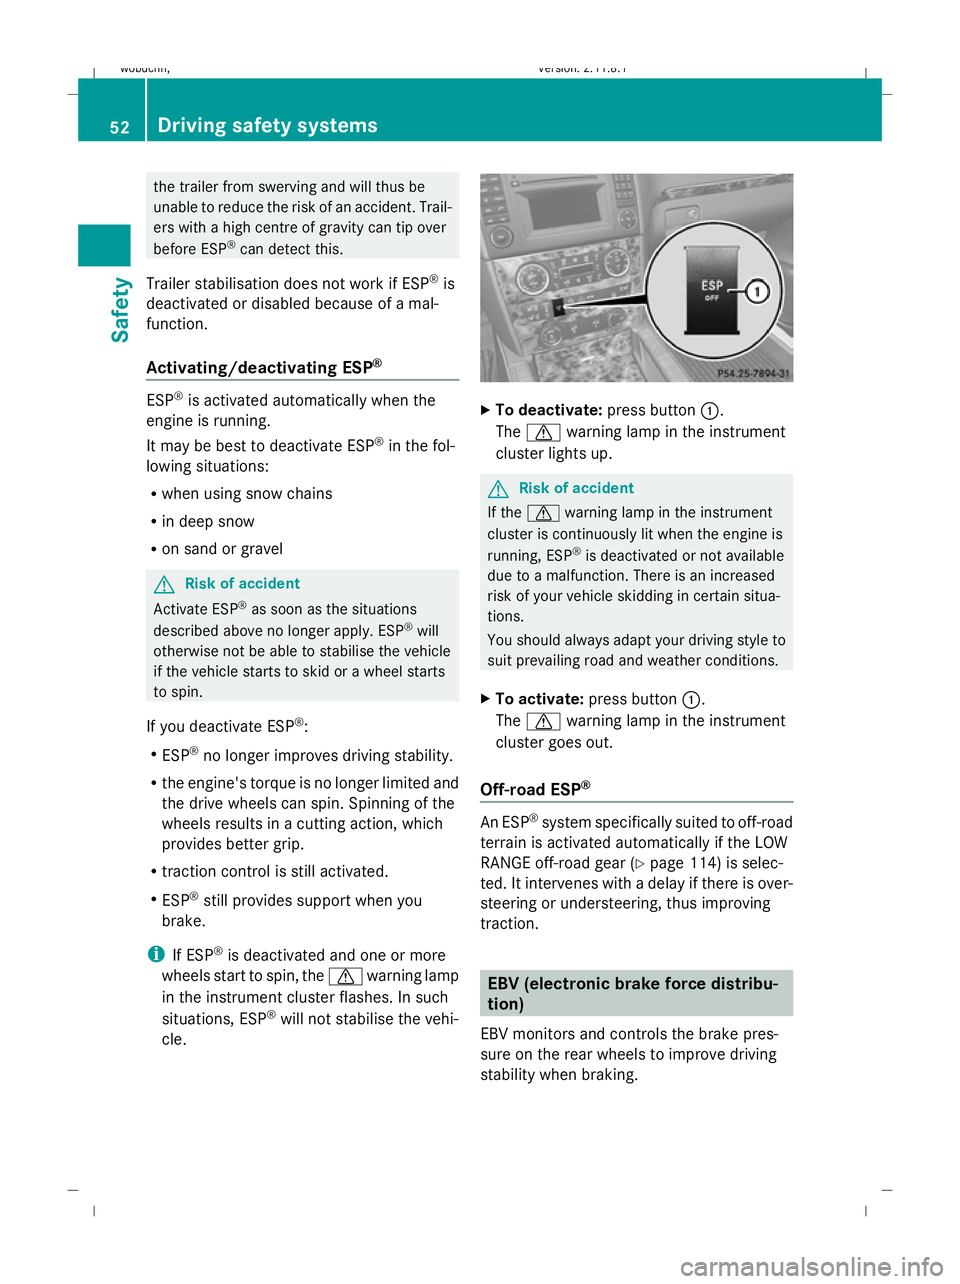
cle. X
To deactivate: press button:.
The d warning lamp in the instrument
cluster lights up. G
Risk of accident
If the d warning lamp in the instrument
cluster is continuously lit when the engine is
running, ESP ®
is deactivated or not available
due to a malfunction. There is an increased
risk of your vehicle skidding in certain situa-
tions.
You should always adapt your driving style to
suit prevailing road and weather conditions.
X To activate: press button :.
The d warning lamp in the instrument
cluster goes out.
Off-road ESP ® An ESP
®
system specifically suited to off-road
terrain is activated automatically if the LOW
RANGE off-road gear (Y page 114) is selec-
ted. It intervenes with a delay if there is over-
steering or understeering, thus improving
traction. EBV (electronic brake force distribu-
tion)
EBV monitors and controls the brake pres-
sure on the rear wheels to improve driving
stability when braking. 52
Driving safety systemsSafety
X164_AKB; 2; 3, en-GB
wobuchh
,V ersion: 2.11.8.1
2009-03-31T14:14:58+02:00 - Seite 52
Dateiname: 6515431202_buchblock.pdf; erzeugt am 01. Apr 2009 00:16:49; WK
Page 56 of 309

G
Risk of accident
If EBV is malfunctioning, the brake system is
still available with full brake boosting effect.
However, the rear wheels can still lock, e.g.
under full braking. This could cause you to
lose control of your vehicle and cause an acci-
dent. You should therefore adapt your driving
style to the different handling characteristics. 4ETS (Electronic Traction System)
4ETS makes it possible to pull away or accel-
erate on a slippery surface. It brakes the
wheels individually if they start to spin.
The d warning lamp in the instrument
cluster lights up briefly when the engine is
started. This indicates that the warning lamp
is operational.
X Activate the LOW RANGE off-road gear
(Y page 114) if appropriate to driving con-
ditions.
The d warning lamp in the instrument
cluster flashes at any speed if at least one tyre
has exceeded its tyre grip limit. G
Risk of accident
If the d warning lamp in the instrument
cluster flashes, proceed as follows:
R only depress the accelerator pedal as far as
necessary when pulling away.
R accelerate less when driving.
R adapt your driving style to suit the prevail-
ing road and weather conditions.
Otherwise, the vehicle could skid.
If you drive too fast, 4ETS cannot reduce the
risk of an accident. 4ETS cannot override the
laws of physics.
! Only operate the vehicle briefly (for a max-
imum of ten seconds) on a brake dyna-
mometer. Turn the key in the ignition lock
to position 0or 1. You could otherwise
damage the drive train or the brake system. !
A function or performance test should
only be carried out on a twin-axle dyna-
mometer. If you wish to operate the vehicle
on such a dynamometer, please consult a
Mercedes-Benz Service Centre in advance.
You could otherwise damage the drive train
or the brake system.
i If the brakes are subjected to heavy loads,
4ETS switches off automatically for a brief
period so that the brakes do not heat up
further. If, for this reason, 4ETS does not
engage, the dwarning lamp in the
instrument cluster lights up. The message
ABS, ESP unavailable see Owner's
Manual also appears in the multi-function
display.
! The engine must be off when the parking
brake is being checked on the brake dyna-
mometer. Application of the brakes via
4ETS may otherwise destroy the braking
system.
Off-road terrain-4ETS (Electronic Trac-
tion System) A 4ETS system specifically suited to off-road
terrain is activated automatically if the LOW
RANGE* off-road gear is selected
(Y page 114). Distance warning function* (vehicles
with Distronic*)
This function will issue a warning at speeds of
around 30 km/h or more if:
R for a period of several seconds, the dis-
tance to the vehicle in front is too short for
the speed at which you are travelling. The
· distance warning lamp in the instru-
ment cluster will light up.
R you are approaching the vehicle in front too
rapidly. An intermittent warning tone will
then sound and the ·distance warning
lamp will light up in the instrument cluster. Driving safety systems
53Safety
* optional
X164_AKB; 2; 3, en-GB
wobuchh,
Version: 2.11.8.1 2009-03-31T14:14:58+02:00 - Seite 53 Z
Dateiname: 6515431202_buchblock.pdf; erzeugt am 01. Apr 2009 00:16:49; WK
Page 57 of 309
In order to maintain the appropriate distance
to the vehicle in front and thus prevent a
crash, you must apply the brakes yourself. G
Risk of accident
Pay particular attention to the traffic condi-
tions if the distance warning lamp ·in the
instrument cluster lights up or an intermittent
warning tone sounds.
If necessary, brake or manoeuvre to avoid an
obstacle.
X To activate/deactivate: activate or deac-
tivate the distance warning function in the
on-board computer (Y page 109).
After activation, the Äsymbol is dis-
played in the lower multi-function display.
For more information on the distance warning
function, see the Distronic section*
(Y page 119). Anti-theft systems
Immobiliser
The immobiliser prevents your vehicle from
being started without the correct key.
Activating the immobiliser X
With the key: remove the key from the
ignition lock.
X With KEYLESS GO*: press the start/stop
button on the dashboard.
The engine switches off.
Deactivating the immobiliser X
With the key: turn the key to position 2in
the ignition lock.
X With KEYLESS GO*: press the start/stop
button on the dashboard twice without
depressing the brake.
i The immobiliser is always deactivated
when you start the engine. ATA* (anti-theft alarm system)
A visual and audible alarm is triggered when
the alarm system is primed and you open:
R a door
R a door using the emergency key element
R the tailgate
R the bonnet
The alarm is not switched off even if you close
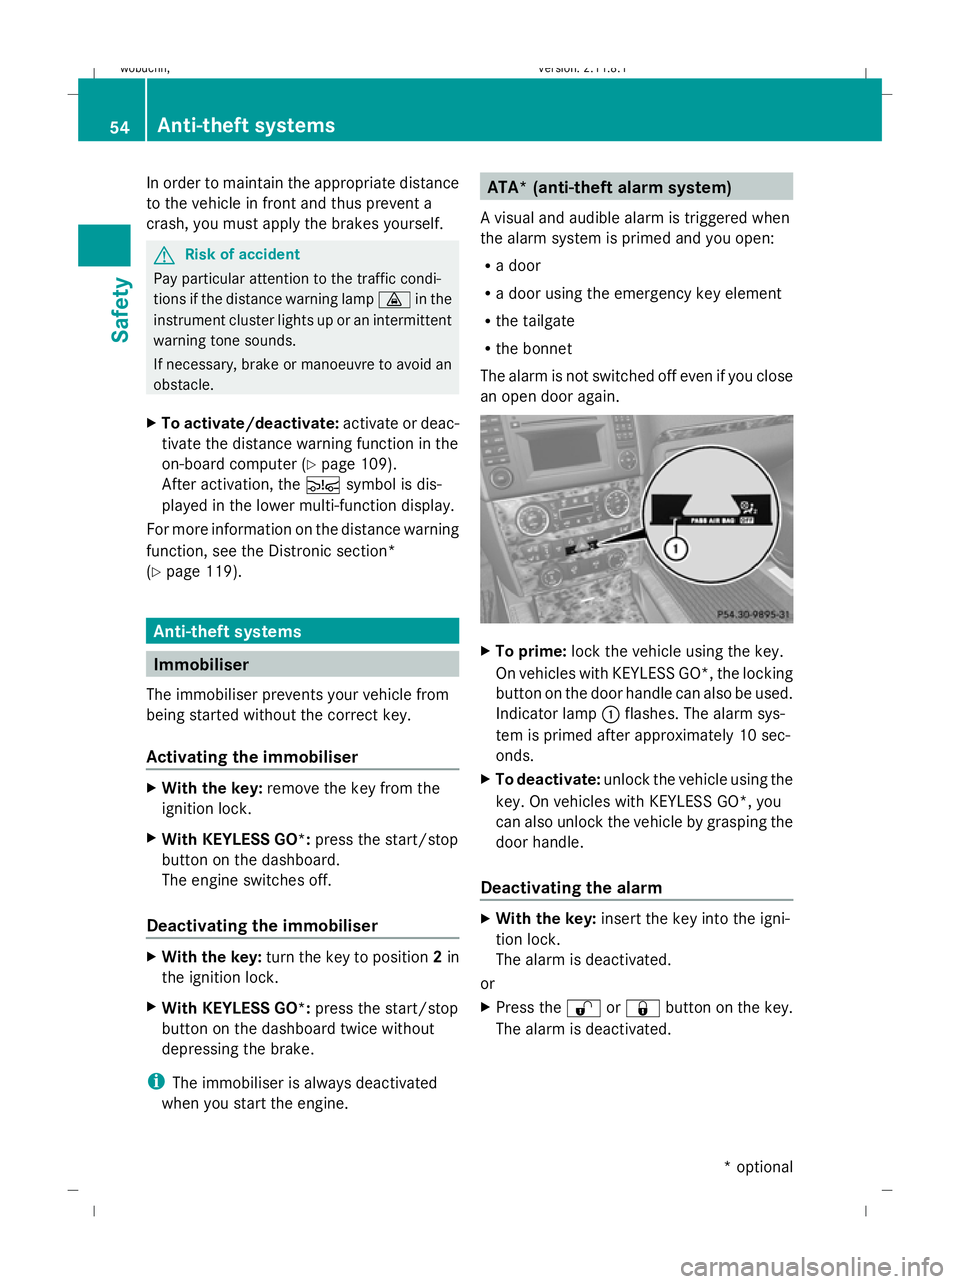
an open door again. X
To prime: lock the vehicle using the key.
On vehicles with KEYLESS GO*, the locking
button on the door handle can also be used.
Indicator lamp :flashes. The alarm sys-
tem is primed after approximately 10 sec-
onds.
X To deactivate: unlock the vehicle using the
key. On vehicles with KEYLESS GO*, you
can also unlock the vehicle by grasping the
door handle.
Deactivating the alarm X
With the key: insert the key into the igni-
tion lock.
The alarm is deactivated.
or
X Press the %or& button on the key.
The alarm is deactivated. 54
Anti-theft systemsSafety
* optional
X164_AKB; 2; 3, en-GB
wobuchh,
Version: 2.11.8.1 2009-03-31T14:14:58+02:00 - Seite 54
Dateiname: 6515431202_buchblock.pdf; erzeugt am 01. Apr 2009 00:16:49; WK
Page 60 of 309
Opening and closing
...........................58
Tailgate ................................................ 60
Key positions ....................................... 63
Seats .................................................... 64
Steering wheel .................................... 70
Mirrors ................................................. 72
Memory functions* .............................74
Seat belts ............................................. 75
Lights ................................................... 78
Windscreen wipers .............................84
Side windows ...................................... 85
Driving and parking ............................88
Transmission ....................................... 91
Instrument cluster ..............................96
On-board computer .............................97
Off-road driving ................................. 112
Driving systems ................................ 117
Air conditioning ................................. 136
Sliding sunroof .................................. 149
Loading and stowing ........................151
Features ............................................. 161 57Controls
X164_AKB; 2; 3, en-GB
wobuchh,
Version: 2.11.8.1 2009-03-31T14:14:58+02:00 - Seite 57
Dateiname: 6515431202_buchblock.pdf; erzeugt am 01. Apr 2009 00:16:51; WK
Page 61 of 309

Opening and closing
Key
The key centrally locks/unlocks:
R the doors
R the tailgate
R the fuel filler flap G
Risk of accident
If children are left unsupervised in the vehicle,
they could:
R open a door from the inside at any time,
even if it has been locked
R start the vehicle using a key which has been
left in the vehicle
R release the parking brake
They could thereby endanger themselves and
others. Never leave children unsupervised in
the vehicle. Always take the key with you
when leaving the vehicle, even if you are only
leaving it for a short time. :
& To lock the vehicle
; F To open/close the tailgate*
= Emergency key element
? % To unlock the vehicle
A Battery check lamp
When unlocking, the turn signals flash once.
When locking, they flash three times.
When it is dark, the surround lighting also
comes on if it is activated in the on-board
computer. The vehicle relocks automatically if you do not
open a door or the tailgate within 40 seconds
of unlocking the vehicle.
KEYLESS GO* You can start, lock or unlock the vehicle using
the KEYLESS GO key. To do this, you only
need carry the key with you. When you touch
the surface of the sensors on the vehicle's
door handles, KEYLESS GO establishes a
radio connection between the vehicle and the
key.
The distance to the door handle from which
you wish to lock or unlock the vehicle must
not be greater than 1 m.
When starting the engine and whilst driving,
KEYLESS GO also checks whether a valid key
is in the vehicle by periodically establishing
radio contact. X
To unlock the vehicle: touch the inner
surface of the door handle.
X To lock the vehicle: press locking but-
ton :.
If you pull on the handle of the tailgate, only
the luggage compartment of the vehicle is
unlocked.
i If the vehicle has been parked for a long
time, you must pull the door handle to acti-
vate KEYLESS GO. 58
Opening and closingControls
* optional
X164_AKB; 2; 3, en-GB
wobuchh,
Version: 2.11.8.1 2009-03-31T14:14:58+02:00 - Seite 58
Dateiname: 6515431202_buchblock.pdf; erzeugt am 01. Apr 2009 00:16:51; WK
Page 74 of 309
However, the steerability of the vehicle is not
affected.
When you adjust the steering wheel, make
sure that:
R the steering wheel can be reached with
your arms slightly bent
R you can move your legs freely
R you can see all the displays in the instru-
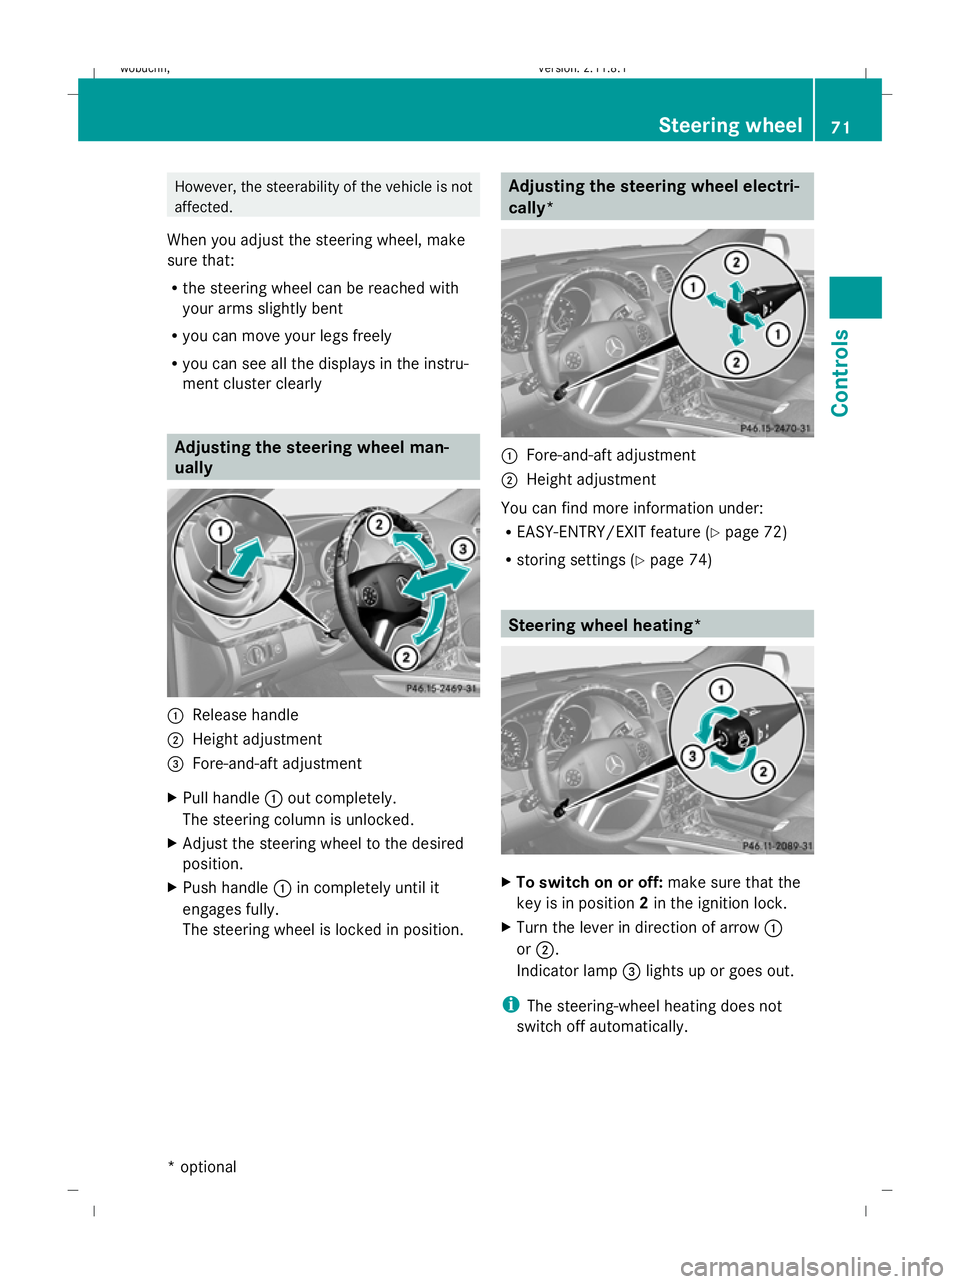
ment cluster clearly Adjusting the steering wheel man-
ually
:
Release handle
; Height adjustment
= Fore-and-aft adjustment
X Pull handle :out completely.
The steering column is unlocked.
X Adjust the steering wheel to the desired
position.
X Push handle :in completely until it
engages fully.
The steering wheel is locked in position. Adjusting the steering wheel electri-
cally*
:
Fore-and-aft adjustment
; Height adjustment
You can find more information under:
R EASY-ENTRY/EXIT feature (Y page 72)
R storing settings (Y page 74) Steering wheel heating*
X
To switch on or off: make sure that the
key is in position 2in the ignition lock.
X Turn the lever in direction of arrow :
or ;.
Indicator lamp =lights up or goes out.
i The steering-wheel heating does not
switch off automatically. Steering wheel
71Controls
* optional
X164_AKB; 2; 3, en-GB
wobuchh
,V ersion: 2.11.8.1
2009-03-31T14:14:58+02:00 - Seite 71 Z
Dateiname: 6515431202_buchblock.pdf; erzeugt am 01. Apr 2009 00:17:02; WK
Page 76 of 309
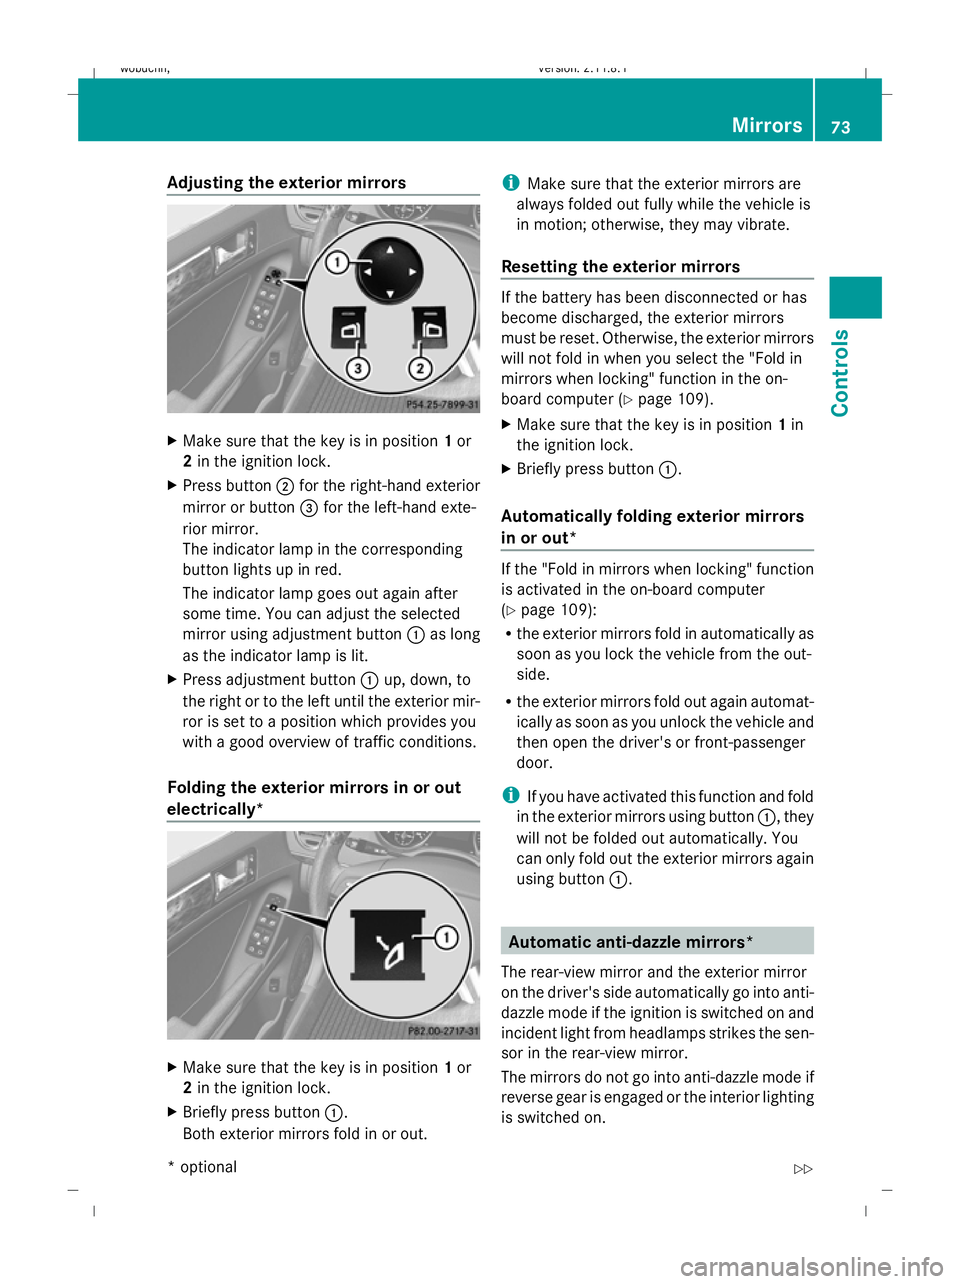
Adjusting the exterior mirrors
X
Make sure that the key is in position 1or
2 in the ignition lock.
X Press button ;for the right-hand exterior
mirror or button =for the left-hand exte-
rior mirror.
The indicator lamp in the corresponding
button lights up in red.
The indicator lamp goes out again after
some time. You can adjust the selected
mirror using adjustment button :as long
as the indicator lamp is lit.
X Press adjustment button :up, down, to
the right or to the left until the exterior mir-
ror is set to a position which provides you
with a good overview of traffic conditions.
Folding the exterior mirrors in or out
electrically* X
Make sure that the key is in position 1or
2 in the ignition lock.
X Briefly press button :.
Both exterior mirrors fold in or out. i
Make sure that the exterior mirrors are
always folded out fully while the vehicle is
in motion; otherwise, they may vibrate.
Resetting the exterior mirrors If the battery has been disconnected or has
become discharged, the exterior mirrors
must be reset. Otherwise, the exterior mirrors
will not fold in when you select the "Fold in
mirrors when locking" function in the on-
board computer (Y
page 109).
X Make sure that the key is in position 1in
the ignition lock.
X Briefly press button :.
Automatically folding exterior mirrors
in or out* If the "Fold in mirrors when locking" function
is activated in the on-board computer
(Y
page 109):
R the exterior mirrors fold in automatically as
soon as you lock the vehicle from the out-
side.
R the exterior mirrors fold out again automat-
ically as soon as you unlock the vehicle and
then open the driver's or front-passenger
door.
i If you have activated this function and fold
in the exterior mirrors using button :, they
will not be folded out automatically. You
can only fold out the exterior mirrors again
using button :. Automatic anti-dazzle mirrors*
The rear-view mirror and the exterior mirror
on the driver's side automatically go into anti-
dazzle mode if the ignition is switched on and
incident light from headlamps strikes the sen-
sor in the rear-view mirror.
The mirrors do not go into anti-dazzle mode if
reverse gear is engaged or the interior lighting
is switched on. Mirrors
73Controls
* optional
X164_AKB; 2; 3, en-GB
wobuchh,
Version: 2.11.8.1 2009-03-31T14:14:58+02:00 - Seite 73 Z
Dateiname: 6515431202_buchblock.pdf; erzeugt am 01. Apr 2009 00:17:03; WK
Page 77 of 309
G
Risk of accident
If incident light from headlamps is prevented
from striking the sensor in the rear-view mir-
ror, for instance, if the safety net is fitted, the
mirror’s automatic anti-dazzle function will
not work.
Incident light could then dazzle you. This may
prevent you from observing the traffic condi-
tions, thereby causing an accident. In this
case, adjust the rear-view mirror manually. Memory functions*
Storing settings
Using the memory button you can store up to
three different settings, e. g. for three differ-
ent people.
The following settings are stored as a single
memory preset:
R position of the seat, backrest and head
restraint
R driver's side: steering wheel position
R driver's side: position of the exterior mir-
rors on the driver's and front-passenger
sides G
Risk of injury
The memory function can still be used when
the key has been removed. For this reason,
children should never be left unsupervised in
the vehicle. Otherwise, they could become
trapped when moving the seat or the steering
wheel. G
Risk of accident
Only use the memory function on the driver’s
side when the vehicle is stationary. Other-
wise, you could be distracted from the traffic
conditions by the steering wheel and seat
moving of their own accord, and as a result
cause an accident. X
Adjust the seat ( Ypage 64).
X On the driver's side, also adjust the steer-
ing wheel (Y page 70) and the mirrors
(Y page 72).
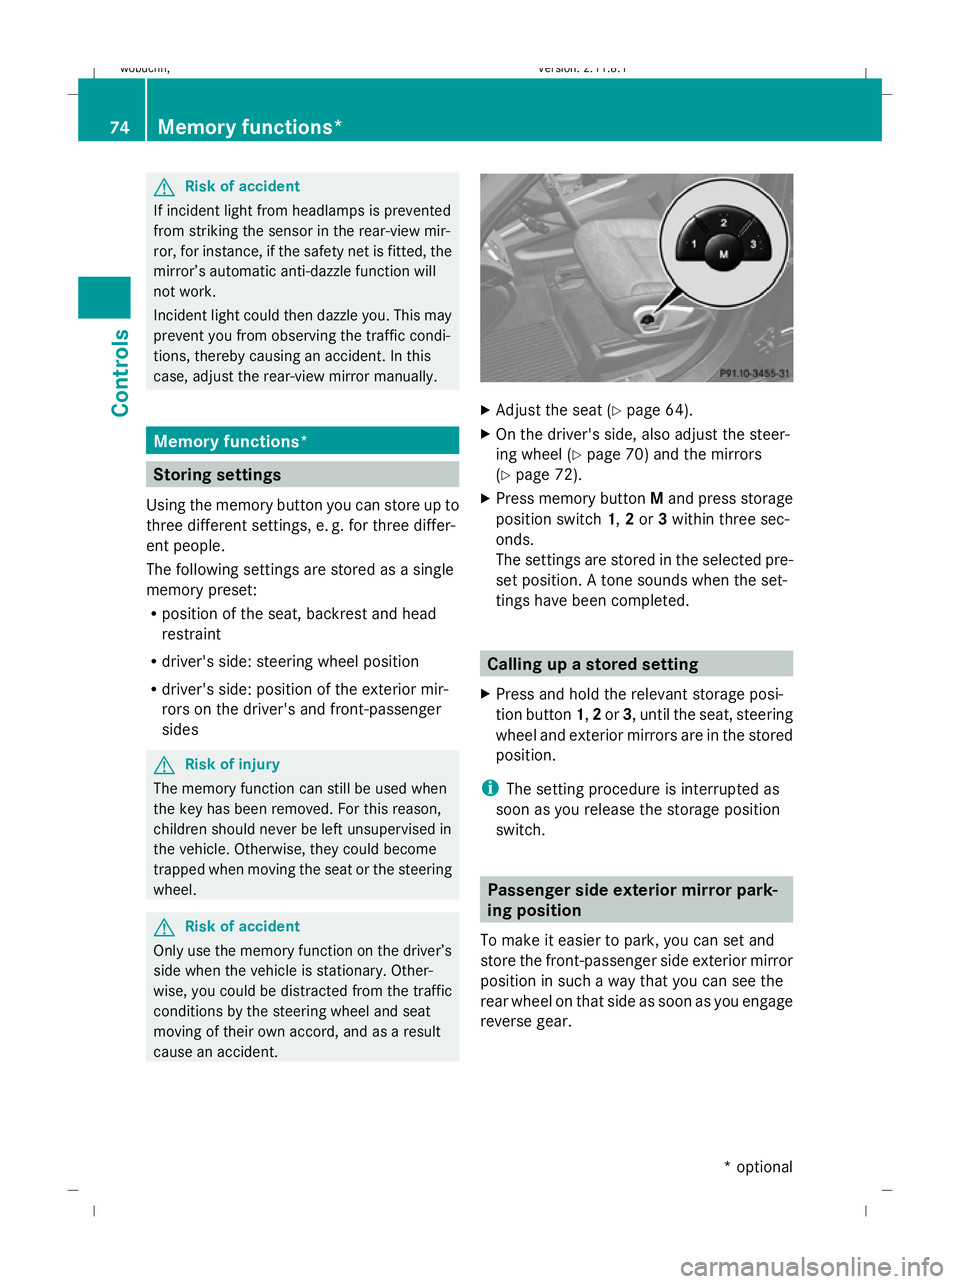
X Press memory button Mand press storage
position switch 1,2or 3within three sec-
onds.
The settings are stored in the selected pre-
set position. A tone sounds when the set-
tings have been completed. Calling up a stored setting
X Press and hold the relevant storage posi-
tion button 1,2or 3, until the seat, steering
wheel and exterior mirrors are in the stored
position.
i The setting procedure is interrupted as
soon as you release the storage position
switch. Passenger side exterior mirror park-
ing position
To make it easier to park, you can set and
store the front-passenger side exterior mirror
position in such a way that you can see the
rear wheel on that side as soon as you engage
reverse gear. 74
Memory functions*Controls
* optional
X164_AKB; 2; 3, en-GB
wobuchh,
Version: 2.11.8.1 2009-03-31T14:14:58+02:00 - Seite 74
Dateiname: 6515431202_buchblock.pdf; erzeugt am 01. Apr 2009 00:17:04; WK