2009 MERCEDES-BENZ GL SUV tailgate
[x] Cancel search: tailgatePage 198 of 309
i
The key remains inserted when you
remove the ball coupling. X
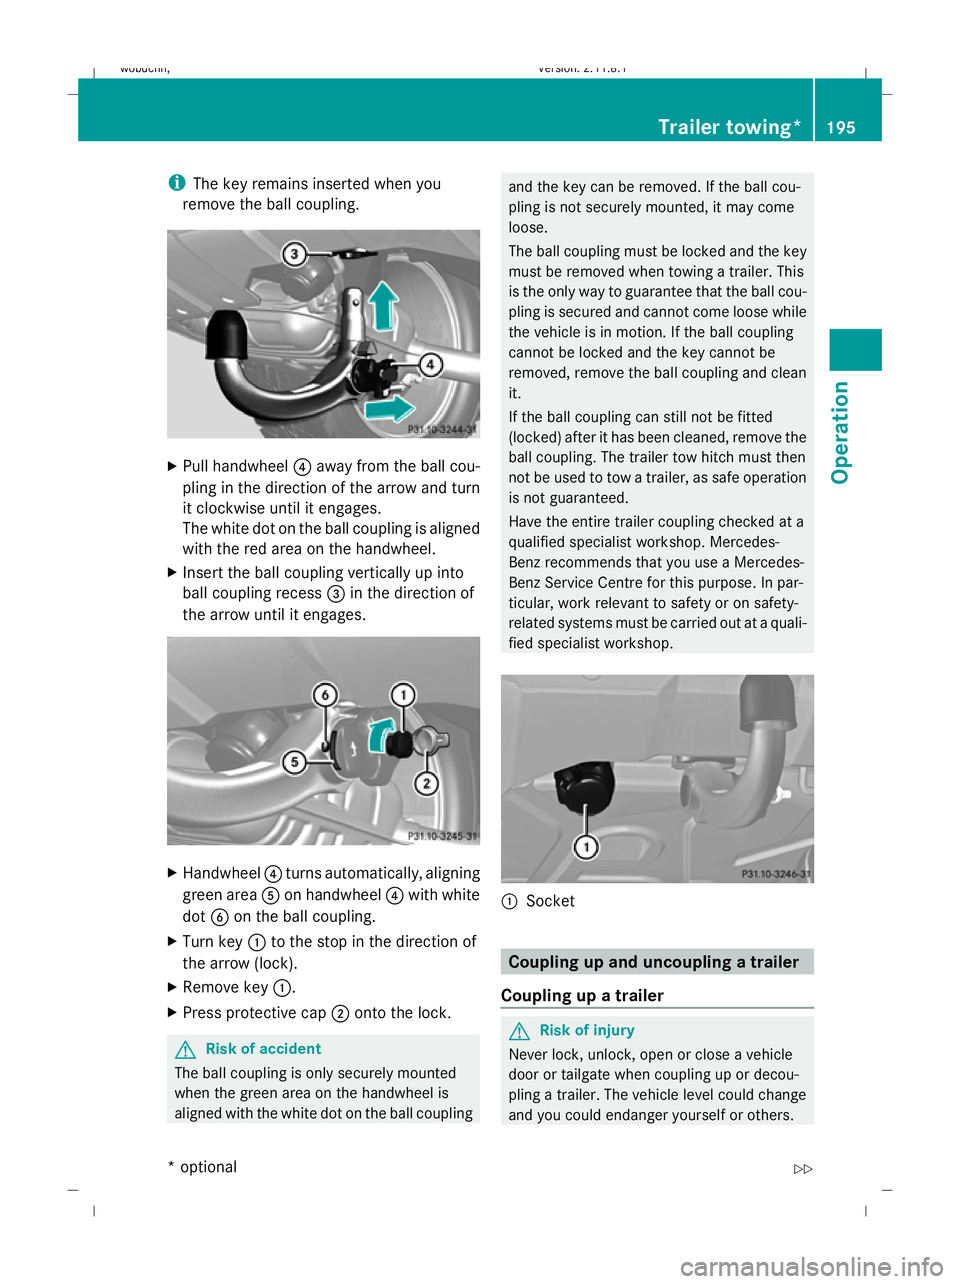
Pull handwheel ?away from the ball cou-
pling in the direction of the arrow and turn
it clockwise until it engages.
The white dot on the ball coupling is aligned
with the red area on the handwheel.
X Insert the ball coupling vertically up into
ball coupling recess =in the direction of
the arrow until it engages. X
Handwheel ?turns automatically, aligning
green area Aon handwheel ?with white
dot Bon the ball coupling.
X Turn key :to the stop in the direction of
the arrow (lock).
X Remove key :.
X Press protective cap ;onto the lock. G
Risk of accident
The ball coupling is only securely mounted
when the green area on the handwheel is
aligned with the white dot on the ball coupling and the key can be removed. If the ball cou-
pling is not securely mounted, it may come
loose.
The ball coupling must be locked and the key
must be removed when towing a trailer. This
is the only way to guarantee that the ball cou-
pling is secured and cannot come loose while
the vehicle is in motion. If the ball coupling
cannot be locked and the key cannot be
removed, remove the ball coupling and clean
it.
If the ball coupling can still not be fitted
(locked) after it has been cleaned, remove the
ball coupling. The trailer tow hitch must then
not be used to tow a trailer, as safe operation
is not guaranteed.
Have the entire trailer coupling checked at a
qualified specialist workshop. Mercedes-
Benz recommends that you use a Mercedes-
Benz Service Centre for this purpose. In par-
ticular, work relevant to safety or on safety-
related systems must be carried out at a quali-
fied specialist workshop. :
Socket Coupling up and uncoupling a trailer
Coupling up a trailer G
Risk of injury
Never lock, unlock, open or close a vehicle
door or tailgate when coupling up or decou-
pling a trailer. The vehicle level could change
and you could endanger yourself or others. Trailer towing*
195Operation
* optional
X164_AKB; 2; 3, en-GB
wobuchh,
Version: 2.11.8.1 2009-03-31T14:14:58+02:00 - Seite 195 Z
Dateiname: 6515431202_buchblock.pdf; erzeugt am 01. Apr 2009 00:17:51; WK
Page 199 of 309
Never press the ADS button* or operate the
level control* while you are coupling up or
decoupling a trailer.
X Make sure the DIRECT SELECT selector
lever is set to P.
X Depress the parking brake.
X Start the engine.
X Set the vehicle to highway level
(Y page 132).
X Set the adaptive damping system (ADS)
setting to AUTOorCOMF (Ypage 129).
X Switch off the engine.
X Close the doors and tailgate.
X Position the trailer level behind the vehicle.
X Couple up the trailer.
X Establish the electrical connection
between the vehicle and the trailer.
i If you have coupled a trailer, the vehicle
will remain at highway level.
The vehicle automatically lowers to high-
way level if you drive faster than 8 km/h
with a trailer. The vehicle is not lowered to
the high-speed level even if you are travel-
ling at higher speeds.
This also applies when using accessories
that are plugged into the socket of the
trailer coupling (e.g. a bicycle rack).
Decoupling a trailer G
Risk of injury
Do not disconnect a trailer with an engaged
overrun brake. Otherwise, your hand could
become trapped between the bumper and
drawbar.
! Do not uncouple a trailer with overrun
brake between the bumper and drawbar,
otherwise your vehicle could be damaged
by the spring action of the overrun brake. X
Make sure the DIRECT SELECT selector
lever is set to P.
X Depress the parking brake.
X Start the engine.
X Close the doors and tailgate.
X Secure the trailer against rolling away. G
Risk of injury
The vehicle is lowered as soon as you discon-
nect the trailer cable. Make sure that nobody
is in the vicinity of the wheel arch or the
underbody. You could otherwise trap yourself
or others.
As soon as you decouple the trailer, the unla-
den vehicle rises slightly. Make sure that you
or others are not injured in the process.
X Remove the trailer cable and decouple the
trailer.
X Switch off the engine. Notes on towing a trailer
G
Risk of accident
When reversing the vehicle towards the
trailer, make sure there is nobody between
the trailer and the vehicle.
Couple and uncouple the trailer carefully. If
you do not couple the trailer to the towing
vehicle correctly, the trailer could become
detached.
Make sure that the following values are not
exceeded:
R the permissible trailer drawbar noseweight
R the permissible trailer load
R the permissible rear axle load of the towing
vehicle
R the maximum permissible gross vehicle
weight of both the towing vehicle and the
trailer
You will find the applicable permissible val-
ues, which must not be exceeded, in the vehi-
cle documents. 196
Trailer towing*Operation
* optional
X164_AKB; 2; 3, en-GB
wobuchh
,V ersion: 2.11.8.1
2009-03-31T14:14:58+02:00 - Seite 196
Dateiname: 6515431202_buchblock.pdf; erzeugt am 01. Apr 2009 00:17:51; WK
Page 212 of 309
Observe the legal requirements in all coun-
tries concerned.
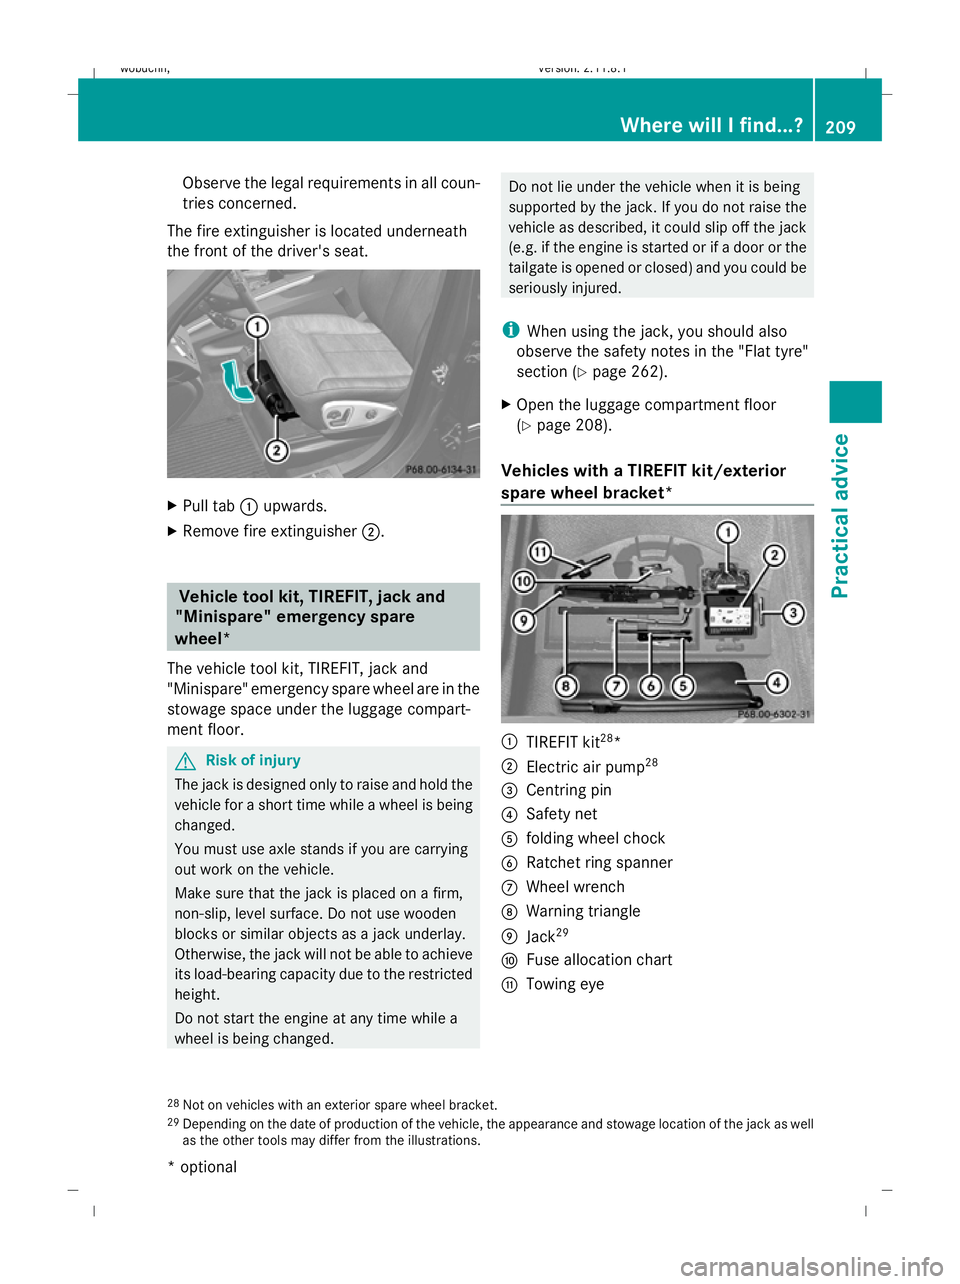
The fire extinguisher is located underneath
the front of the driver's seat. X
Pull tab :upwards.
X Remove fire extinguisher ;. Vehicle tool kit, TIREFIT, jack and
"Minispare" emergency spare
wheel*
The vehicle tool kit, TIREFIT, jack and
"Minispare" emergency spare wheel are in the
stowage space under the luggage compart-
ment floor. G
Risk of injury
The jack is designed only to raise and hold the
vehicle for a short time while a wheel is being
changed.
You must use axle stands if you are carrying
out work on the vehicle.
Make sure that the jack is placed on a firm,
non-slip, level surface. Do not use wooden
blocks or similar objects as a jack underlay.
Otherwise, the jack will not be able to achieve
its load-bearing capacity due to the restricted
height.
Do not start the engine at any time while a
wheel is being changed. Do not lie under the vehicle when it is being
supported by the jack. If you do not raise the
vehicle as described, it could slip off the jack
(e.g. if the engine is started or if a door or the
tailgate is opened or closed) and you could be
seriously injured.
i When using the jack, you should also
observe the safety notes in the "Flat tyre"
section (Y page 262).
X Open the luggage compartment floor
(Y page 208).
Vehicles with a TIREFIT kit/exterior
spare wheel bracket* :
TIREFIT kit 28
*
; Electric air pump 28
= Centring pin
? Safety net
A folding wheel chock
B Ratchet ring spanner
C Wheel wrench
D Warning triangle
E Jack 29
F Fuse allocation chart
G Towing eye
28 Not on vehicles with an exterior spare wheel bracket.
29 Depending on the date of production of the vehicle, the appearance and stowage location of the jack as well
as the other tools may differ from the illustrations. Where will I find...?
209Practical advice
* optional
X164_AKB; 2; 3, en-GB
wobuchh,
Version: 2.11.8.1 2009-03-31T14:14:58+02:00 - Seite 209 Z
Dateiname: 6515431202_buchblock.pdf; erzeugt am 01. Apr 2009 00:17:56; WK
Page 213 of 309
Exterior spare wheel bracket*
G
Risk of injury
The spare wheel is heavy. Make sure that
nobody is injured as you remove the spare
wheel.
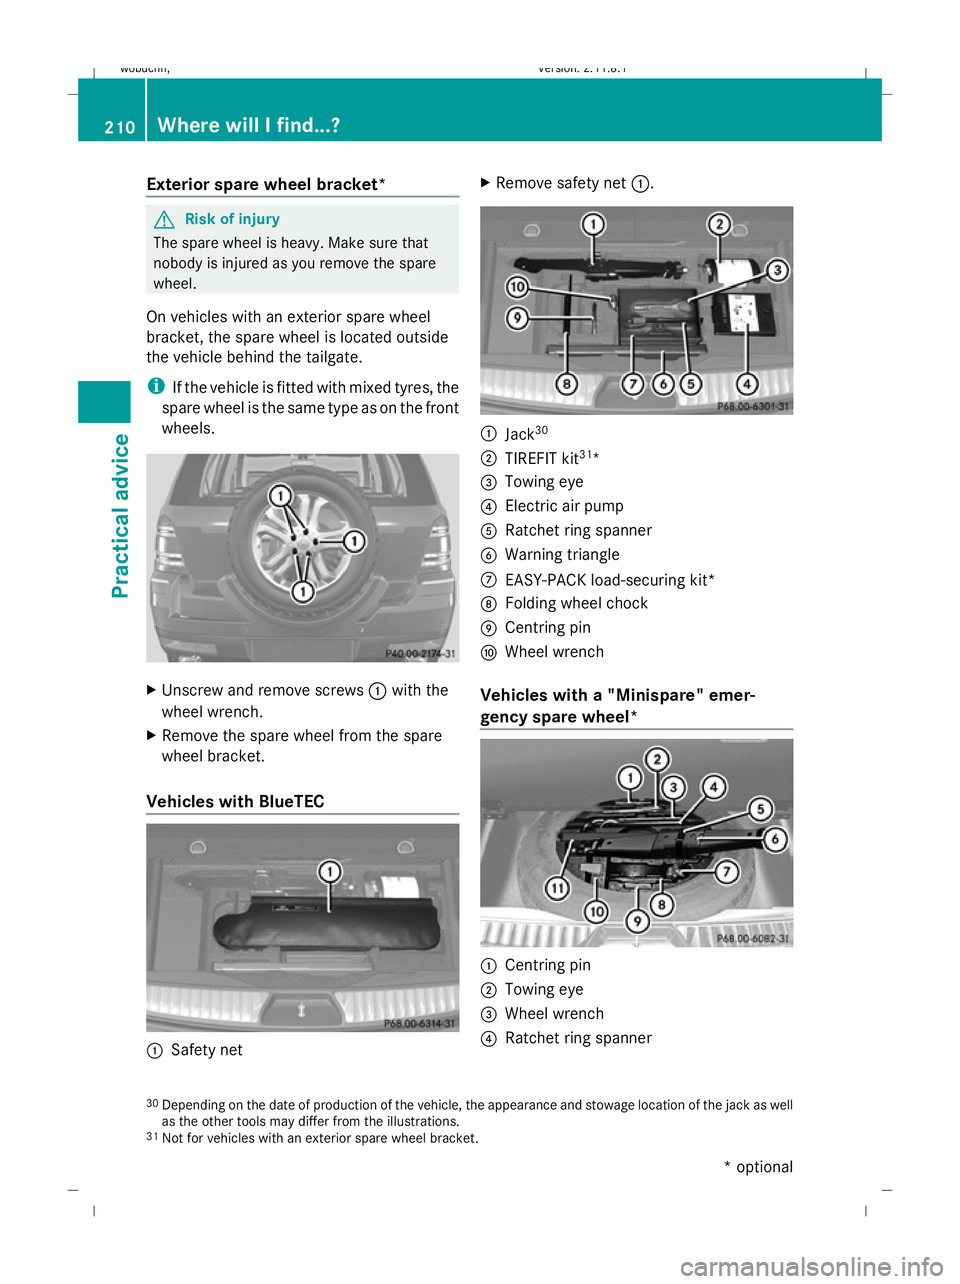
On vehicles with an exterior spare wheel
bracket, the spare wheel is located outside
the vehicle behind the tailgate.
i If the vehicle is fitted with mixed tyres, the
spare wheel is the same type as on the front
wheels. X
Unscrew and remove screws :with the
wheel wrench.
X Remove the spare wheel from the spare
wheel bracket.
Vehicles with BlueTEC :
Safety net X
Remove safety net :. :
Jack 30
; TIREFIT kit 31
*
= Towing eye
? Electric air pump
A Ratchet ring spanner
B Warning triangle
C EASY-PACK load-securing kit*
D Folding wheel chock
E Centring pin
F Wheel wrench
Vehicles with a "Minispare" emer-
gency spare wheel* :
Centring pin
; Towing eye
= Wheel wrench
? Ratchet ring spanner
30 Depending on the date of production of the vehicle, the appearance and stowage location of the jack as well
as the other tools may differ from the illustrations.
31 Not for vehicles with an exterior spare wheel bracket. 210
Where will I find...?Practical advice
* optional
X164_AKB; 2; 3, en-GB
wobuchh,
Version: 2.11.8.1 2009-03-31T14:14:58+02:00 - Seite 210
Dateiname: 6515431202_buchblock.pdf; erzeugt am 01. Apr 2009 00:17:58; WK
Page 222 of 309
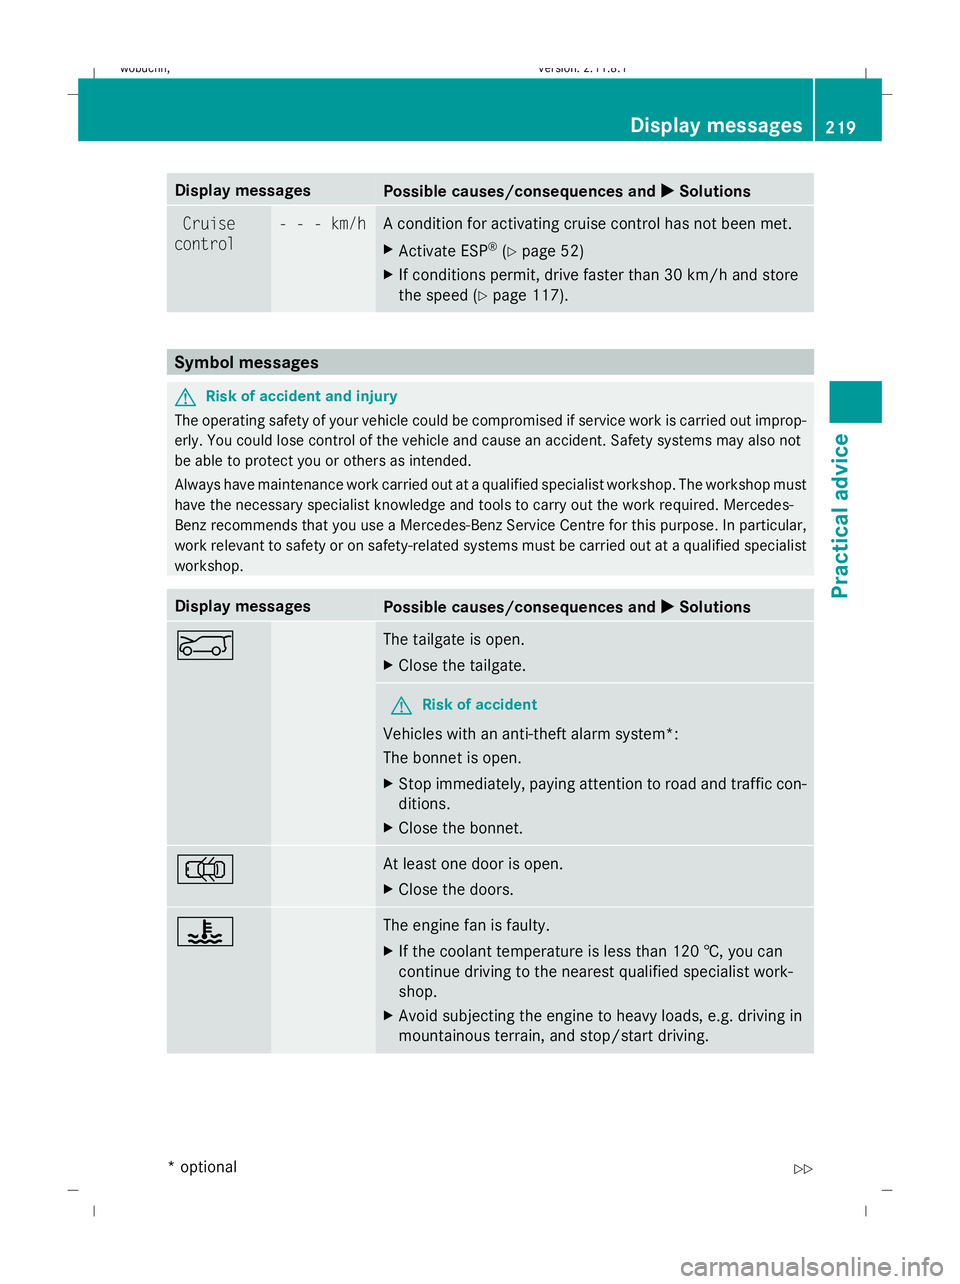
Display messages
Possible causes/consequences and
X
X Solutions Cruise
control - - - km/h A condition for activating cruise control has not been met.
X
Activate ESP ®
(Y page 52)
X If conditions permit, drive faster than 30 km/h and store
the speed (Y page 117). Symbol messages
G
Risk of accident and injury
The operating safety of your vehicle could be compromised if service work is carried out improp-
erly. You could lose control of the vehicle and cause an accident. Safety systems may also not
be able to protect you or others as intended.
Always have maintenance work carried out at a qualified specialist workshop. The workshop must
have the necessary specialist knowledge and tools to carry out the work required. Mercedes-
Benz recommends that you use a Mercedes-Benz Service Centre for this purpose. In particular,
work relevant to safety or on safety-related systems must be carried out at a qualified specialist
workshop. Display messages
Possible causes/consequences and
X
X Solutions E The tailgate is open.
X
Close the tailgate. G
Risk of accident
Vehicles with an anti-theft alarm system*:
The bonnet is open.
X Stop immediately, paying attention to road and traffic con-
ditions.
X Close the bonnet. ; At least one door is open.
X
Close the doors. ? The engine fan is faulty.
X
If the coolant temperature is less than 120 †, you can
continue driving to the nearest qualified specialist work-
shop.
X Avoid subjecting the engine to heavy loads, e.g. driving in
mountainous terrain, and stop/start driving. Display
messages
219Practical advice
* optional
X164_AKB; 2; 3, en-GB
wobuchh
,V ersion: 2.11.8.1
2009-03-31T14:14:58+02:00 - Seite 219 Z
Dateiname: 6515431202_buchblock.pdf; erzeugt am 01. Apr 2009 00:17:59; WK
Page 244 of 309
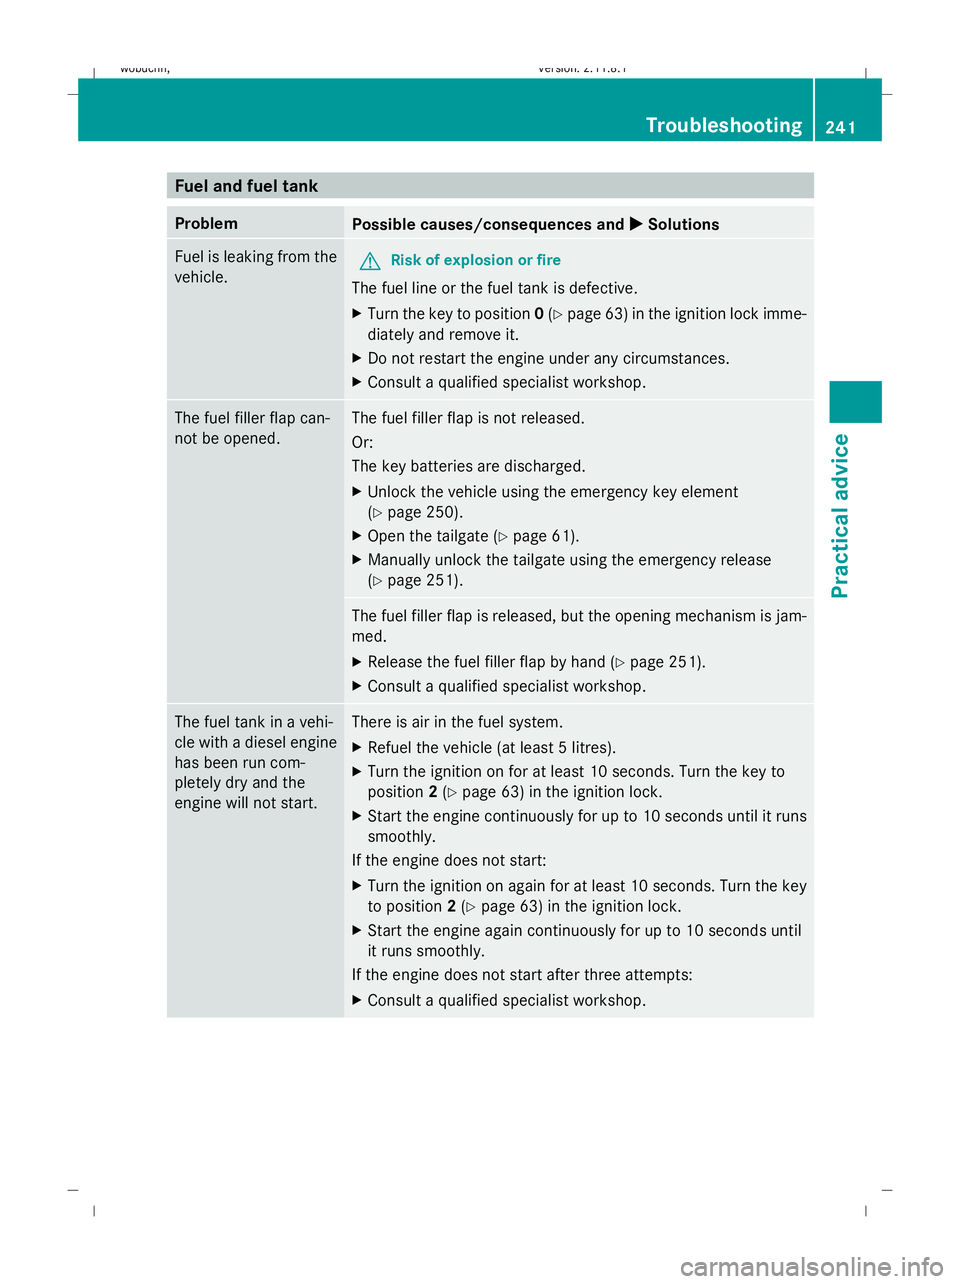
Fuel and fuel tank
Problem
Possible causes/consequences and
X
X Solutions Fuel is leaking from the
vehicle.
G
Risk of explosion or fire
The fuel line or the fuel tank is defective.
X Turn the key to position 0(Y page 63 )in the ignition lock imme-
diately and remove it.
X Do not restart the engine under any circumstances.
X Consult a qualified specialist workshop. The fuel filler flap can-
not be opened. The fuel filler flap is not released.
Or:
The key batteries are discharged.
X Unlock the vehicle using the emergency key element
(Y page 250).
X Open the tailgate (Y page 61).
X Manually unlock the tailgate using the emergency release
(Y page 251). The fuel filler flap is released, but the opening mechanism is jam-
med.
X
Release the fuel filler flap by hand (Y page 251).
X Consult a qualified specialist workshop. The fuel tank in a vehi-
cle with a diesel engine
has been run com-
pletely dry and the
engine will not start. There is air in the fuel system.
X
Refuel the vehicle (at least 5 litres).
X Turn the ignition on for at least 10 seconds. Turn the key to
position 2(Y page 63) in the ignition lock.
X Start the engine continuously for up to 10 seconds until it runs
smoothly.
If the engine does not start:
X Turn the ignition on again for at least 10 seconds. Turn the key
to position 2(Y page 63) in the ignition lock.
X Start the engine again continuously for up to 10 seconds until
it runs smoothly.
If the engine does not start after three attempts:
X Consult a qualified specialist workshop. Troubleshooting
241Practical advice
X164_AKB; 2; 3, en-GB
wobuchh,V ersion: 2.11.8.1
2009-03-31T14:14:58+02:00 - Seite 241 Z
Dateiname: 6515431202_buchblock.pdf; erzeugt am 01. Apr 2009 00:18:02; WK
Page 254 of 309
The door is unlocked.
X Turn the emergency key element back and
remove it.
X Pull the door handle again. Locking the vehicle
If the vehicle can no longer be unlocked cen-
trally with the key or KEYLESS GO*:
X Close the front-passenger door, the rear
door on the front-passenger side and the
tailgate.
X Open the driver’s door and the rear door on
the driver’s side.
X Press the locking button on the driver’s
door (Y page 59).
The locking knobs in the front-passenger
door and in the rear doors drop down.
X Press the locking knobs in the front-
passenger door and in the rear doors down
manually, if necessary.
X Close the driver's door from the outside.
X Press down the locking knob of the driver's
door by reaching in through the open rear
door.
i Make sure that you have the vehicle key
on your person and that it is not left in the
vehicle.
X Close the rear door on the driver’s side.
X Check whether the doors and the tailgate
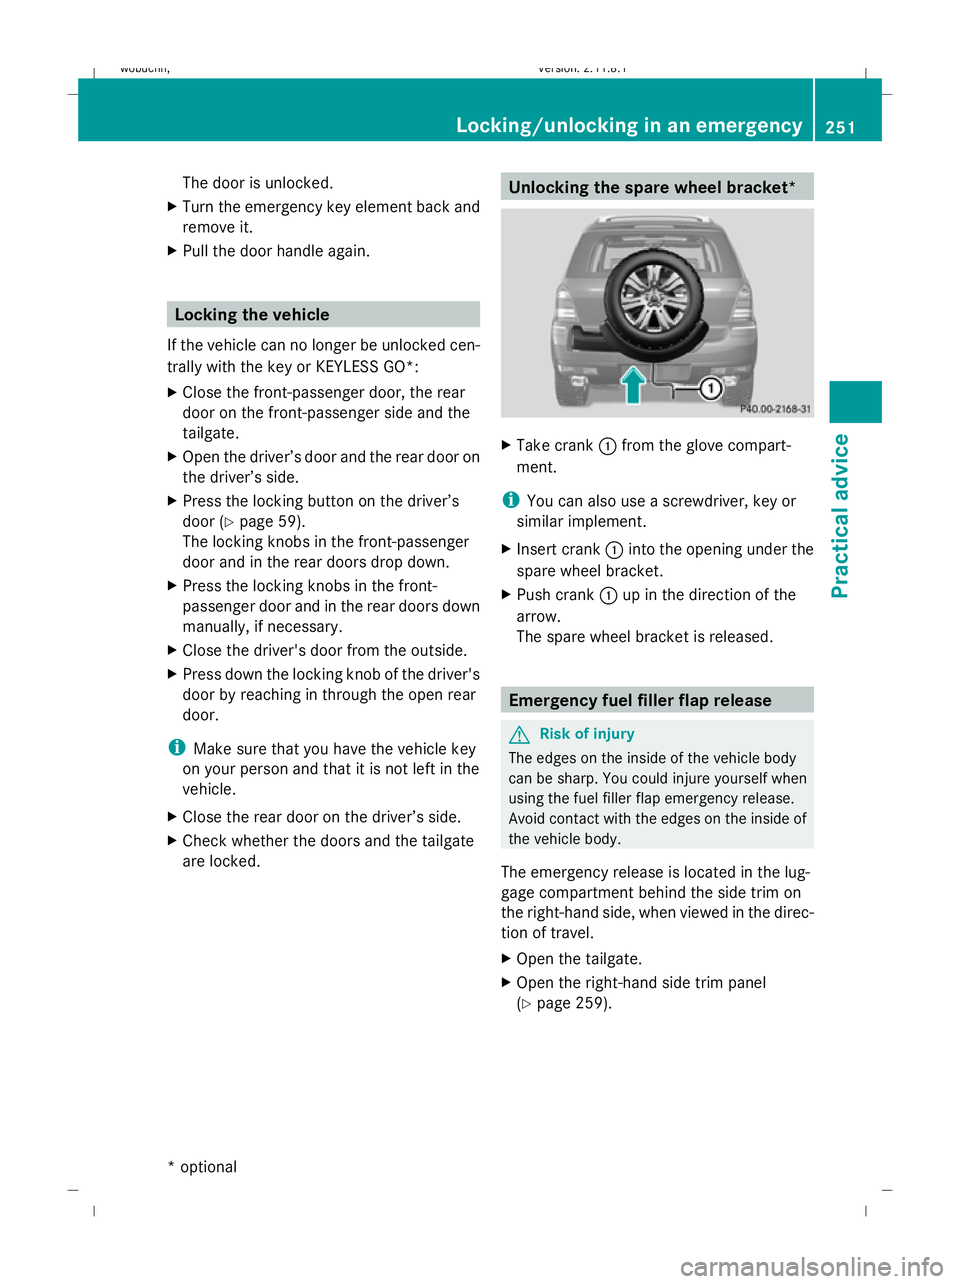
are locked. Unlocking the spare wheel bracket*
X
Take crank :from the glove compart-
ment.
i You can also use a screwdriver, key or
similar implement.
X Insert crank :into the opening under the
spare wheel bracket.
X Push crank :up in the direction of the
arrow.
The spare wheel bracket is released. Emergency fuel filler flap release
G
Risk of injury
The edges on the inside of the vehicle body
can be sharp. You could injure yourself when
using the fuel filler flap emergency release.
Avoid contact with the edges on the inside of
the vehicle body.
The emergency release is located in the lug-
gage compartment behind the side trim on
the right-hand side, when viewed in the direc-
tion of travel.
X Open the tailgate.
X Open the right-hand side trim panel
(Y page 259). Locking/unlocking in an emergency
251Practical advice
* optional
X164_AKB; 2; 3, en-GB
wobuchh,
Version: 2.11.8.1 2009-03-31T14:14:58+02:00 - Seite 251 Z
Dateiname: 6515431202_buchblock.pdf; erzeugt am 01. Apr 2009 00:18:03; WK
Page 264 of 309
X
Switch off the lights.
X Open the tailgate.
X Remove screws :.
X Remove licence plate lamp.
X Replace the bulb.
X Insert licence plate lamp.
X Replace and tighten screws :.Replacing the wiper blades
Windscreen wiper blades
G
Risk of accident
The windscreen will no longer be wiped prop-
erly if the wiper blades are worn. This could
prevent you from observing the traffic condi-
tions, thereby causing an accident. Replace
the wiper blades twice a year, ideally in spring
and autumn. G
Risk of accident
The wiper arms could start moving and cause
an injury if you leave the windscreen wipers
switched on.
Remove the key from the ignition lock before
replacing the wiper blades.
! To avoid damaging the windscreen wiper
blades, make sure that you touch only the
wiper arm of the windscreen wiper.
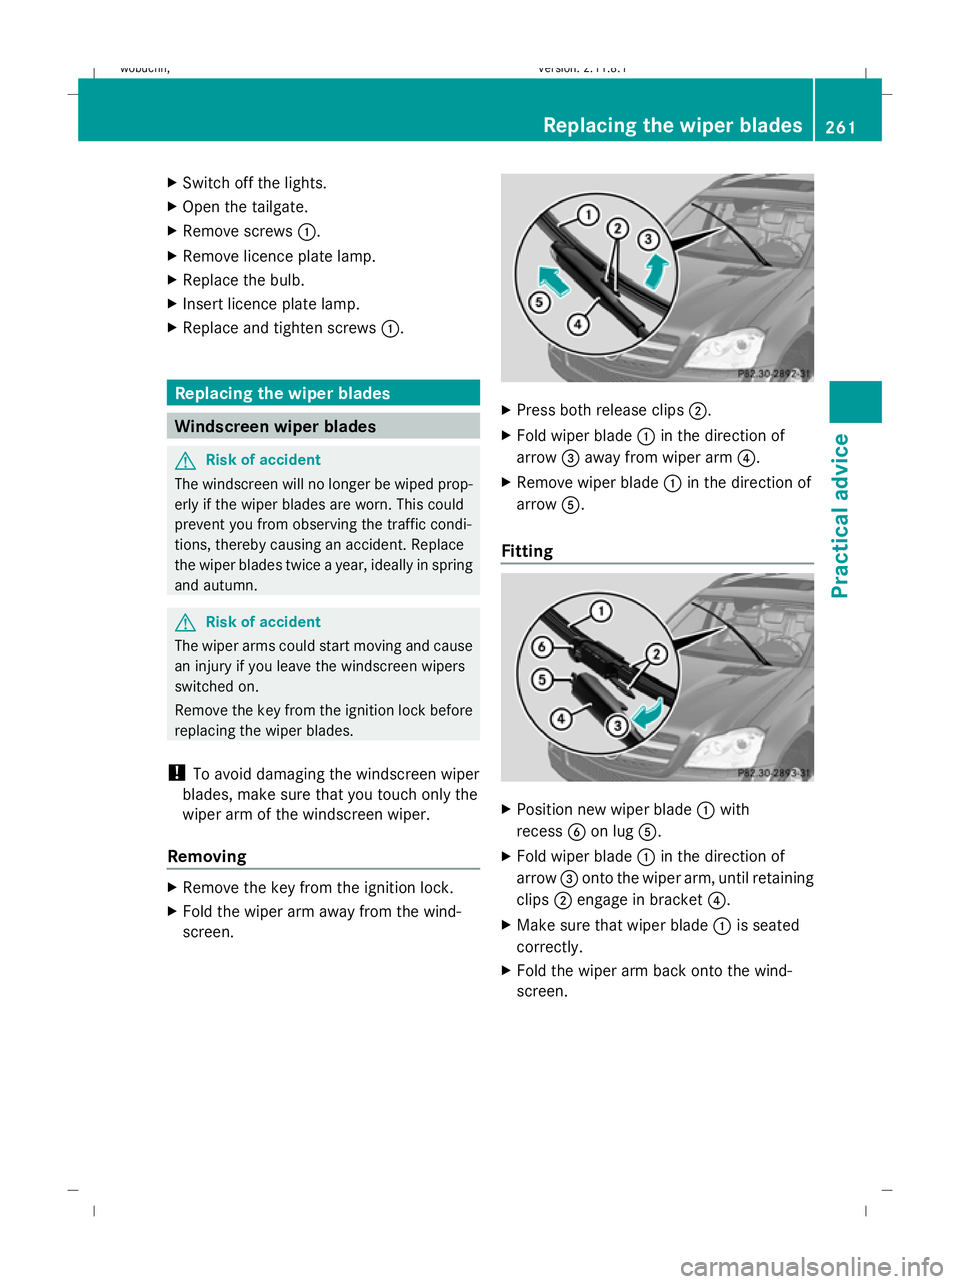
Removing X
Remove the key from the ignition lock.
X Fold the wiper arm away from the wind-
screen. X
Press both release clips ;.
X Fold wiper blade :in the direction of
arrow =away from wiper arm ?.
X Remove wiper blade :in the direction of
arrow A.
Fitting X
Position new wiper blade :with
recess Bon lug A.
X Fold wiper blade :in the direction of
arrow =onto the wiper arm, until retaining
clips ;engage in bracket ?.
X Make sure that wiper blade :is seated
correctly.
X Fold the wiper arm back onto the wind-
screen. Replacing the wiper blades
261Practical advice
X164_AKB; 2; 3, en-GB
wobuchh, Version: 2.11.8.1 2009-03-31T14:14:58+02:00 - Seite 261 Z
Dateiname: 6515431202_buchblock.pdf; erzeugt am 01. Apr 2009 00:18:08; WK