2009 MERCEDES-BENZ GL SUV tailgate
[x] Cancel search: tailgatePage 66 of 309
X
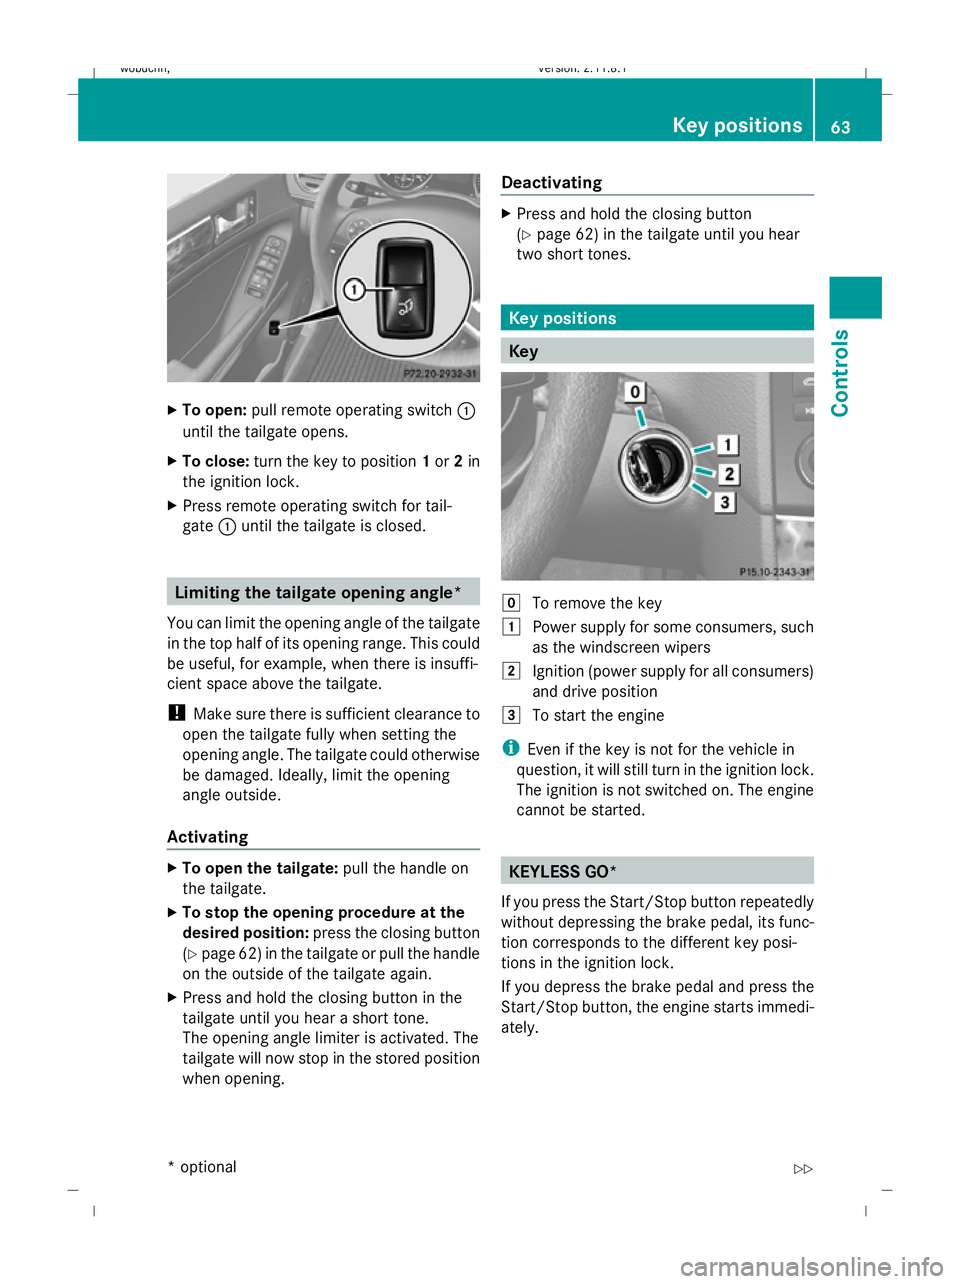
To open: pull remote operating switch :
until the tailgate opens.
X To close: turn the key to position 1or 2in
the ignition lock.
X Press remote operating switch for tail-
gate :until the tailgate is closed. Limiting the tailgate opening angle*
You can limit the opening angle of the tailgate
in the top half of its opening range. This could
be useful, for example, when there is insuffi-
cient space above the tailgate.
! Make sure there is sufficient clearance to
open the tailgate fully when setting the
opening angle. The tailgate could otherwise
be damaged. Ideally, limit the opening
angle outside.
Activating X
To open the tailgate: pull the handle on
the tailgate.
X To stop the opening procedure at the
desired position: press the closing button
(Y page 62) in the tailgate or pull the handle
on the outside of the tailgate again.
X Press and hold the closing button in the
tailgate until you hear a short tone.
The opening angle limiter is activated. The
tailgate will now stop in the stored position
when opening. Deactivating X
Press and hold the closing button
(Y page 62) in the tailgate until you hear
two short tones. Key positions
Key
g
To remove the key
1 Power supply for some consumers, such
as the windscreen wipers
2 Ignition (power supply for all consumers)
and drive position
3 To start the engine
i Even if the key is not for the vehicle in
question, it will still turn in the ignition lock.
The ignition is not switched on. The engine
cannot be started. KEYLESS GO*
If you press the Start/Stop button repeatedly
without depressing the brake pedal, its func-
tion corresponds to the different key posi-
tions in the ignition lock.
If you depress the brake pedal and press the
Start/Stop button, the engine starts immedi-
ately. Key positions
63Controls
* optional
X164_AKB; 2; 3, en-GB
wobuchh
,V ersion: 2.11.8.1
2009-03-31T14:14:58+02:00 - Seite 63 Z
Dateiname: 6515431202_buchblock.pdf; erzeugt am 01. Apr 2009 00:16:54; WK
Page 71 of 309
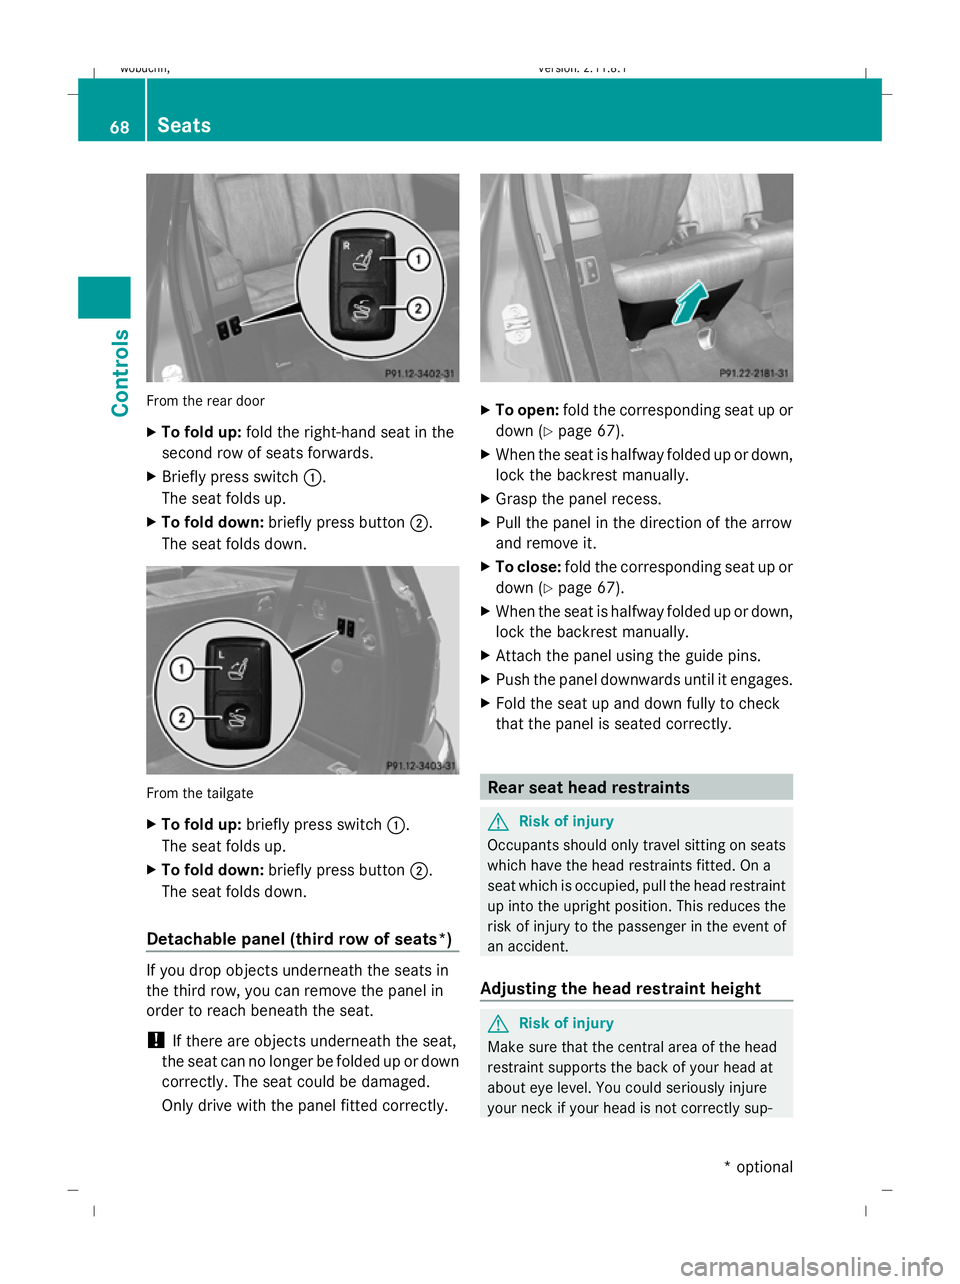
From the rear door
X
To fold up: fold the right-hand seat in the
second row of seats forwards.
X Briefly press switch :.
The seat folds up.
X To fold down: briefly press button ;.
The seat folds down. From the tailgate
X
To fold up: briefly press switch :.
The seat folds up.
X To fold down: briefly press button ;.
The seat folds down.
Detachable panel (third row of seats*) If you drop objects underneath the seats in
the third row, you can remove the panel in
order to reach beneath the seat.
! If there are objects underneath the seat,
the seat can no longer be folded up or down
correctly. The seat could be damaged.
Only drive with the panel fitted correctly. X
To open: fold the corresponding seat up or
down (Y page 67).
X When the seat is halfway folded up or down,
lock the backrest manually.
X Grasp the panel recess.
X Pull the panel in the direction of the arrow
and remove it.
X To close: fold the corresponding seat up or
down (Y page 67).
X When the seat is halfway folded up or down,
lock the backrest manually.
X Attach the panel using the guide pins.
X Push the panel downwards until it engages.
X Fold the seat up and down fully to check
that the panel is seated correctly. Rear seat head restraints
G
Risk of injury
Occupants should only travel sitting on seats
which have the head restraints fitted. On a
seat which is occupied, pull the head restraint
up into the upright position. This reduces the
risk of injury to the passenger in the event of
an accident.
Adjusting the head restraint height G
Risk of injury
Make sure that the central area of the head
restraint supports the back of your head at
about eye level. You could seriously injure
your neck if your head is not correctly sup- 68
SeatsControls
* optional
X164_AKB; 2; 3, en-GB
wobuchh
,V ersion: 2.11.8.1
2009-03-31T14:14:58+02:00 - Seite 68
Dateiname: 6515431202_buchblock.pdf; erzeugt am 01. Apr 2009 00:16:59; WK
Page 138 of 309
The automatic transmission position deter-
mines which warning display is active when
the engine is running:
Automatic trans-
mission position Warning display
D
Front area activated
R
or N Rear and front areas
activated
P
No areas activated
One or more segments light up as the vehicle
approaches an obstacle, depending on the
vehicle's distance to the obstacle.
From the:
R sixth segment onwards, you will hear an
intermittent warning tone for approx-
imately two seconds.
R seventh segment onwards, you will hear a
warning tone for approximately two sec-
onds. You have reached the minimum dis-
tance.
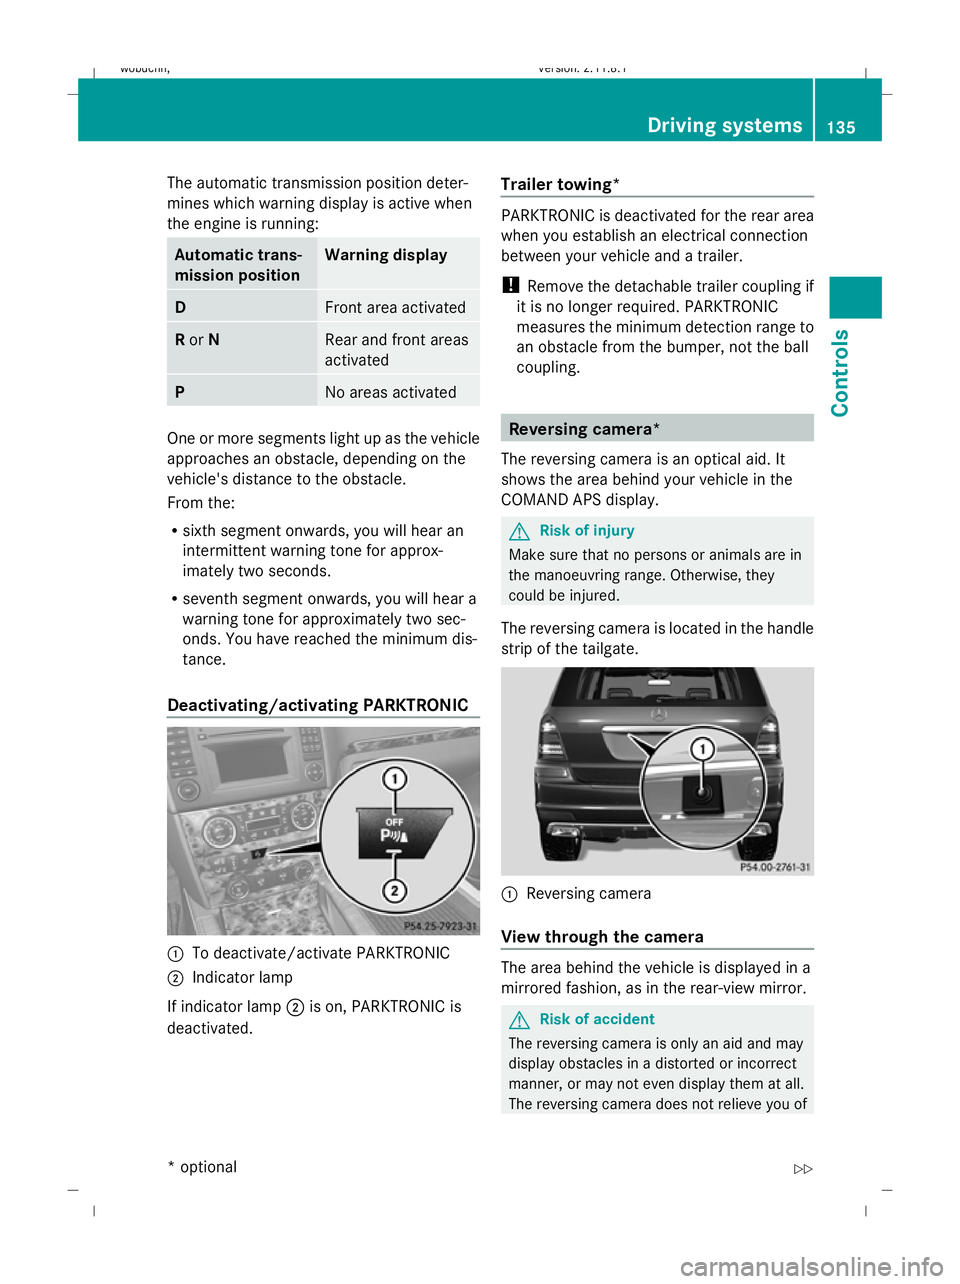
Deactivating/activating PARKTRONIC :
To deactivate/activate PARKTRONIC
; Indicator lamp
If indicator lamp ;is on, PARKTRONIC is
deactivated. Trailer towing* PARKTRONIC is deactivated for the rear area
when you establish an electrical connection
between your vehicle and a trailer.
!
Remove the detachable trailer coupling if
it is no longer required. PARKTRONIC
measures the minimum detection range to
an obstacle from the bumper, not the ball
coupling. Reversing camera*
The reversing camera is an optical aid. It
shows the area behind your vehicle in the
COMAND APS display. G
Risk of injury
Make sure that no persons or animals are in
the manoeuvring range. Otherwise, they
could be injured.
The reversing camera is located in the handle
strip of the tailgate. :
Reversing camera
View through the camera The area behind the vehicle is displayed in a
mirrored fashion, as in the rear-view mirror.
G
Risk of accident
The reversing camera is only an aid and may
display obstacles in a distorted or incorrect
manner, or may not even display them at all.
The reversing camera does not relieve you of Driving systems
135Controls
* optional
X164_AKB; 2; 3, en-GB
wobuchh,
Version: 2.11.8.1 2009-03-31T14:14:58+02:00 - Seite 135 Z
Dateiname: 6515431202_buchblock.pdf; erzeugt am 01. Apr 2009 00:17:27; WK
Page 139 of 309
the responsibility to pay attention. The cam-
era cannot show objects:
R very near to the rear bumper
R below the rear bumper
R that are located above the tailgate handle
recess
You are always responsible for safety and
must continue to pay attention to your imme-
diate surroundings when parking and
manoeuvring. This applies to the areas
behind, in front of and next to the vehicle. You
could otherwise endanger yourself and oth-
ers. G
Risk of accident
Under the following circumstances, the
reversing camera will not function, or function
in a limited manner:
R if the tailgate is open
R in heavy rain, snow or fog
R at night or in very dark places
R if the camera is exposed to very bright light R
if the area is lit by fluorescent light (the dis-
play may flicker)
R if there is a sudden change in temperature,
e.g. when driving into a heated garage in
winter
R if the camera lens is dirty or obstructed
R if the rear of your vehicle is damaged. In this
event have the camera position and setting
checked at a qualified specialist workshop.
Mercedes-Benz recommends that you use
a Mercedes-Benz Service Centre for this
purpose.
Do not use the reversing camera in these
types of situation. You could, otherwise,
injure others or damage objects and your
vehicle while you are parking.
Activating the reversing camera X
Make sure that the key is in position 2in
the ignition lock.
X Engage reverse gear.
The area behind the vehicle is shown in the
COMAND APS display. Air conditioning
Overview of air-conditioning systems
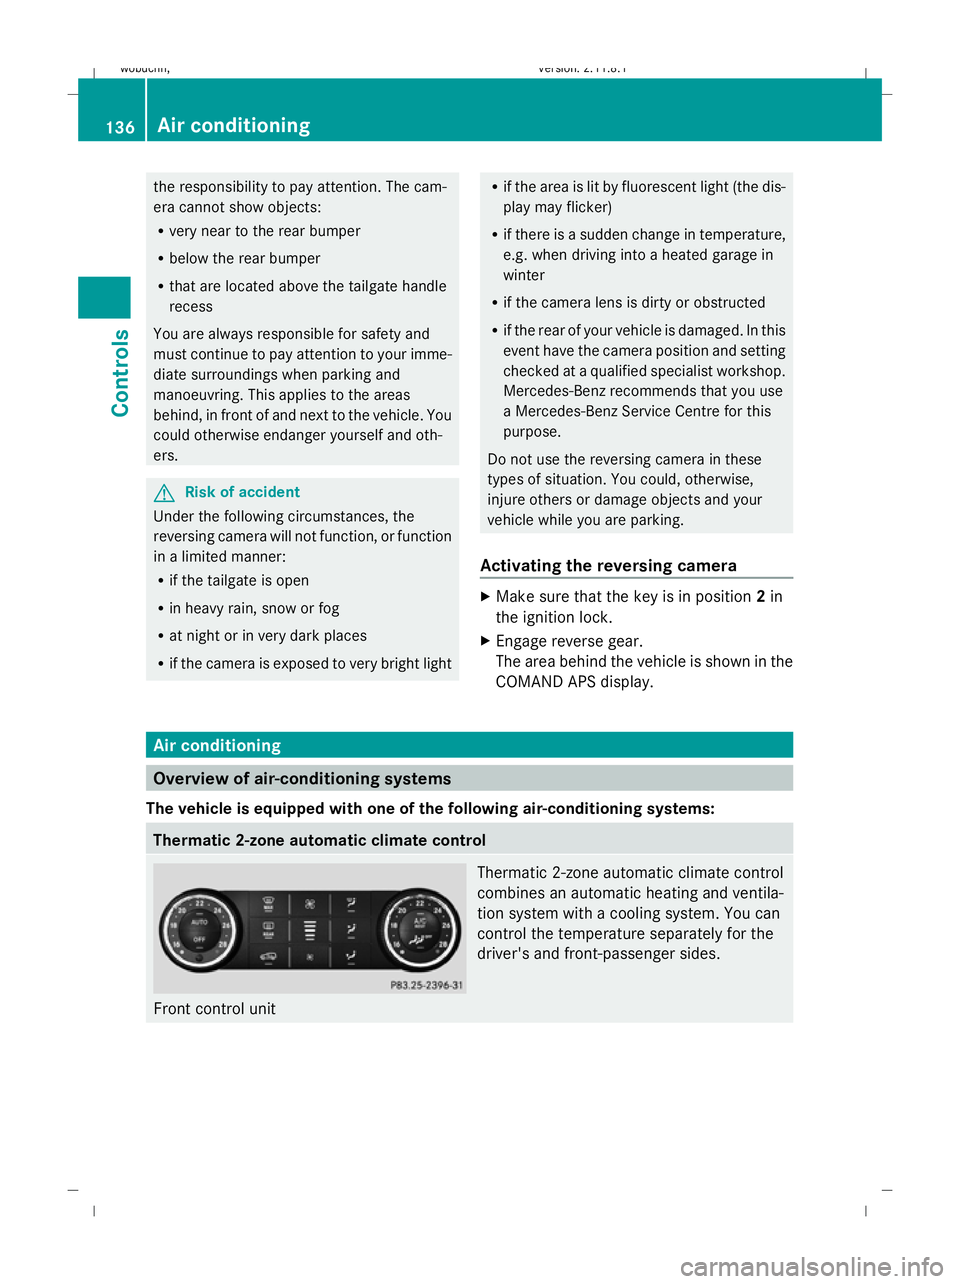
The vehicle is equipped with one of the following air-conditioning systems: Thermatic 2-zone automatic climate control
Front control unit Thermatic 2-zone automatic climate control
combines an automatic heating and ventila-
tion system with a cooling system. You can
control the temperature separately for the
driver's and front-passenger sides.136
Air conditioningControls
X164_AKB; 2; 3, en-GB
wobuchh
,V ersion: 2.11.8.1
2009-03-31T14:14:58+02:00 - Seite 136
Dateiname: 6515431202_buchblock.pdf; erzeugt am 01. Apr 2009 00:17:27; WK
Page 154 of 309
direction of arrow
;until the sliding/tilt-
ing sunroof is closed.
The sliding/tilting sunroof is closed with
more force.
If the sliding/tilting sunroof locks up during
closing again:
X Immediately after it locks up, pull the
switch again to the pressure point in the
direction of arrow ;until the sliding/tilt-
ing sunroof is closed.
The sliding/tilting sunroof is closed without
the anti-entrapment feature.
Rain closing feature* The sliding/tilting sunroof closes automati-
cally:
R
if it starts to rain
R after 12 hours
The rear of the sliding/tilting sunroof is then
raised in order to ventilate the interior of the
vehicle.
i The sliding/tilting sunroof is opened
slightly again if it is obstructed while being
closed by the rain closing feature. The rain
closing feature is then deactivated.
The sliding/tilting sunroof does not close if:
R it is raised at the rear
R it is blocked
R no rain is falling on the area of the wind-
screen being monitored by the rain sensor
(e.g. because the vehicle is under a bridge
or in a carport)
Resetting Reset the sliding/tilting sunroof if it does not
open smoothly, or if the battery has been dis-
connected or has become discharged.
X
Switch the ignition off and then on again.
X The sliding/tilting sunroof is raised fully at
the rear. X
Keep the switch pressed for an additional
second.
X Make sure that the sliding/tilting sunroof
can be opened or closed fully again
(Y page 150).
X If this is not the case, consult a qualified
specialist workshop. Loading and stowing
Loading guidelines
G
Risk of injury
Secure and position the load as described in
the loading guidelines.
Otherwise, vehicle occupants could
be injured by the load being thrown around in
the event of sharp braking, a sudden change
in direction or an accident.
You will find further information in the "Secur-
ing a load" section.
Even if you follow all the loading guidelines,
the load will increase the risk of injury in the
event of an accident. G
Risk of poisoning
Keep the tailgate closed when the engine is
running. Otherwise, you could be poisoned by
exhaust fumes entering the vehicle.
The handling characteristics of a laden vehi-
cle are dependent on the distribution of the
load within the vehicle. For this reason, you
should observe the following notes when
transporting a load:
R never exceed the maximum permissible
gross vehicle weight or the permissible axle
loads for the vehicle (including occupants).
R position heavy loads as far forwards and as
low down in the luggage compartment as
possible.
R the load must not protrude above the upper
edge of the seat backrests.
R always place the load against the rear or
front seat backrests. Make sure that the Loading and stowing
151Controls
* optional
X164_AKB; 2; 3, en-GB
wobuchh,
Version: 2.11.8.1 2009-03-31T14:14:58+02:00 - Seite 151 Z
Dateiname: 6515431202_buchblock.pdf; erzeugt am 01. Apr 2009 00:17:32; WK
Page 158 of 309
fold down the respective backrests and
attach the safety net.
G
Risk of poisoning
Always drive with the tailgate closed. Exhaust
fumes could otherwise enter the vehicle inte-
rior.
Folding the rear bench seat forwards G
Risk of accident and injury
Do not fold the backrest onto the folded-down
seat cushions. If the seat cushions are folded
down, luggage can be thrown over the back-
rest into the passenger compartment during,
for instance, heavy braking, sudden changes
of direction or in the event of an accident. You
could cause an accident or cause injury to
yourself and others. !
When the rear bench seat is folded for-
wards, the front seats cannot be moved to
their rearmost position, as otherwise, the
seats and the rear seat bench could be
damaged.
i If the driver's or front-passenger seat has
been adjusted for a tall person, it may be
necessary to move the seats forwards
slightly to fold the backrests forwards.
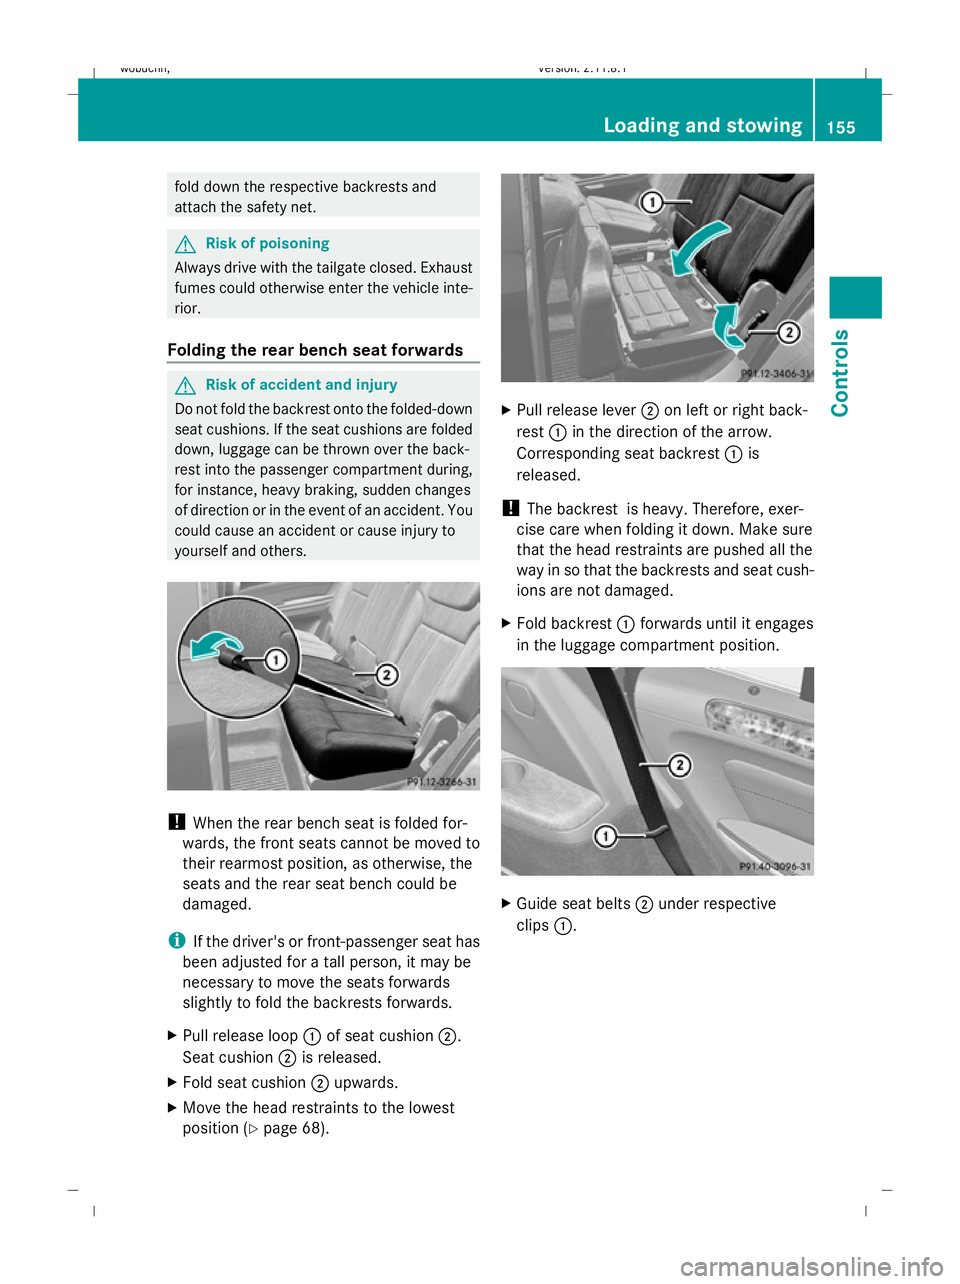
X Pull release loop :of seat cushion ;.
Seat cushion ;is released.
X Fold seat cushion ;upwards.
X Move the head restraints to the lowest
position (Y page 68). X
Pull release lever ;on left or right back-
rest :in the direction of the arrow.
Corresponding seat backrest :is
released.
! The backrest is heavy. Therefore, exer-
cise care when folding it down. Make sure
that the head restraints are pushed all the
way in so that the backrests and seat cush-
ions are not damaged.
X Fold backrest :forwards until it engages
in the luggage compartment position. X
Guide seat belts ;under respective
clips :. Loading and stowing
155Controls
X164_AKB; 2; 3, en-GB
wobuchh, Version: 2.11.8.1 2009-03-31T14:14:58+02:00 - Seite 155 Z
Dateiname: 6515431202_buchblock.pdf; erzeugt am 01. Apr 2009 00:17:36; WK
Page 164 of 309
Roof rack system*
G
Risk of accident and injury
An incorrectly secured roof rack, ski rack or
load could become detached from the vehi-
cle. These objects may be thrown around and
can injure you or others, or cause an accident.
Follow the roof rack/ski rack manufacturer's
installation instructions and special instruc-
tions for use.
The roof load raises the vehicle's centre of
gravity, thereby affecting vehicle handling.
You must always observe the maximum roof
load of 100 kg. Always adapt your driving style
to the prevailing road, traffic and weather
conditions and drive with particular care if the
roof is laden.
! Mercedes-Benz recommends that you
only use roof rack systems which have
been tested and approved for Mercedes-
Benz vehicles. This helps to prevent dam-
age to the vehicle.
Position the load on the roof rack in such a
way that the vehicle will not sustain dam-
age even when it is in motion.
Depending on the vehicle's equipment,
make sure that you can:
R raise the sliding/tilting sunroof* fully
R open the tailgate fully X
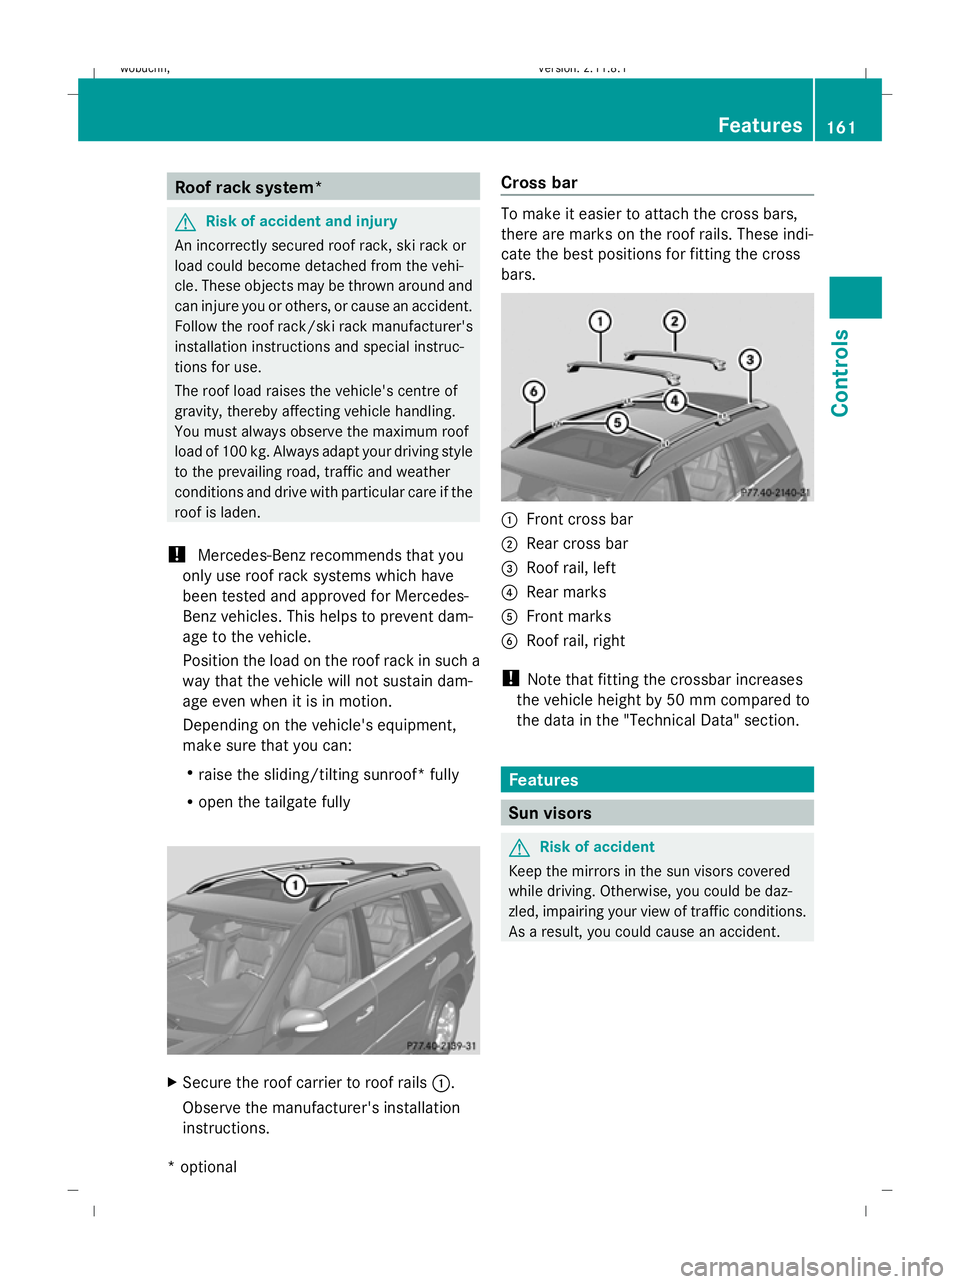
Secure the roof carrier to roof rails :.
Observe the manufacturer's installation
instructions. Cross bar To make it easier to attach the cross bars,
there are marks on the roof rails. These indi-
cate the best positions for fitting the cross
bars. :
Front cross bar
; Rear cross bar
= Roof rail, left
? Rear marks
A Front marks
B Roof rail, right
! Note that fitting the crossbar increases
the vehicle height by 50 mm compared to
the data in the "Technical Data" section. Features
Sun visors
G
Risk of accident
Keep the mirrors in the sun visors covered
while driving. Otherwise, you could be daz-
zled, impairing your view of traffic conditions.
As a result, you could cause an accident. Features
161Controls
* optional
X164_AKB; 2; 3, en-GB
wobuchh,
Version: 2.11.8.1 2009-03-31T14:14:58+02:00 - Seite 161 Z
Dateiname: 6515431202_buchblock.pdf; erzeugt am 01. Apr 2009 00:17:40; WK
Page 170 of 309
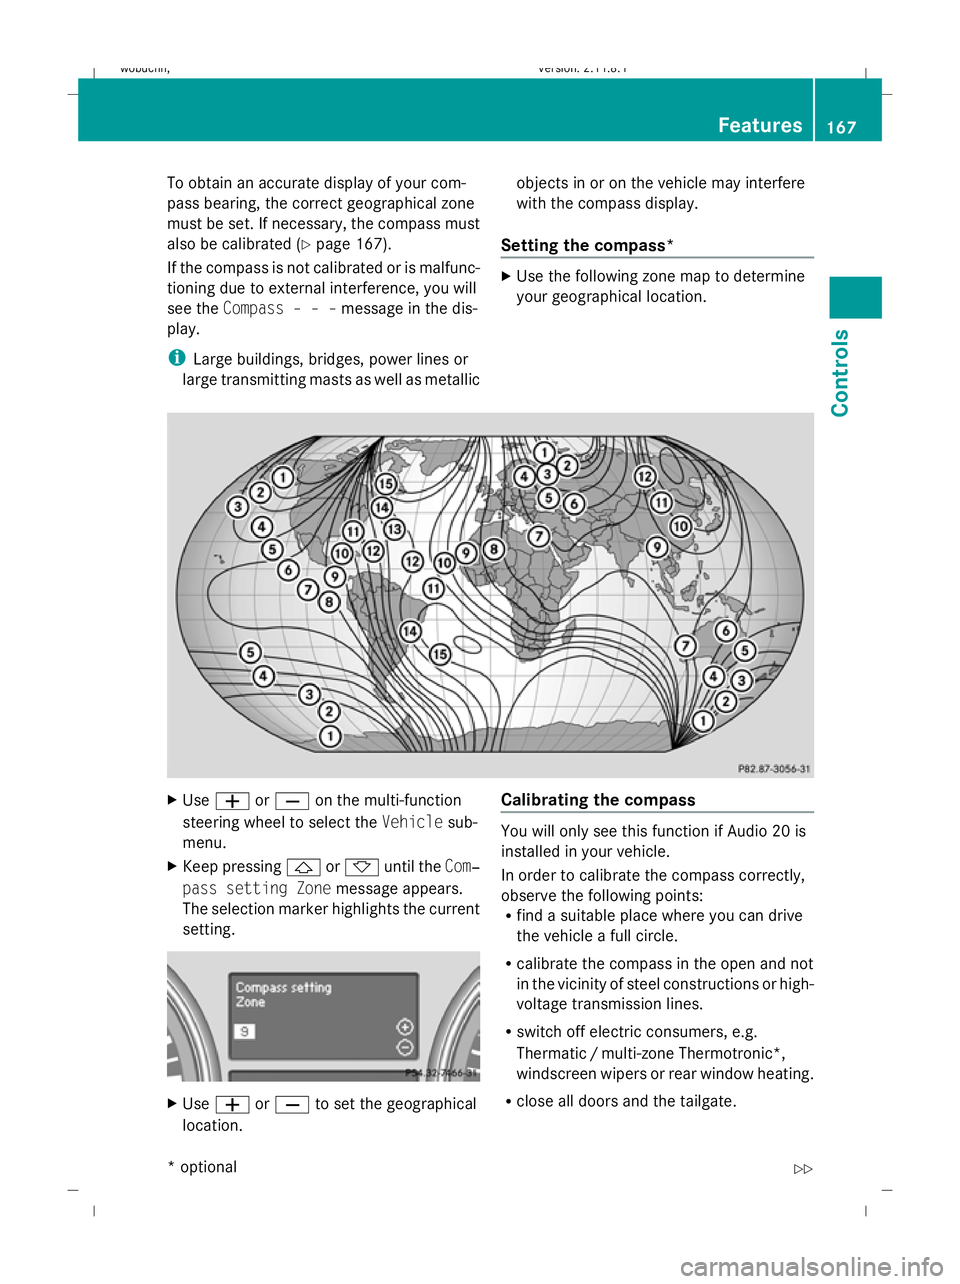
To obtain an accurate display of your com-
pass bearing, the correct geographical zone
must be set. If necessary, the compass must
also be calibrated (Y page 167).
If the compass is not calibrated or is malfunc-
tioning due to external interference, you will
see the Compass – – – message in the dis-
play.
i Large buildings, bridges, power lines or
large transmitting masts as well as metallic objects in or on the vehicle may interfere
with the compass display.
Setting the compass* X
Use the following zone map to determine
your geographical location. X
Use W orX on the multi-function
steering wheel to select the Vehiclesub-
menu.
X Keep pressing &or* until the Com‐
pass setting Zone message appears.
The selection marker highlights the current
setting. X
Use W orX to set the geographical
location. Calibrating the compass You will only see this function if Audio 20 is
installed in your vehicle.
In order to calibrate the compass correctly,
observe the following points:
R
find a suitable place where you can drive
the vehicle a full circle.
R calibrate the compass in the open and not
in the vicinity of steel constructions or high-
voltage transmission lines.
R switch off electric consumers, e.g.
Thermatic /multi-zone Thermotronic*,
windscreen wipers or rear window heating.
R close all doors and the tailgate. Features
167Controls
* optional
X164_AKB; 2; 3, en-GB
wobuchh,
Version: 2.11.8.1 2009-03-31T14:14:58+02:00 - Seite 167 Z
Dateiname: 6515431202_buchblock.pdf; erzeugt am 01. Apr 2009 00:17:43; WK