2009 MERCEDES-BENZ GL SUV service reset
[x] Cancel search: service resetPage 16 of 309
Rear-compartment seats
....................67
Rear foglamp Display message ............................ 227
Rear-view mirror
Adjusting ......................................... 72
Anti-dazzle (manual) ......................... 72
Anti-dazzle mode (automatic) ..........73
Rear window heating ........................146
Malfunction indicator lamp ............234
Rear window wiper .............................85
Replacing the wiper blade .............. 262
Refuelling ........................................... 172
Remote control Auxiliary heating ............................ 148
Changing the batteries (auxiliary
heating) ......................................... 254
Garage door opene r....................... 165
Programming (garage door
opener) .......................................... 165
Reserve
Warning lamp ................................. 239
Reserve fuel ....................................... 287
Display message ............................ 232
Fuel tank ........................................ 287
Warning lamp ................................. 239
Reset button ........................................ 25
Restraint system See SRS .......................................... 35
Restraint systems
For children ..................................... 41
Rev counter .......................................... 97
Reversing camera ............................. 135
Cleaning ......................................... 203
Reversing lamps
Display message ............................ 228
Roof carrier ....................................... 161S
Safety net .......................................... .158
Seat Adjusting ................................... 64, 65
Correct driver's seat position ........... 78
Folding down/up (3rd row of
seats) ............................................... 67
Storing settings ............................... 74Seat belt
Adjusting the driver's and front-
passenger seat belt .........................77
Adjusting the height ......................... 77
Fastening ......................................... 75
Warning lamp ........................... 77, 238
Seat covers
Cleaning ......................................... 204
Seat heating ........................................ .70
Seat ventilation ................................... 69
Malfunction indicator lamp ............233
Securing a load .................................. 156
Securing hooks .................................. 157
Service indicator see ASSYST PLUS service interval
displa y........................................... 199
Service products ............................... 287
AdBlue ®
additives .......................... 288
Brake fluid ..................................... 291
Coolant .......................................... 291
Engine oil ....................................... 289
Fuel ................................................ 287
Windscreen washer fluid ................291
Settings
Calling up a stored setting ...............74
Factory (on-board computer) .........103
On-board computer .......................103
Setting the unit (on-board computer)
Speedometer ................................. 103
Shift ranges
Automatic transmission ...................94
Sidebag ................................................ 39
Side windows Convenience closing ........................87
Convenience opening ......................87
Fault .............................................. 246
Hinged side windows .......................86
Opening/closing .............................. 85
resetting .......................................... 86
Sliding/tilting sunroof ......................150
Convenience closing ........................87
Convenience opening ......................87
Rain closing feature .......................151
Resetting ....................................... 151
Sliding sunroof
see Sliding/tilting sunroof
Snow chains ...................................... 186 Index
13 X164_AKB; 2; 3, en-GB
wobuchh,
Version: 2.11.8.1
2009-03-31T14:14:58+02:00 - Seite 13Dateiname: 6515431202_buchblock.pdf; erzeugt am 01. Apr 2009 00:16:30; WK
Page 44 of 309
restraints from triggering properly. The NECK-
PRO head restraints/NECK-PRO luxury head
restraints can therefore not provide the inten-
ded protection. Do not use head restraint cov-
ers.
If NECK-PRO head restraints/NECK-PRO
luxury head restraints have been triggered in
an accident, you must reset the head
restraints on the driver’s and front-passenger
seat (Y page 252). Head restraints that have
been triggered are tilted forwards. Children in the vehicle
If a child is travelling in your vehicle, secure
the child using a child restraint system which
is appropriate to the size and age of the child
and is recommended for Mercedes-Benz
vehicles. You should fit the restraint system
to a suitable rear seat. Ensure that the child
is secured throughout the trip.
You can obtain information about the correct
child restraint system from any Mercedes-
Benz Service Centre.
i It is advisable to use Mercedes-Benz care
products to clean child restraint systems.
Information about this can be obtained
from any Mercedes-Benz Service Centre. G
Risk of injury
Do not leave children unsupervised in the
vehicle, even if they are secured in a child
restraint system. Children could injure them-
selves on parts of the vehicle. They could also
be seriously or even fatally injured by pro-
longed exposure to extreme heat or cold.
Do not expose the child restraint system to
direct sunlight. Parts of the child restraint sys-
tem could heat up and the child could burn
herself/himself on them.
If a child opens a door, the child or other per-
sons could be injured as a result. The child
could get out and be injured in the process or
be injured by a passing vehicle. G
Risk of injury
An unsecured or an incorrectly positioned
load increases the risk of injury for the child
and all other occupants, during:
R an accident
R a braking manoeuvre
R a sudden change of direction
Do not carry heavy or hard objects inside the
vehicle unless they are secured. You will find
further information under "Loading guide-
lines" in the index.
Child restraint systems Mercedes-Benz recommends that you only
use the child restraint systems listed on
(Y
page 46). G
Risk of injury
To reduce the risk of serious or even fatal
injury to the child in the event of a sudden
change in direction, braking or an accident:
R children less than 1.50 m tall and under
twelve years of age must always be secured
in special child restraint systems on a suit-
able vehicle seat. This is necessary
because the seat belts are not designed for
children of this size.
R do not secure children less than 1.50 m tall
or under twelve years of age on the front-
passenger seat. Exception: the child is
secured in a vehicle with automatic child
seat recognition on the front-passenger
seat* and is secured in a child restraint
system with automatic child seat recogni-
tion.
R if you secure a forward-facing child
restraint system to the front-passenger
seat, you must move the front-passenger
seat as far back as possible.
R children must never travel sitting on the lap
of another occupant. Due to the forces
occurring in the event of a sudden change
of direction, heavy braking or an accident, Occupant safety
41Safety
* optional
X164_AKB; 2; 3, en-GB
wobuchh,
Version: 2.11.8.1 2009-03-31T14:14:58+02:00 - Seite 41 Z
Dateiname: 6515431202_buchblock.pdf; erzeugt am 01. Apr 2009 00:16:45; WK
Page 103 of 309

X
Press the VorU button to select the
standard display. Standard display
:
Trip meter
; Total distance
You can select the following functions in the
Standard display menu using the&or
* button:
R tyre pressure loss warning (Y page 182) or
tyre pressure monitor* (Y page 183)
R coolant temperature (Y page 100)
R digital speedometer or outside tempera-
ture (Y page 104)
R ASSYST PLUS service interval display
R engine oil level* (Y page 176)
X To reset the trip meter: press and hold
the .reset button in the instrument clus-
ter until the trip meter is reset.
Displaying the coolant temperature X
Press the VorU button to select the
standard display.
X Press the &or* button to select the
coolant temperature. Under normal driving conditions, with the cor-
rect anti-corrosion and antifreeze additive concentration, the reading may rise to
120 †.
Displaying the digital speedometer or
outside temperature If you have selected the digital speedometer
as the status line (Y
page 104), select the
outside temperature display here 20
.
X Press the VorU button to select the
standard display.
X Press the &or* button to select
digital speedometer or the outside temper-
ature. Digital speedometer
Outside temperature
Audio/TV*/DVD* menu
Use the functions in the Audio/TV/DVD
menu to operate the audio equipment or
COMAND APS*.
Selecting a radio station You can only store new stations using the
audio system or COMAND APS* (see the sep-
arate operating instructions).
20 Vehicles for the United Kingdom: the outside temperature is always displayed. 100
On-board computerControls
* optional
X164_AKB; 2; 3, en-GB
wobuchh,
Version: 2.11.8.1 2009-03-31T14:14:58+02:00 - Seite 100
Dateiname: 6515431202_buchblock.pdf; erzeugt am 01. Apr 2009 00:17:15; WK
Page 203 of 309
The letters displayed range from
Afor a short
service duration (approx. 1 hour) to Hfor a
long service duration (approx. 8 hours).
The ASSYST PLUS service interval display
does not take into account any periods of
time during which the battery is disconnec-
ted.
Maintaining the time-dependent service
schedule:
X Note down the service due date displayed
before disconnecting the battery.
or
X Subtract the battery disconnection periods
from the service date shown on the display
after reconnecting the battery.
Hiding a service message X
Press the .reset button on the instru-
ment cluster (Y page 25).
Service overdue A display message is shown in the multi-func-
tion display, for example:
Service A exceeded by .. days
Service A exceeded by .. km
You will also hear a warning tone.
i If you fail to have the service performed
by the specified date, you may be violating
applicable laws. Your warranty may be inva-
lidated and goodwill settlements may be
refused.
Calling up a service due date X
Switch on the ignition.
X Press VorU to select the standard
display menu on the steering wheel
(Y page 99).
X Press &or* to select the service
information.
The multi-function display shows the
¯ symbol and the service due date. AdBlue
®
service indicator
i For Blue-TEC vehicles only.
The BlueTEC exhaust gas aftertreatment
must be operated with a reducing agent
(AdBlue ®
) in order for it to function correctly.
AdBlue ®
is topped up as part of maintenance
work. Under normal operating conditions, a
full tank of AdBlue ®
should last until the next
service due date.
Depending on how and where the vehicle is
used, there may be an increase in the
AdBlue ®
consumption. If the AdBlue ®
supply
does not last until the next service, it will be
necessary to top it up sooner.
The following messages tell you about the
AdBlue ®
supply:
Refill AdBlue at workshop See Own‐
er's Manual
Refill AdBlue at workshop No start
in: ... km
Before taking a trip with your vehicle outside
Europe, have the AdBlue ®
supply checked
and, if necessary, topped up at a qualified
specialist workshop. Before using your vehi-
cle for an extended period in countries out-
side Europe, contact a qualified specialist
workshop.
! Have the AdBlue ®
tank topped up at a
qualified specialist workshop only. The
vehicle may otherwise be damaged or
soiled.
Damage or consequential damage is not
covered by the Mercedes-Benz implied
warranty.
You can obtain general information about
BlueTEC exhaust gas aftertreatment and
AdBlue ®
from any Mercedes-Benz Service
Centre.
Further information about AdBlue ®
(Y page 288). 200
ServiceOperation
X164_AKB; 2; 3, en-GB
wobuchh,
Version: 2.11.8.1 2009-03-31T14:14:58+02:00 - Seite 200
Dateiname: 6515431202_buchblock.pdf; erzeugt am 01. Apr 2009 00:17:53; WK
Page 255 of 309
X
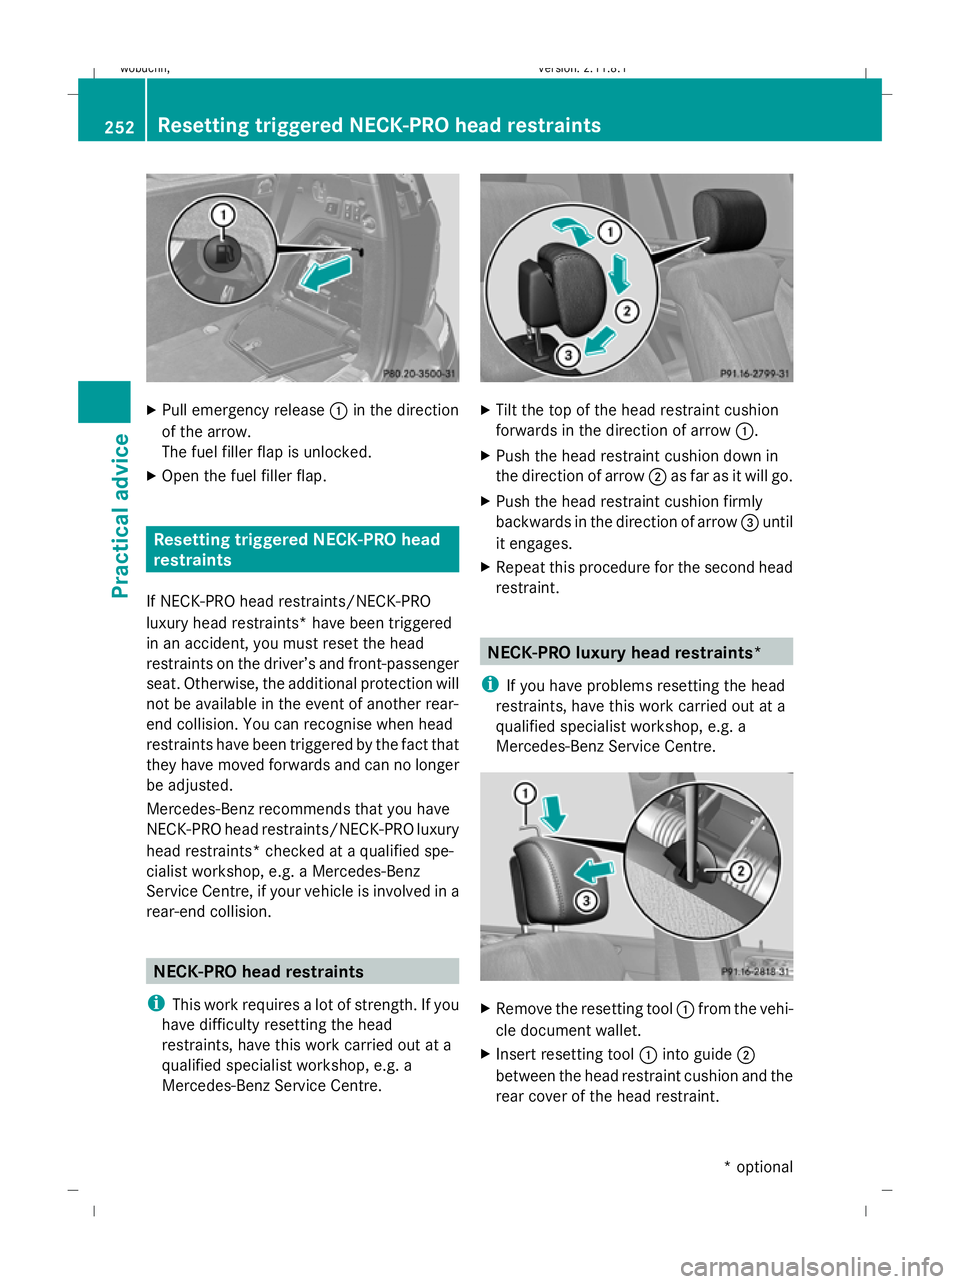
Pull emergency release :in the direction
of the arrow.
The fuel filler flap is unlocked.
X Open the fuel filler flap. Resetting triggered NECK-PRO head
restraints
If NECK-PRO head restraints/NECK-PRO
luxury head restraints* have been triggered
in an accident, you must reset the head
restraints on the driver’s and front-passenger
seat. Otherwise, the additional protection will
not be available in the event of another rear-
end collision. You can recognise when head
restraints have been triggered by the fact that
they have moved forwards and can no longer
be adjusted.
Mercedes-Benz recommends that you have
NECK-PRO head restraints/NECK-PRO luxury
head restraints* checked at a qualified spe-
cialist workshop, e.g. a Mercedes-Benz
Service Centre, if your vehicle is involved in a
rear-end collision. NECK-PRO head restraints
i This work requires a lot of strength. If you
have difficulty resetting the head
restraints, have this work carried out at a
qualified specialist workshop, e.g. a
Mercedes-Benz Service Centre. X
Tilt the top of the head restraint cushion
forwards in the direction of arrow :.
X Push the head restraint cushion down in
the direction of arrow ;as far as it will go.
X Push the head restraint cushion firmly
backwards in the direction of arrow =until
it engages.
X Repeat this procedure for the second head
restraint. NECK-PRO luxury head restraints*
i If you have problems resetting the head
restraints, have this work carried out at a
qualified specialist workshop, e.g. a
Mercedes-Benz Service Centre. X
Remove the resetting tool :from the vehi-
cle document wallet.
X Insert resetting tool :into guide ;
between the head restraint cushion and the
rear cover of the head restraint. 252
Resetting triggered NECK-PRO head restraintsPractical advice
* optional
X164_AKB; 2; 3, en-GB
wobuchh,
Version: 2.11.8.1 2009-03-31T14:14:58+02:00 - Seite 252
Dateiname: 6515431202_buchblock.pdf; erzeugt am 01. Apr 2009 00:18:04; WK
Page 256 of 309
X
Press resetting tool :downwards until
you hear the head restraint deployment
mechanism engage.
X Pull out resetting tool :.
X Firmly press back the head restraint cush-
ion until it engages =.
X Repeat this procedure for the second head
restraint. Replacing batteries (key and remote
control) Notes
It is advisable to have the batteries replaced
at a qualified specialist workshop, e.g. at a
Mercedes-Benz Service Centre. G
Risk of poisoning
Batteries contain toxic and caustic substan-
ces. For this reason, keep batteries away from
children.
If a battery is swallowed, consult a doctor
immediately. H
Environmental note
Do not dispose of batteries with the house-
hold rubbish. They contain highly toxic sub-
stances.
Take discharged batteries to a qualified spe-
cialist workshop, e.g. a Mercedes-Benz
Service Centre, or to a special collection point
for old batteries. Key
Checking the batteries X
Press the &or% button.
The batteries are in working order if the
battery charge indicator lamp lights up
briefly. Changing batteries (key with KEYLESS
GO*) You require two CR 2025 3 V cell batteries.
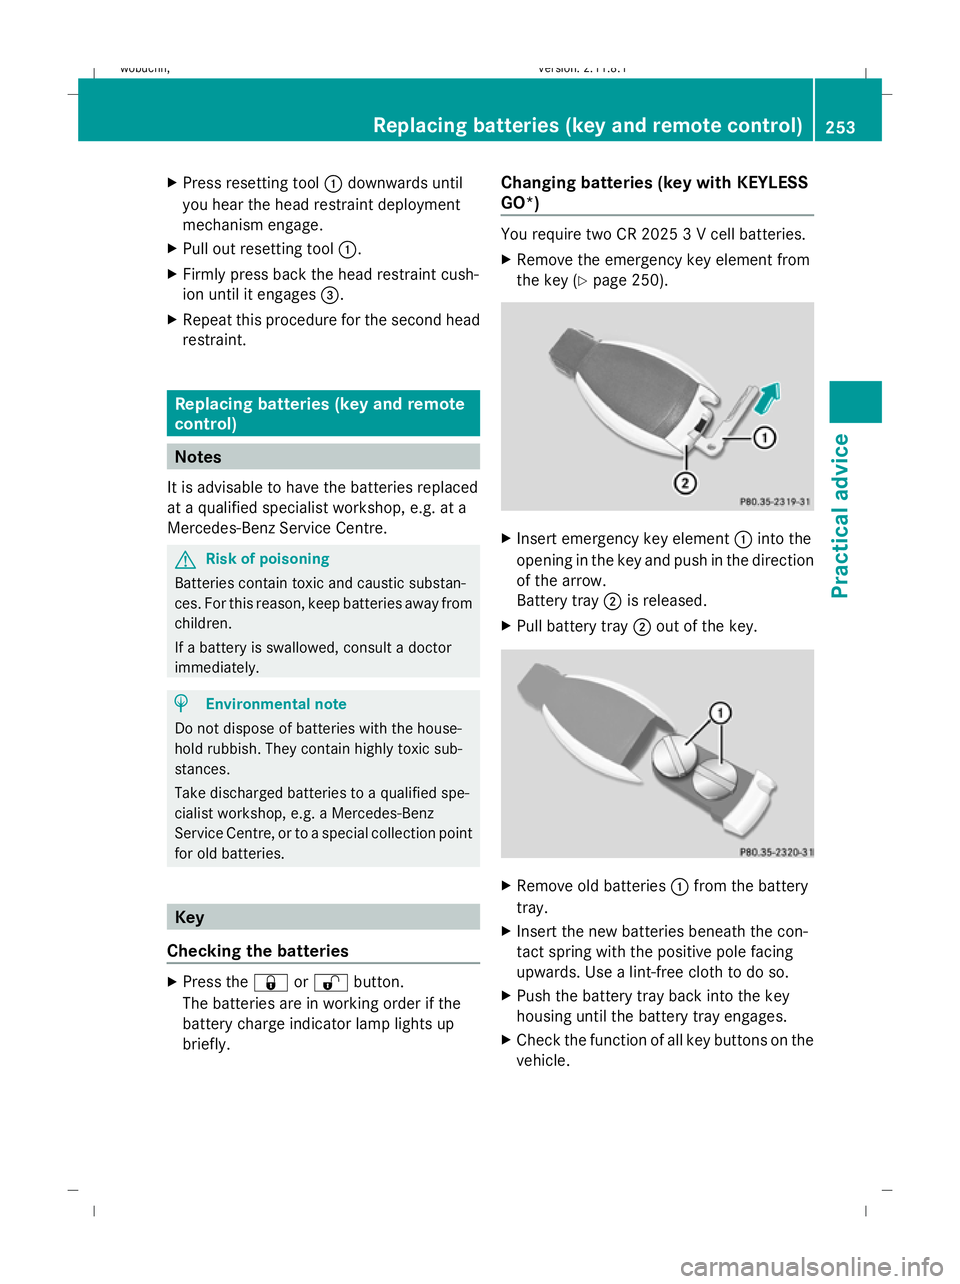
X
Remove the emergency key element from
the key (Y page 250). X
Insert emergency key element :into the
opening in the key and push in the direction
of the arrow.
Battery tray ;is released.
X Pull battery tray ;out of the key. X
Remove old batteries :from the battery
tray.
X Insert the new batteries beneath the con-
tact spring with the positive pole facing
upwards. Use a lint-free cloth to do so.
X Push the battery tray back into the key
housing until the battery tray engages.
X Check the function of all key buttons on the
vehicle. Replacing batteries (key and remote control)
253Practical advice
X164_AKB; 2; 3, en-GB
wobuchh,Version: 2.11.8.1 2009-03-31T14:14:58+02:00 - Seite 253 Z
Dateiname: 6515431202_buchblock.pdf; erzeugt am 01. Apr 2009 00:18:04; WK
Page 279 of 309
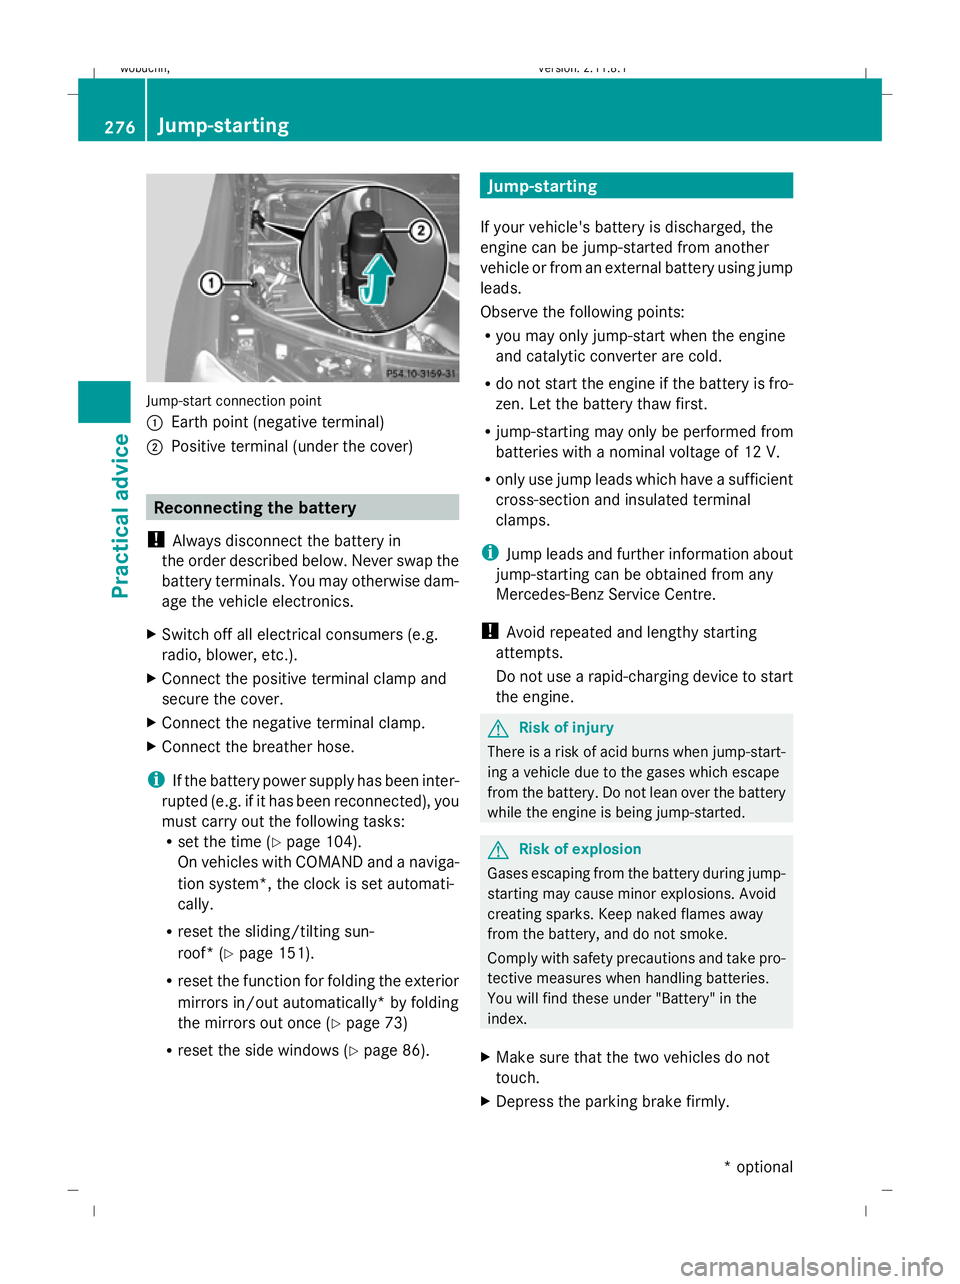
Jump-start connection point
:
Earth point (negative terminal)
; Positive terminal (under the cover) Reconnecting the battery
! Always disconnect the battery in
the order described below. Never swap the
battery terminals. You may otherwise dam-
age the vehicle electronics.
X Switch off all electrical consumers (e.g.
radio, blower, etc.).
X Connect the positive terminal clamp and
secure the cover.
X Connect the negative terminal clamp.
X Connect the breather hose.
i If the battery power supply has been inter-
rupted (e.g. if it has been reconnected), you
must carry out the following tasks:
R set the time (Y page 104).
On vehicles with COMAND and a naviga-
tion system*, the clock is set automati-
cally.
R reset the sliding/tilting sun-
roof* (Y page 151).
R reset the function for folding the exterior
mirrors in/out automatically* by folding
the mirrors out once (Y page 73)
R reset the side windows ( Ypage 86). Jump-starting
If your vehicle's battery is discharged, the
engine can be jump-started from another
vehicle or from an external battery using jump
leads.
Observe the following points:
R you may only jump-start when the engine
and catalytic converter are cold.
R do not start the engine if the battery is fro-
zen. Let the battery thaw first.
R jump-starting may only be performed from
batteries with a nominal voltage of 12 V.
R only use jump leads which have a sufficient
cross-section and insulated terminal
clamps.
i Jump leads and further information about
jump-starting can be obtained from any
Mercedes-Benz Service Centre.
! Avoid repeated and lengthy starting
attempts.
Do not use a rapid-charging device to start
the engine. G
Risk of injury
There is a risk of acid burns when jump-start-
ing a vehicle due to the gases which escape
from the battery. Do not lean over the battery
while the engine is being jump-started. G
Risk of explosion
Gases escaping from the battery during jump-
starting may cause minor explosions. Avoid
creating sparks. Keep naked flames away
from the battery, and do not smoke.
Comply with safety precautions and take pro-
tective measures when handling batteries.
You will find these under "Battery" in the
index.
X Make sure that the two vehicles do not
touch.
X Depress the parking brake firmly. 276
Jump-startingPractical advice
* optional
X164_AKB; 2; 3, en-GB
wobuchh,
Version: 2.11.8.1 2009-03-31T14:14:58+02:00 - Seite 276
Dateiname: 6515431202_buchblock.pdf; erzeugt am 01. Apr 2009 00:18:17; WK