2009 MERCEDES-BENZ GL SUV sensor
[x] Cancel search: sensorPage 137 of 309
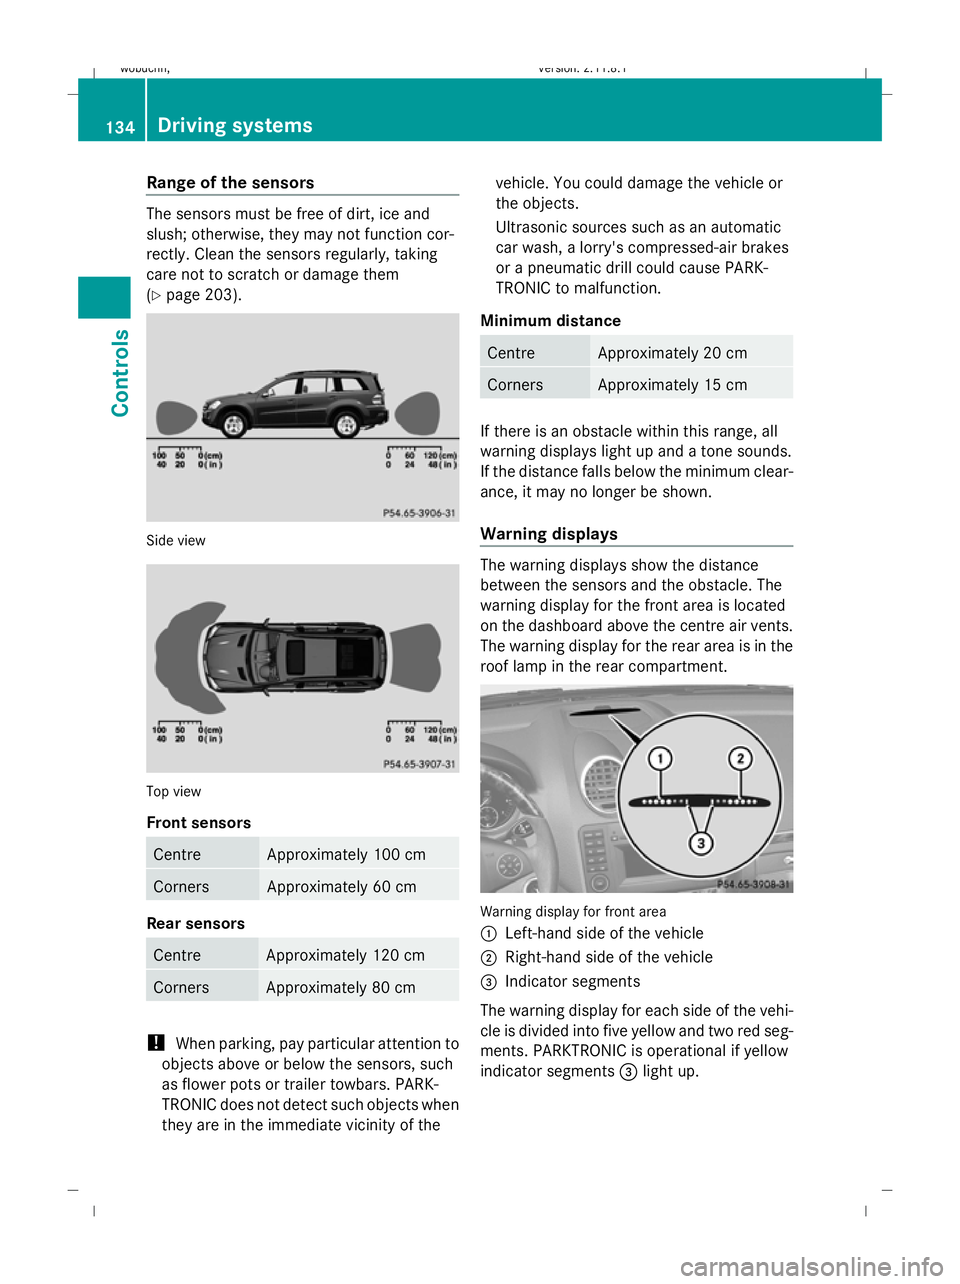
Range of the sensors
The sensors must be free of dirt, ice and
slush; otherwise, they may not function cor-
rectly. Clean the sensors regularly, taking
care not to scratch or damage them
(Y page 203). Side view
Top view
Front sensors
Centre Approximately 100 cm
Corners Approximately 60 cm
Rear sensors
Centre Approximately 120 cm
Corners Approximately 80 cm
!
When parking, pay particular attention to
objects above or below the sensors, such
as flower pots or trailer towbars. PARK-
TRONIC does not detect such objects when
they are in the immediate vicinity of the vehicle. You could damage the vehicle or
the objects.
Ultrasonic sources such as an automatic
car wash, a lorry's compressed-air brakes
or a pneumatic drill could cause PARK-
TRONIC to malfunction.
Minimum distance Centre Approximately 20 cm
Corners Approximately 15 cm
If there is an obstacle within this range, all
warning displays light up and a tone sounds.
If the distance falls below the minimum clear-
ance, it may no longer be shown.
Warning displays The warning displays show the distance
between the sensors and the obstacle. The
warning display for the front area is located
on the dashboard above the centre air vents.
The warning display for the rear area is in the
roof lamp in the rear compartment. Warning display for front area
:
Left-hand side of the vehicle
; Right-hand side of the vehicle
= Indicator segments
The warning display for each side of the vehi-
cle is divided into five yellow and two red seg-
ments. PARKTRONIC is operational if yellow
indicator segments =light up. 134
Driving systemsControls
X164_AKB; 2; 3, en-GB
wobuchh,
Version: 2.11.8.1 2009-03-31T14:14:58+02:00 - Seite 134
Dateiname: 6515431202_buchblock.pdf; erzeugt am 01. Apr 2009 00:17:26; WK
Page 141 of 309
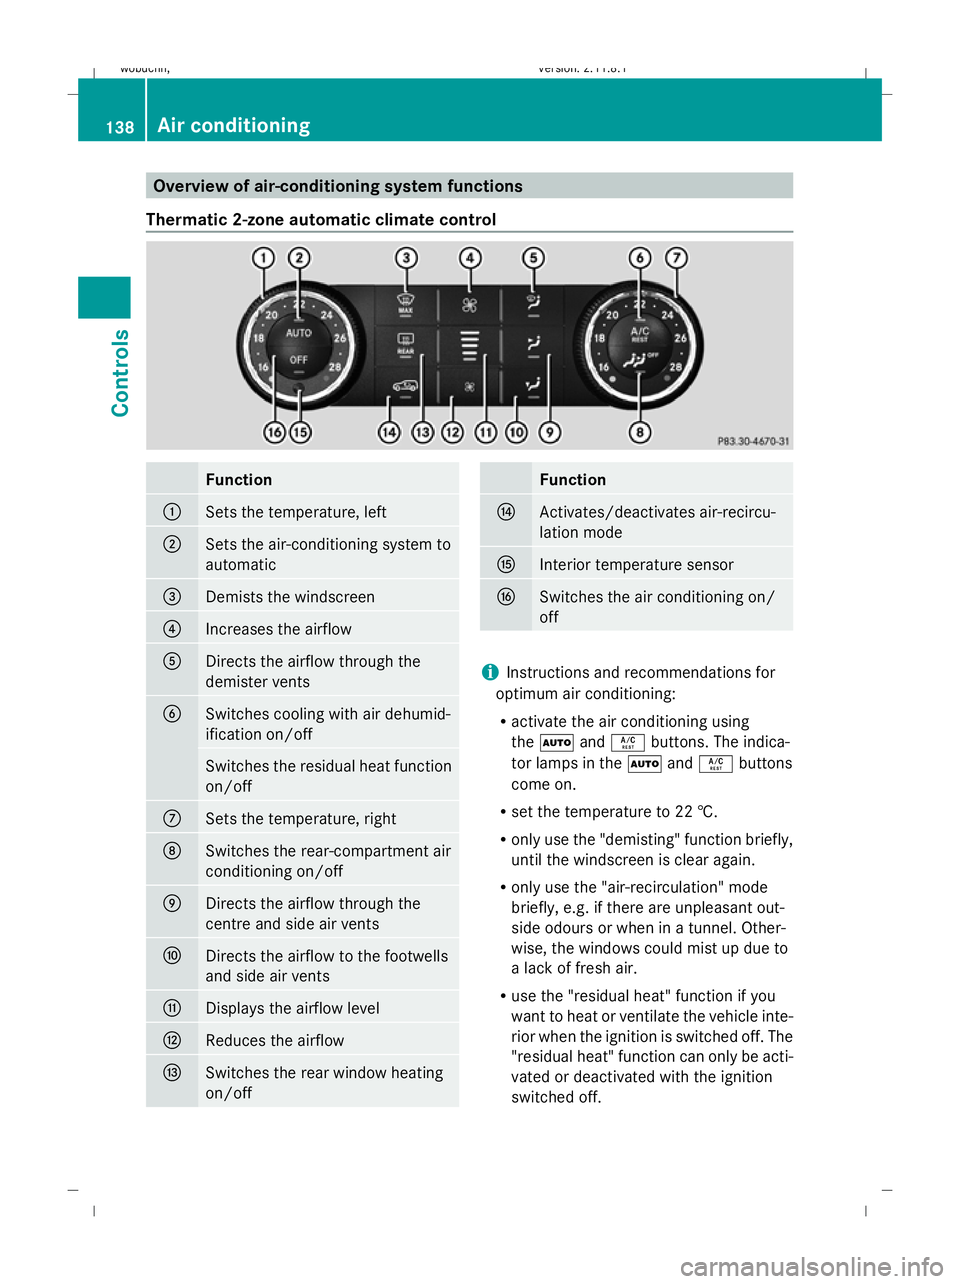
Overview of air-conditioning system functions
Thermatic 2-zone automatic climate control Function
:
Sets the temperature, left
;
Sets the air-conditioning system to
automatic
=
Demists the windscreen
?
Increases the airflow
A
Directs the airflow through the
demister vents
B
Switches cooling with air dehumid-
ification on/off
Switches the residual heat function
on/off
C
Sets the temperature, right
D
Switches the rear-compartment air
conditioning on/off
E
Directs the airflow through the
centre and side air vents
F
Directs the airflow to the footwells
and side air vents
G
Displays the airflow level
H
Reduces the airflow
I
Switches the rear window heating
on/off Function
J
Activates/deactivates air-recircu-
lation mode
K
Interior temperature sensor
L
Switches the air conditioning on/
off
i
Instructions and recommendations for
optimum air conditioning:
R activate the air conditioning using
the à andÁ buttons. The indica-
tor lamps in the ÃandÁ buttons
come on.
R set the temperature to 22 †.
R only use the "demisting" function briefly,
until the windscreen is clear again.
R only use the "air-recirculation" mode
briefly, e.g. if there are unpleasant out-
side odours or when in a tunnel. Other-
wise, the windows could mist up due to
a lack of fresh air.
R use the "residual heat" function if you
want to heat or ventilate the vehicle inte-
rior when the ignition is switched off. The
"residual heat" function can only be acti-
vated or deactivated with the ignition
switched off. 138
Air conditioningControls
X164_AKB; 2; 3, en-GB
wobuchh,
Version: 2.11.8.1 2009-03-31T14:14:58+02:00 - Seite 138
Dateiname: 6515431202_buchblock.pdf; erzeugt am 01. Apr 2009 00:17:28; WK
Page 142 of 309
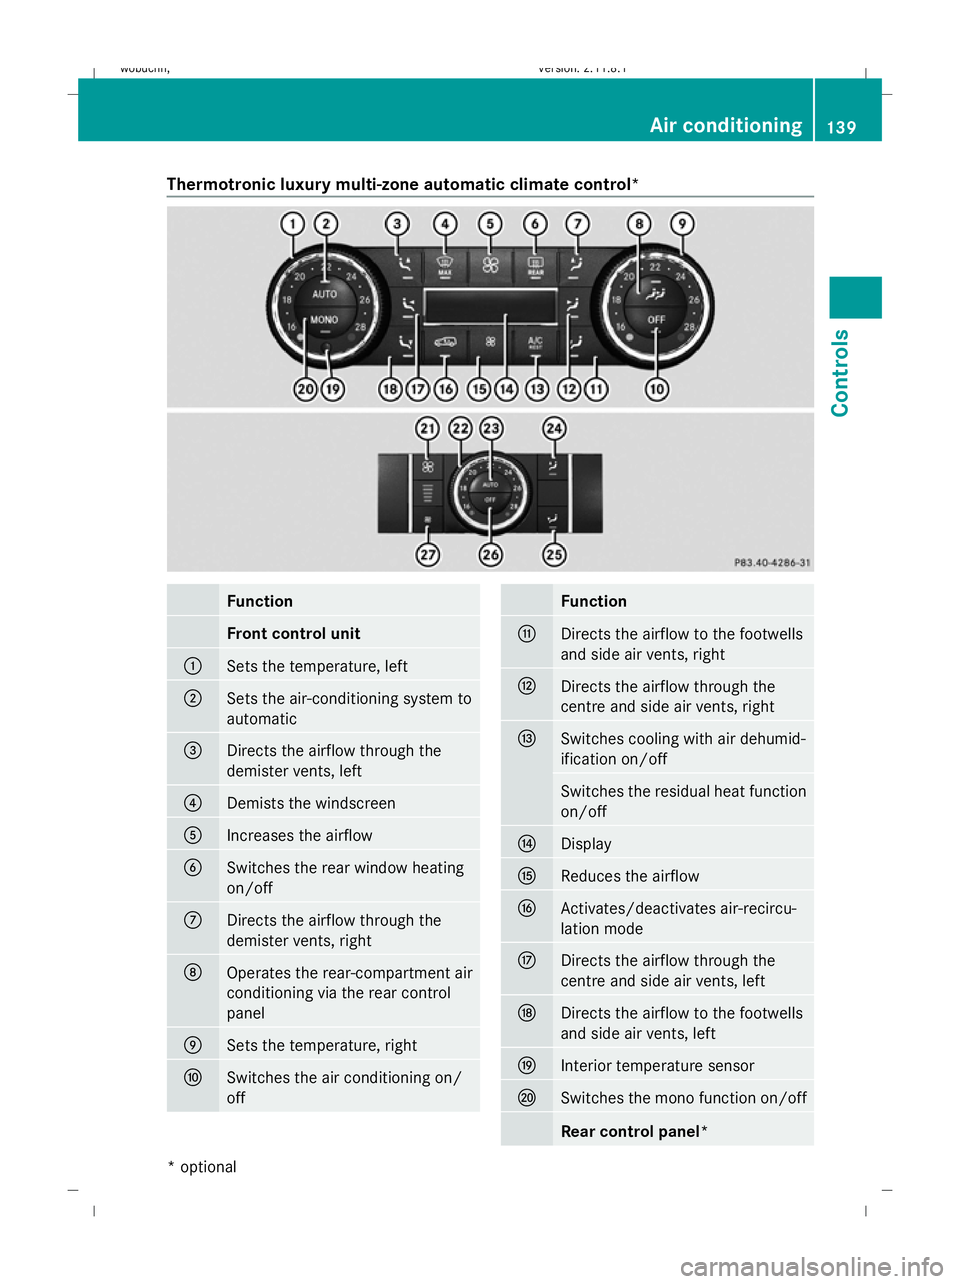
Thermotronic luxury multi-zone automatic climate control*
Function
Front control unit
:
Sets the temperature, left
;
Sets the air-conditioning system to
automatic
=
Directs the airflow through the
demister vents, left
?
Demists the windscreen
A
Increases the airflow
B
Switches the rear window heating
on/off
C
Directs the airflow through the
demister vents, right
D
Operates the rear-compartment air
conditioning via the rear control
panel E
Sets the temperature, right
F
Switches the air conditioning on/
off Function
G
Directs the airflow to the footwells
and side air vents, right
H
Directs the airflow through the
centre and side air vents, right
I
Switches cooling with air dehumid-
ification on/off
Switches the residual heat function
on/off
J
Display
K
Reduces the airflow
L
Activates/deactivates air-recircu-
lation mode
M
Directs the airflow through the
centre and side air vents, left
N
Directs the airflow to the footwells
and side air vents, left
O
Interior temperature sensor
P
Switches the mono function on/off
Rear control panel* Air conditioning
139Controls
* optional
X164_AKB; 2; 3, en-GB
wobuchh
,V ersion: 2.11.8.1
2009-03-31T14:14:58+02:00 - Seite 139 Z
Dateiname: 6515431202_buchblock.pdf; erzeugt am 01. Apr 2009 00:17:29; WK
Page 154 of 309
direction of arrow
;until the sliding/tilt-
ing sunroof is closed.
The sliding/tilting sunroof is closed with
more force.
If the sliding/tilting sunroof locks up during
closing again:
X Immediately after it locks up, pull the
switch again to the pressure point in the
direction of arrow ;until the sliding/tilt-
ing sunroof is closed.
The sliding/tilting sunroof is closed without
the anti-entrapment feature.
Rain closing feature* The sliding/tilting sunroof closes automati-
cally:
R
if it starts to rain
R after 12 hours
The rear of the sliding/tilting sunroof is then
raised in order to ventilate the interior of the
vehicle.
i The sliding/tilting sunroof is opened
slightly again if it is obstructed while being
closed by the rain closing feature. The rain
closing feature is then deactivated.
The sliding/tilting sunroof does not close if:
R it is raised at the rear
R it is blocked
R no rain is falling on the area of the wind-
screen being monitored by the rain sensor
(e.g. because the vehicle is under a bridge
or in a carport)
Resetting Reset the sliding/tilting sunroof if it does not
open smoothly, or if the battery has been dis-
connected or has become discharged.
X
Switch the ignition off and then on again.
X The sliding/tilting sunroof is raised fully at
the rear. X
Keep the switch pressed for an additional
second.
X Make sure that the sliding/tilting sunroof
can be opened or closed fully again
(Y page 150).
X If this is not the case, consult a qualified
specialist workshop. Loading and stowing
Loading guidelines
G
Risk of injury
Secure and position the load as described in
the loading guidelines.
Otherwise, vehicle occupants could
be injured by the load being thrown around in
the event of sharp braking, a sudden change
in direction or an accident.
You will find further information in the "Secur-
ing a load" section.
Even if you follow all the loading guidelines,
the load will increase the risk of injury in the
event of an accident. G
Risk of poisoning
Keep the tailgate closed when the engine is
running. Otherwise, you could be poisoned by
exhaust fumes entering the vehicle.
The handling characteristics of a laden vehi-
cle are dependent on the distribution of the
load within the vehicle. For this reason, you
should observe the following notes when
transporting a load:
R never exceed the maximum permissible
gross vehicle weight or the permissible axle
loads for the vehicle (including occupants).
R position heavy loads as far forwards and as
low down in the luggage compartment as
possible.
R the load must not protrude above the upper
edge of the seat backrests.
R always place the load against the rear or
front seat backrests. Make sure that the Loading and stowing
151Controls
* optional
X164_AKB; 2; 3, en-GB
wobuchh,
Version: 2.11.8.1 2009-03-31T14:14:58+02:00 - Seite 151 Z
Dateiname: 6515431202_buchblock.pdf; erzeugt am 01. Apr 2009 00:17:32; WK
Page 186 of 309
G
Risk of accident
The tyre pressure loss warning system can
only give reliable warnings if you have set the
correct tyre pressure.
If an incorrect tyre pressure is set, these
incorrect values will be monitored.
A tyre with insufficient pressure results in
vehicle instability when driving, thus increas-
ing the risk of an accident.
X Make sure that the key is in position
2 (Y page 63) in the ignition lock.
In the multi-function display you will see the
standard display (Y page 98).
X Press *or& to select the Tyre
pressure function.
The
Run Flat Indicator active
Menu: R-Button message is displayed.
X Press the reset button (Y page 25) on the
instrument cluster.
The multi-function display shows the mes-
sage:
Restart Run Flat Indicator?
Yes Cancel
If you wish to confirm the restart:
X Press the Wbutton.
The multi-function display shows the mes-
sage:
Run Flat Indicator restarted
After a teach-in period, the tyre pressure
loss warning system will monitor the set
tyre pressures of all four tyres.
If you wish to cancel the restart:
X Press the Xbutton.
or
X Wait until the Restart Run Flat Indi‐
cator? Yes Cancel message disappears.
The tyre pressure values stored at the last
restart will continue to be monitored. Tyre pressure monitor*
If a tyre pressure monitor system is fitted, the
vehicle's wheels have sensors fitted that
monitor the tyre pressures in all four tyres.
The tyre pressure monitor warns you when
the pressure drops in one or more of the
tyres. The tyre pressure monitor only func-
tions if the correct wheel electronics units are
fitted to all wheels. G
Risk of accident
The tyre pressure monitor does not warn you
of an incorrectly set tyre pressure. The table
on the inside of the fuel filler flap will help you
decide whether the tyre pressures should be
corrected.
The tyre pressure monitor is not able to warn
you of a sudden loss of pressure, e.g. if the
tyre is penetrated by a foreign object. In the
event of a sudden loss of pressure, bring the
vehicle to a halt by braking carefully. Do not
make any sudden steering movements when
doing so.
i The operation of the tyre pressure moni-
tor can be affected by interference from
radio transmitting equipment (e.g. radio
headphones, two-way radios) that may be
being operated in or near the vehicle.
Checking tyre pressure electronically X
Make sure that the key is in posi-
tion 2(Y page 63) in the ignition lock.
X Press the &or* button to select the
Tyre pressure function.
The current tyre pressure for each wheel will
be displayed in the multi-function display.
If the vehicle has been parked for longer than
20 minutes or if you have not driven faster
than 25 km/h since starting the vehicle, the
following message appears:
i The tyre pressure values indicated by the
on-board computer may differ from those
measured at a filling station with a pressure
gauge. The tyre pressures shown by the on- Tyres and wheels
183Operation
* optional
X164_AKB; 2; 3, en-GB
wobuchh,
Version: 2.11.8.1 2009-03-31T14:14:58+02:00 - Seite 183 Z
Dateiname: 6515431202_buchblock.pdf; erzeugt am 01. Apr 2009 00:17:48; WK
Page 187 of 309

board computer refer to those measured at
sea level. At high altitudes, the tyre pres-
sure values indicated by a pressure gauge
are higher than those shown by the on-
board computer. In this case, do not reduce
the tyre pressures.
i After a teach-in period, the tyre pressure
monitor automatically recognises new
wheels or new sensors. As long as a clear
allocation of the tyre pressure values to the
individual wheels is not possible, the dis-
play message Tyre pressure monitor
active is shown instead of the tyre pres-
sure display. The tyre pressures are already
being monitored.
Restarting the tyre pressure monitor When you restart the tyre pressure monitor,
all existing warning messages are deleted and
the warning lamps go out. The monitor uses
the currently set tyre pressures as the speci-
fied values for monitoring.
In most cases, the tyre pressure monitor will
automatically detect the new reference val-
ues, e.g. if you have:
R changed the tyre pressure
R changed the wheels or tyres
R fitted new wheels or tyres
i You will find the menu overview on
(Y page 99).
If you wish to define the new reference values
manually:
X Use the table on the inside of the fuel filler
flap to ensure that the tyre pressure is set
correctly in all four tyres for the current
operating conditions.
Also observe the notes in the section on
tyre pressures (Y page 180).
X Make sure that the key is in position 2in
the ignition lock.
X Press the &or* button to select the
Tyre pressure function or wait until the
following message appears: X
Press the reset button on the instrument
cluster (Y page 25).
The multi-function display shows the mes-
sage:
Restart tyre pressure monitor?
Yes Cancel
X Press the Wbutton.
The multi-function display shows the mes-
sage:
Tyre pressure monitor restarted
The tyre pressure monitor has stored the
pressure of the tyres as a new reference
value.
Cancelling the restart X
Press the Xbutton.
Other messages in the multi-function
display If in multi-function display the following mes-
sage appears:
Please correct tyre pressures
X
Check the tyre pressure on all four wheels
and correct it if necessary.
i If the wheel positions on the vehicle are
interchanged, the tyre pressures may be
displayed for the wrong positions for a
short time. This is rectified after a few
minutes of driving, and the tyre pressures
are displayed for the correct positions. Interchanging the wheels
G
Risk of accident
Interchange the front and rear wheels only if
they have the same dimensions: for example
size, offset, etc.
After a wheel is changed, have the tightening
torque checked at a specialist workshop that
has the necessary specialist knowledge and
tools to carry out the work required.
Mercedes-Benz recommends that you use a 184
Tyres and wheelsOperation
X164_AKB; 2; 3, en-GB
wobuchh,
Version: 2.11.8.1 2009-03-31T14:14:58+02:00 - Seite 184
Dateiname: 6515431202_buchblock.pdf; erzeugt am 01. Apr 2009 00:17:48; WK
Page 204 of 309
Care
Care and cleaning products
Regular care of your vehicle is a condition for
retaining the quality in the long term.
Use only care products and cleaning agents
recommended and approved by Mercedes-
Benz.
! For cleaning your vehicle, do not use any
of the following:
R dry, rough or hard cloths
R abrasive cleaning agents
R solvents
R cleaning agents containing solvents
and do not scrub.
Do not touch the surfaces and protective
films with hard objects, e.g. rings or ice
scrapers. You could otherwise scratch or
damage the surfaces and protective film. H
Environmental note
Dispose of empty packaging, cleaning cloths
and polishing wads in an environmentally
responsible manner.
! Do not park the vehicle for a long period
of time directly after cleaning, especially if
the wheels have just been cleaned with a
wheel cleaner. Wheel cleaners could cause
rapid corrosion of the brake discs and
brake pads/linings. After cleaning, park
the vehicle when it is at normal operating
temperature. Exterior care
Automatic car wash G
Risk of accident
The efficiency of the brakes is reduced after
using an automatic car wash. This could cause
an accident. For this reason, following a car
wash, drive with particular care until the
brakes are dry. You can wash the vehicle in an automatic car
wash from the beginning.
!
Do not wash vehicles with an exterior
spare wheel bracket* in an automatic car
wash.
If the vehicle is very dirty, pre-wash it before
cleaning it in an automatic car wash.
! Make sure that the automatic car wash is
suitable for the size of the vehicle. Fold in
the exterior mirrors before the vehicle is
washed. There is otherwise a risk of dam-
age to the exterior mirrors.
! When washing your vehicle in a tow-
through car wash, make sure that the auto-
matic transmission is in position N, other-
wise the vehicle could be damaged.
R Vehicles with a key:
Do not remove the key from the ignition
lock. Do not open the driver's or front-
passenger door when the engine is
switched off, as this automatically shifts
the automatic transmission to park posi-
tion Pand locks the wheels, unless you
have previously shifted the automatic
transmission to N.
R Vehicles with KEYLESS GO*:
Do not open the driver's or front-
passenger door when the engine is
switched off, as this shifts the automatic
transmission to park position Pand locks
the wheels.
! Make sure that the side windows are com-
pletely closed, that the ventilation/heater
blower is fully turned off and that the wind-
screen wiper switch is set to 0. Otherwise,
the rain/light sensor may be activated, trig-
gering unintended wiper movements. This
could cause damage to the vehicle.
After using an automatic car wash, wipe off
wax and drying agents from the windscreen
and the wiper blades. This will prevent smears
and reduce wiping noises caused by residue
on the windscreen. Care
201Operation
* optional
X164_AKB; 2; 3, en-GB
wobuchh,
Version: 2.11.8.1 2009-03-31T14:14:58+02:00 - Seite 201 Z
Dateiname: 6515431202_buchblock.pdf; erzeugt am 01. Apr 2009 00:17:53; WK
Page 206 of 309
!
Do not clean the wiper blades too often,
and avoid rubbing too hard, as this could
result in damage to the graphite coating.
This could cause wiper noise.
X Fold the wiper arms away from the wind-
screen.
X Clean the wiper blades carefully with a
damp cloth.
X Fold the wiper arms back again before
switching on the ignition.
Cleaning the headlamps X
Clean the plastic lenses of the headlamps
with a wet sponge and windscreen washer
fluid or cleaning cloths.
! Only use washer fluid or cleaning cloths
suitable for plastic lenses. Unsuitable
washer fluid or cleaning cloths could
scratch or damage the plastic lenses of the
headlamps.
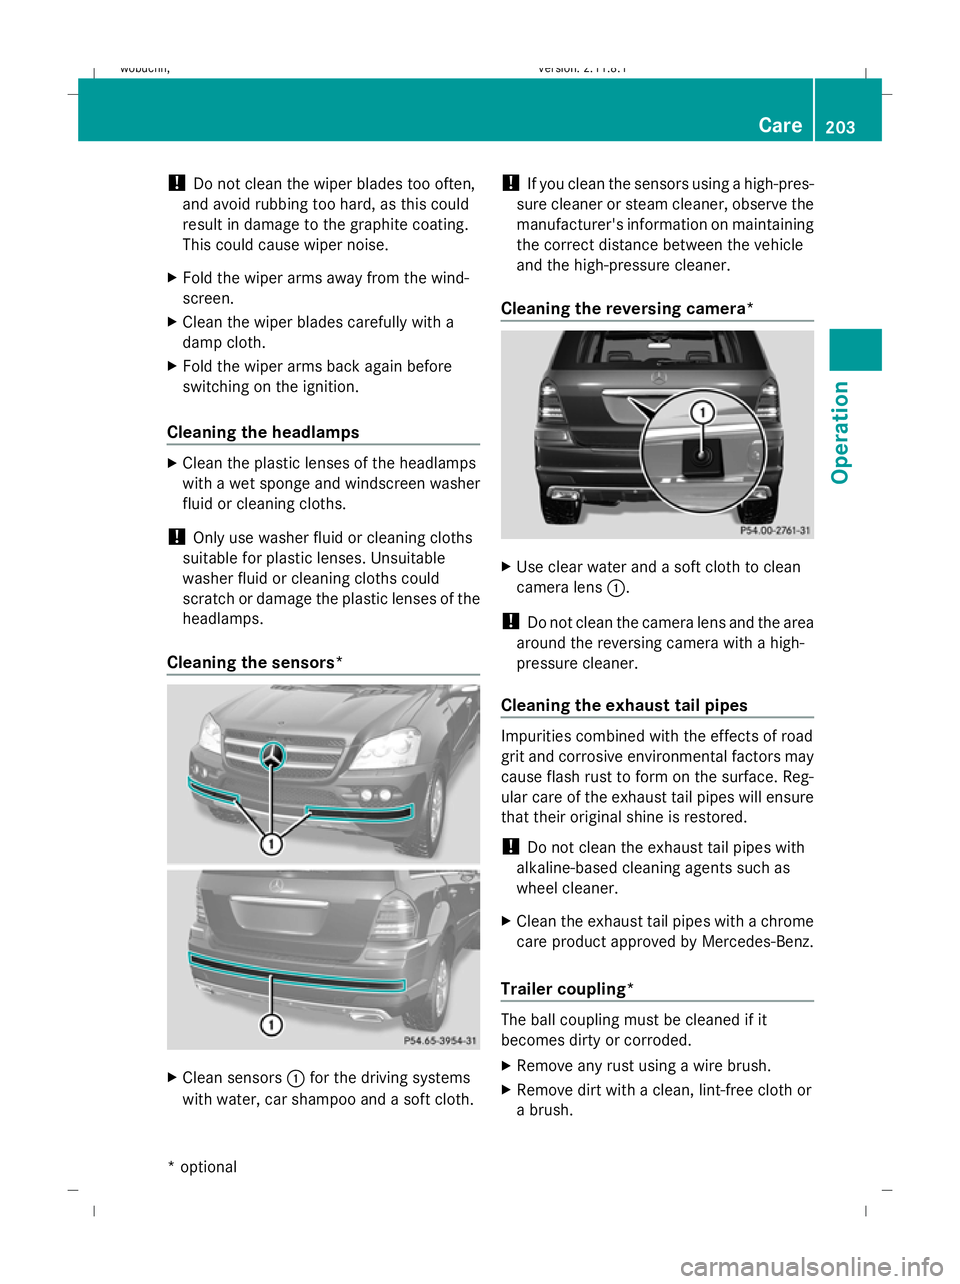
Cleaning the sensors* X
Clean sensors :for the driving systems
with water, car shampoo and a soft cloth. !
If you clean the sensors using a high-pres-
sure cleaner or steam cleaner, observe the
manufacturer's information on maintaining
the correct distance between the vehicle
and the high-pressure cleaner.
Cleaning the reversing camera* X
Use clear water and a soft cloth to clean
camera lens :.
! Do not clean the camera lens and the area
around the reversing camera with a high-
pressure cleaner.
Cleaning the exhaust tail pipes Impurities combined with the effects of road
grit and corrosive environmental factors may
cause flash rust to form on the surface. Reg-
ular care of the exhaust tail pipes will ensure
that their original shine is restored.
!
Do not clean the exhaust tail pipes with
alkaline-based cleaning agents such as
wheel cleaner.
X Clean the exhaust tail pipes with a chrome
care product approved by Mercedes-Benz.
Trailer coupling* The ball coupling must be cleaned if it
becomes dirty or corroded.
X
Remove any rust using a wire brush.
X Remove dirt with a clean, lint-free cloth or
a brush. Care
203Operation
* optional
X164_AKB; 2; 3, en-GB
wobuchh,
Version: 2.11.8.1 2009-03-31T14:14:58+02:00 - Seite 203 Z
Dateiname: 6515431202_buchblock.pdf; erzeugt am 01. Apr 2009 00:17:53; WK