2009 MERCEDES-BENZ E-CLASS SALOON warning
[x] Cancel search: warningPage 232 of 373

X
Use the table on the inside of the fuel filler
flap to ensure that the tyre pressure is set
correctly in all four tyres for the current
operating conditions.
Also observe the notes in the section on
tyre pressures (Y page 225).
X Make sure that the key is in position 2in
the ignition lock.
X Press the =or; button to select the
Service menu.
X Press the 9or: button to select
Tyre press..
X Press the abutton.
The current pressure in each individual tyre
is displayed, or the following message
appears:
Tyre pressures will be displayed
after a few minutes of driving
X Press the :button.
The multi-function display shows the mes-
sage:
Use current pressures as new ref‐
erence values
X Press the abutton.
The multi-function display shows the mes-
sage:
Tyre press. monitor restarted
After a few minutes of driving, the current
pressures are adopted as the new monitor-
ing values.
Cancelling the restart X
Press the %button.
or
X Press the 9button to leave the menu.
Other messages in the multi-function
display If in multi-function display the following mes-
sage appears:
Please correct tyre pressure
X
Check the tyre pressure on all four wheels
and correct it if necessary. i
If the wheel positions on the vehicle are
interchanged, the tyre pressures may be
displayed for the wrong positions for a
short time. This is rectified after a few
minutes of driving, and the tyre pressures
are displayed for the correct positions. Interchanging the wheels
G
Risk of accident
Interchange the front and rear wheels only if
they have the same dimensions: for example
size, offset, etc.
After a wheel is changed, have the tightening
torque checked at a specialist workshop that
has the necessary specialist knowledge and
tools to carry out the work required.
Mercedes-Benz recommends that you use a
Mercedes-Benz Service Centre for this pur-
pose. In particular, work relevant to safety or
on safety-related systems must be carried out
at a qualified specialist workshop.
The wheels could work loose if they are not
tightened to a torque of 130 Nm.
For safety reasons, Mercedes-Benz recom-
mends that you only use wheel bolts of the
correct size which have been approved for
Mercedes-Benz vehicles.
The wear patterns on the front and rear tyres
differ, depending on the operating conditions.
Interchange the wheels before a clear wear
pattern has formed on the tyres. Front tyres
typically wear more on the shoulders and the
rear tyres in the centre.
On vehicles that have the same size front and
rear wheels you can interchange the wheels
every 5,000 km to 10,000 km depending on
the degree of tyre wear. Do not reverse the
direction of tyre rotation.
Clean the contact surfaces of the wheel and
the brake disc thoroughly every time a wheel
is interchanged. Check the tyre pressure and,
if necessary, restart the tyre pressure loss
warning system or the tyre pressure moni-
tor*. Tyres and wheels
229Operation
* optional
212_AKB; 2; 4, en-GB
mkalafa,
Version: 2.11.8.1 2009-05-05T14:17:16+02:00 - Seite 229 Z
Dateiname: 6515346702_buchblock.pdf; erzeugt am 07. May 2009 14:16:58; WK
Page 233 of 373
!
On vehicles fitted with a tyre pressure
monitor*, electronic components are loca-
ted in the wheel.
Tyre-fitting tools should not be applied in
the area of the valve, as this could damage
the electronic components.
Always have the wheels interchanged/
changed at a qualified specialist workshop,
e.g. a Mercedes-Benz Service Centre. Winter driving
Points to remember
Have your vehicle winterproofed at a qualified
specialist workshop, e.g. at a Mercedes-Benz
Service Centre, at the onset of winter.
Observe the notes in the "Changing a wheel"
section (Y page 229). Winter tyres
Use winter tyres at temperatures below
+7 ˚C and in wintry road conditions. Only
winter tyres displaying the isnowflake
symbol in addition to the M+S marking pro-
vide optimum grip in wintry road conditions.
Only these tyres will allow the ABS, ESP ®
and
4MATIC* driving systems to function opti-
mally in winter, as these tyres have been
designed specifically for driving in snow.
Use winter tyres of the same make and tread
on all wheels to maintain safe handling char-
acteristics. G
Risk of accident
Winter tyres with a tread depth of less than
4 mm must be replaced immediately. They are
no longer suitable for winter use and can no
longer provide sufficient grip. This could
cause you to lose control of your vehicle and
cause an accident.
Always observe the maximum permissible
speed specified for the winter tyres you have fitted. If you fit winter tyres which have a
lower maximum permissible speed than that
of the vehicle, affix an appropriate warning
sign in the driver's field of vision. This can be
obtained at a qualified specialist workshop,
e.g. from a Mercedes-Benz Service Centre.
Under these circumstances, you should also
restrict the maximum speed of the vehicle
using permanent Speedtronic
39
to the maxi-
mum permissible speed for the winter tyres
(Y page 150).
Once you have fitted the winter tyres:
X Check the tyre pressures (Y page 225).
X Restart the tyre pressure moni-
tor* (Y page 228). G
Risk of accident
If you fit the spare wheel* when driving with
winter tyres, bear in mind that driving stability
will be impaired owing to unstable cornering
characteristics caused by the different tyres.
You should therefore adapt your driving style
and drive carefully.
Have the spare wheel* replaced at the near-
est qualified specialist workshop which has
the necessary specialist knowledge and tools
to carry out the work required. Mercedes-
Benz recommends that you use a Mercedes-
Benz Service Centre for this purpose. In par-
ticular, work relevant to safety or on safety-
related systems must be carried out at a quali-
fied specialist workshop. Snow chains
For safety reasons, Mercedes-Benz recom-
mends that you only use snow chains which
have been specially approved for your vehicle
by Mercedes-Benz, or are of a corresponding
standard of quality.
If you intend to fit snow chains, please bear
the following points in mind:
R you may not attach snow chains to all
wheel-tyre combinations; see the "Tyres
39 Only available for certain countries. 230
Winter drivingOperation
* optional
212_AKB; 2; 4, en-GB
mkalafa,
Version: 2.11.8.1 2009-05-05T14:17:16+02:00 - Seite 230
Dateiname: 6515346702_buchblock.pdf; erzeugt am 07. May 2009 14:16:58; WK
Page 251 of 373
Where will I find...?
Warning triangle
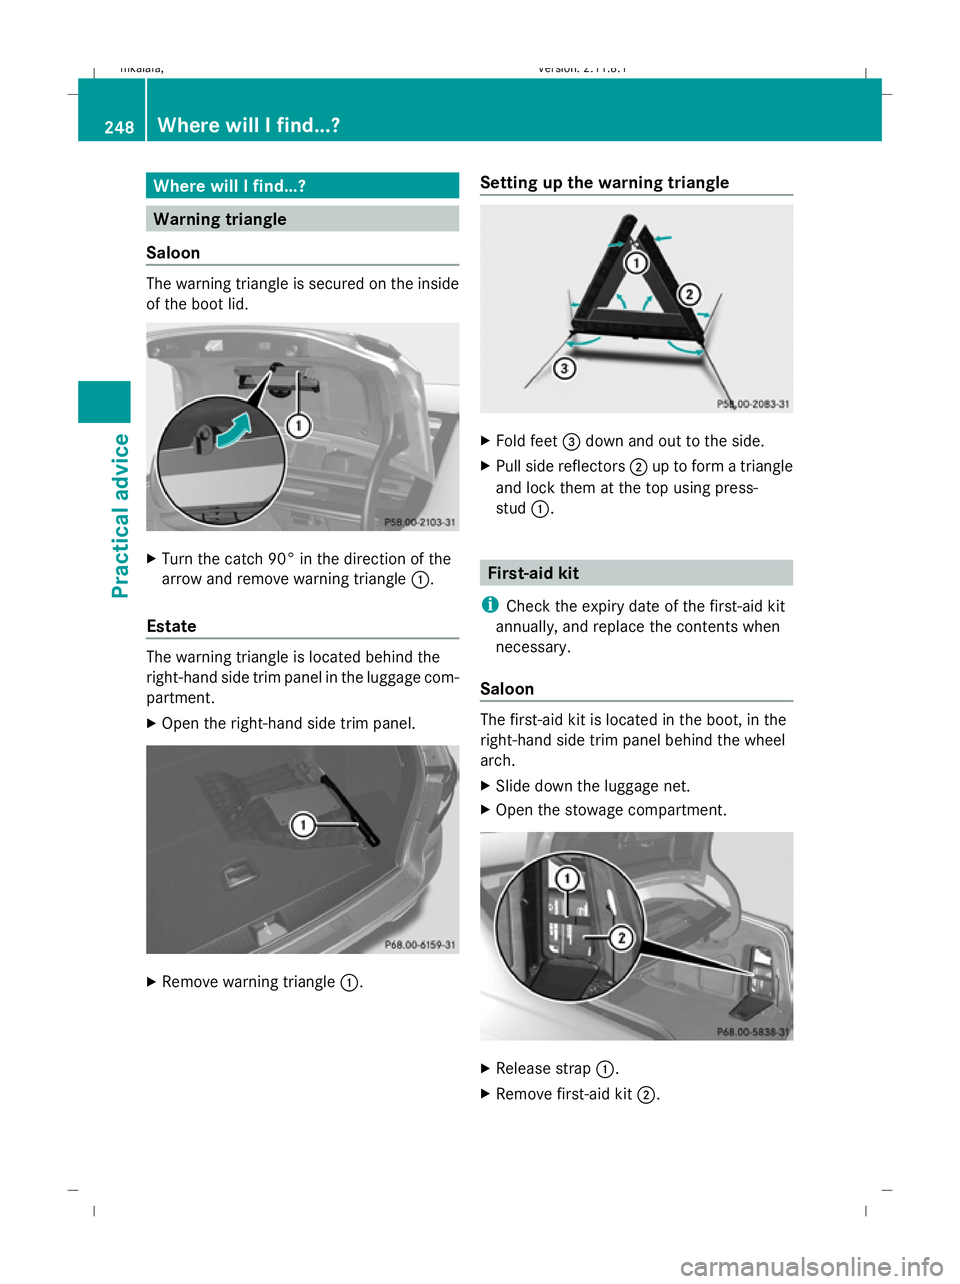
Saloon The warning triangle is secured on the inside
of the boot lid. X
Turn the catch 90° in the direction of the
arrow and remove warning triangle :.
Estate The warning triangle is located behind the
right-hand side trim panel in the luggage com-
partment.
X Open the right-hand side trim panel. X
Remove warning triangle :.Setting up the warning triangle X
Fold feet =down and out to the side.
X Pull side reflectors ;up to form a triangle
and lock them at the top using press-
stud :. First-aid kit
i Check the expiry date of the first-aid kit
annually, and replace the contents when
necessary.
Saloon The first-aid kit is located in the boot, in the
right-hand side trim panel behind the wheel
arch.
X
Slide down the luggage net.
X Open the stowage compartment. X
Release strap :.
X Remove first-aid kit ;.248
Where will I find...?Practical advice
212_AKB; 2; 4, en-GB
mkalafa,
Version: 2.11.8.1 2009-05-05T14:17:16+02:00 - Seite 248
Dateiname: 6515346702_buchblock.pdf; erzeugt am 07. May 2009 14:17:05; WK
Page 254 of 373
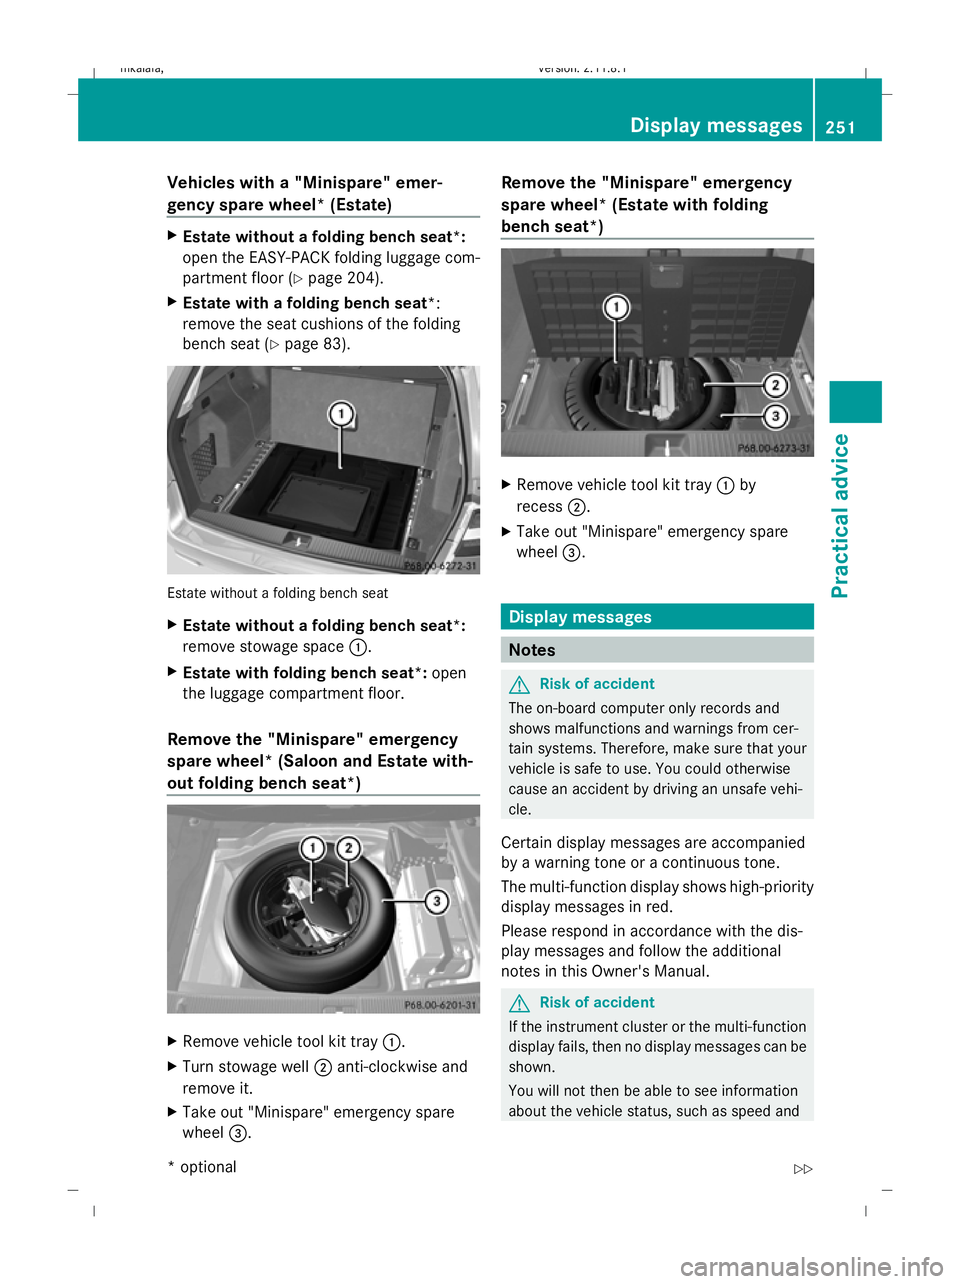
Vehicles with a "Minispare" emer-
gency spare wheel* (Estate)
X
Estate without a folding bench seat*:
open the EASY-PACK folding luggage com-
partment floor ( Ypage 204).
X Estate with a folding bench seat *:
remove the seat cushions of the folding
bench seat (Y page 83). Estate without a folding bench seat
X
Estate without a folding bench seat*:
remove stowage space :.
X Estate with folding bench seat*: open
the luggage compartment floor.
Remove the "Minispare" emergency
spare wheel* (Saloon and Estate with-
out folding bench seat*) X
Remove vehicle tool kit tray :.
X Turn stowage well ;anti-clockwise and
remove it.
X Take out "Minispare" emergency spare
wheel =. Remove the "Minispare" emergency
spare wheel* (Estate with folding
bench seat*)
X
Remove vehicle tool kit tray :by
recess ;.
X Take out "Minispare" emergency spare
wheel =. Display messages
Notes
G
Risk of accident
The on-board computer only records and
shows malfunctions and warnings from cer-
tain systems. Therefore, make sure that your
vehicle is safe to use. You could otherwise
cause an accident by driving an unsafe vehi-
cle.
Certain display messages are accompanied
by a warning tone or a continuous tone.
The multi-function display shows high-priority
display messages in red.
Please respond in accordance with the dis-
play messages and follow the additional
notes in this Owner's Manual. G
Risk of accident
If the instrument cluster or the multi-function
display fails, then no display messages can be
shown.
You will not then be able to see information
about the vehicle status, such as speed and Display messages
251Practical advice
* optional
212_AKB; 2; 4, en-GB
mkalafa,
Version: 2.11.8.1 2009-05-05T14:17:16+02:00 - Seite 251 Z
Dateiname: 6515346702_buchblock.pdf; erzeugt am 07. May 2009 14:17:07; WK
Page 255 of 373
outside temperature, warning and indicator
lamps, display messages or the failure of sys-
tems. The vehicle’s handling characteristics
may be affected. Adapt your driving style and
speed accordingly.
Immediately consult a qualified specialist
workshop which has the necessary specialist
knowledge and tools to carry out the work
required. Mercedes-Benz recommends that
you use a Mercedes-Benz Service Centre for
this purpose. In particular, work relevant to
safety or on safety-related systems must be
carried out at a qualified specialist workshop.
When you stop and park the vehicle, please
observe the instructions provided for HOLD
(Y page 151)and parking (Y page 107).
Calling up display messages The on-board computer saves certain display
messages, which you can call up.
X Press =or; on the steering wheel
to select the Servicemenu.
If there are display messages, the multi-
function display shows, e.g. 2 messages.
X Using 9or: select the entry, e.g.
2 messages. X
Confirm with a.
X Using :or9 scroll through the dis-
play messages.
Hiding display messages You cannot hide display messages of the
highest priority. The multi-function display
shows these messages continuously until
their causes have been remedied.
Use the buttons on the multi-function steer-
ing wheel.
X
Use the aor% button on the steer-
ing wheel to hide the display message.
The following tables contain all the display
messages. Text messages
G
Risk of accident and injury
The operating safety of the vehicle can be compromised if maintenance work is carried out
incorrectly. This could cause you to lose control of the vehicle and cause an accident. The safety
systems may also not be able to protect you or others as they are designed to do.
Always have maintenance work carried out at a qualified specialist workshop. The qualified spe-
cialist workshop must have the necessary specialist knowledge and tools to carry out the work
required. Mercedes-Benz recommends that you use a Mercedes-Benz Service Centre for this
purpose. In particular, work relevant to safety or on safety-related systems must be carried out
at a qualified specialist workshop. 252
Display messagesPractical advice
212_AKB; 2; 4, en-GB
mkalafa,
Version: 2.11.8.1 2009-05-05T14:17:16+02:00 - Seite 252
Dateiname: 6515346702_buchblock.pdf; erzeugt am 07. May 2009 14:17:07; WK
Page 256 of 373
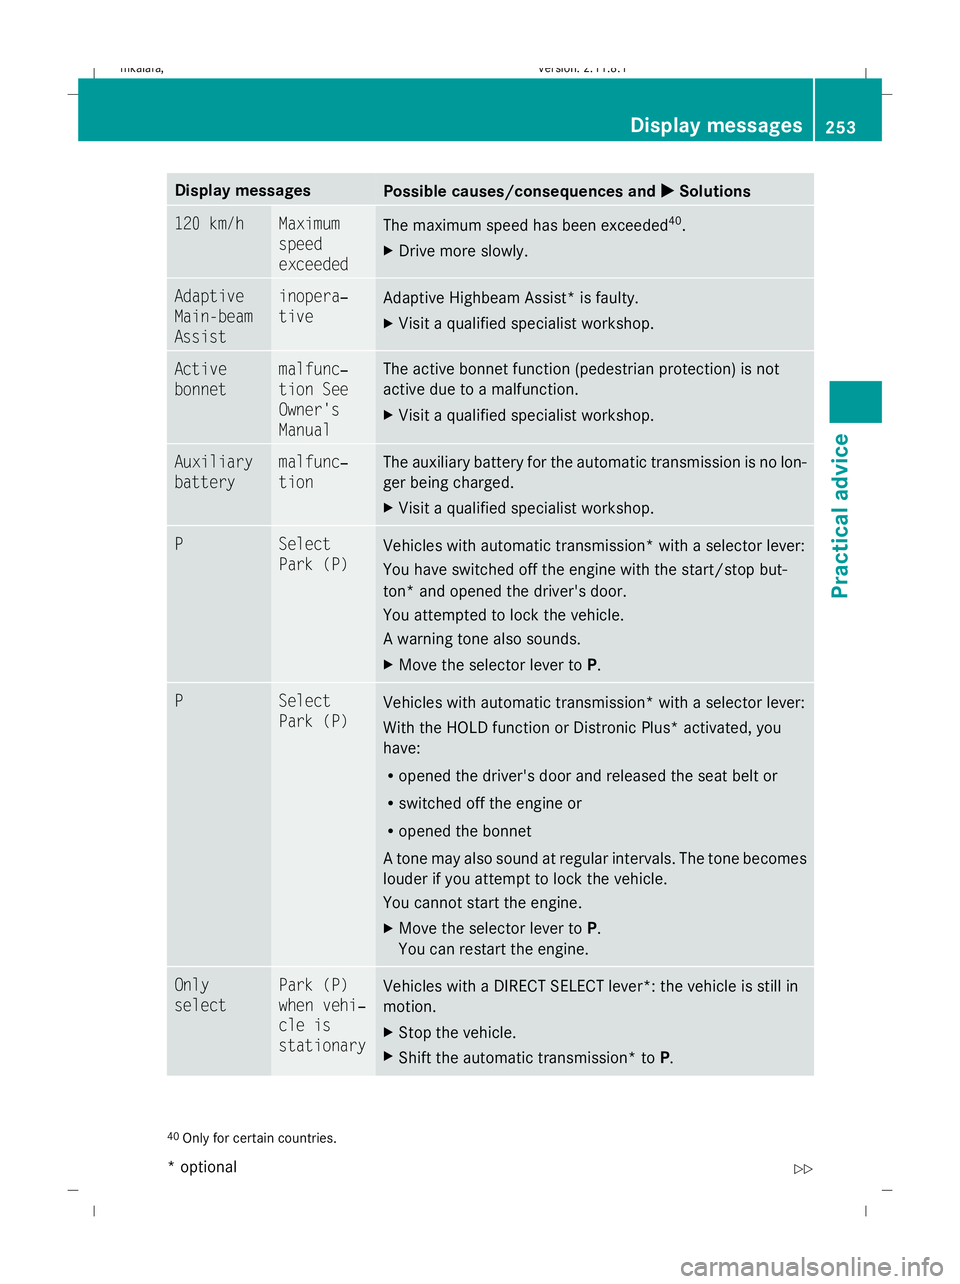
Display messages
Possible causes/consequences and
X
X Solutions 120 km/h Maximum
speed
exceeded
The maximum speed has been exceeded
40
.
X Drive more slowly. Adaptive
Main-beam
Assist inopera‐
tive
Adaptive Highbeam Assist* is faulty.
X
Visit a qualified specialist workshop. Active
bonnet malfunc‐
tion See
Owner's
Manual The active bonnet function (pedestrian protection) is not
active due to a malfunction.
X
Visit a qualified specialist workshop. Auxiliary
battery malfunc‐
tion The auxiliary battery for the automatic transmission is no lon-
ger being charged.
X
Visit a qualified specialist workshop. P Select
Park (P)
Vehicles with automatic transmission* with a selector lever:
You have switched off the engine with the start/stop but-
ton* and opened the driver's door.
You attempted to lock the vehicle.
A warning tone also sounds.
X
Move the selector lever to P.P Select
Park (P)
Vehicles with automatic transmission* with a selector lever:
With the HOLD function or Distronic Plus
*activated, you
have:
R opened the driver's door and released the seat belt or
R switched off the engine or
R opened the bonnet
A tone may also sound at regular intervals. The tone becomes
louder if you attempt to lock the vehicle.
You cannot start the engine.
X Move the selector lever to P.
You can restart the engine. Only
select Park (P)
when vehi‐
cle is
stationary
Vehicles with a DIRECT SELECT lever*: the vehicle is still in
motion.
X
Stop the vehicle.
X Shift the automatic transmission* to P.40
Only for certain countries. Display messages
253Practical advice
* optional
212_AKB; 2; 4, en-GB
mkalafa
,V ersion: 2.11.8.1
2009-05-05T14:17:16+02:00 - Seite 253 Z
Dateiname: 6515346702_buchblock.pdf; erzeugt am 07. May 2009 14:17:08; WK
Page 257 of 373

Display messages
Possible causes/consequences and
X
X Solutions Vehicle not in
position P
Vehicles with a DIRECT SELECT lever*: the driver's door is
open and the automatic transmission* is in position
R,Nor
D. A warning tone also sounds.
X Shift the automatic transmission* to P.
X Engage the parking brake. To start
engine, shift to
P or N You have attempted to start the engine and the selector lever
is in position
Dor R.
X Move the selector lever to Por N. Apply
brake to
deselect Park (P)
position
X
Depress the brake pedal. Without
changing
gear, consult
workshop You cannot change the transmission position.
X
In transmission position D: consult a qualified specialist
workshop without changing the transmission position.
or
X In transmission positions N,Ror P: contact a qualified spe-
cialist workshop. DISTRONIC
PLUS deactiva‐
ted
autom.
See Own‐
er's Man‐
ual
Vehicles with a navigation system*: the vehicle is close to a
radio-telescope facility and, therefore, must not transmit any
radar signals. The radar sensor system has switched off auto-
matically. A warning tone also sounds.
X
Drive on.
Distronic Plus* is available again as soon as the vehicle is
far enough away from the radio telescope facility
(Y page 362). 254
Display
messagesPractical advice
* optional
212_AKB; 2; 4, en-GB
mkalafa
,V ersion: 2.11.8.1
2009-05-05T14:17:16+02:00 - Seite 254
Dateiname: 6515346702_buchblock.pdf; erzeugt am 07. May 2009 14:17:08; WK
Page 258 of 373

Display messages
Possible causes/consequences and
X
X Solutions DISTRONIC
PLUS currently
unavaila‐
ble See
Owner's
Manual
Distronic Plus* is deactivated and is temporarily inoperative
if:
R
the Distronic Plus* cover in the radiator grille is dirty.
R the sensors in the bumpers are dirty.
R the radar sensor system is temporarily inoperative, e.g. due
to electromagnetic radiation emitted by nearby TV or radio
stations or other sources of electromagnetic radiation.
R its function is impaired due to heavy rain or snow.
R the system is outside the operating temperature range.
R the on-board voltage is too low.
A warning tone also sounds.
Distronic Plus *is operational again and the display message
disappears when:
R the dirt (e.g. slush) drops away while you are driving.
R the system detects that the sensors are fully available
again.
R the system is within the operating temperature range.
If the display message continues to be shown:
X Clean the Distronic Plus* cover in the radiator grille
(Y page 243).
X Clean the bumpers (Y page 243).
X Restart the engine. DISTRONIC
PLUS inopera‐
tive
Distronic Plus* is faulty. BAS PLUS* and PRE-SAFE
®
Brake*
may also have failed. A warning tone also sounds.
X Visit a qualified specialist workshop. DISTRONIC
PLUS suspended
You have depressed the accelerator pedal. Distronic Plus* is
no longer controlling the speed of the vehicle.
X
Remove your foot from the accelerator pedal. Display messages
255Practical advice
* optional
212_AKB; 2; 4, en-GB
mkalafa,
Version: 2.11.8.1 2009-05-05T14:17:16+02:00 - Seite 255 Z
Dateiname: 6515346702_buchblock.pdf; erzeugt am 07. May 2009 14:17:08; WK