2009 MERCEDES-BENZ E-CLASS ESTATE trailer
[x] Cancel search: trailerPage 85 of 373
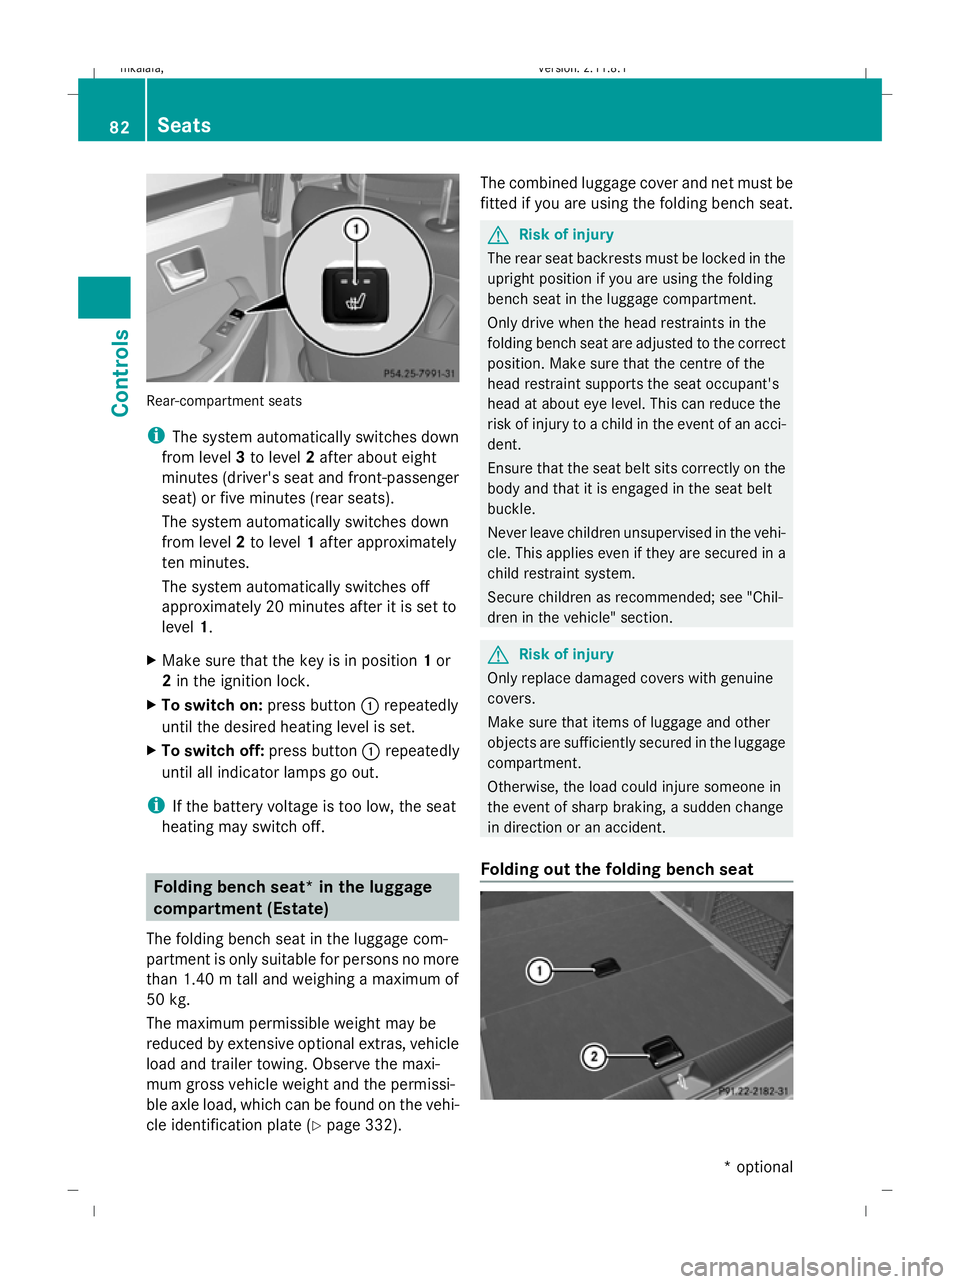
Rear-compartment seats
i
The system automatically switches down
from level 3to level 2after about eight
minutes (driver's seat and front-passenger
seat) or five minutes (rear seats).
The system automatically switches down
from level 2to level 1after approximately
ten minutes.
The system automatically switches off
approximately 20 minutes after it is set to
level 1.
X Make sure that the key is in position 1or
2 in the ignition lock.
X To switch on: press button:repeatedly
until the desired heating level is set.
X To switch off: press button:repeatedly
until all indicator lamps go out.
i If the battery voltage is too low, the seat
heating may switch off. Folding bench seat* in the luggage
compartment (Estate)
The folding bench seat in the luggage com-
partment is only suitable for persons no more
than 1.40 m tall and weighing a maximum of
50 kg.
The maximum permissible weight may be
reduced by extensive optional extras, vehicle
load and trailer towing. Observe the maxi-
mum gross vehicle weight and the permissi-
ble axle load, which can be found on the vehi-
cle identification plate (Y page 332).The combined luggage cover and net must be
fitted if you are using the folding bench seat. G
Risk of injury
The rear seat backrests must be locked in the
upright position if you are using the folding
bench seat in the luggage compartment.
Only drive when the head restraints in the
folding bench seat are adjusted to the correct
position. Make sure that the centre of the
head restraint supports the seat occupant's
head at about eye level. This can reduce the
risk of injury to a child in the event of an acci-
dent.
Ensure that the seat belt sits correctly on the
body and that it is engaged in the seat belt
buckle.
Never leave children unsupervised in the vehi-
cle. This applies even if they are secured in a
child restraint system.
Secure children as recommended; see "Chil-
dren in the vehicle" section. G
Risk of injury
Only replace damaged covers with genuine
covers.
Make sure that items of luggage and other
objects are sufficiently secured in the luggage
compartment.
Otherwise, the load could injure someone in
the event of sharp braking, a sudden change
in direction or an accident.
Folding out the folding bench seat 82
SeatsCont
rols
* optional
212_AKB; 2; 4, en-GB
mkalafa
,V ersion: 2.11.8.1
2009-05-05T14:17:16+02:00 - Seite 82
Dateiname: 6515346702_buchblock.pdf; erzeugt am 07. May 2009 14:15:53; WK
Page 101 of 373
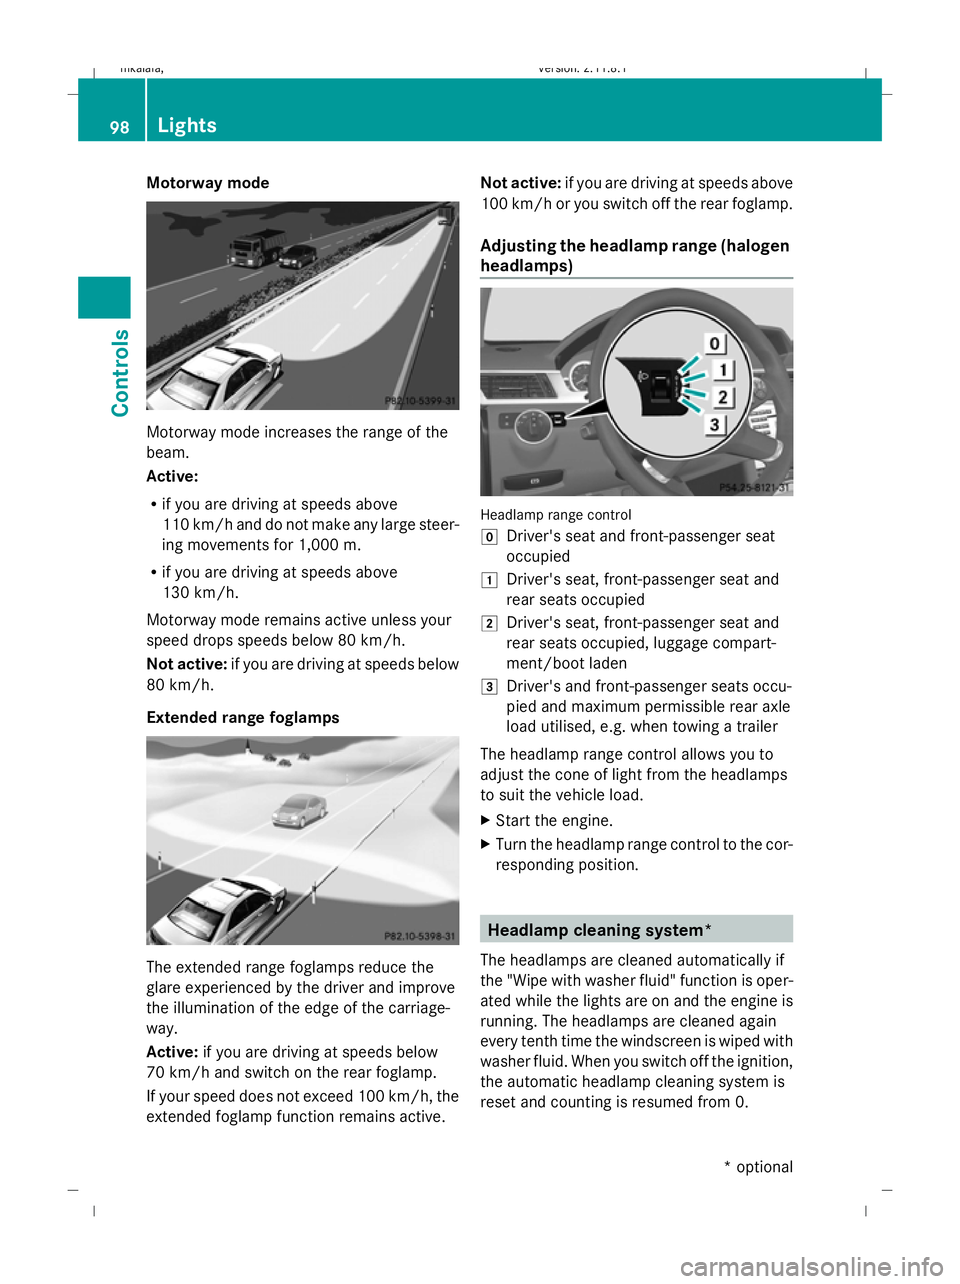
Motorway mode
Motorway mode increases the range of the
beam.
Active:
R if you are driving at speeds above
110 km/h and do not make any large steer-
ing movements for 1,000 m.
R if you are driving at speeds above
130 km/h.
Motorway mode remains active unless your
speed drops speeds below 80 km/h.
Not active: if you are driving at speeds below
80 km/h.
Extended range foglamps The extended range foglamps reduce the
glare experienced by the driver and improve
the illumination of the edge of the carriage-
way.
Active: if you are driving at speeds below
70 km/h and switch on the rear foglamp.
If your speed does not exceed 100 km/h, the
extended foglamp function remains active. Not active:
if you are driving at speeds above
100 km/h or you switch off the rear foglamp.
Adjusting the headlamp range (halogen
headlamps) Headlamp range control
g
Driver's seat and front-passenger seat
occupied
1 Driver's seat, front-passenger seat and
rear seats occupied
2 Driver's seat, front-passenger seat and
rear seats occupied, luggage compart-
ment/boot laden
3 Driver's and front-passenger seats occu-
pied and maximum permissible rear axle
load utilised, e.g. when towing a trailer
The headlamp range control allows you to
adjust the cone of light from the headlamps
to suit the vehicle load.
X Start the engine.
X Turn the headlamp range control to the cor-
responding position. Headlamp cleaning system*
The headlamps are cleaned automatically if
the "Wipe with washer fluid" function is oper-
ated while the lights are on and the engine is
running. The headlamps are cleaned again
every tenth time the windscreen is wiped with
washer fluid. When you switch off the ignition,
the automatic headlamp cleaning system is
reset and counting is resumed from 0. 98
LightsControls
* optional
212_AKB; 2; 4, en-GB
mkalafa,
Version: 2.11.8.1 2009-05-05T14:17:16+02:00 - Seite 98
Dateiname: 6515346702_buchblock.pdf; erzeugt am 07. May 2009 14:16:01; WK
Page 117 of 373
Drive program
Cis characterised by the fol-
lowing:
R comfort-oriented engine and suspension
settings
R optimal fuel consumption resulting from
the automatic transmission shifting up
sooner
R the vehicle pulling away more gently in
forward and reverse gears, unless the
accelerator pedal is depressed fully
R increased sensitivity. This improves driving
stability on slippery road surfaces, for
example
R the automatic transmission shifting up
sooner, which results in the vehicle being
driven at lower engine speeds and the
wheels being less likely to spin
Drive program Sis characterised by the fol-
lowing:
R sporty engine and suspension configura-
tion
R the vehicle pulling away in first gear
R the automatic transmission shifting up
later
R the late shift point of the automatic trans-
mission can lead to higher fuel consump-
tion
Driving tips Accelerator pedal position
Your style of driving influences how the auto-
matic transmission shifts gear:
R little throttle: early upshifts
R more throttle: late upshifts
AMG vehicles
When shifting down, the double-clutch func-
tion is active, regardless of the currently
selected drive program. The double-clutch
function reduces load change reactions and
is conducive to a sporty driving style. The sound generated by the double-clutch func-
tion depends on the drive program selected.
Kickdown
Use kickdown for maximum acceleration.
X
Depress the accelerator pedal beyond the
pressure point.
The transmission shifts to a lower gear
depending on the engine speed.
X Ease off the accelerator pedal once the
desired speed is reached.
The automatic transmission shifts back up.
Trailer towing
X When driving up gradients, keep to the mid-
dle of the engine speed range.
X Shift down to shift range 3or
2 (Y page 113) depending on the incline of
the uphill or downhill gradient, even if
cruise control is activated. Steering wheel gearshift paddles*
and manual drive program*
G
Risk of accident
Do not shift down to brake on a slippery road
surface. This could cause the drive wheels to
lose their grip, and the vehicle could skid.
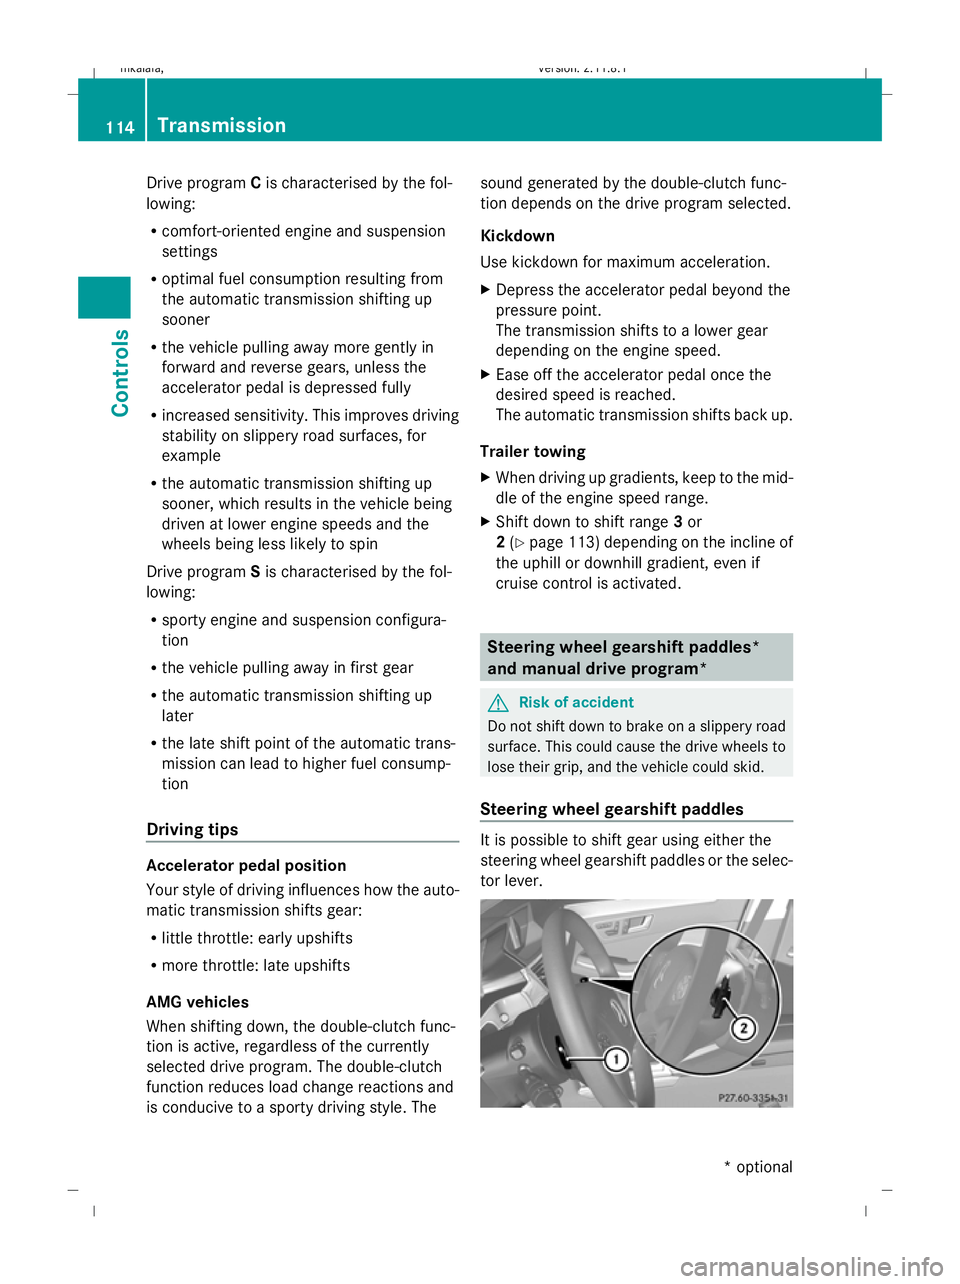
Steering wheel gearshift paddles It is possible to shift gear using either the
steering wheel gearshift paddles or the selec-
tor lever.114
TransmissionControls
* optional
212_AKB; 2; 4, en-GB
mkalafa
,V ersion: 2.11.8.1
2009-05-05T14:17:16+02:00 - Seite 114
Dateiname: 6515346702_buchblock.pdf; erzeugt am 07. May 2009 14:16:08; WK
Page 141 of 373
Brake* are described in the "Driving safety
systems" section (Y page 58). Cruise control
Cruise control maintains a constant road
speed for you. It brakes automatically in order
to avoid exceeding the set speed. On long and
steep downhill gradients, especially if the
vehicle is laden or towing a trailer, you must
shift to a lower gear in good time or select
shift range 1,2or 3on vehicles with auto-
matic transmission*. By doing so, you will
make use of the braking effect of the engine,
which relieves the load on the brake system
and prevents the brakes from overheating
and wearing too quickly. G
Risk of accident
Do not change down for additional engine
braking on a slippery road surface. This could
cause the drive wheels to lose their grip and
the vehicle could skid.
Use cruise control only if road and traffic con-
ditions make it appropriate to maintain a
steady speed for a prolonged period. You can
store any road speed above 30 km/h. G
Risk of accident
Cruise control cannot take account of road
and traffic conditions.
Always pay attention to traffic conditions
even when cruise control is activated.
Cruise control is only an aid designed to assist
driving. You are responsible for the vehicle's
speed and for braking in good time. G
Risk of accident
Do not use cruise control:
R in road and traffic conditions which do not
allow you to maintain a constant speed (e.g. heavy traffic or winding roads). You could
otherwise cause an accident.
R on slippery roads. Braking or accelerating
could cause the drive wheels to lose trac-
tion and the vehicle could then skid.
R when there is poor visibility, e.g. due to fog,
heavy rain or snow
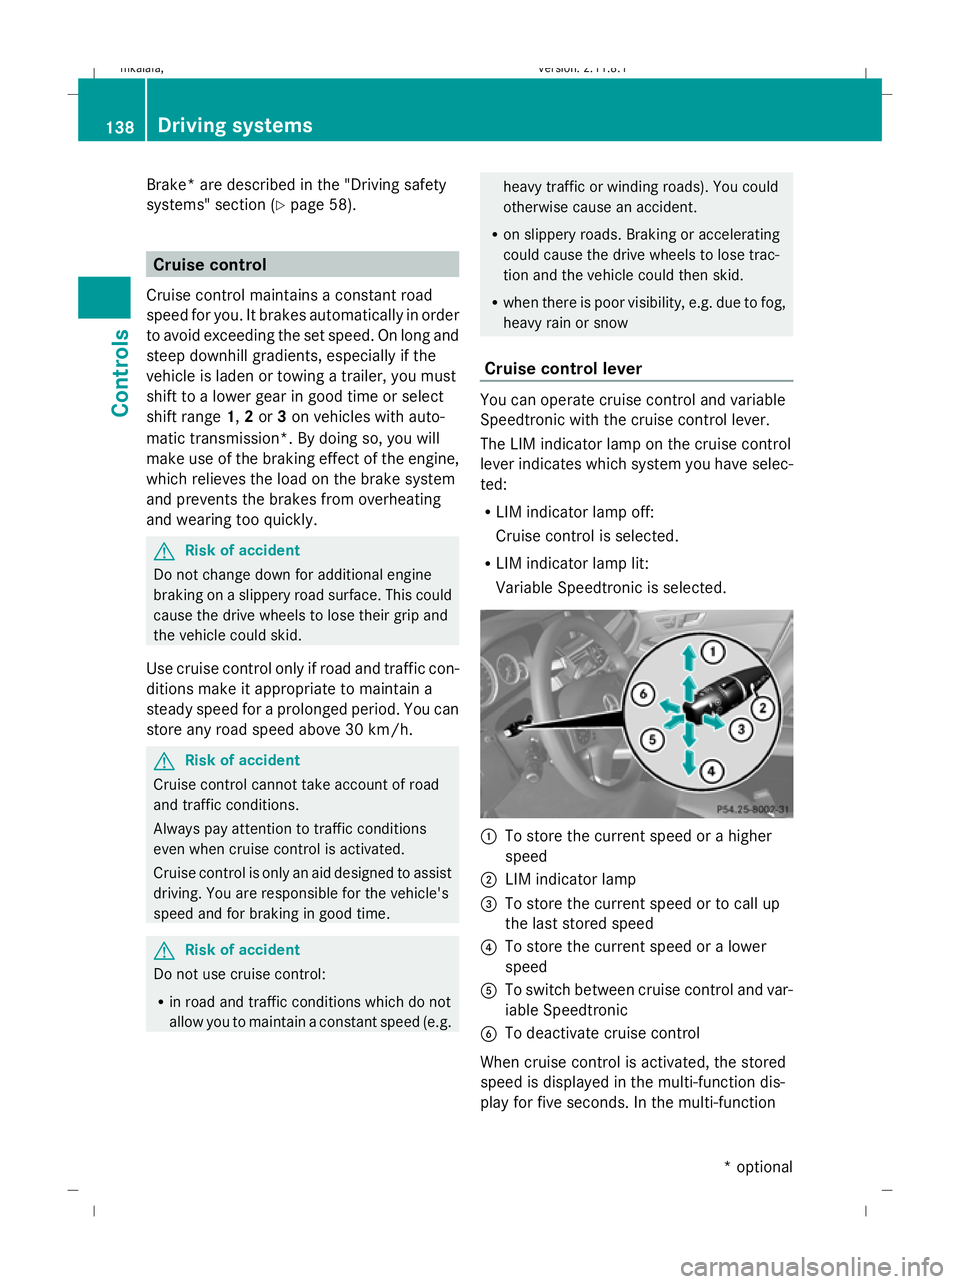
Cruise control lever You can operate cruise control and variable
Speedtronic with the cruise control lever.
The LIM indicator lamp on the cruise control
lever indicates which system you have selec-
ted:
R LIM indicator lamp off:
Cruise control is selected.
R LIM indicator lamp lit:
Variable Speedtronic is selected. :
To store the current speed or a higher
speed
; LIM indicator lamp
= To store the current speed or to call up
the last stored speed
? To store the current speed or a lower
speed
A To switch between cruise control and var-
iable Speedtronic
B To deactivate cruise control
When cruise control is activated, the stored
speed is displayed in the multi-function dis-
play for five seconds. In the multi-function 138
Driving systemsControls
* optional
212_AKB; 2; 4, en-GB
mkalafa
,V ersion: 2.11.8.1
2009-05-05T14:17:16+02:00 - Seite 138
Dateiname: 6515346702_buchblock.pdf; erzeugt am 07. May 2009 14:16:17; WK
Page 143 of 373
Adjustment in 10 km/h increments
X
Briefly press the cruise control lever
beyond the pressure point, up :for a
higher speed or down ?for a lower speed.
The last speed stored is increased or
reduced.
Deactivating cruise control There are several ways to deactivate cruise
control:
X
Briefly press the cruise control lever for-
wards B.
or
X Brake.
or
X Briefly press the cruise control lever in the
direction of arrow A.
Variable Speedtronic is selected. LIM indi-
cator lamp ;in the cruise control lever
lights up.
Cruise control is automatically deactivated if:
R you depress the parking brake.
R you drive at less than 30 km/h
R ESP ®
intervenes or you deactivate ESP ®
R you change into neutral in a vehicle with
manual transmission while driving or if the
clutch is depressed for longer than 6 sec-
onds
R on vehicles with manual transmission, you
shift to a higher gear and as a result the
engine speed is too low
R you move the selector lever to Non vehi-
cles with automatic transmission* while
driving
If cruise control is deactivated, you will hear
a warning tone. You see the Cruise con‐
trol off message in the multi-function dis-
play for approximately five seconds.
i The last speed stored is cleared when you
switch off the engine. Distronic Plus*
i Distronic Plus is not available in all coun-
tries.
Distronic Plus regulates the speed and auto-
matically maintains the distance to the vehi-
cle in front. It brakes automatically in order
to avoid exceeding the set speed. On long and
steep downhill gradients, especially if the
vehicle is laden or towing a trailer, you must
select shift range 1,2or 3in good time. By
doing so, you will make use of the braking
effect of the engine, which relieves the load
on the brake system and prevents the brakes
from overheating and wearing too quickly. G
Risk of accident
Do not change down for additional engine
braking on a slippery road surface. This could
cause the drive wheels to lose their grip and
the vehicle could skid. G
Risk of accident
Distronic Plus is only an aid designed to assist
driving. The driver is fully responsible for the
vehicle's distance from other vehicles, the
vehicle's speed and for braking in good time.
Distronic Plus does not react to:
R pedestrians
R stationary obstacles on the road, e.g. stop-
ped or parked vehicles
R oncoming and crossing traffic
Distronic Plus may not detect narrow vehicles
driving in front, e.g. motorcycles, or vehicles
driving on a different line. Therefore, always
pay attention to traffic conditions even when
Distronic Plus is activated. Otherwise, you
may fail to recognise dangers in time, cause
an accident and injure yourself and others.
If a slower-moving vehicle is detected in front,
Distronic Plus causes your vehicle to brake
and maintain a preset distance to the vehicle
in front. 140
Driving systemsCont
rols
* optional
212_AKB; 2; 4, en-GB
mkalafa
,V ersion: 2.11.8.1
2009-05-05T14:17:16+02:00 - Seite 140
Dateiname: 6515346702_buchblock.pdf; erzeugt am 07. May 2009 14:16:17; WK
Page 151 of 373
of its narrow width. The distance to the vehi-
cle in front will be too short.
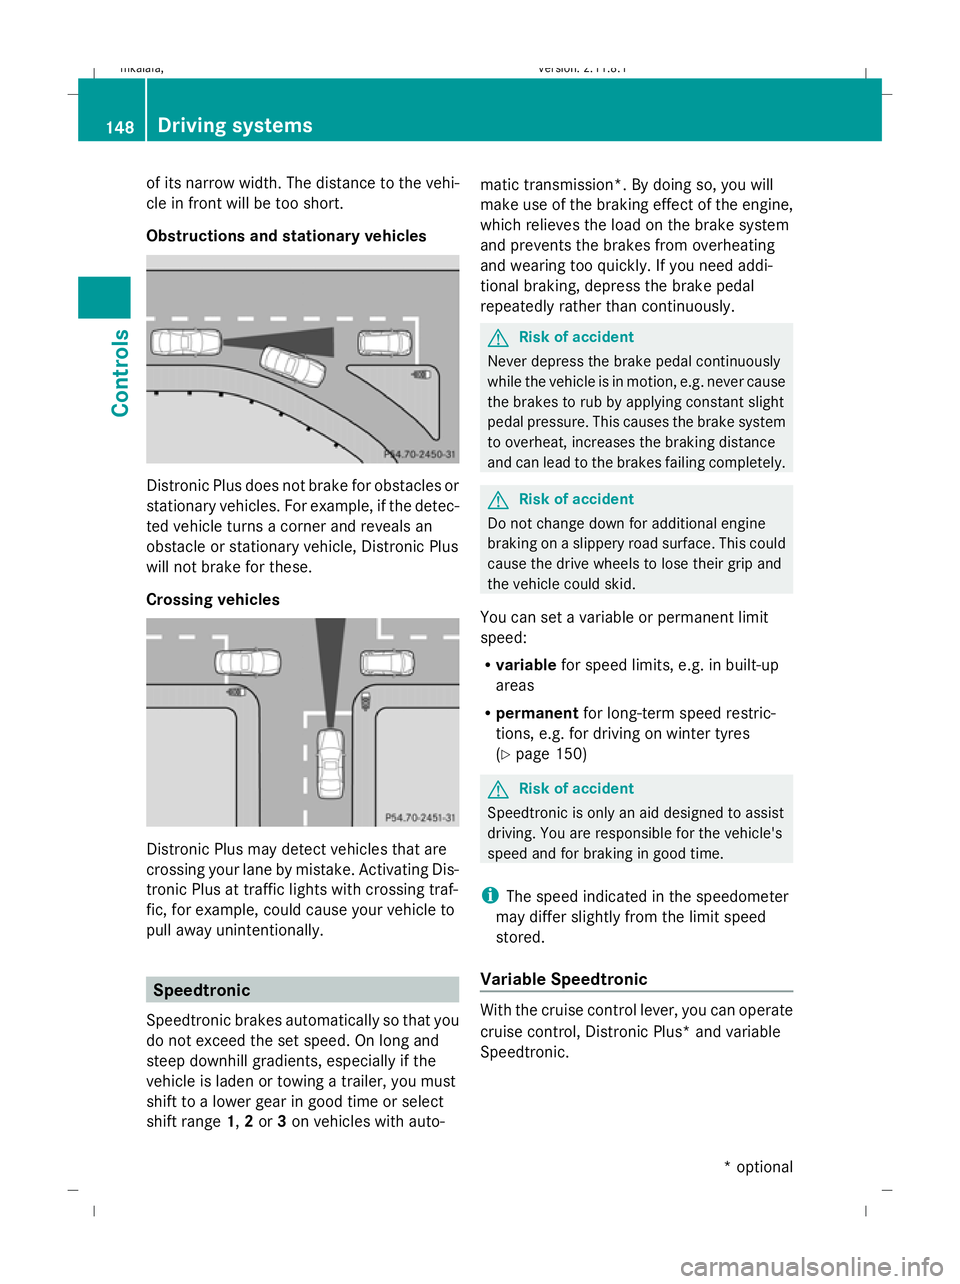
Obstructions and stationary vehicles Distronic Plus does not brake for obstacles or
stationary vehicles. For example, if the detec-
ted vehicle turns a corner and reveals an
obstacle or stationary vehicle, Distronic Plus
will not brake for these.
Crossing vehicles Distronic Plus may detect vehicles that are
crossing your lane by mistake. Activating Dis-
tronic Plus at traffic lights with crossing traf-
fic, for example, could cause your vehicle to
pull away unintentionally. Speedtronic
Speedtronic brakes automatically so that you
do not exceed the set speed. On long and
steep downhill gradients, especially if the
vehicle is laden or towing a trailer, you must
shift to a lower gear in good time or select
shift range 1,2or 3on vehicles with auto- matic transmission*. By doing so, you will
make use of the braking effect of the engine,
which relieves the load on the brake system
and prevents the brakes from overheating
and wearing too quickly. If you need addi-
tional braking, depress the brake pedal
repeatedly rather than continuously. G
Risk of accident
Never depress the brake pedal continuously
while the vehicle is in motion, e.g. never cause
the brakes to rub by applying constant slight
pedal pressure. This causes the brake system
to overheat, increases the braking distance
and can lead to the brakes failing completely. G
Risk of accident
Do not change down for additional engine
braking on a slippery road surface. This could
cause the drive wheels to lose their grip and
the vehicle could skid.
You can set a variable or permanent limit
speed:
R variable for speed limits, e.g. in built-up
areas
R permanent for long-term speed restric-
tions, e.g. for driving on winter tyres
(Y page 150) G
Risk of accident
Speedtronic is only an aid designed to assist
driving. You are responsible for the vehicle's
speed and for braking in good time.
i The speed indicated in the speedometer
may differ slightly from the limit speed
stored.
Variable Speedtronic With the cruise control lever, you can operate
cruise control, Distronic Plus* and variable
Speedtronic.148
Driving systemsControls
* optional
212_AKB; 2; 4, en-GB
mkalafa,
Version: 2.11.8.1 2009-05-05T14:17:16+02:00 - Seite 148
Dateiname: 6515346702_buchblock.pdf; erzeugt am 07. May 2009 14:16:20; WK
Page 161 of 373
Front sensors
Centre Approximately 100 cm
Corners Approximately 60 cm
Rear sensors
Centre Approximately 120 cm
Corners Approximately 80 cm
!
When parking, pay particular attention to
objects above or below the sensors, such
as flower pots or trailer towbars. PARK-
TRONIC does not detect such objects when
they are in the immediate vicinity of the
vehicle. You could damage the vehicle or
the objects.
Ultrasonic sources such as an automatic
car wash, a lorry's compressed-air brakes
or a pneumatic drill could cause PARK-
TRONIC to malfunction.
Minimum distance Centre Approximately 20 cm
Corners Approximately 15 cm
If there is an obstacle within this range, all
warning displays light up and a tone sounds.
If the distance falls below the minimum clear-
ance, it may no longer be shown.
Warning displays
The warning displays show the distance
between the sensors and the obstacle. The
warning display for the front area is located
on the dashboard above the centre air vents.
The warning display for the rear area is loca-
ted on the roof lining in the rear compart-
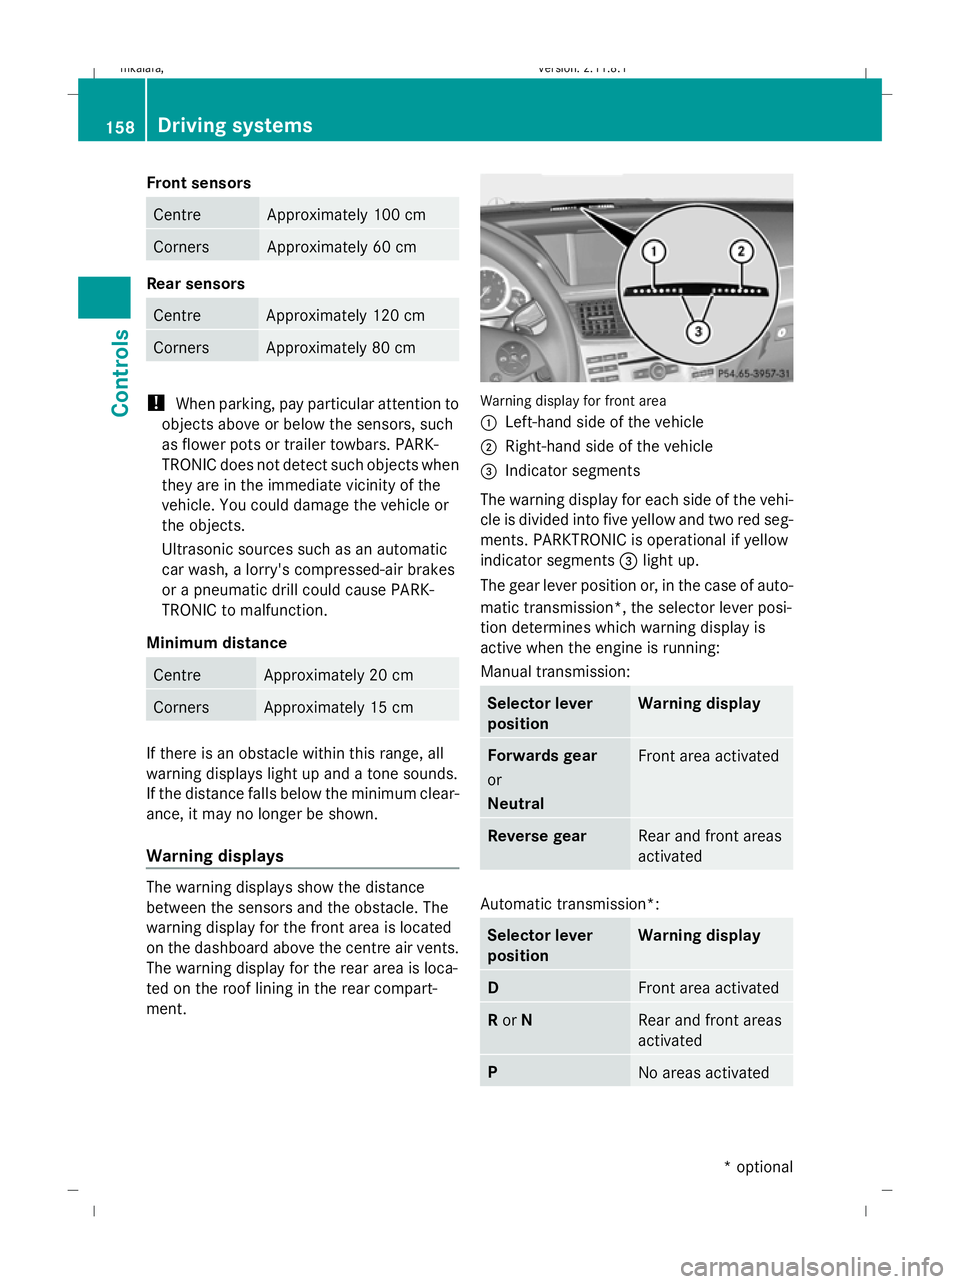
ment. Warning display for front area
:
Left-hand side of the vehicle
; Right-hand side of the vehicle
= Indicator segments
The warning display for each side of the vehi-
cle is divided into five yellow and two red seg-
ments. PARKTRONIC is operational if yellow
indicator segments =light up.
The gear lever position or, in the case of auto-
matic transmission*, the selector lever posi-
tion determines which warning display is
active when the engine is running:
Manual transmission: Selector lever
position Warning display
Forwards gear
or
Neutral
Front area activated
Reverse gear
Rear and front areas
activated
Automatic transmission*:
Selector lever
position Warning display
D
Front area activated
R
or N Rear and front areas
activated
P
No areas activated158
Driving systemsControls
* optional
212_AKB; 2; 4, en-GB
mkalafa
,V ersion: 2.11.8.1
2009-05-05T14:17:16+02:00 - Seite 158
Dateiname: 6515346702_buchblock.pdf; erzeugt am 07. May 2009 14:16:23; WK
Page 162 of 373
One or more segments light up as the vehicle
approaches an obstacle, depending on the
vehicle's distance to the obstacle.
From the:
R
sixth segment onwards, you will hear an
intermittent warning tone for approx-
imately two seconds.
R seventh segment onwards, you will hear a
warning tone for approximately two sec-
onds. You have reached the minimum dis-
tance.
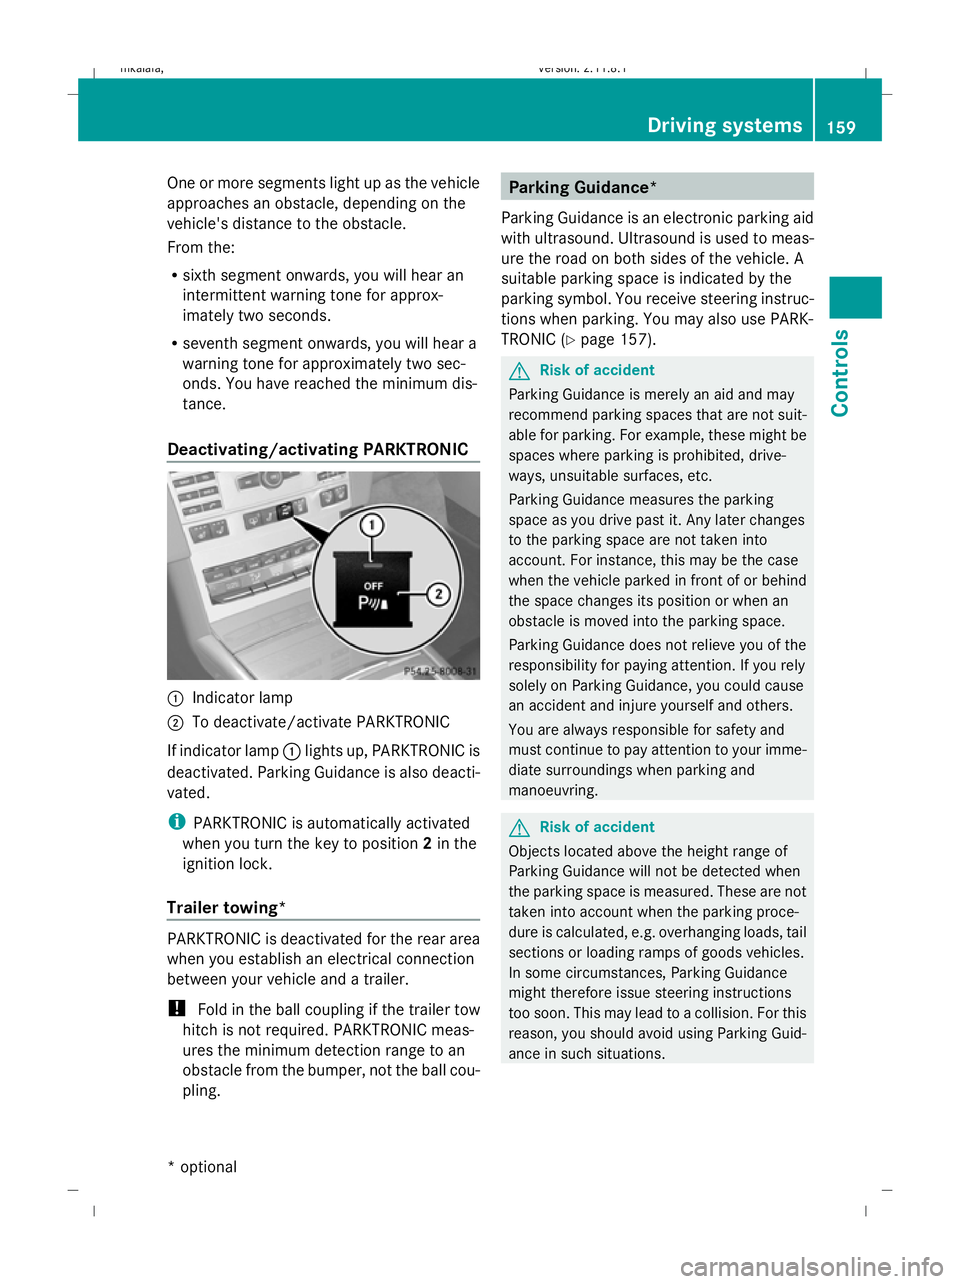
Deactivating/activating PARKTRONIC :
Indicator lamp
; To deactivate/activate PARKTRONIC
If indicator lamp :lights up, PARKTRONIC is
deactivated. Parking Guidance is also deacti-
vated.
i PARKTRONIC is automatically activated
when you turn the key to position 2in the
ignition lock.
Trailer towing* PARKTRONIC is deactivated for the rear area
when you establish an electrical connection
between your vehicle and a trailer.
!
Fold in the ball coupling if the trailer tow
hitch is not required. PARKTRONIC meas-
ures the minimum detection range to an
obstacle from the bumper, not the ball cou-
pling. Parking Guidance*
Parking Guidance is an electronic parking aid
with ultrasound. Ultrasound is used to meas-
ure the road on both sides of the vehicle. A
suitable parking space is indicated by the
parking symbol. You receive steering instruc-
tions when parking. You may also use PARK-
TRONIC (Y page 157). G
Risk of accident
Parking Guidance is merely an aid and may
recommend parking spaces that are not suit-
able for parking. For example, these might be
spaces where parking is prohibited, drive-
ways, unsuitable surfaces, etc.
Parking Guidance measures the parking
space as you drive past it. Any later changes
to the parking space are not taken into
account. For instance, this may be the case
when the vehicle parked in front of or behind
the space changes its position or when an
obstacle is moved into the parking space.
Parking Guidance does not relieve you of the
responsibility for paying attention. If you rely
solely on Parking Guidance, you could cause
an accident and injure yourself and others.
You are always responsible for safety and
must continue to pay attention to your imme-
diate surroundings when parking and
manoeuvring. G
Risk of accident
Objects located above the height range of
Parking Guidance will not be detected when
the parking space is measured. These are not
taken into account when the parking proce-
dure is calculated, e.g. overhanging loads, tail
sections or loading ramps of goods vehicles.
In some circumstances, Parking Guidance
might therefore issue steering instructions
too soon. This may lead to a collision. For this
reason, you should avoid using Parking Guid-
ance in such situations. Driving systems
159Controls
* optional
212_AKB; 2; 4, en-GB
mkalafa,
Version: 2.11.8.1 2009-05-05T14:17:16+02:00 - Seite 159 Z
Dateiname: 6515346702_buchblock.pdf; erzeugt am 07. May 2009 14:16:23; WK