2009 MERCEDES-BENZ E-CLASS ESTATE trailer
[x] Cancel search: trailerPage 163 of 373

G
Risk of injury
Make sure that no persons or animals are in
the manoeuvring range. Otherwise, they
could be injured.
When PARKTRONIC is deactivated, Parking
Guidance is also unavailable.
Use Parking Guidance for parking spaces:
R that are parallel to the direction of travel
R that are on straight roads, not bends
R that are on the same level as the road, i.e.
not on the pavement
Parking tips:
R On narrow roads, drive as close to the park-
ing space as possible.
R Parking spaces which are littered, over-
grown or partially occupied by trailer draw-
bars might be identified incorrectly or not
at all.
R Snowfall or heavy rain may lead to a parking
space being measured inaccurately.
R Pay attention to the PARKTRONIC warning
messages during the parking procedure
(Y page 157).
R When transporting a load which protrudes
from your vehicle, you must not use Parking
Guidance.
R Never use Parking Guidance with snow
chains or an emergency spare wheel* fit-
ted.
R The way your vehicle is positioned in the
parking space after parking is dependent
on various factors. These include the posi-
tion and shape of the vehicles parked in
front and behind it and the conditions of the
location. In some cases, Parking Guidance
may guide you too far or not far enough into
a parking space. In some cases, it may also
lead you across or onto the kerb. If neces-
sary, cancel the parking procedure with
Parking Guidance. !
If unavoidable, you should drive over
obstacles such as kerbs slowly and not at
a sharp angle. Otherwise, you may damage
the wheels or tyres.
Detecting parking spaces Vehicles with automatic transmission* and selec-
tor lever (example)
:
Detected parking space on the left
; Parking symbol
= Detected parking space on the right
Parking Guidance is automatically activated
when you drive forwards. The system is
operational at speeds of up to approximately
35 km/h. While in operation, the system inde-
pendently locates and measures parking
spaces on both sides of the vehicle. At a
speed below 30 km/h, you will see parking
symbol ;as the status indicator in the
instrument cluster. If a parking space has
been detected, an arrow pointing to the right
= or left :is also displayed. Parking Guid-
ance only displays parking spaces on the
front-passenger side as standard. Parking
spaces on the driver's side are displayed as
soon as the turn signal on the driver's side is
activated. To park on the driver's side, you
must leave the driver's side turn signal
switched on until you have engaged reverse
gear.
Parking Guidance will only detect parking
spaces:
R that are parallel to the direction of travel
R that are at least 1.5 m wide
R that are at least 1.3 m longer than your
vehicle 160
Driving systemsControls
* optional
212_AKB; 2; 4, en-GB
mkalafa
,V ersion: 2.11.8.1
2009-05-05T14:17:16+02:00 - Seite 160
Dateiname: 6515346702_buchblock.pdf; erzeugt am 07. May 2009 14:16:24; WK
Page 165 of 373
steer in a different direction and then
change gear. In this case, further displays
in the multi-function display will direct you
to the final position.
X Manoeuvre, if necessary.
X Always observe the warning messages dis-
played by PARKTRONIC (Y page 157).
Cancelling Parking Guidance X
Press the PARKTRONIC button on the
centre console (Y page 157).
Parking Guidance is cancelled immediately
and PARKTRONIC is deactivated.
Parking Guidance is cancelled automatically
if it is no longer possible to guide you into the
parking space, or if a malfunction occurs.
The parking space symbol disappears and the
Parking Guidance cancelled message
appears in the multi-function display.
Trailer towing* For vehicles with a trailer coupling, the mini-
mum length for parking spaces is slightly
increased.
If you have attached a trailer to your vehicle,
you should not use Parking Guidance. When
the electrical connection is established
between your vehicle and the trailer, Parking
Guidance ceases to be available. PARK-
TRONIC is deactivated for the rear area. Reversing camera*
The reversing camera is an optical aid. It
shows the area behind your vehicle in the
COMAND APS display. G
Risk of injury
Make sure that no persons or animals are in
the manoeuvring range. Otherwise, they
could be injured. The reversing camera is located in the handle
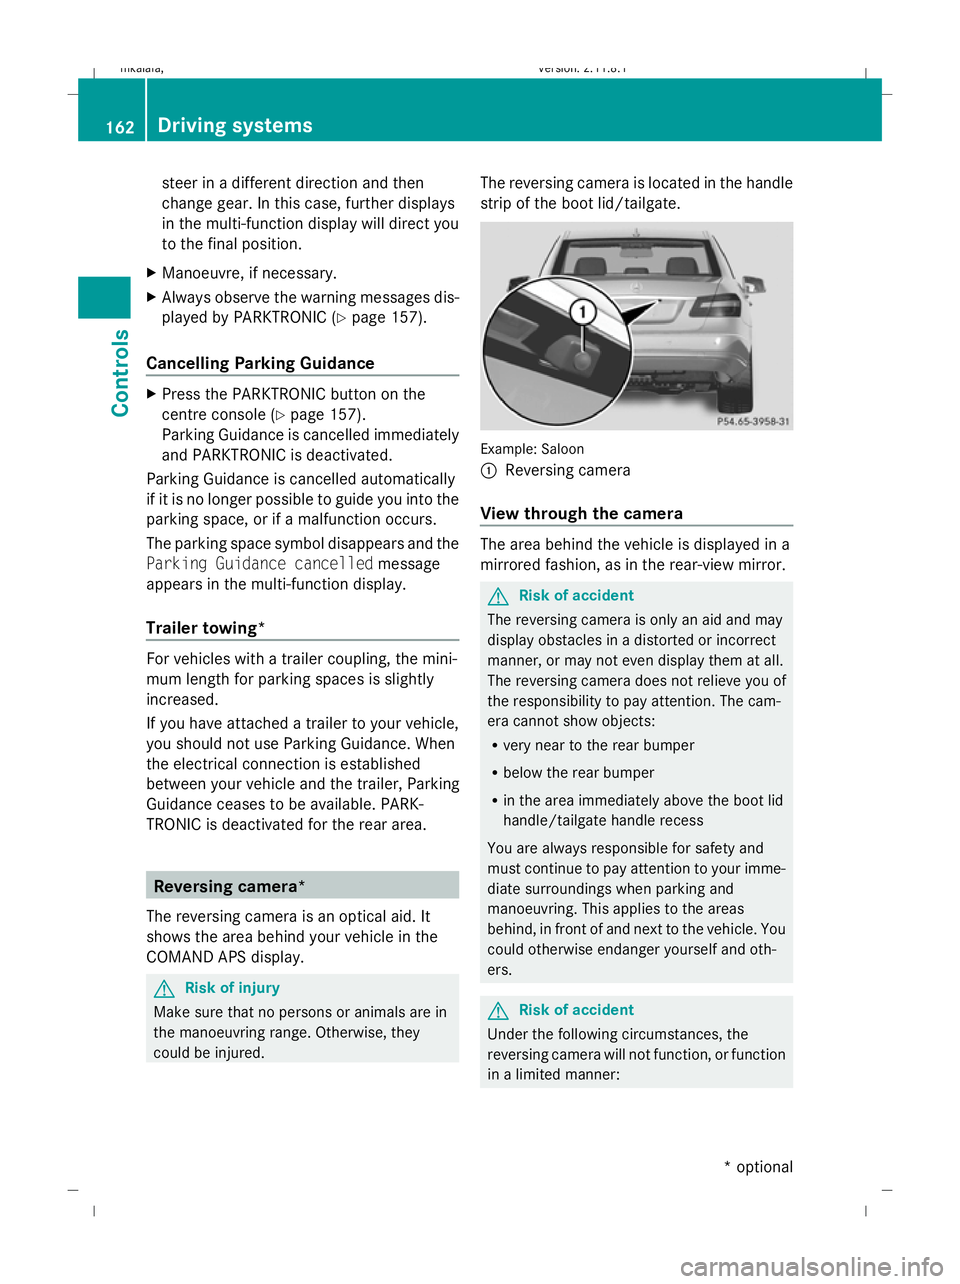
strip of the boot lid/tailgate.
Example: Saloon
:
Reversing camera
View through the camera The area behind the vehicle is displayed in a
mirrored fashion, as in the rear-view mirror.
G
Risk of accident
The reversing camera is only an aid and may
display obstacles in a distorted or incorrect
manner, or may not even display them at all.
The reversing camera does not relieve you of
the responsibility to pay attention. The cam-
era cannot show objects:
R very near to the rear bumper
R below the rear bumper
R in the area immediately above the boot lid
handle/tailgate handle recess
You are always responsible for safety and
must continue to pay attention to your imme-
diate surroundings when parking and
manoeuvring. This applies to the areas
behind, in front of and next to the vehicle. You
could otherwise endanger yourself and oth-
ers. G
Risk of accident
Under the following circumstances, the
reversing camera will not function, or function
in a limited manner: 162
Driving systemsControls
* optional
212_AKB; 2; 4, en-GB
mkalafa,
Version: 2.11.8.1 2009-05-05T14:17:16+02:00 - Seite 162
Dateiname: 6515346702_buchblock.pdf; erzeugt am 07. May 2009 14:16:24; WK
Page 172 of 373

Information and warning display
:
Yellow indicator lamp/red warning lamp
When you turn the key to position 2in the
ignition lock, warning lamps :in the exterior
mirrors light up red.
If Blind Spot Assist is switched on and the
engine is running, indicator lamps :in the
exterior mirrors light up yellow up to a speed
of 30 km/h. At speeds above 30 km/h, the
indicator lamp goes out and Blind Spot Assist
is operational.
If a vehicle is detected within the monitoring
range of Blind Spot Assist at speeds above
30 km/h, warning lamp :on the corre-
sponding side lights up red. This warning is
always issued when a vehicle enters the blind
spot monitoring range from behind or from
the side. When you overtake a vehicle, the
warning only occurs if the difference in speed
is less than 12 km/h.
The yellow indicator lamp goes out after
reverse gear is engaged. In this event, Blind
Spot Assist is no longer active.
The brightness of the indicator/warning
lamps is adjusted automatically according to
the ambient light. G
Risk of accident
Blind Spot Assist is not active at speeds below
30 km/h, and the indicator lamps in the exte-
rior mirrors are yellow. Vehicles in the moni-
toring range are then not indicated.
Always pay attention to traffic conditions and
your surroundings. Otherwise, you may fail to recognise dangers in time, cause an accident
and injure yourself and others.
Collision warning
If a vehicle is detected in the monitoring range
of Blind Spot Assist and you switch on the turn
signal, a double warning tone sounds. Red
warning lamp :flashes. If the turn signal
remains on, detected vehicles are indicated
by the flashing of red warning lamp :. There
are no further warning tones.
Switching on Blind Spot Assist
X Make sure that the radar sensor system
(Y page 134) and Blind Spot Assist
(Y page 130) are activated in the on-board
computer.
X Turn the key to position 2in the ignition
lock.
Red warning lamps :in the exterior mir-
rors are lit.
X Start the engine.
Warning lamps :in the exterior mirrors
now light up yellow.
Trailer towing*
Blind Spot Assist is deactivated when you
connect the trailer to your vehicle electrically.
The Blind Spot Assist currently
unavailable See Owner's Manual mes-
sage appears in the multi-function display.
Lane Keeping Assist If you select
kmon the on-board computer in
the Speed-/odometer: function
(Y page 131), Lane Keeping Assist is activa-
ted starting at a speed of 60 km/h. If the
miles display unit is selected, the assistance
range begins at between 35 and 40 mph.
Lane Keeping Assist is designed to detect
lane markings on the road and warn you
before you leave your lane unintentionally.
Usually the warning is given when a front
wheel passes over a lane marking. It will warn
you by means of intermittent vibration in the
steering wheel for up to 1.5 seconds. Driving systems
169Controls
* optional
212_AKB; 2; 4, en-GB
mkalafa
,V ersion: 2.11.8.1
2009-05-05T14:17:16+02:00 - Seite 169 Z
Dateiname: 6515346702_buchblock.pdf; erzeugt am 07. May 2009 14:16:27; WK
Page 218 of 373
Running-in notes
............................... 216
Refuelling ........................................... 216
Engine compartment ........................219
Tyres and wheels .............................. 223
Winter driving ................................... 230
Driving tips ........................................ 231
Driving abroad ................................... 233
Trailer towing .................................... 234
Service ............................................... 239
Care .................................................... 240 215Operation
212_AKB; 2; 4, en-GB
mkalafa,
Version: 2.11.8.1 2009-05-05T14:17:16+02:00 - Seite 215
Dateiname: 6515346702_buchblock.pdf; erzeugt am 07. May 2009 14:16:53; WK
Page 228 of 373
Thus, you should replace tyres that have
insufficient tread.
R winter tyres should be replaced when the
tread depth is 4 mm or less as they will no
longer provide adequate grip.
R the tread on a tyre may not wear evenly.
Thus, you should regularly check the tread
depth and the condition of the tread across
the entire width of all tyres. If necessary,
turn the front wheels to full lock in order to
inspect the tyre tread more easily.
Otherwise, you could lose control of the vehi-
cle and cause an accident due to the reduced
grip of the tyres on the road. Tyre pressures
i You will find a table of tyre pressures for
various operating conditions on the inside
of your vehicle's fuel filler flap.
The applicable value for the "Minispare"
emergency spare wheel* is stated on the
spare wheel and in the technical data sec-
tion.
The applicable value for the maximum load
during trailer towing is stated on the tyre
pressure information label on the inside of
your vehicle's fuel filler flap.
The load condition "partially laden" or "fully
laden" is defined in the table by the differing
number of passengers and amount of lug-
gage. The actual number of seats may vary
from this – more information can be found on
the vehicle's registration document.
If no other data is stated, the tyre pressures
specified on the fuel filler flap apply for all
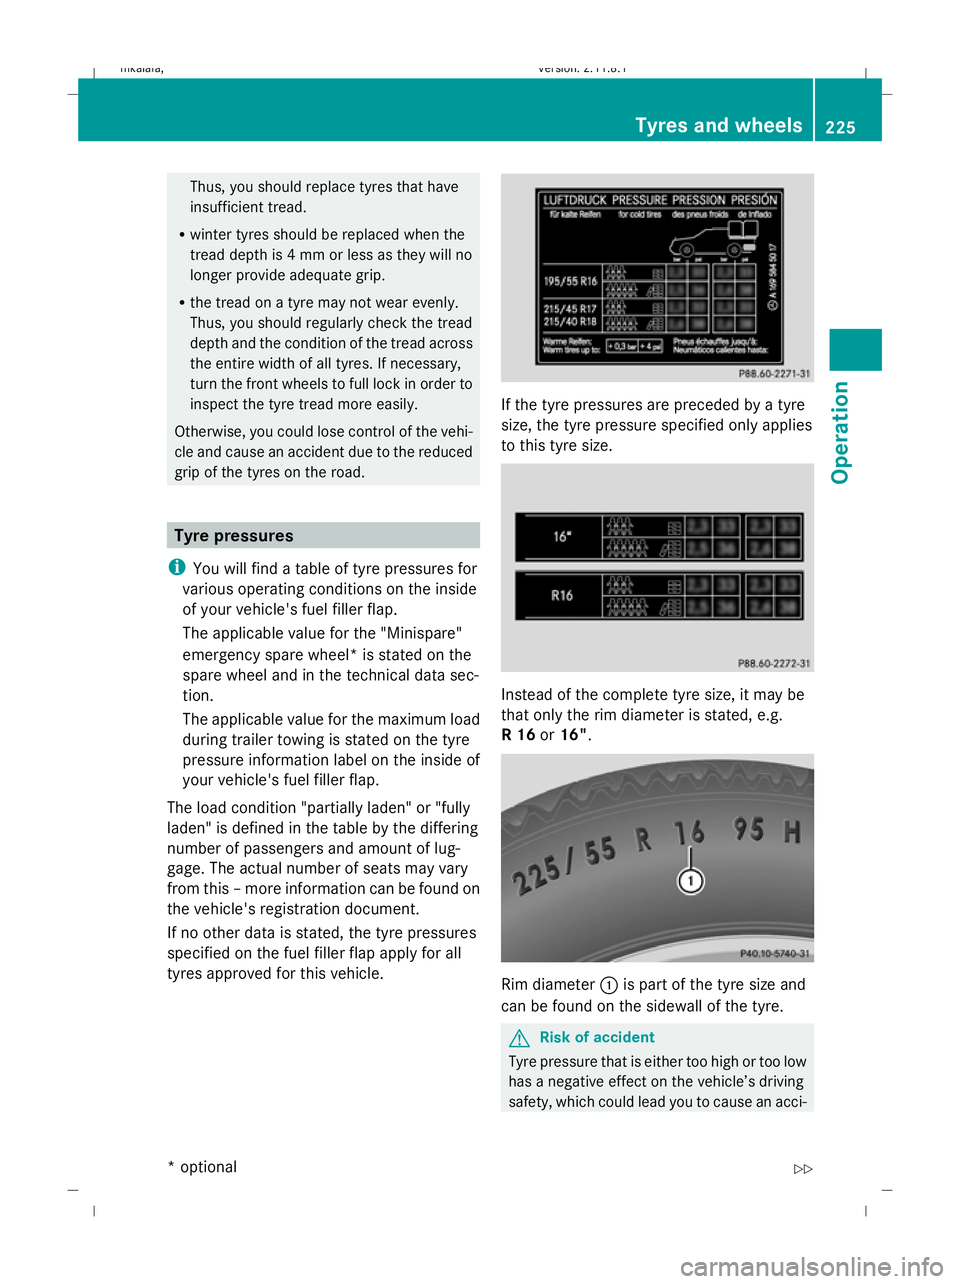
tyres approved for this vehicle. If the tyre pressures are preceded by a tyre
size, the tyre pressure specified only applies
to this tyre size.
Instead of the complete tyre size, it may be
that only the rim diameter is stated, e.g.
R 16
or16". Rim diameter
:is part of the tyre size and
can be found on the sidewall of the tyre. G
Risk of accident
Tyre pressure that is either too high or too low
has a negative effect on the vehicle’s driving
safety, which could lead you to cause an acci- Tyres and wheels
225Operation
* optional
212_AKB; 2; 4, en-GB
mkalafa,
Version: 2.11.8.1 2009-05-05T14:17:16+02:00 - Seite 225 Z
Dateiname: 6515346702_buchblock.pdf; erzeugt am 07. May 2009 14:16:57; WK
Page 229 of 373
dent. Therefore, you should regularly check
the pressure of all the tyres, particularly prior
to long trips, and correct the pressure as nec-
essary.
To test tyre pressure, use a suitable pressure
gauge. The outer appearance of a tyre does
not permit any reliable conclusion about the
tyre pressure. On vehicles fitted with the elec-
tronic tyre pressure monitor*, the tyre pres-
sure can be checked in the on-board com-
puter. G
Risk of accident
Do not fit anything else to the tyre valve other
than the standard valve cap. In particular, ret-
rofitted tyre pressure monitors which are
screwed on to the valve may overload it and
cause it to fail. Due to their design, the valve
is kept open continuously, which may lead to
air loss. G
Risk of accident
Should the tyre pressure drop repeatedly:
R check the tyre for foreign bodies.
R check whether the wheel is losing air or the
valve is leaking.
R make sure that only a valve cap approved
by Mercedes-Benz is fitted on the tyre
valve.
Tyre pressures that are too low have a nega-
tive effect on vehicle safety, which could lead
to your causing an accident.
If possible, you should only correct tyre pres-
sures when the tyres are cold. Depending on
the ambient temperature, the speed you are
driving at and the load on the tyres, the tyre
temperature and thus the tyre pressure may
change by approximately 0.1 bar per 10 †.
Take this into account when checking the
pressure of warm tyres and only correct it if
it is too low for the current operating condi-
tions. Driving with tyre pressure that is too high or
too low can:
R
shorten the service life of the tyres
R increase the likelihood of tyre damage
R have a negative effect on handling charac-
teristics (e.g. by causing aquaplaning)
Also check the pressure of the "Minispare"
emergency spare wheel*. H
Environmental note
Check the tyre pressure regularly, at least
every 14 days.
Speeds up to 210 km/h:
Despite the values stated on the tyre pressure
information label (fuel filler flap), for speeds
up to 210 km/h andwith 16" or 17" tyres,
the values stated can be reduced as follows,
without a reduction in safety:
Saloon: -0.3 bar / (-4 psi)
Estate: -0.2 bar (-3 psi)
This does not apply to vehicles towing a
trailer.
This improves the ride comfort of your vehi-
cle; however, the fuel consumption may
increase slightly. Tyre pressure loss warning
While the vehicle is in motion, the tyre pres-
sure loss warning system monitors the set
tyre pressure using the rotational speed of
the wheels. This enables the system to detect
significant pressure loss in a tyre. If the speed
of rotation of a wheel changes as a result of
a loss of pressure, a corresponding warning
message will appear in the multi-function dis-
play. G
Risk of accident
The tyre pressure loss warning system does
not warn you of an incorrectly set tyre pres-
sure. The table on the inside of the fuel filler
flap will help you decide whether the tyre
pressures should be corrected. 226
Tyres and wheelsOperation
* optional
212_AKB; 2; 4, en-GB
mkalafa,
Version: 2.11.8.1 2009-05-05T14:17:16+02:00 - Seite 226
Dateiname: 6515346702_buchblock.pdf; erzeugt am 07. May 2009 14:16:57; WK
Page 230 of 373
The tyre pressure loss warning system does
not replace the need to regularly check your
vehicle's tyre pressures, since an even loss of
pressure on several tyres at the same time
cannot be detected by the tyre pressure loss
warning system.
The tyre pressure monitor is not able to warn
you of a sudden loss of pressure, e.g. if the
tyre is penetrated by a foreign object.
In the event of a sudden loss of pressure, bring
the vehicle to a halt by braking carefully. Do
not make any sudden steering movements
when doing so.
The function of the tyre pressure loss warning
system is limited or delayed if:
R snow chains are fitted to your vehicle's
tyres.
R road conditions are wintry.
R you are driving on sand or gravel.
R you adopt a very sporty driving style (cor-
nering at high speeds or driving with high
rates of acceleration).
R you are towing a very heavy or large trailer.
R you are driving with a heavy load (in the
vehicle or on the roof).
Restarting the tyre pressure loss warn-
ing system Restart the tyre pressure loss warning system
if you have:
R
changed the tyre pressure
R changed the wheels or tyres
R fitted new wheels or tyres
X Before restarting, consult the table of tyre
pressures on the inside of the fuel filler flap
to ensure that the tyre pressure in all four
tyres is set correctly for the respective
operating conditions.
X Observe the notes in the section on tyre
pressures (Y page 225). G
Risk of accident
The tyre pressure loss warning system can
only give reliable warnings if you have set the
correct tyre pressure.
If an incorrect tyre pressure is set, these
incorrect values will be monitored.
A tyre with insufficient pressure results in
vehicle instability when driving, thus increas-
ing the risk of an accident.
X Make sure that the key is in position 2in
the ignition lock.
In the multi-function display you will see the
standard display (Y page 119).
X Press the =or; button to select the
Service menu.
X Press the 9or: button to select
Tyre pressure.
X Press the abutton.
The multi-function display shows the mes-
sage:
Run Flat Indicator active Restart
with OK
If you wish to confirm the restart:
X Press the abutton.
The multi-function display shows the mes-
sage:
Tyre press. now OK?
X Press the 9or: button to select
Yes.
X Press the abutton.
You will see the following message in the
multi-function display:
Run Flat Indicator restarted
After a teach-in period, the tyre pressure
loss warning system will monitor the set
tyre pressures of all four tyres.
If you wish to cancel the restart:
X Press the %button.
or
X When the Tyre press. now OK? message
appears, press 9or: to select
Cancel. Tyres and wheels
227Operation
212_AKB; 2; 4, en-GB
mkalafa, Version: 2.11.8.1 2009-05-05T14:17:16+02:00 - Seite 227 Z
Dateiname: 6515346702_buchblock.pdf; erzeugt am 07. May 2009 14:16:57; WK
Page 234 of 373
and wheels" section in the "Technical data"
chapter.
R snow chains must not be fitted to emer-
gency spare wheels, e.g. a "Minispare"
emergency spare wheel.
R Only fit snow chains in pairs and to the rear
wheels, even on vehicles with 4MATIC*.
Comply with the manufacturer's installa-
tion instructions.
On vehicles with AIRMATIC*, if snow chains
have been fitted, you may only drive at raised
vehicle level (Y page 154).
Do not exceed the maximum permissible
speed of 50 km/h.
i You may wish to deactivate ESP ®
when
pulling away with snow chains fitted
(Y page 60). This way, you can allow the
wheels to spin in a controlled manner, ach-
ieving an increased driving force (cutting
action). Winter driving
G
Risk of accident
Do not shift down for additional engine brak-
ing on a slippery road surface. This could
cause the drive wheels to lose their grip and
the vehicle could skid.
You should drive particularly carefully on slip-
pery road surfaces. Avoid sudden accelera-
tion, steering and braking manoeuvres.
If the vehicle threatens to skid or cannot be
stopped when moving at low speed:
X Vehicles with manual transmission: engage
neutral.
X Vehicles with automatic transmission*:
shift the selector lever to N.
X Try to bring the vehicle under control by
using corrective steering. Driving tips
Rolling with the engine switched off
G
Risk of accident
Never switch the engine off while the vehicle
is in motion.
There is no power assistance for the steering
and the service brake when the engine is not
running.
You will require considerably more effort to
steer and brake and you could therefore lose
control of the vehicle and cause an accident. Brakes
G
Risk of accident
Do not change down for additional engine
braking on a slippery road surface. This could
cause the drive wheels to lose their grip and
the vehicle could skid. G
Risk of accident
Make sure that other road users are not
endangered by your braking.
Downhill gradients On long and steep downhill stretches, espe-
cially if the vehicle is laden or towing a trailer,
you must shift to a lower gear in good time or,
on vehicles with automatic transmission*,
select shift range 1,2or 3.
i This also applies if you have activated
cruise control, Speedtronic or Distronic
Plus*.
This will use the braking effect of the engine,
so less braking will be required to maintain
the speed. This relieves the load on the brake
system and prevents the brakes from over-
heating and wearing too quickly. If you need
additional braking, depress the brake pedal
repeatedly rather than continuously. Driving tips
231Operation
* optional
212_AKB; 2; 4, en-GB
mkalafa
,V ersion: 2.11.8.1
2009-05-05T14:17:16+02:00 - Seite 231 Z
Dateiname: 6515346702_buchblock.pdf; erzeugt am 07. May 2009 14:16:58; WK