2009 MERCEDES-BENZ E-CLASS ESTATE change wheel
[x] Cancel search: change wheelPage 121 of 373
Changes in the outside temperature are dis-
played after a short delay. On-board computer
Points to remember
The on-board computer is activated as soon
as you turn the key to position 1in the ignition
lock. G
Risk of accident
Only use the on-board computer when road
and traffic conditions permit. You would oth-
erwise be distracted and unable to concen-
trate properly on driving, and could cause an
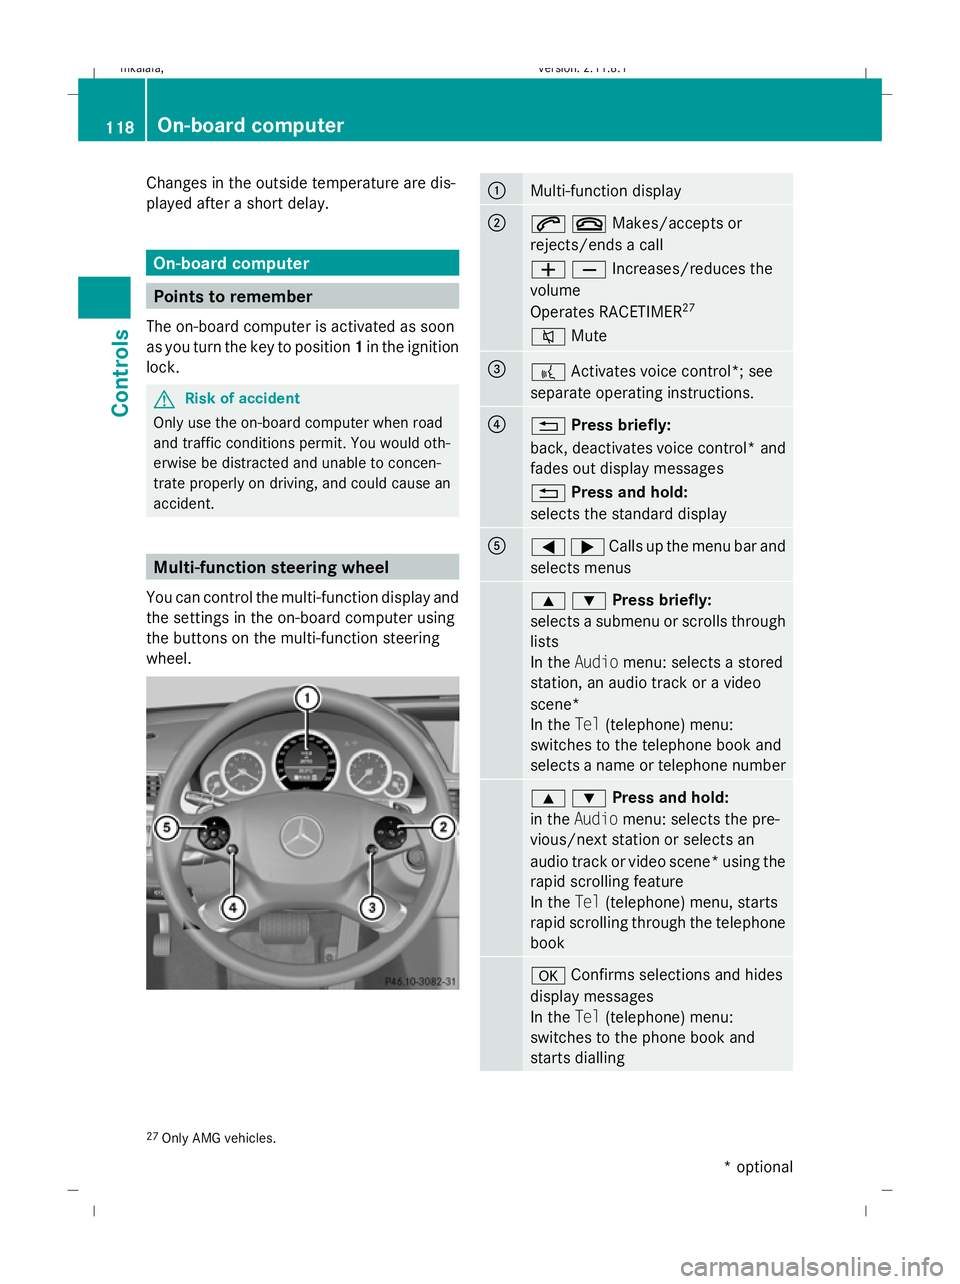
accident. Multi-function steering wheel
You can control the multi-function display and
the settings in the on-board computer using
the buttons on the multi-function steering
wheel. :
Multi-function display
;
6~Makes/accepts or
rejects/ends a call
WXIncreases/reduces the
volume
Operates RACETIMER
27
8 Mute =
?
Activates voice control*; see
separate operating instructions. ?
%
Press briefly:
back, deactivates voice control* and
fades out display messages
% Press and hold:
selects the standard display A
=;Calls up the menu bar and
selects menus
9:Press briefly:
selects a submenu or scrolls through
lists
In the
Audio menu: selects a stored
station, an audio track or a video
scene*
In the Tel(telephone) menu:
switches to the telephone book and
selects a name or telephone number 9:Press and hold:
in the
Audio menu: selects the pre-
vious/next station or selects an
audio track or video scene* using the
rapid scrolling feature
In the Tel(telephone) menu, starts
rapid scrolling through the telephone
book a
Confirms selections and hides
display messages
In the Tel(telephone) menu:
switches to the phone book and
starts dialling 27
Only AMG vehicles. 118
On-board computerControls
* optional
212_AKB; 2; 4, en-GB
mkalafa,
Version: 2.11.8.1 2009-05-05T14:17:16+02:00 - Seite 118
Dateiname: 6515346702_buchblock.pdf; erzeugt am 07. May 2009 14:16:09; WK
Page 128 of 373
X
Press =or; on the steering wheel
to select the AMGmenu.
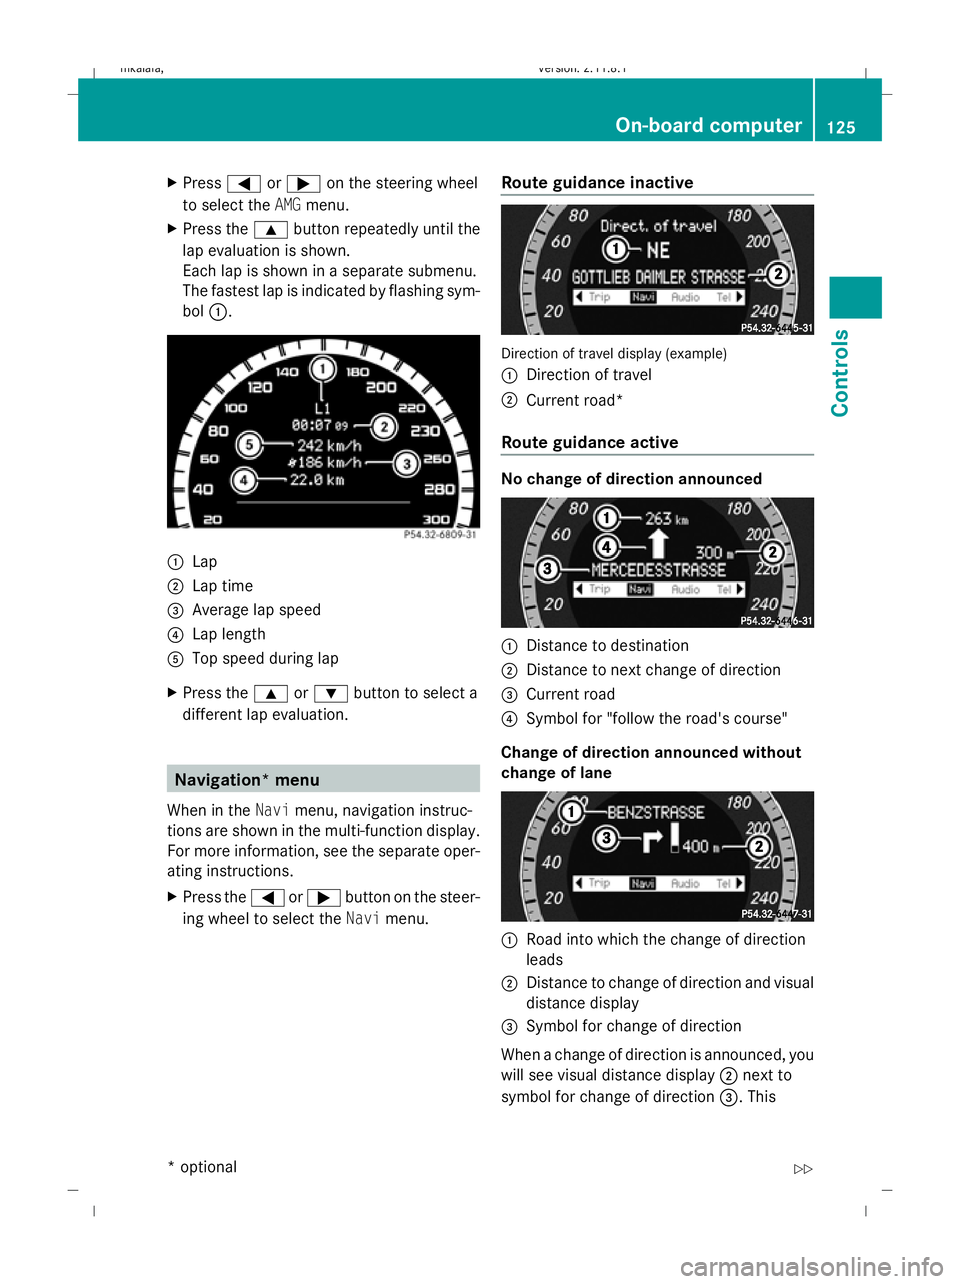
X Press the 9button repeatedly until the
lap evaluation is shown.
Each lap is shown in a separate submenu.
The fastest lap is indicated by flashing sym-
bol :. :
Lap
; Lap time
= Average lap speed
? Lap length
A Top speed during lap
X Press the 9or: button to select a
different lap evaluation. Navigation* menu
When in the Navimenu, navigation instruc-
tions are shown in the multi-function display.
For more information, see the separate oper-
ating instructions.
X Press the =or; button on the steer-
ing wheel to select the Navimenu. Route guidance inactive Direction of travel display (example)
:
Direction of travel
; Current road*
Route guidance active No change of direction announced
:
Distance to destination
; Distance to next change of direction
= Current road
? Symbol for "follow the road's course"
Change of direction announced without
change of lane :
Road into which the change of direction
leads
; Distance to change of direction and visual
distance display
= Symbol for change of direction
When a change of direction is announced, you
will see visual distance display ;next to
symbol for change of direction =. This On-board computer
125Controls
* optional
212_AKB; 2; 4, en-GB
mkalafa,
Version: 2.11.8.1 2009-05-05T14:17:16+02:00 - Seite 125 Z
Dateiname: 6515346702_buchblock.pdf; erzeugt am 07. May 2009 14:16:13; WK
Page 129 of 373
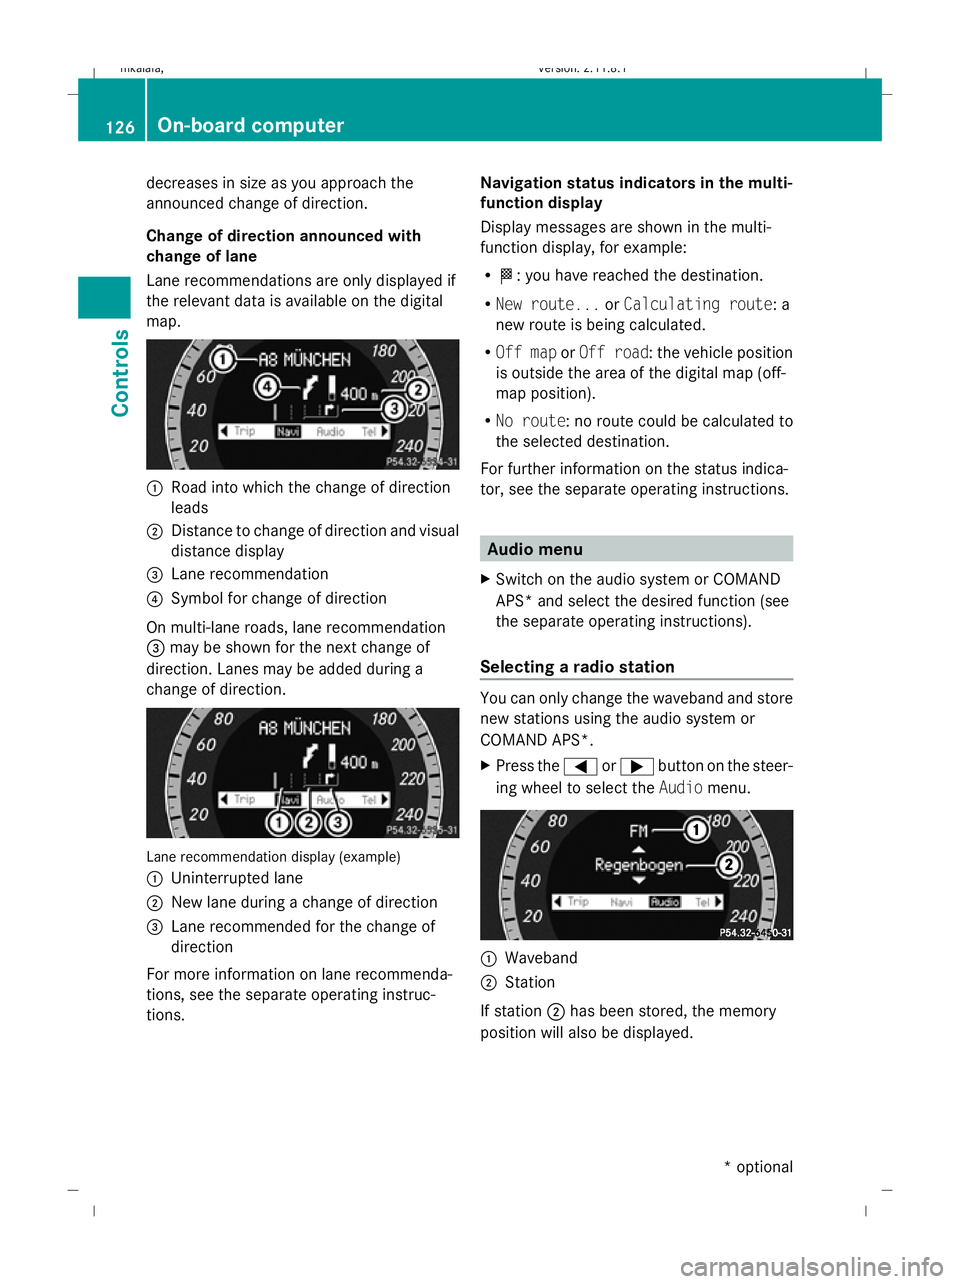
decreases in size as you approach the
announced change of direction.
Change of direction announced with
change of lane
Lane recommendations are only displayed if
the relevant data is available on the digital
map. :
Road into which the change of direction
leads
; Distance to change of direction and visual
distance display
= Lane recommendation
? Symbol for change of direction
On multi-lane roads, lane recommendation
= may be shown for the next change of
direction. Lanes may be added during a
change of direction. Lane recommendation display (example)
:
Uninterrupted lane
; New lane during a change of direction
= Lane recommended for the change of
direction
For more information on lane recommenda-
tions, see the separate operating instruc-
tions. Navigation status indicators in the multi-
function display
Display messages are shown in the multi-
function display, for example:
R O: you have reached the destination.
R New route... orCalculating route: a
new route is being calculated.
R Off map orOff road : the vehicle position
is outside the area of the digital map (off-
map position).
R No route : no route could be calculated to
the selected destination.
For further information on the status indica-
tor, see the separate operating instructions. Audio menu
X Switch on the audio system or COMAND
APS* and select the desired function (see
the separate operating instructions).
Selecting a radio station You can only change the waveband and store
new stations using the audio system or
COMAND APS*.
X
Press the =or; button on the steer-
ing wheel to select the Audiomenu. :
Waveband
; Station
If station ;has been stored, the memory
position will also be displayed. 126
On-board computerControls
* optional
212_AKB; 2; 4, en-GB
mkalafa,
Version: 2.11.8.1 2009-05-05T14:17:16+02:00 - Seite 126
Dateiname: 6515346702_buchblock.pdf; erzeugt am 07. May 2009 14:16:14; WK
Page 132 of 373
X
If only one telephone number is stored
for a name: press the6ora button
to start dialling.
or
X If there is more than one number for a
particular name: press the6ora
button to display the numbers.
X Press the 9or: button to select the
number you want to dial.
X Press the 6ora button to start dial-
ling.
or
X If you do not want to make a call: press
the ~ button.
Redialling The on-board computer saves the last names
or numbers dialled in the redial memory.
X
Press the =or; button on the steer-
ing wheel to select the Telmenu.
X Press the 6button to switch to the
redial memory.
X Press the 9or: button to select the
desired name or number.
X Press the 6ora button to start dial-
ling. Assistance menu
In the Assist. (Assistance) menu, you can:
R display Speed Limit Assist * (Ypage 129)
R activate/deactivate the Speed Limit Assist
message function* (Y page 129)
R show the distance display* ( Ypage 130)
R activate/deactivate PRE-SAFE ®
Brake*
(Y page 130)
R activate/deactivate ATTENTION ASSIST
(Y page 130) R
activate/deactivate Blind Spot
Assist* (Y page 130)
R activate/deactivate Lane Keeping
Assist* (Y page 130)
Speed Limit Assist* In the
Speed Lim. Asst. function, a detec-
ted speed limit is displayed under certain
conditions. You can set Speed Limit Assist to
display a detected speed limit automatically
for five seconds. Other messages in the multi-
function display will be faded out for this
length of time.
When Speed Limit Assist is operational and
the message function is activated, the multi-
function display shows the Äsymbol
when the ignition is switched on.
Displaying Speed Limit Assist
X Press =or; on the steering wheel
to select the Assist.menu.
X Press 9or: to select Speed Lim.
Asst.
X Press the abutton.
Speed Limit Assist appears in the multi-
function display.
When a speed limit is detected, this
appears in the multi-function display until:
R the speed limit ceases to apply.
R you pass city limits.
R the type of road changes, e.g. motorway
or country road.
R the speed limit is not detected anymore
after a certain distance.
Activating/deactivating the Speed Limit
Assist message function
X Press =or; on the steering wheel
to select the Assist.menu.
X Press 9or: to select Speed Lim.
Asst. On-board computer
129Controls
* optional
212_AKB; 2; 4, en-GB
mkalafa,
Version: 2.11.8.1 2009-05-05T14:17:16+02:00 - Seite 129 Z
Dateiname: 6515346702_buchblock.pdf; erzeugt am 07. May 2009 14:16:15; WK
Page 134 of 373
R
call up display messages (Y page 251)
R reset the tyre pressure loss warning system
(Y page 226) or check the tyre pressure
electronically* (Y page 228)
R call up the service due date (Y page 239)Settings menu
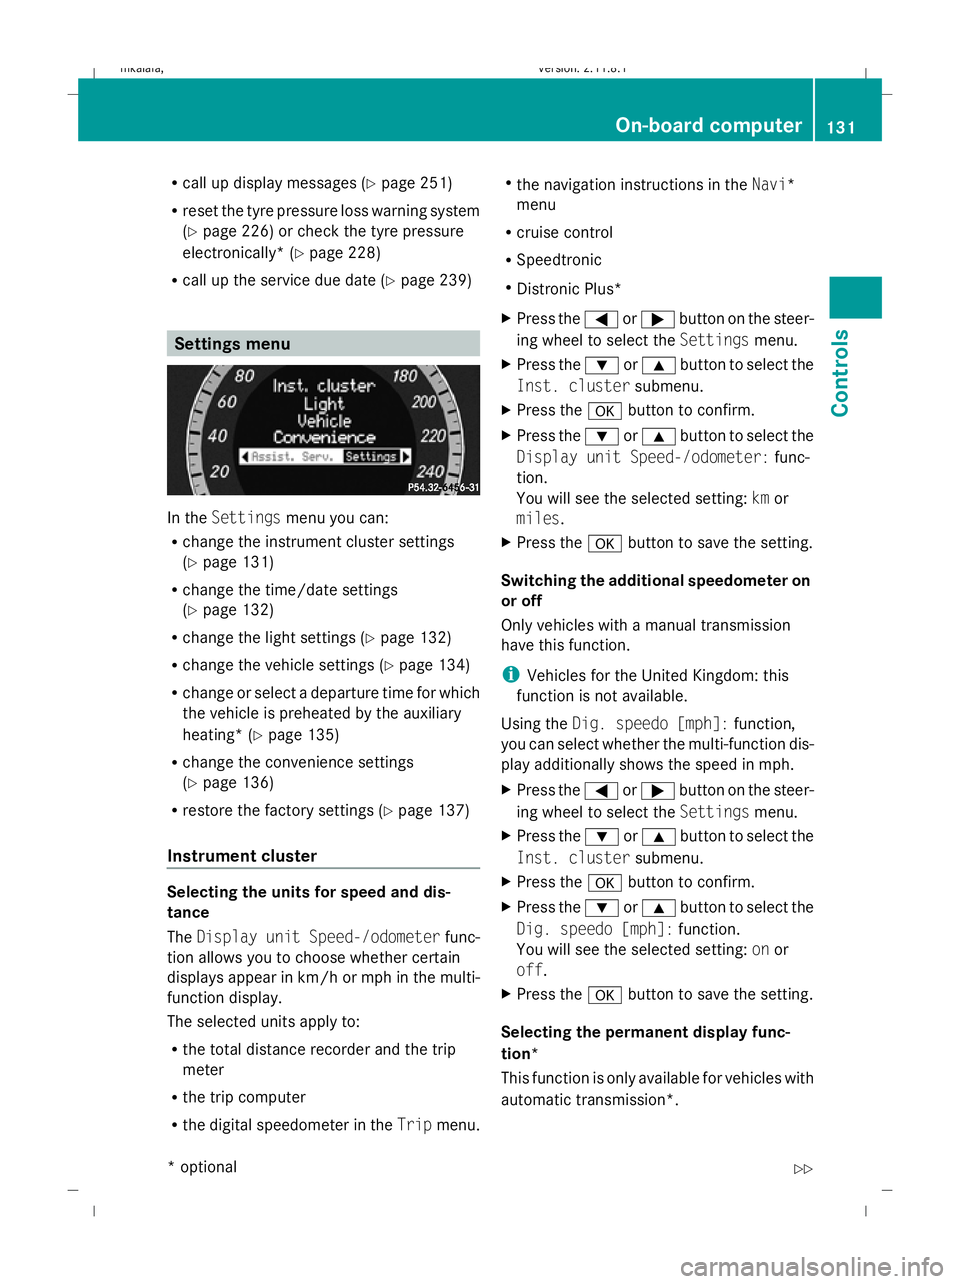
In the
Settings menu you can:
R change the instrument cluster settings
(Y page 131)
R change the time/date settings
(Y page 132)
R change the light settings ( Ypage 132)
R change the vehicle settings (Y page 134)
R change or select a departure time for which
the vehicle is preheated by the auxiliary
heating* (Y page 135)
R change the convenience settings
(Y page 136)
R restore the factory settings (Y page 137)
Instrument cluster Selecting the units for speed and dis-
tance
The
Display unit Speed-/odometer func-
tion allows you to choose whether certain
displays appear in km/h or mph in the multi-
function display.
The selected units apply to:
R the total distance recorder and the trip
meter
R the trip computer
R the digital speedometer in the Tripmenu. R
the navigation instructions in the Navi*
menu
R cruise control
R Speedtronic
R Distronic Plus*
X Press the =or; button on the steer-
ing wheel to select the Settingsmenu.
X Press the :or9 button to select the
Inst. cluster submenu.
X Press the abutton to confirm.
X Press the :or9 button to select the
Display unit Speed-/odometer: func-
tion.
You will see the selected setting: kmor
miles.
X Press the abutton to save the setting.
Switching the additional speedometer on
or off
Only vehicles with a manual transmission
have this function.
i Vehicles for the United Kingdom: this
function is not available.
Using the Dig. speedo [mph]: function,
you can select whether the multi-function dis-
play additionally shows the speed in mph.
X Press the =or; button on the steer-
ing wheel to select the Settingsmenu.
X Press the :or9 button to select the
Inst. cluster submenu.
X Press the abutton to confirm.
X Press the :or9 button to select the
Dig. speedo [mph]: function.
You will see the selected setting: onor
off.
X Press the abutton to save the setting.
Selecting the permanent display func-
tion*
This function is only available for vehicles with
automatic transmission*. On-board computer
131Controls
* optional
212_AKB; 2; 4, en-GB
mkalafa
,V ersion: 2.11.8.1
2009-05-05T14:17:16+02:00 - Seite 131 Z
Dateiname: 6515346702_buchblock.pdf; erzeugt am 07. May 2009 14:16:15; WK
Page 135 of 373
i
Vehicles for the United Kingdom: this
function is not available.
The Permanent display: function allows
you to choose whether the multi-function dis-
play always shows the outside temperature
or the speed in mph.
X Press the =or; button on the steer-
ing wheel to select the Settingsmenu.
X Press the :or9 button to select the
Inst. cluster submenu.
X Press the abutton to confirm.
X Press the :or9 button to select the
Permanent display: function.
You will see the selected setting: outside
temperature orDig. speedo [mph].
X Press the abutton to save the setting.
Time/date This submenu is only available on vehicles
with Audio 20.
Your vehicle may be equipped with one of the
following audio systems:
A: Audio 20
B: Audio 50 APS*
C: COMAND APS*
X You can see which audio system is fitted in
your vehicle by referring to the separate
operating instructions.
Depending on the audio system fitted, time
and date are received from GPS satellites and
therefore cannot be set using the on-board
computer. Refer to the following table. A B C
Setting using the on-board com-
puter X
Automatic GPS satellite recep-
tion X X
Set the time zone once – see
separate operating instructions X X In the
Time/date submenu, you can set the
time and date.
Setting the time
X Press the =or; button on the steer-
ing wheel to select the Settingsmenu.
X Press the :or9 button to select the
Time/date submenu.
X Press the abutton to confirm.
X Press the :or9 button to select the
Time: function.
You will see the time currently set.
X Press the abutton to change it.
X Press the =or; button to select the
display to be changed: hours, minutes.
X Press the :or9 button to set the
selected display.
X Press the abutton to store the entry.
Setting the date
X Press the =or; button on the steer-
ing wheel to select the Settingsmenu.
X Press the :or9 button to select the
Time/date submenu.
X Press the abutton to confirm.
X Press the :or9 button to select the
Date: function.
You will see the date currently set.
X Press the abutton to change it.
X Press the =or; button to select the
display to be changed: day, month, year.
X Press the :or9 button to set the
selected display.
X Press the abutton to store the entry.
Lights Switching the daytime driving lights on/
off
If you have activated the
Daytime driving
lamps: function and the light switch is in the
c position the daytime driving lights are
switched on automatically when the engine is 132
On-board computerControls
* optional
212_AKB; 2; 4, en-GB
mkalafa,
Version: 2.11.8.1 2009-05-05T14:17:16+02:00 - Seite 132
Dateiname: 6515346702_buchblock.pdf; erzeugt am 07. May 2009 14:16:16; WK
Page 138 of 373
X
Press the abutton to confirm.
X Press the :or9 button to select the
Automatic door locks: function.
You will see the selected setting: onor
off.
X Press the abutton to save the setting.
Activating/deactivating the radar sensor
system*
i You must deactivate the radar sensor sys-
tem in certain countries and near radio
telescope facilities. You will find further
information under "Radar sensor system"
in the index.
Vehicles with a navigation system*: the radar
sensor system is deactivated automatically if
you are close to radio telescope facilities.
The following systems are switched off when
the radar sensor system is deactivated:
R Distronic Plus* (Y page 140)
R BAS PLUS* (Y page 59)
R PRE-SAFE ®
Brake* (Y page 63)
R Blind Spot Assist* (Y page 167)
X Press the =or; button on the steer-
ing wheel to select the Settingsmenu.
X Press the :or9 button to select the
Vehicle submenu.
X Press the abutton to confirm.
X Press the 9or: button to select the
Radar sensor (See Owner's Man.):
You will see the selected setting: onor
off.
X Press the abutton to save the setting.
Heating* Auxiliary heating* departure time
Only vehicles with auxiliary heating have this
submenu.
In the
Heating submenu, you can select a
stored departure time or change a departure time, at which the vehicle is preheated by the
auxiliary heating.
The auxiliary heating timer function calcu-
lates the switch-on time according to the out-
side temperature so that the vehicle is pre-
heated by the departure time. When the
departure time is reached, the auxiliary heat-
ing continues to heat for a further five
minutes and then switches off. The auxiliary
heating adopts the 2-zone Thermatic or the
3-zone Thermotronic *temperature settings.
You can switch off the auxiliary heating by
using the remote control or the auxiliary heat-
ing button on the centre console. G
Risk of poisoning
Exhaust fumes are produced when the auxili-
ary heating is in operation. Inhaling these
exhaust fumes can be poisonous. You should
therefore switch off the auxiliary heating in
confined spaces without an extraction sys-
tem, e.g. a garage. G
Risk of fire
When the auxiliary heating is in operation,
parts of the vehicle can become very hot.
Make sure that the exhaust system does
not under any circumstances come into con-
tact with highly flammable materials such as
dry grass or fuels. The highly flammable mate-
rial could otherwise ignite and set the vehicle
alight. Select your parking space accordingly.
Operating the auxiliary heating is therefore
prohibited at filling stations or when your vehi-
cle is being refuelled. Always switch off the
auxiliary heating at filling stations.
Selecting the departure time or deactivat-
ing a selected departure time
X Press the =or; button on the steer-
ing wheel to select the Settingsmenu.
X Press the :or9 button to select the
Heating submenu.
X Press the abutton to confirm.
You will see the selected setting.
X Press the abutton to confirm. On-board computer
135Controls
* optional
212_AKB; 2; 4, en-GB
mkalafa
,V ersion: 2.11.8.1
2009-05-05T14:17:16+02:00 - Seite 135 Z
Dateiname: 6515346702_buchblock.pdf; erzeugt am 07. May 2009 14:16:16; WK
Page 139 of 373
X
Press the :or9 button to select
one of the three departure times or Timer
off (no timer active).
X Press the abutton to confirm.
When a departure time is selected, the yel-
low indicator lamp lights up on the auxiliary
heating button.
Changing the departure time
X Press the =or; button to select the
Settings menu.
X Press the :or9 button to select the
Heating submenu.
X Press the abutton to confirm.
You will see the selected setting.
X Press the abutton to confirm.
X Press the :or9 button to select
Change A, Bor C.
X Press the abutton to confirm.
You can now change the departure time.
X Press the =or; button to select the
display to be changed: hours, minutes.
X Press the :or9 button to set the
selected display.
X Press the abutton to store the entry.
The yellow indicator lamp on the auxiliary
heating button lights up.
Convenience Activating/deactivating the EASY-
ENTRY/EXIT feature*
You can use the
Easy Entry/Exit: function
to activate or deactivate the easy-entry/exit
feature (Y page 85). G
Risk of injury
The steering wheel moves when the EASY-
ENTRY/EXIT feature is active. There is a risk
of occupants becoming trapped. Before acti-
vating the EASY-ENTRY/EXIT feature, make
sure that nobody can become trapped.
Do not leave children unsupervised in the
vehicle, even if they are secured in a child restraint system. The children could open the
driver's door and thereby unintentionally acti-
vate the EASY-ENTRY/EXIT feature and
become trapped.
X Press the =or; button on the steer-
ing wheel to select the Settingsmenu.
X Press the :or9 button to select the
Convenience submenu.
X Press the abutton to confirm.
X Press the :or9 button to select the
Easy Entry/Exit: function.
You will see the selected setting: onor
off.
X Press the abutton to save the setting.
Switching the belt adjustment on/off
X Press the =or; button on the steer-
ing wheel to select the Settingsmenu.
X Press the :or9 button to select the
Convenience submenu.
X Press the abutton to confirm.
X Press the :or9 button to select the
Belt adjustment: function.
You will see the selected setting: onor
off.
X Press the abutton to save the setting.
Switching the fold in mirrors when lock-
ing* function on/off
If you switch on the Fold mirrors in when
locking: function, the exterior mirrors fold
in when you lock the vehicle. When you
unlock the vehicle and then open the driver's
or front-passenger door, the exterior mirrors
fold out again.
If you have switched the function on and you
fold the exterior mirrors in using the button
on the door (Y page 86), they will not fold out
automatically. The exterior mirrors can then
only be folded out using the button on the
door. 136
On-board computerControls
* optional
212_AKB; 2; 4, en-GB
mkalafa,
Version: 2.11.8.1 2009-05-05T14:17:16+02:00 - Seite 136
Dateiname: 6515346702_buchblock.pdf; erzeugt am 07. May 2009 14:16:16; WK