2009 MERCEDES-BENZ E-CLASS ESTATE change wheel
[x] Cancel search: change wheelPage 232 of 373
X
Use the table on the inside of the fuel filler
flap to ensure that the tyre pressure is set
correctly in all four tyres for the current
operating conditions.
Also observe the notes in the section on
tyre pressures (Y page 225).
X Make sure that the key is in position 2in
the ignition lock.
X Press the =or; button to select the
Service menu.
X Press the 9or: button to select
Tyre press..
X Press the abutton.
The current pressure in each individual tyre
is displayed, or the following message
appears:
Tyre pressures will be displayed
after a few minutes of driving
X Press the :button.
The multi-function display shows the mes-
sage:
Use current pressures as new ref‐
erence values
X Press the abutton.
The multi-function display shows the mes-
sage:
Tyre press. monitor restarted
After a few minutes of driving, the current
pressures are adopted as the new monitor-
ing values.
Cancelling the restart X
Press the %button.
or
X Press the 9button to leave the menu.
Other messages in the multi-function
display If in multi-function display the following mes-
sage appears:
Please correct tyre pressure
X
Check the tyre pressure on all four wheels
and correct it if necessary. i
If the wheel positions on the vehicle are
interchanged, the tyre pressures may be
displayed for the wrong positions for a
short time. This is rectified after a few
minutes of driving, and the tyre pressures
are displayed for the correct positions. Interchanging the wheels
G
Risk of accident
Interchange the front and rear wheels only if
they have the same dimensions: for example
size, offset, etc.
After a wheel is changed, have the tightening
torque checked at a specialist workshop that
has the necessary specialist knowledge and
tools to carry out the work required.
Mercedes-Benz recommends that you use a
Mercedes-Benz Service Centre for this pur-
pose. In particular, work relevant to safety or
on safety-related systems must be carried out
at a qualified specialist workshop.
The wheels could work loose if they are not
tightened to a torque of 130 Nm.
For safety reasons, Mercedes-Benz recom-
mends that you only use wheel bolts of the
correct size which have been approved for
Mercedes-Benz vehicles.
The wear patterns on the front and rear tyres
differ, depending on the operating conditions.
Interchange the wheels before a clear wear
pattern has formed on the tyres. Front tyres
typically wear more on the shoulders and the
rear tyres in the centre.
On vehicles that have the same size front and
rear wheels you can interchange the wheels
every 5,000 km to 10,000 km depending on
the degree of tyre wear. Do not reverse the
direction of tyre rotation.
Clean the contact surfaces of the wheel and
the brake disc thoroughly every time a wheel
is interchanged. Check the tyre pressure and,
if necessary, restart the tyre pressure loss
warning system or the tyre pressure moni-
tor*. Tyres and wheels
229Operation
* optional
212_AKB; 2; 4, en-GB
mkalafa,
Version: 2.11.8.1 2009-05-05T14:17:16+02:00 - Seite 229 Z
Dateiname: 6515346702_buchblock.pdf; erzeugt am 07. May 2009 14:16:58; WK
Page 233 of 373
!
On vehicles fitted with a tyre pressure
monitor*, electronic components are loca-
ted in the wheel.
Tyre-fitting tools should not be applied in
the area of the valve, as this could damage
the electronic components.
Always have the wheels interchanged/
changed at a qualified specialist workshop,
e.g. a Mercedes-Benz Service Centre. Winter driving
Points to remember
Have your vehicle winterproofed at a qualified
specialist workshop, e.g. at a Mercedes-Benz
Service Centre, at the onset of winter.
Observe the notes in the "Changing a wheel"
section (Y page 229). Winter tyres
Use winter tyres at temperatures below
+7 ˚C and in wintry road conditions. Only
winter tyres displaying the isnowflake
symbol in addition to the M+S marking pro-
vide optimum grip in wintry road conditions.
Only these tyres will allow the ABS, ESP ®
and
4MATIC* driving systems to function opti-
mally in winter, as these tyres have been
designed specifically for driving in snow.
Use winter tyres of the same make and tread
on all wheels to maintain safe handling char-
acteristics. G
Risk of accident
Winter tyres with a tread depth of less than
4 mm must be replaced immediately. They are
no longer suitable for winter use and can no
longer provide sufficient grip. This could
cause you to lose control of your vehicle and
cause an accident.
Always observe the maximum permissible
speed specified for the winter tyres you have fitted. If you fit winter tyres which have a
lower maximum permissible speed than that
of the vehicle, affix an appropriate warning
sign in the driver's field of vision. This can be
obtained at a qualified specialist workshop,
e.g. from a Mercedes-Benz Service Centre.
Under these circumstances, you should also
restrict the maximum speed of the vehicle
using permanent Speedtronic
39
to the maxi-
mum permissible speed for the winter tyres
(Y page 150).
Once you have fitted the winter tyres:
X Check the tyre pressures (Y page 225).
X Restart the tyre pressure moni-
tor* (Y page 228). G
Risk of accident
If you fit the spare wheel* when driving with
winter tyres, bear in mind that driving stability
will be impaired owing to unstable cornering
characteristics caused by the different tyres.
You should therefore adapt your driving style
and drive carefully.
Have the spare wheel* replaced at the near-
est qualified specialist workshop which has
the necessary specialist knowledge and tools
to carry out the work required. Mercedes-
Benz recommends that you use a Mercedes-
Benz Service Centre for this purpose. In par-
ticular, work relevant to safety or on safety-
related systems must be carried out at a quali-
fied specialist workshop. Snow chains
For safety reasons, Mercedes-Benz recom-
mends that you only use snow chains which
have been specially approved for your vehicle
by Mercedes-Benz, or are of a corresponding
standard of quality.
If you intend to fit snow chains, please bear
the following points in mind:
R you may not attach snow chains to all
wheel-tyre combinations; see the "Tyres
39 Only available for certain countries. 230
Winter drivingOperation
* optional
212_AKB; 2; 4, en-GB
mkalafa,
Version: 2.11.8.1 2009-05-05T14:17:16+02:00 - Seite 230
Dateiname: 6515346702_buchblock.pdf; erzeugt am 07. May 2009 14:16:58; WK
Page 234 of 373
and wheels" section in the "Technical data"
chapter.
R snow chains must not be fitted to emer-
gency spare wheels, e.g. a "Minispare"
emergency spare wheel.
R Only fit snow chains in pairs and to the rear
wheels, even on vehicles with 4MATIC*.
Comply with the manufacturer's installa-
tion instructions.
On vehicles with AIRMATIC*, if snow chains
have been fitted, you may only drive at raised
vehicle level (Y page 154).
Do not exceed the maximum permissible
speed of 50 km/h.
i You may wish to deactivate ESP ®
when
pulling away with snow chains fitted
(Y page 60). This way, you can allow the
wheels to spin in a controlled manner, ach-
ieving an increased driving force (cutting
action). Winter driving
G
Risk of accident
Do not shift down for additional engine brak-
ing on a slippery road surface. This could
cause the drive wheels to lose their grip and
the vehicle could skid.
You should drive particularly carefully on slip-
pery road surfaces. Avoid sudden accelera-
tion, steering and braking manoeuvres.
If the vehicle threatens to skid or cannot be
stopped when moving at low speed:
X Vehicles with manual transmission: engage
neutral.
X Vehicles with automatic transmission*:
shift the selector lever to N.
X Try to bring the vehicle under control by
using corrective steering. Driving tips
Rolling with the engine switched off
G
Risk of accident
Never switch the engine off while the vehicle
is in motion.
There is no power assistance for the steering
and the service brake when the engine is not
running.
You will require considerably more effort to
steer and brake and you could therefore lose
control of the vehicle and cause an accident. Brakes
G
Risk of accident
Do not change down for additional engine
braking on a slippery road surface. This could
cause the drive wheels to lose their grip and
the vehicle could skid. G
Risk of accident
Make sure that other road users are not
endangered by your braking.
Downhill gradients On long and steep downhill stretches, espe-
cially if the vehicle is laden or towing a trailer,
you must shift to a lower gear in good time or,
on vehicles with automatic transmission*,
select shift range 1,2or 3.
i This also applies if you have activated
cruise control, Speedtronic or Distronic
Plus*.
This will use the braking effect of the engine,
so less braking will be required to maintain
the speed. This relieves the load on the brake
system and prevents the brakes from over-
heating and wearing too quickly. If you need
additional braking, depress the brake pedal
repeatedly rather than continuously. Driving tips
231Operation
* optional
212_AKB; 2; 4, en-GB
mkalafa
,V ersion: 2.11.8.1
2009-05-05T14:17:16+02:00 - Seite 231 Z
Dateiname: 6515346702_buchblock.pdf; erzeugt am 07. May 2009 14:16:58; WK
Page 237 of 373
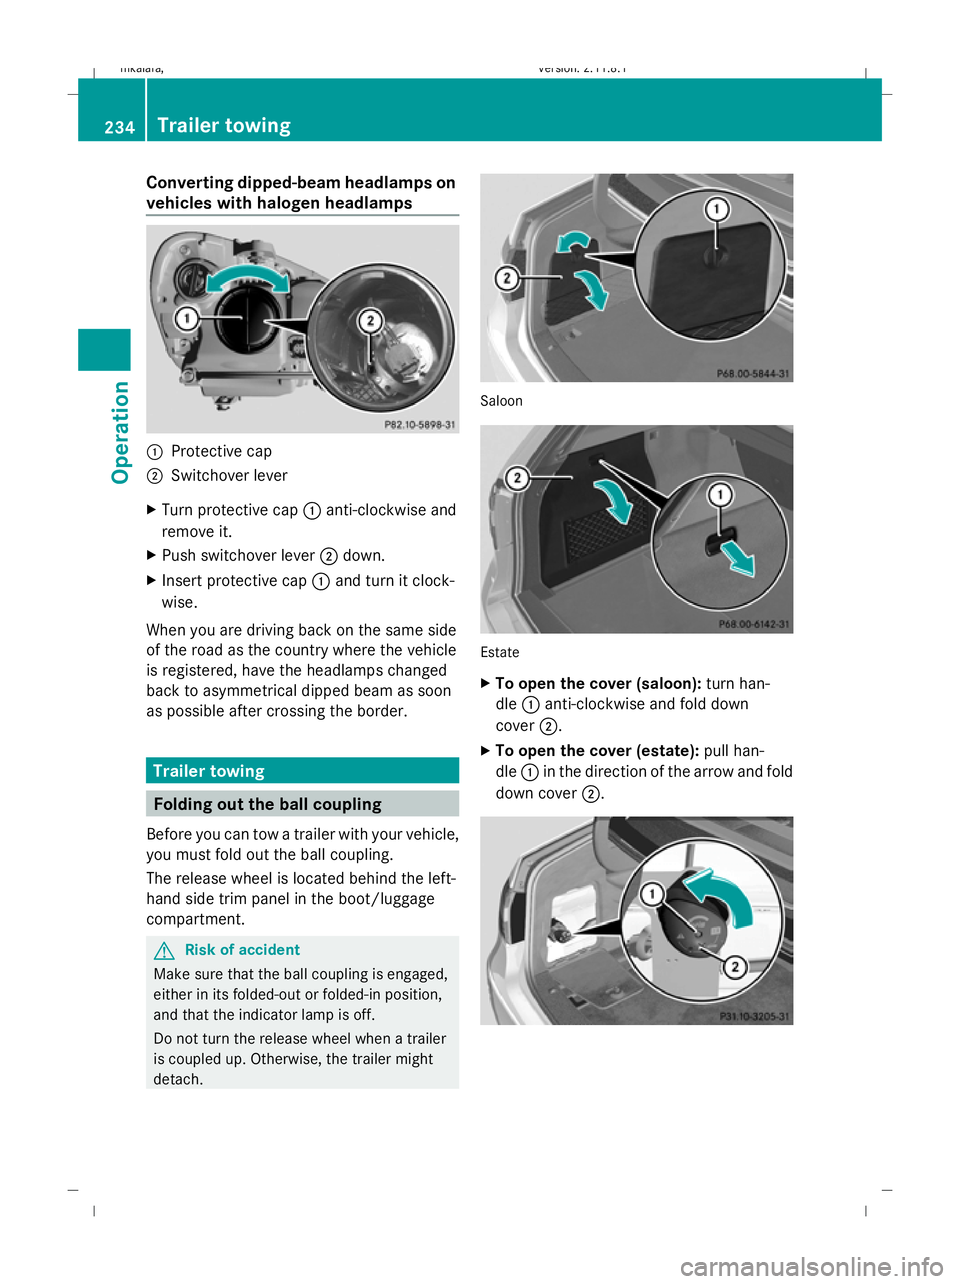
Converting dipped-beam headlamps on
vehicles with halogen headlamps :
Protective cap
; Switchover lever
X Turn protective cap :anti-clockwise and
remove it.
X Push switchover lever ;down.
X Insert protective cap :and turn it clock-
wise.
When you are driving back on the same side
of the road as the country where the vehicle
is registered, have the headlamps changed
back to asymmetrical dipped beam as soon
as possible after crossing the border. Trailer towing
Folding out the ball coupling
Before you can tow a trailer with your vehicle,
you must fold out the ball coupling.
The release wheel is located behind the left-
hand side trim panel in the boot/luggage
compartment. G
Risk of accident
Make sure that the ball coupling is engaged,
either in its folded-out or folded-in position,
and that the indicator lamp is off.
Do not turn the release wheel when a trailer
is coupled up. Otherwise, the trailer might
detach. Saloon
Estate
X
To open the cover (saloon): turn han-
dle :anti-clockwise and fold down
cover ;.
X To open the cover (estate): pull han-
dle :in the direction of the arrow and fold
down cover ;. 234
Trailer towingOperation
212_AKB; 2; 4, en-GB
mkalafa
,V ersion: 2.11.8.1
2009-05-05T14:17:16+02:00 - Seite 234
Dateiname: 6515346702_buchblock.pdf; erzeugt am 07. May 2009 14:16:59; WK
Page 252 of 373
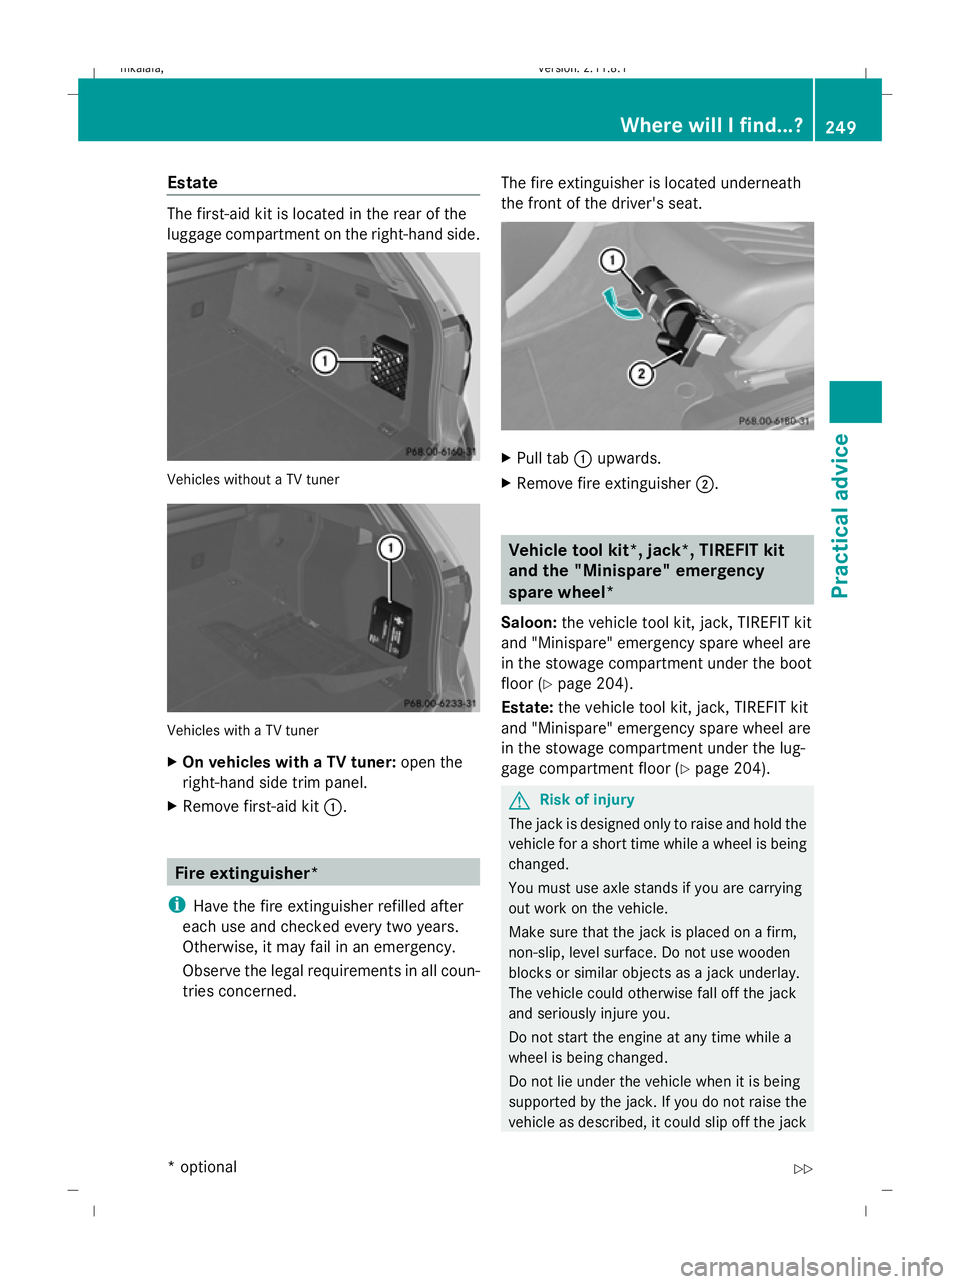
Estate
The first-aid kit is located in the rear of the
luggage compartment on the right-hand side.
Vehicles without a TV tuner
Vehicles with a TV tuner
X On vehicles with a TV tuner: open the
right-hand side trim panel.
X Remove first-aid kit :. Fire extinguisher*
i Have the fire extinguisher refilled after
each use and checked every two years.
Otherwise, it may fail in an emergency.
Observe the legal requirements in all coun-
tries concerned. The fire extinguisher is located underneath
the front of the driver's seat. X
Pull tab :upwards.
X Remove fire extinguisher ;. Vehicle tool kit
*, jack*, TIREFIT kit
and the "Minispare" emergency
spare wheel*
Saloon: the vehicle tool kit, jack, TIREFIT kit
and "Minispare" emergency spare wheel are
in the stowage compartment under the boot
floor (Y page 204).
Estate: the vehicle tool kit, jack, TIREFIT kit
and "Minispare" emergency spare wheel are
in the stowage compartment under the lug-
gage compartment floor (Y page 204). G
Risk of injury
The jack is designed only to raise and hold the
vehicle for a short time while a wheel is being
changed.
You must use axle stands if you are carrying
out work on the vehicle.
Make sure that the jack is placed on a firm,
non-slip, level surface. Do not use wooden
blocks or similar objects as a jack underlay.
The vehicle could otherwise fall off the jack
and seriously injure you.
Do not start the engine at any time while a
wheel is being changed.
Do not lie under the vehicle when it is being
supported by the jack. If you do not raise the
vehicle as described, it could slip off the jack Where will I find...?
249Practical advice
* optional
212_AKB; 2; 4, en-GB
mkalafa,
Version: 2.11.8.1 2009-05-05T14:17:16+02:00 - Seite 249 Z
Dateiname: 6515346702_buchblock.pdf; erzeugt am 07. May 2009 14:17:06; WK
Page 261 of 373
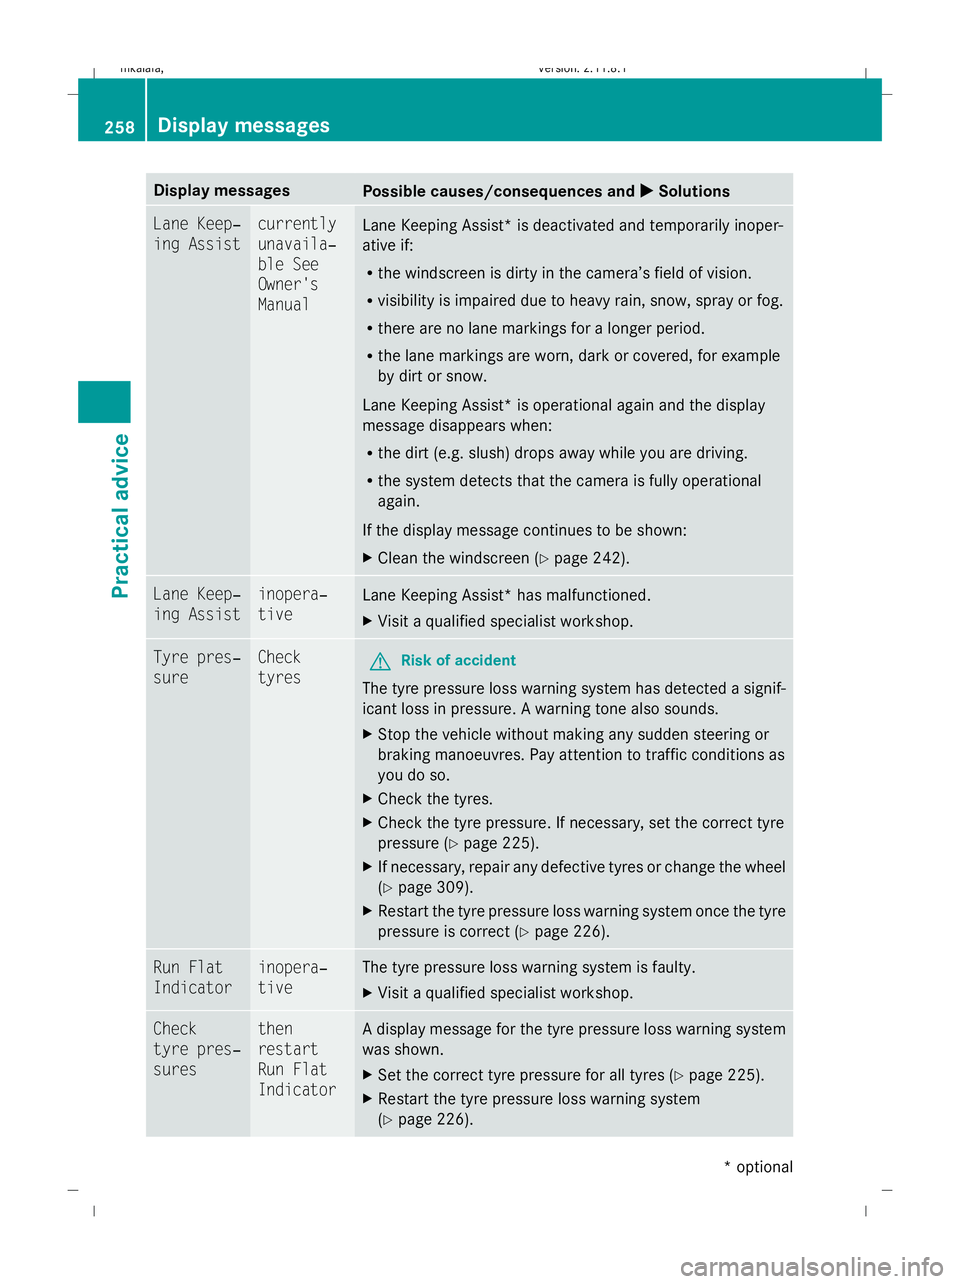
Display messages
Possible causes/consequences and
X
X Solutions Lane Keep‐
ing Assist currently
unavaila‐
ble See
Owner's
Manual
Lane Keeping Assist* is deactivated and temporarily inoper-
ative if:
R
the windscreen is dirty in the camera’s field of vision.
R visibility is impaired due to heavy rain, snow, spray or fog.
R there are no lane markings for a longer period.
R the lane markings are worn, dark or covered, for example
by dirt or snow.
Lane Keeping Assist* is operational again and the display
message disappears when:
R the dirt (e.g. slush) drops away while you are driving.
R the system detects that the camera is fully operational
again.
If the display message continues to be shown:
X Clean the windscreen (Y page 242).Lane Keep‐
ing Assist inopera‐
tive
Lane Keeping Assist* has malfunctioned.
X
Visit a qualified specialist workshop. Tyre pres‐
sure Check
tyres
G
Risk of accident
The tyre pressure loss warning system has detected a signif-
icant loss in pressure. A warning tone also sounds.
X Stop the vehicle without making any sudden steering or
braking manoeuvres. Pay attention to traffic conditions as
you do so.
X Check the tyres.
X Check the tyre pressure. If necessary, set the correct tyre
pressure ( Ypage 225).
X If necessary, repair any defective tyres or change the wheel
(Y page 309).
X Restart the tyre pressure loss warning system once the tyre
pressure is correct (Y page 226).Run Flat
Indicator inopera‐
tive The tyre pressure loss warning system is faulty.
X
Visit a qualified specialist workshop. Check
tyre pres‐
sures then
restart
Run Flat
Indicator A display message for the tyre pressure loss warning system
was shown.
X
Set the correct tyre pressure for all tyres (Y page 225).
X Restart the tyre pressure loss warning system
(Y page 226). 258
Display
messagesPractical advice
* optional
212_AKB; 2; 4, en-GB
mkalafa
,V ersion: 2.11.8.1
2009-05-05T14:17:16+02:00 - Seite 258
Dateiname: 6515346702_buchblock.pdf; erzeugt am 07. May 2009 14:17:08; WK
Page 262 of 373
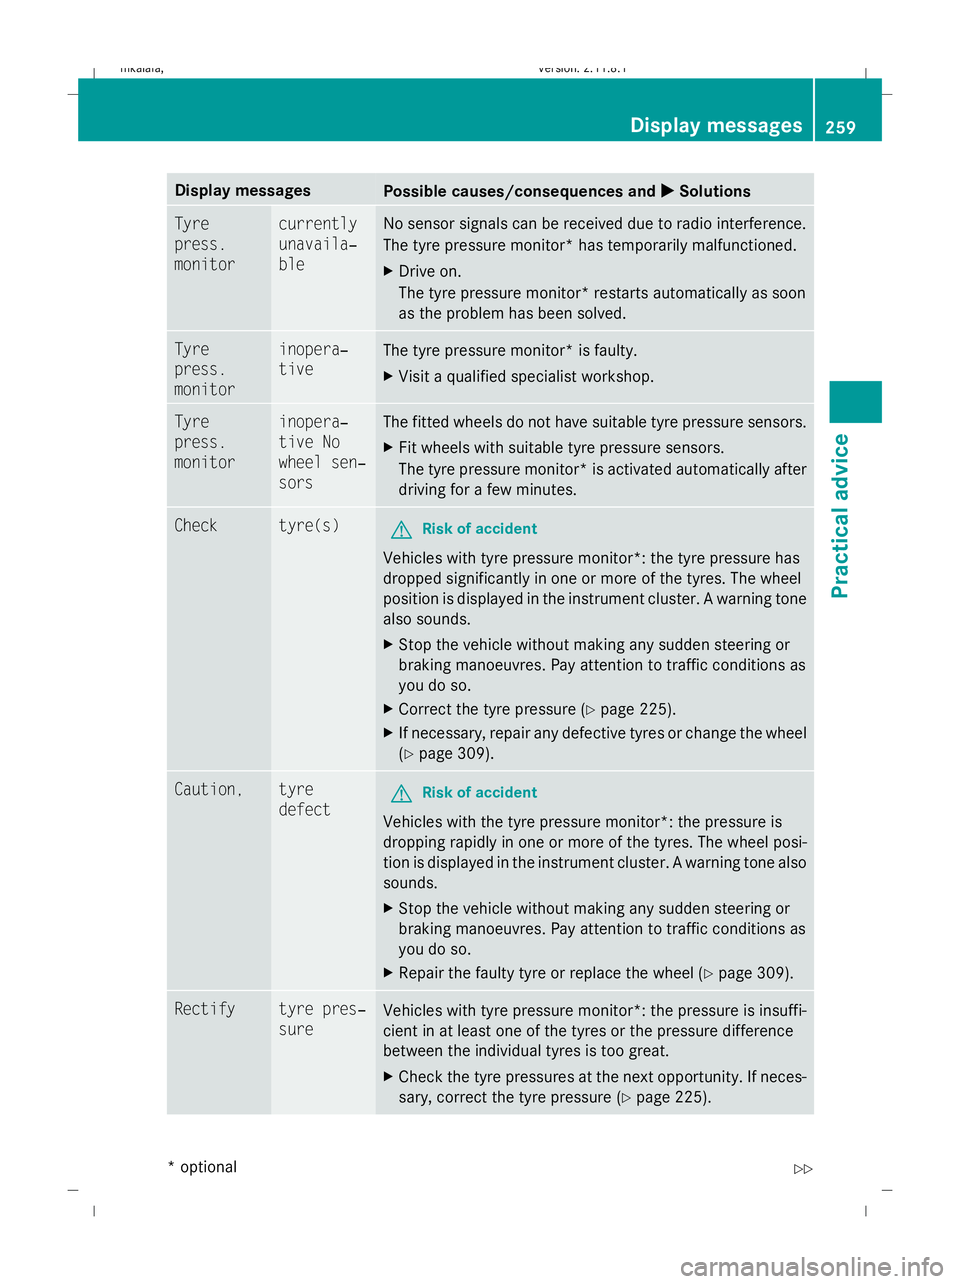
Display messages
Possible causes/consequences and
X
X Solutions Tyre
press.
monitor currently
unavaila‐
ble No sensor signals can be received due to radio interference.
The tyre pressure monitor* has temporarily malfunctioned.
X
Drive on.
The tyre pressure monitor* restarts automatically as soon
as the problem has been solved. Tyre
press.
monitor inopera‐
tive
The tyre pressure monitor* is faulty.
X
Visit a qualified specialist workshop. Tyre
press.
monitor inopera‐
tive No
wheel sen‐
sors The fitted wheels do not have suitable tyre pressure sensors.
X
Fit wheels with suitable tyre pressure sensors.
The tyre pressure monitor* is activated automatically after
driving for a few minutes. Check tyre(s)
G
Risk of accident
Vehicles with tyre pressure monitor*: the tyre pressure has
dropped significantly in one or more of the tyres. The wheel
position is displayed in the instrument cluster. A warning tone
also sounds.
X Stop the vehicle without making any sudden steering or
braking manoeuvres. Pay attention to traffic conditions as
you do so.
X Correct the tyre pressure (Y page 225).
X If necessary, repair any defective tyres or change the wheel
(Y page 309). Caution, tyre
defect
G
Risk of accident
Vehicles with the tyre pressure monitor*: the pressure is
dropping rapidly in one or more of the tyres. The wheel posi-
tion is displayed in the instrument cluster. A warning tone also
sounds.
X Stop the vehicle without making any sudden steering or
braking manoeuvres. Pay attention to traffic conditions as
you do so.
X Repair the faulty tyre or replace the wheel ( Ypage 309). Rectify tyre pres‐
sure
Vehicles with tyre pressure monitor*: the pressure is insuffi-
cient in at least one of the tyres or the pressure difference
between the individual tyres is too great.
X
Check the tyre pressures at the next opportunity. If neces-
sary, correct the tyre pressure (Y page 225). Display
messages
259Practical advice
* optional
212_AKB; 2; 4, en-GB
mkalafa
,V ersion: 2.11.8.1
2009-05-05T14:17:16+02:00 - Seite 259 Z
Dateiname: 6515346702_buchblock.pdf; erzeugt am 07. May 2009 14:17:08; WK
Page 279 of 373
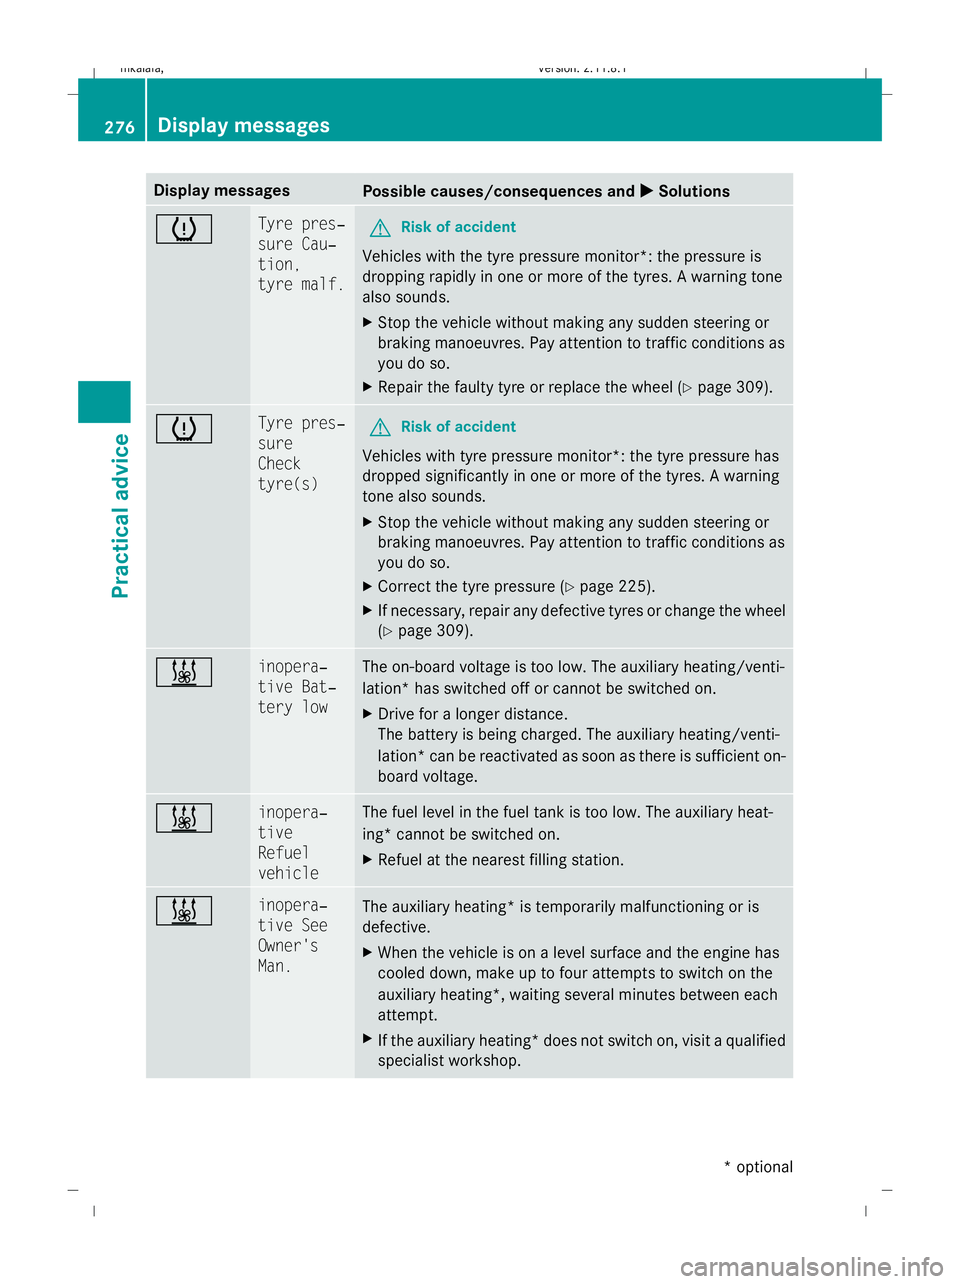
Display messages
Possible causes/consequences and
X
X Solutions h Tyre pres‐
sure Cau‐
tion,
tyre malf.
G
Risk of accident
Vehicles with the tyre pressure monitor*: the pressure is
dropping rapidly in one or more of the tyres. A warning tone
also sounds.
X Stop the vehicle without making any sudden steering or
braking manoeuvres. Pay attention to traffic conditions as
you do so.
X Repair the faulty tyre or replace the wheel ( Ypage 309). h Tyre pres‐
sure
Check
tyre(s)
G
Risk of accident
Vehicles with tyre pressure monitor*: the tyre pressure has
dropped significantly in one or more of the tyres. A warning
tone also sounds.
X Stop the vehicle without making any sudden steering or
braking manoeuvres. Pay attention to traffic conditions as
you do so.
X Correct the tyre pressure (Y page 225).
X If necessary, repair any defective tyres or change the wheel
(Y page 309). & inopera‐
tive Bat‐
tery low The on-board voltage is too low. The auxiliary heating/venti-
lation* has switched off or cannot be switched on.
X
Drive for a longer distance.
The battery is being charged. The auxiliary heating/venti-
lation *can be reactivated as soon as there is sufficient on-
board voltage. & inopera‐
tive
Refuel
vehicle The fuel level in the fuel tank is too low. The auxiliary heat-
ing* cannot be switched on.
X
Refuel at the nearest filling station. & inopera‐
tive See
Owner's
Man.
The auxiliary heating
*is temporarily malfunctioning or is
defective.
X When the vehicle is on a level surface and the engine has
cooled down, make up to four attempts to switch on the
auxiliary heating*, waiting several minutes between each
attempt.
X If the auxiliary heating* does not switch on, visit a qualified
specialist workshop. 276
Display messagesPractical advice
* optional
212_AKB; 2; 4, en-GB
mkalafa,
Version: 2.11.8.1 2009-05-05T14:17:16+02:00 - Seite 276
Dateiname: 6515346702_buchblock.pdf; erzeugt am 07. May 2009 14:17:11; WK