2009 MERCEDES-BENZ E-CLASS COUPE clock
[x] Cancel search: clockPage 28 of 313

Instrumen
tcluster Instrumen
tcluster ,kilometres Function Page
0046
Fuel gauge
0047
Speedometer 107
008A
Segments 107
0088
Multifunction display 108
0086
Coolan
ttem perature gauge 107 Function Page
0087
Rev counter 107
006E
Clock 118
006F
Instrumen
tcluste rlighting
brightness control :turn
clockwise or anti-clockwise Instrument cluster
25Atag lance
207_AKB ;2;3,en-GB
mkalafa, Version:2.11.8.1
2009-07-23T10:23:49+02:00
-Seite 25 Z
Page 29 of 313

Instrumen
tcluster ,miles Function Page
0046
Fuel gauge
0047
Speedometer 107
008A
Segments 107
0088
Multifunction display 108
0086
Coolan
ttem perature gauge 107 Function Page
0087
Rev counter 107
006E
Clock 118
006F
Instrumen
tcluste rlighting
brightness control :turn
clockwise or anti-clockwise 26
Instrumen
tclusterAt ag lance
207_AKB ;2;3,en-GB
mkalafa, Version:2.11.8.1
2009-07-23T10:23:49+02:00
-Seite 26
Page 68 of 313

X
To close: pull the boot li ddownfirmly using
recess 0047or008A.
X Lock the vehicle, if necessary ,with
the 0037 button on the key or with KEY-
LESS-GO* (Y page 62).
i If yo uleave aKEYLESS-GO key *inthe
boot, the boot li dwilln ot lock.
Lockin gthe boot separately Yo
uc an lock the boot separately 17
.Ify outhen
unlock the vehicl ecentrally, the boot remains
locked and canno tbeo pened.
X Close the boot lid.
X Remov ethe emergency key element from
the key (Y page 249). X
Insert the emergency key element into the
boot li dlocka sfar as the stop.
X Turn the emergency key element clockwise
from position 004Ato position 004B.
X Remov ethe emergency key element. Opening automaticall
yfrom outside
Yo uc an unlock and open the boot li dsimul-
taneousl ywitht he key.
X To unloc kand open: press and hold
the 0054 button on the key unti lthe boot
li do pens. Opening automaticall
yfrom inside
Yo uc an open the tailgate from the driver's
sea twhent he vehicl eisstationary. X
To open: pull remote operating switch for
boot lid 0046unti lthe boot li dopens. Ke
yp ositions Key
005D
To remove the key
004A Power supply for som econsumers, such
as the windscree nwipers
17 Not availabl einallcountries. Ke
yp ositions
65Controls
*optional
207_AKB; 2; 3, en-GB
mkalafa,
Version: 2.11.8.1 2009-07-23T10:23:49+02:00-Seite 65 Z
Page 156 of 313

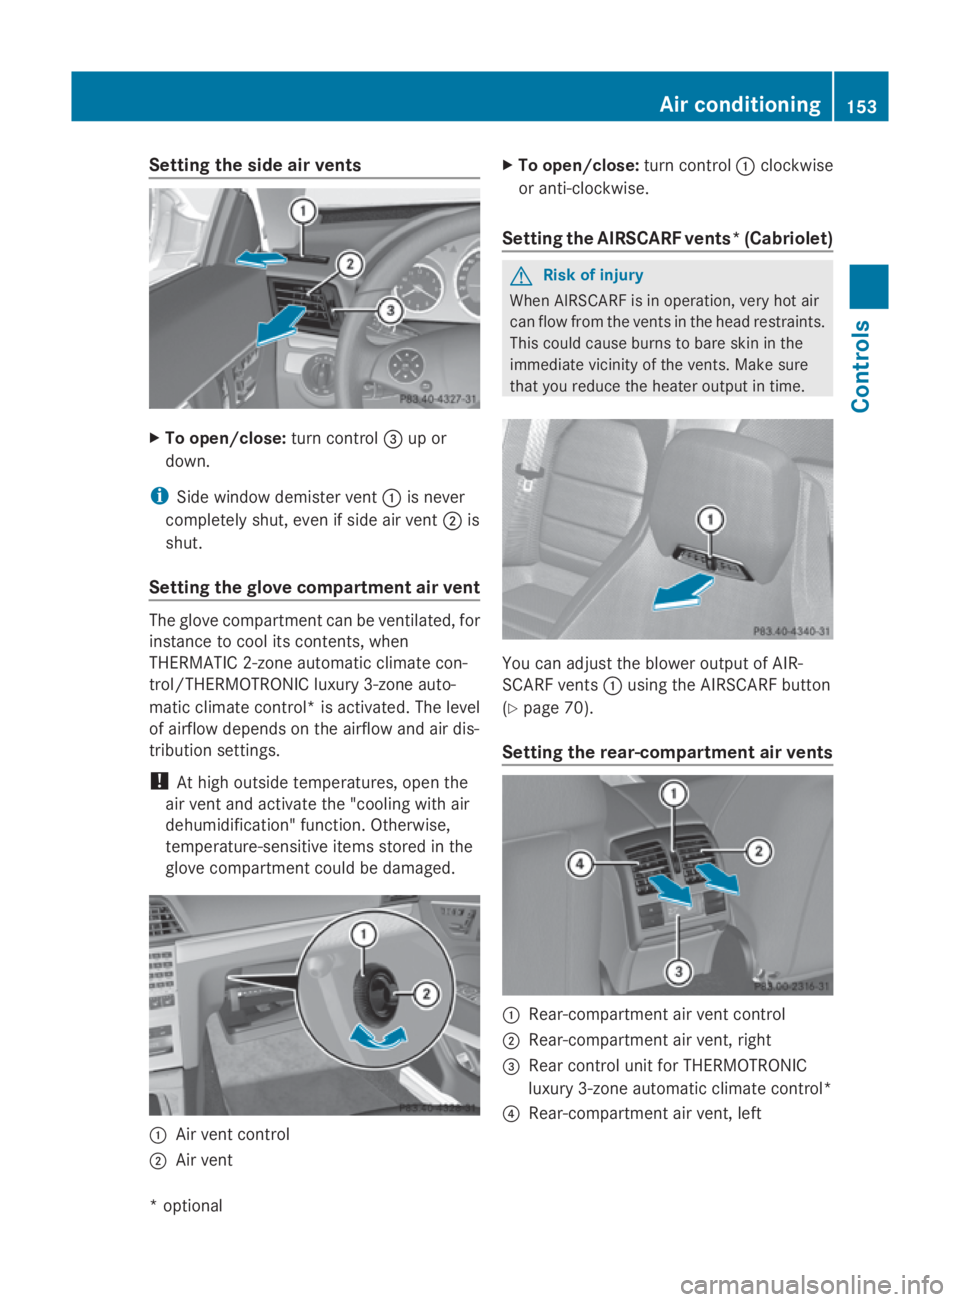
Setting the side air vents
X
To open/close: turn control008Aup or
down.
i Side window demister vent 0046is never
completely shut, even if side air vent 0047is
shut.
Setting the glove compartment air vent The glove compartmen
tcan be ventilated, for
instancetoc ool its contents, when
THERMATIC 2-zone automatic climate con-
trol/THERMOTRONIC luxury 3-zone auto-
matic climate control* is activated. The level
of airflow depends on the airflow and air dis-
tribution settings.
! At high outside temperatures, open the
air vent and activate the "cooling with air
dehumidification" function. Otherwise,
temperature-sensitive items stored in the
glove compartmen tcould be damaged. 0046
Air vent control
0047 Air vent X
To open/close: turn control0046clockwise
or anti-clockwise.
Setting the AIRSCARF vents* (Cabriolet) G
Risk of injury
When AIRSCARF is in operation, very hot air
can flow from the ventsint he head restraints.
This could cause burns to bare skin in the
immediate vicinity of the vents. Make sure
that you reduce the heater output in time. You can adjust the blower output of AIR-
SCARF vents
0046using the AIRSCARF button
(Y page 70).
Setting the rear-compartment air vents 0046
Rear-compartmen tair vent control
0047 Rear-compartmen tair vent,r ight
008A Rear control unit for THERMOTRONIC
luxury 3-zone automatic climate control*
0088 Rear-compartmen tair vent,l eft Air conditioning
153Controls
*optional
207_AKB; 2; 3, en-GB
mkalafa,
Version: 2.11.8.1 2009-07-23T10:23:49+02:00-Seite 153 Z
Page 169 of 313

The handling characteristics of
aladen vehi-
cle are dependent on the distribution of the
load within the vehicle. For this reason, you
should observe the following notes when
transportin gaload:
R never exceed the maximum permissible
gross vehicle weight or the permissible axle
loads for the vehicle (including occupants).
R position heavy loads as far forwards and as
low in the boot as possible.
R the load must not protrude above the upper
edge of the seat backrests.
R alway splace the load against the rear or
fronts eat backrests. Make sure that the
seat backrest sare securely locked into
place.
R alway splace the load behind unoccupied
seats if possible.
R secure the load with sufficiently stron gand
wear-resistan tload restraints. Pad sharp
edges for protection.
i Load restraints are available at any quali-
fied specialist workshop, e.g. aMercedes-
Benz Servic eCentre. Stowage compartments
G
Risk of injury
The stowage compartmentsm ust be closed
when items are stored in them. Luggage nets
are not designed to secure heavy items of
luggage.
You or other vehicle occupant scould be
injured by object sbeing thrown around if you:
R brake sharply
R change direction suddenly
R are involved in an accident
Sharp-edged and fragile object smust not be
placed in the luggage net. Do not place hard object
sinthe map pockets.
Object smust not protrude from the map
pockets.
Glove compartment i
Dependin gonthe vehicle's equipment,
there is an AUX-IN connection installed in
the glove compartment,oraM edia Inter-
face*, which is auniversal interface for
portable audio equipment, e.g. for an iPod
or USB device; see the separate Audio or
COMAND APS* operating instructions. X
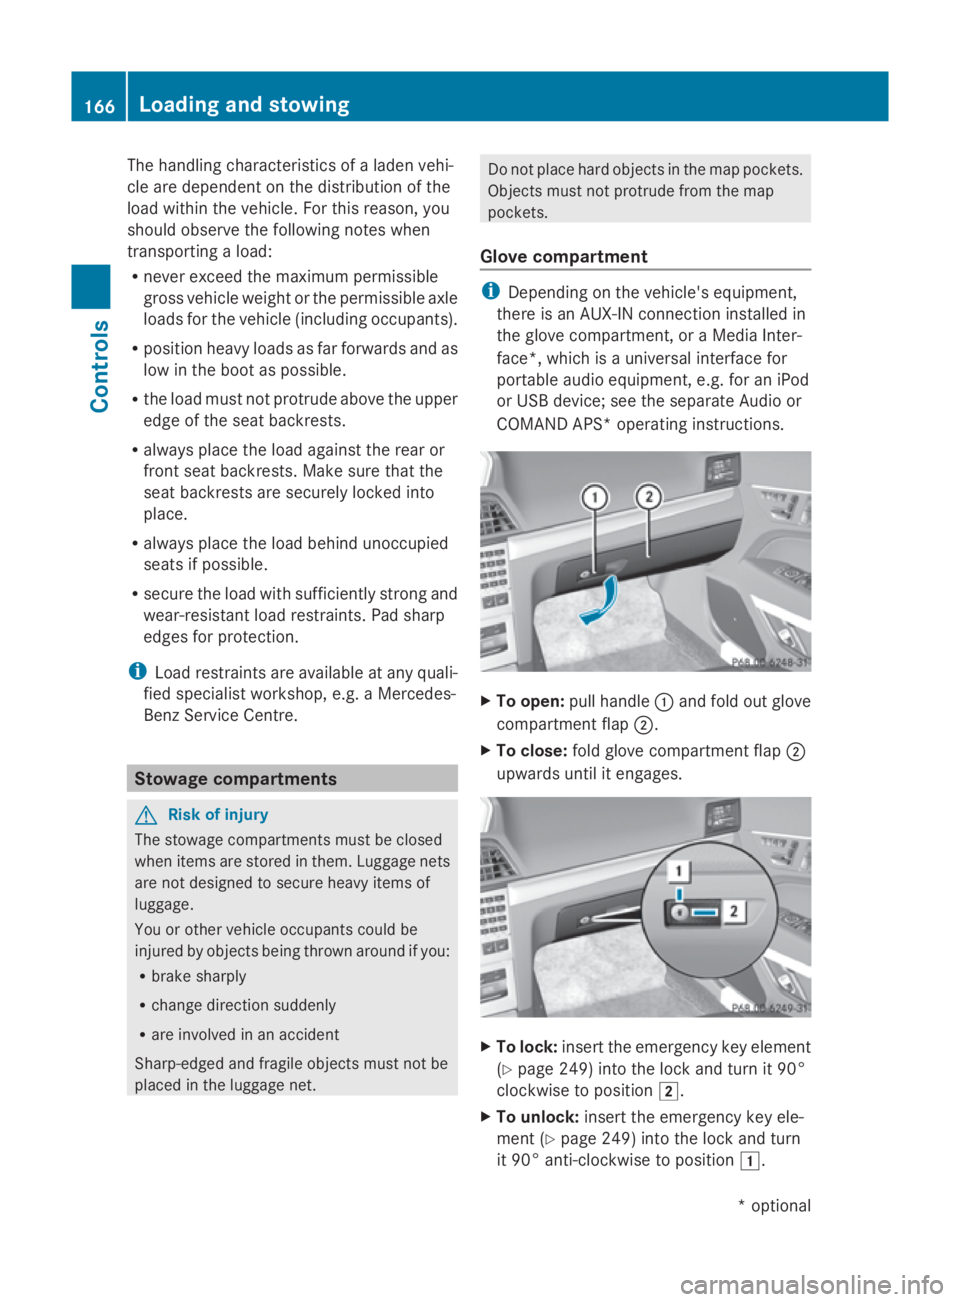
To open: pull handle 0046and fold out glove
compartment flap 0047.
X To close: fold glove compartment flap 0047
upwards until it engages. X
To lock: insert the emergenc ykey element
(Y page 249) into the lock and turn it 90°
clockwise to position 004B.
X To unlock: insert the emergenc ykey ele-
ment (Y page 249) into the lock and turn
it 90° anti-clockwise to position 004A.166
Loading and stowingControls
*o
ptional
207_AKB; 2; 3, en-GB
mkalafa,
Version: 2.11.8.1 2009-07-23T10:23:49+02:00-Seite 166
Page 182 of 313

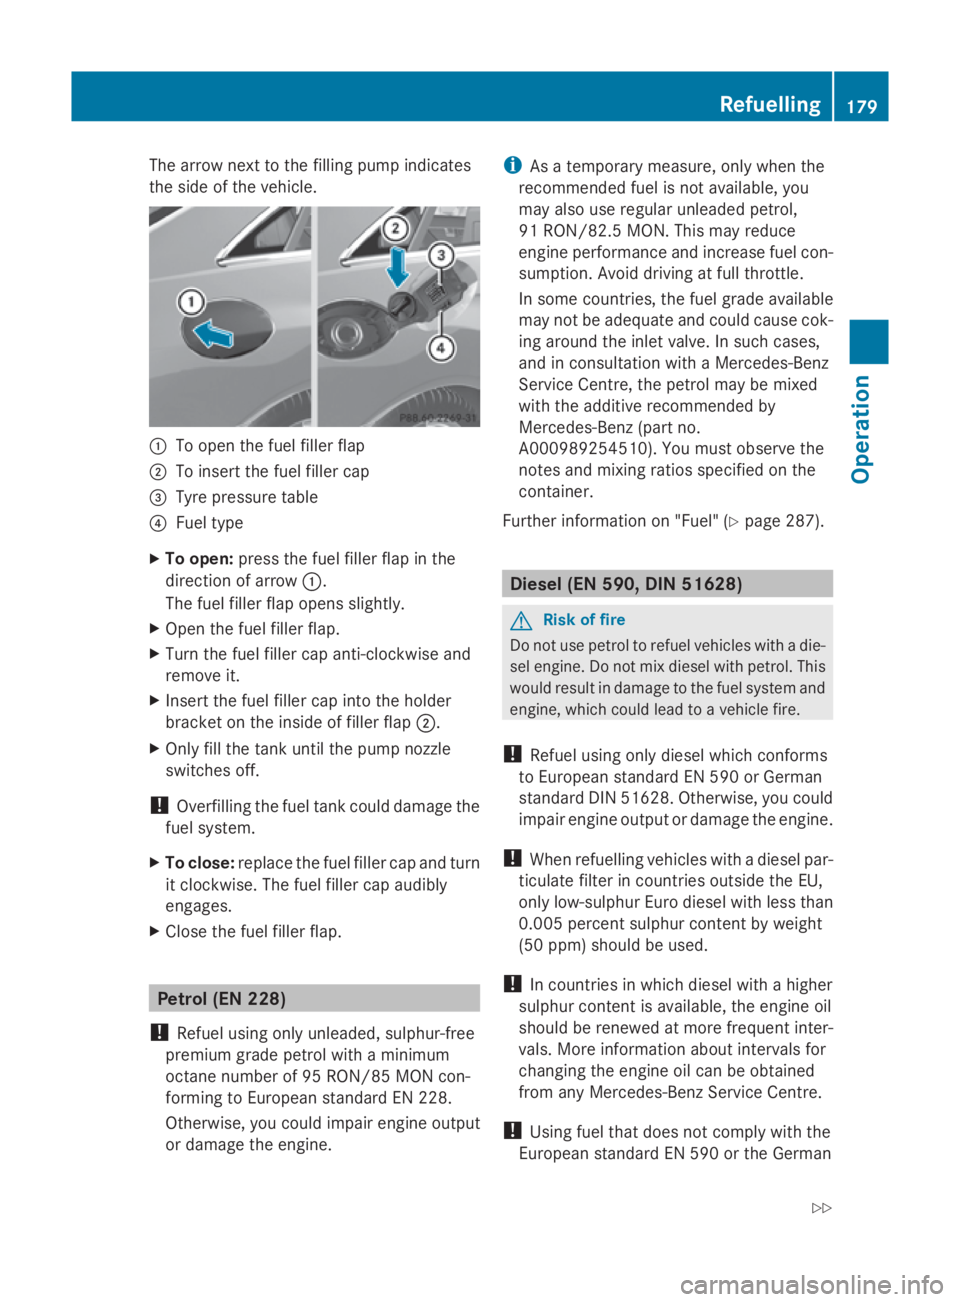
The arrow next to the filling pump indicates
the side of the vehicle. 0046
To open the fuel filler flap
0047 To insert the fuel filler cap
008A Tyre pressure table
0088 Fuel type
X To open: press the fuel filler flap in the
direction of arrow 0046.
The fuel filler flap opens slightly.
X Open the fuel filler flap.
X Turn the fuel filler cap anti-clockwise and
remove it.
X Insert the fuel filler cap into the holder
bracket on the inside of filler flap 0047.
X Only fill the tank until the pump nozzle
switches off.
! Overfilling the fuel tank could damage the
fuel system.
X To close: replace the fuel filler cap and turn
it clockwise. The fuel filler cap audibly
engages.
X Close the fuel filler flap. Petrol (EN 228)
! Refuel using only unleaded, sulphur-free
premium grade petrol with aminimum
octan enumber of 95 RON/85 MON con-
formin gtoEuropean standard EN 228.
Otherwise, you could impair engine output
or damage the engine. i
Asatemporary measure, only when the
recommended fuel is not available, you
may also use regular unleaded petrol,
91 RON/82. 5MON. This may reduce
engine performance and increase fuel con-
sumption. Avoid driving at full throttle.
In some countries, the fuel grade available
may not be adequate and could cause cok-
ing around the inlet valve. In such cases,
and in consultation with aMercedes-Benz
Servic eCentre, the petrol may be mixed
with the additive recommended by
Mercedes-Benz (part no.
A000989254510). You must observe the
notes and mixing ratios specified on the
container.
Further information on "Fuel" (Y page 287). Diese
l(EN 590, DIN 51628) G
Risk of fire
Do not use petrol to refuel vehicles with adie-
sel engine. Do not mix diesel with petrol. This
would result in damage to the fuel system and
engine, which could lead to avehicle fire.
! Refuel using only diesel which conforms
to European standard EN 590 or German
standard DIN 51628. Otherwise, you could
impair engine output or damage the engine.
! When refuelling vehicles with adiesel par-
ticulate filter in countries outside the EU,
only low-sulphur Euro diesel with less than
0.005 percent sulphur content by weight
(50 ppm) should be used.
! In countries in which diesel with ahigher
sulphur content is available, the engine oil
should be renewed at more frequent inter-
vals. More information about intervals for
changin gthe engine oil can be obtained
from any Mercedes-Benz Servic eCentre.
! Using fuel that does not comply with the
European standard EN 590 or the German Refuelling
179Operation
207_AKB; 2; 3, en-GB
mkalafa, Version: 2.11.8.1 2009-07-23T10:23:49+02:00-Seite 179 Z
Page 185 of 313

X
Lower the bonnet and let it fall from a
heightofa pproximately 20 cm.
X Check that the bonnet has engage dprop-
erly.
i If the bonnet can be raiseds lightly, it is
not properl yengaged. Open it again and
close it with alittle more force. Engine oil
Depending on driving style, the vehicle con-
sumes up to 0.8 loil per 1,000 km. The oil
consumption may be highert han this when
the vehicle is new or if you frequently drive at
high engine speeds.
Checking the engine oil level Before checking the engine oil level the fol-
lowing conditions for the vehicle shouldbe
met:
R
the vehicle shouldbep arked on level
ground.
R the engine shouldbes witched off for at
least five minutes if the engine is at normal
operating temperature.
R the engine shouldbes witched off for at
least 30 minutes if the engine is not at
operating temperature (i.e. if you only start
the engine briefly).
Depending on the engine, the oil dipstick may
be installed at adifferent location. E3
50 (example) X
Pullo il dipstick 0046out of the oil dipstick
tube.
X Wipe off oil dipstick 0046.
X Insert oil dipstick 0046into the oil dipstick
tube to the stop, and take it out again.
The oil level is correct if the level is between
the minimum mark 008Aand maximum
mark 0047.
X Top up the oil if necessary.
Topping up the engine oil H
Environmental note
When topping up the oil, take care not to spill
any. Oil must not be allowed to escape into
the soil or waterways. You would otherwis ebe
damaging the environment. Cap (example)
X Turn cap 0046anti-clockwise and remove.
X Top up with the amount of oil required
(Y page 288).
i The difference in quantity betwee nthe
minimum mark and maximu mmark is
approximately 2litres.
i On vehicle switha4-cylinder petrol
engine and vehicle swith an 8-cylinder pet-
rol engine, the difference betwee nthe MIN
mark and the MAX mark is approximately
1.5 litres.
! Do not add too much oil. If too much oil
is added and the oil level is above the max- 182
Engine compartmentOperation
207_AKB; 2; 3, en-GB
mkalafa
,V ersion: 2.11.8.1
2009-07-23T10:23:49+02:00
-Seite 182
Page 186 of 313

imum mark on the dipstick
,the engine or
catalytic converter could be damaged.
Have excess oil siphoned off.
X Replace cap 0046on the filler nec kand
tighten clockwise.
Ensure that the cap lock sintop lace
securely.
For further information on engine oil, see
(Y page 288). Coolant
Only chec kthe coolan tlevel when the vehicle
is on alevel surface and the engine has cooled
down.
X Turn the key to position 2(Y page 65) in
the ignition lock.
X Check the coolan ttemperature gauge in
the instrumen tcluster. G
Risk of injury
The cooling system is pressurised. Therefore,
only unscrew the cap onc ethe engine has
coole ddown. The coolan ttemperature gauge
must display less than 70 †. Otherwise, you
could be scalde difhot coolan tescapes.
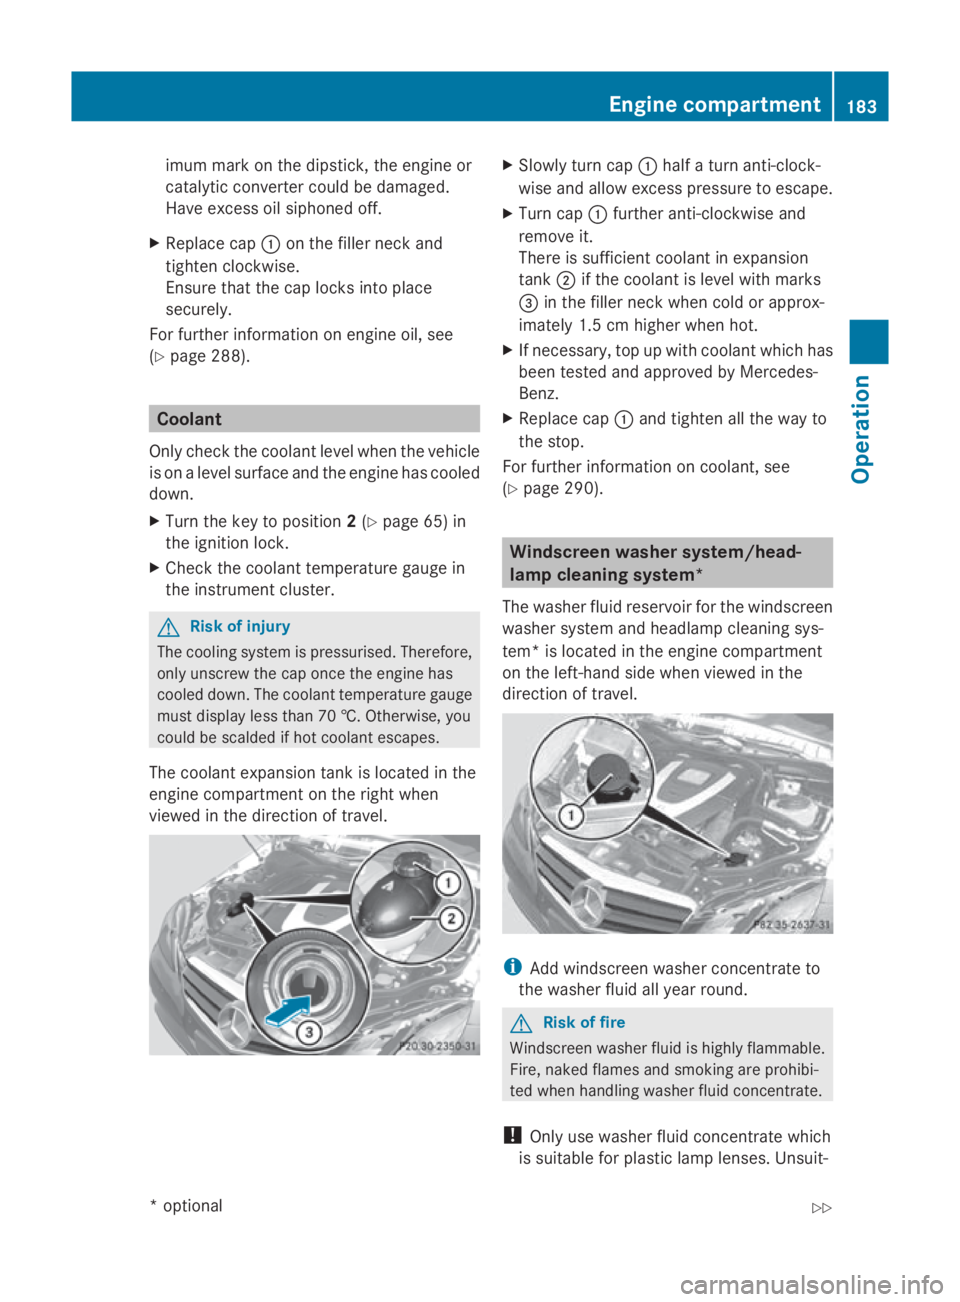
The coolan texpansion tan kislocated in the
engine compartmen tonthe right when
viewed in the direction of travel. X
Slowly tur ncap 0046 half aturna nti-clock-
wise and allow excess pressure to escape.
X Turn cap 0046further anti-clockwise and
remove it.
There is sufficien tcoolan tinexpansion
tank 0047if the coolan tislevel with marks
008A in the filler nec kwhen cold or approx-
imately 1. 5cmhigher when hot.
X If necessary, top up with coolan twhich has
been tested and approved by Mercedes-
Benz.
X Replace cap 0046and tighten all the way to
the stop.
For further information on coolant, see
(Y page 290). Windscreen washer system/head-
lam
pcleaning system*
The washer fluid reservoir for the windscreen
washer system and headlamp cleaning sys-
tem *isl ocated in the engine compartment
on the left-han dside when viewed in the
direction of travel. i
Add windscreen washer concentrate to
the washer fluid all year round. G
Risk of fire
Windscreen washer fluid is highly flammable.
Fire ,naked flames and smoking are prohibi-
ted when handlin gwasher fluid concentrate.
! Only use washer fluid concentrate which
is suitable for plastic lamp lenses. Unsuit- Engine compartment
183Operation
*optional
207_AKB; 2; 3, en-GB
mkalafa,
Version: 2.11.8.1
2009-07-23T10:23:49+02:0
0-Seite1 83 Z