2009 MERCEDES-BENZ E-CLASS COUPE check oil
[x] Cancel search: check oilPage 185 of 313

X
Lower the bonnet and let it fall from a
heightofa pproximately 20 cm.
X Check that the bonnet has engage dprop-
erly.
i If the bonnet can be raiseds lightly, it is
not properl yengaged. Open it again and
close it with alittle more force. Engine oil
Depending on driving style, the vehicle con-
sumes up to 0.8 loil per 1,000 km. The oil
consumption may be highert han this when
the vehicle is new or if you frequently drive at
high engine speeds.
Checking the engine oil level Before checking the engine oil level the fol-
lowing conditions for the vehicle shouldbe
met:
R
the vehicle shouldbep arked on level
ground.
R the engine shouldbes witched off for at
least five minutes if the engine is at normal
operating temperature.
R the engine shouldbes witched off for at
least 30 minutes if the engine is not at
operating temperature (i.e. if you only start
the engine briefly).
Depending on the engine, the oil dipstick may
be installed at adifferent location. E3
50 (example) X
Pullo il dipstick 0046out of the oil dipstick
tube.
X Wipe off oil dipstick 0046.
X Insert oil dipstick 0046into the oil dipstick
tube to the stop, and take it out again.
The oil level is correct if the level is between
the minimum mark 008Aand maximum
mark 0047.
X Top up the oil if necessary.
Topping up the engine oil H
Environmental note
When topping up the oil, take care not to spill
any. Oil must not be allowed to escape into
the soil or waterways. You would otherwis ebe
damaging the environment. Cap (example)
X Turn cap 0046anti-clockwise and remove.
X Top up with the amount of oil required
(Y page 288).
i The difference in quantity betwee nthe
minimum mark and maximu mmark is
approximately 2litres.
i On vehicle switha4-cylinder petrol
engine and vehicle swith an 8-cylinder pet-
rol engine, the difference betwee nthe MIN
mark and the MAX mark is approximately
1.5 litres.
! Do not add too much oil. If too much oil
is added and the oil level is above the max- 182
Engine compartmentOperation
207_AKB; 2; 3, en-GB
mkalafa
,V ersion: 2.11.8.1
2009-07-23T10:23:49+02:00
-Seite 182
Page 186 of 313

imum mark on the dipstick
,the engine or
catalytic converter could be damaged.
Have excess oil siphoned off.
X Replace cap 0046on the filler nec kand
tighten clockwise.
Ensure that the cap lock sintop lace
securely.
For further information on engine oil, see
(Y page 288). Coolant
Only chec kthe coolan tlevel when the vehicle
is on alevel surface and the engine has cooled
down.
X Turn the key to position 2(Y page 65) in
the ignition lock.
X Check the coolan ttemperature gauge in
the instrumen tcluster. G
Risk of injury
The cooling system is pressurised. Therefore,
only unscrew the cap onc ethe engine has
coole ddown. The coolan ttemperature gauge
must display less than 70 †. Otherwise, you
could be scalde difhot coolan tescapes.
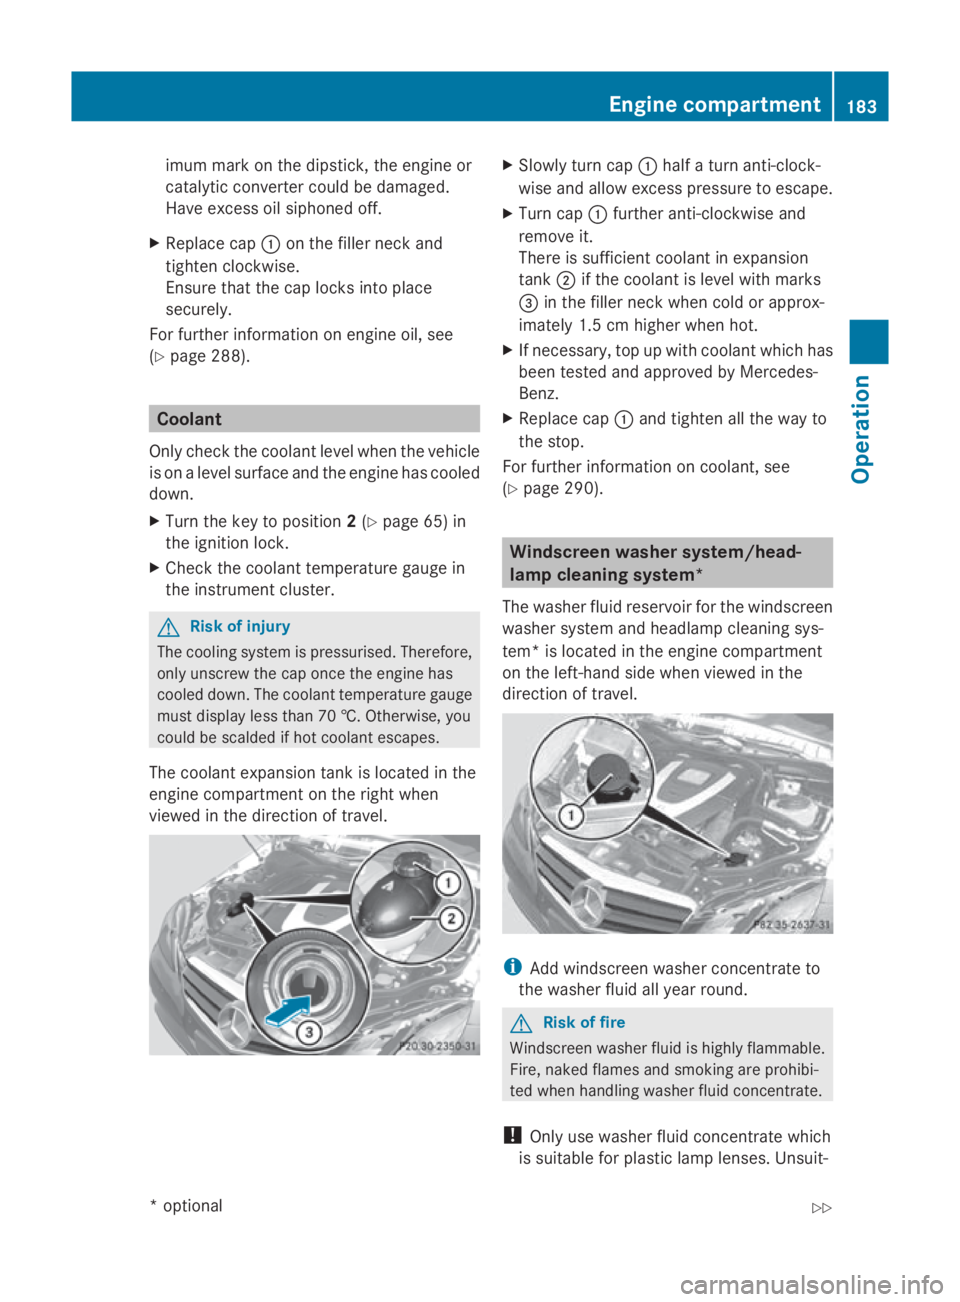
The coolan texpansion tan kislocated in the
engine compartmen tonthe right when
viewed in the direction of travel. X
Slowly tur ncap 0046 half aturna nti-clock-
wise and allow excess pressure to escape.
X Turn cap 0046further anti-clockwise and
remove it.
There is sufficien tcoolan tinexpansion
tank 0047if the coolan tislevel with marks
008A in the filler nec kwhen cold or approx-
imately 1. 5cmhigher when hot.
X If necessary, top up with coolan twhich has
been tested and approved by Mercedes-
Benz.
X Replace cap 0046and tighten all the way to
the stop.
For further information on coolant, see
(Y page 290). Windscreen washer system/head-
lam
pcleaning system*
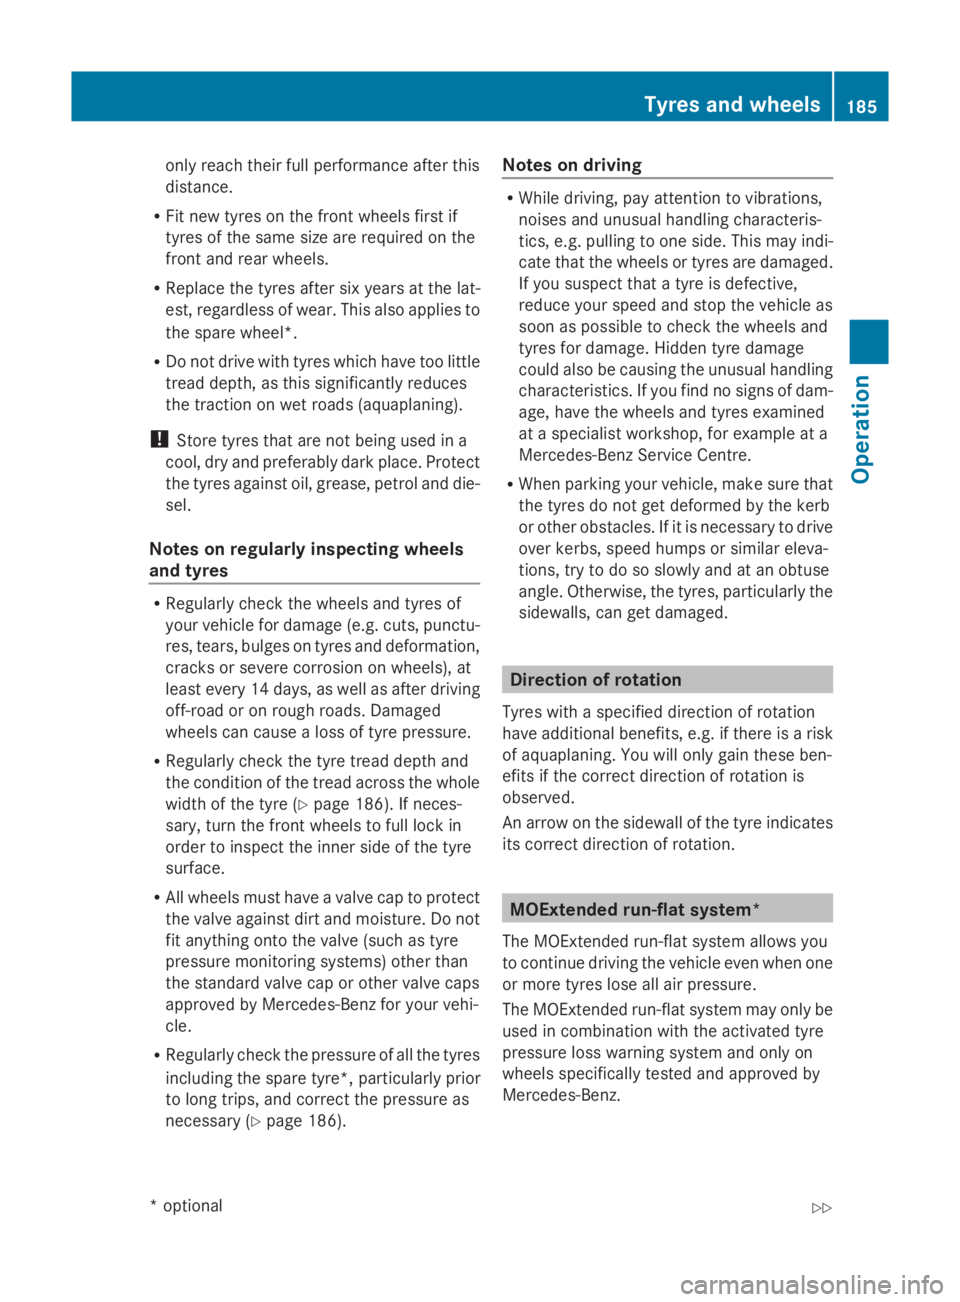
The washer fluid reservoir for the windscreen
washer system and headlamp cleaning sys-
tem *isl ocated in the engine compartment
on the left-han dside when viewed in the
direction of travel. i
Add windscreen washer concentrate to
the washer fluid all year round. G
Risk of fire
Windscreen washer fluid is highly flammable.
Fire ,naked flames and smoking are prohibi-
ted when handlin gwasher fluid concentrate.
! Only use washer fluid concentrate which
is suitable for plastic lamp lenses. Unsuit- Engine compartment
183Operation
*optional
207_AKB; 2; 3, en-GB
mkalafa,
Version: 2.11.8.1
2009-07-23T10:23:49+02:0
0-Seite1 83 Z
Page 188 of 313

only reach their full performanc
eafter this
distance.
R Fit new tyres on the front wheels first if
tyres of the same size are required on the
front and rear wheels.
R Replace the tyres after six years at the lat-
est, regardless of wear. This also applies to
the spare wheel*.
R Do not drive with tyres which have too little
tread depth, as this significantly reduces
the traction on wet roads (aquaplaning).
! Storet yres that are not being used in a
cool, dry and preferably dark place. Protect
the tyres against oil, grease, petrol and die-
sel.
Notes on regularly inspecting wheels
and tyres R
Regularly check the wheels and tyres of
your vehicle for damage (e.g. cuts, punctu-
res, tears, bulges on tyres and deformation,
cracksors evere corrosion on wheels), at
least every 14 days, as well as after driving
off-road or on rough roads. Damaged
wheels can cause aloss of tyre pressure.
R Regularly check the tyre tread depth and
the condition of the tread across the whole
width of the tyre (Y page 186). If neces-
sary, turn the front wheels to full lock in
order to inspect the inner side of the tyre
surface.
R All wheels must have avalve cap to protect
the valve against dirt and moisture. Do not
fit anything ontot he valve (such as tyre
pressure monitoring systems) other than
the standard valve cap or other valve caps
approved by Mercedes-Benz for your vehi-
cle.
R Regularly check the pressure of all the tyres
including the spare tyre* ,particularly prior
to long trips, and correc tthe pressure as
necessary (Y page 186). Notes on driving R
While driving, pay attention to vibrations,
noises and unusual handling characteris-
tics, e.g. pulling to one side. This may indi-
cate that the wheels or tyres are damaged.
If you suspect that atyre is defective,
reduce your speed and stop the vehicle as
soon as possible to check the wheels and
tyres for damage. Hidden tyre damage
could also be causing the unusual handling
characteristics. If you find no signs of dam-
age, have the wheels and tyres examined
at as pecialist workshop, for example at a
Mercedes-Benz Servic eCentre.
R When parking your vehicle, make sure that
the tyres do not get deformed by the kerb
or other obstacles. If it is necessary to drive
over kerbs, speed humps or similar eleva-
tions, try to do so slowly and at an obtuse
angle. Otherwise, the tyres, particularly the
sidewalls, can get damaged. Direction of rotation
Tyres with aspecified direction of rotation
have additional benefits, e.g. if there is arisk
of aquaplaning. You will only gain these ben-
efits if the correc tdirection of rotation is
observed.
An arrow on the sidewal lofthe tyre indicates
its correc tdirection of rotation. MOExtended run-flat system*
The MOExtended run-flat system allows you
to continue driving the vehicle even when one
or more tyres lose all air pressure.
The MOExtended run-flat system may only be
used in combination with the activated tyre
pressure loss warning system and only on
wheels specifically tested and approved by
Mercedes-Benz. Tyres and wheels
185Operation
*optional
207_AKB; 2; 3, en-GB
mkalafa,
Version: 2.11.8.1 2009-07-23T10:23:49+02:00-Seite 185 Z
Page 206 of 313

!
Do not clean the camera lens and the area
around the reversing camera with ahigh-
pressure cleaner.
Cleaning the exhaust tail pipes Impurities combined with the effects of road
grit and corrosive environmental factors may
cause flash rust to form on the surface. Reg-
ularc are of the exhaust tail pipes will ensure
that their original shine is restored.
! Do not clean the exhaust tail pipes with
alkaline-based cleaning agents such as
wheel cleaner.
X Cleant he exhaust tail pipes with achrome
care product approved by Mercedes-Benz.
Trailer tow hitch* The ball coupling must be cleaned if it
becomes dirty or corroded.
X Remove any rust using awire brush.
X Remove dirt with aclean, lint-free cloth or
ab rush.
! Do not clean the ball coupling with ahigh-
pressure cleaner. Do not use solvents. X
After cleaning, lightly oil or grease ball cou-
pling 0046.
X Check that the vehicle's trailer tow hitch is
working properly.
! Observe the note on care provided by the
trailer manufacturer. i
Maintenance of the ball coupling and
trailer tow hitch can also be performed by
any Mercedes-Benz Service Centre. H
Environmental note
Dispose of oily and greasy cloths in an envi-
ronmentally-responsible manner. Interior care
Cleaning the steering wheelb oss and
dashboard G
Risk of injury
When cleaning the steering wheel boss and
dashboard, do not use cockpit sprays or
cleaning agents containing solvents. Cleaning
agents containing solvents cause the surface
to become porous, and as aresult, plastic
parts may break awayw hen an airbagis
deployed, which may result in severe injuries.
X Wipe the dashboard and steering wheel
boss with adamp, lint-free cloth (e.g. a
microfibre cloth) and cleaning agent.
X Heavy soiling: use car care and cleaning
products recommended and approved by
Mercedes-Benz.
Cleaning the COMAND display X
Before cleaning the display, make sure that
it is switched off and has cooled down.
X Cleant he displays urface using acommer-
cially-available microfibre cloth and TFT/
LCD displayc leaner.
X Dry the displays urface usingadry micro-
fibre cloth.
! For cleaning, do not use any of the fol-
lowing:
R alcohol-based solvents or petrol
R abrasive cleaning agents
R commercially-available householdc lean-
ing agents Care
203Operation
*optional
207_AKB;2;3,e
n-GB
mkalafa, Version: 2.11.8.1 2009-07-23T10:23:49+02:00-Seite 203 Z
Page 228 of 313

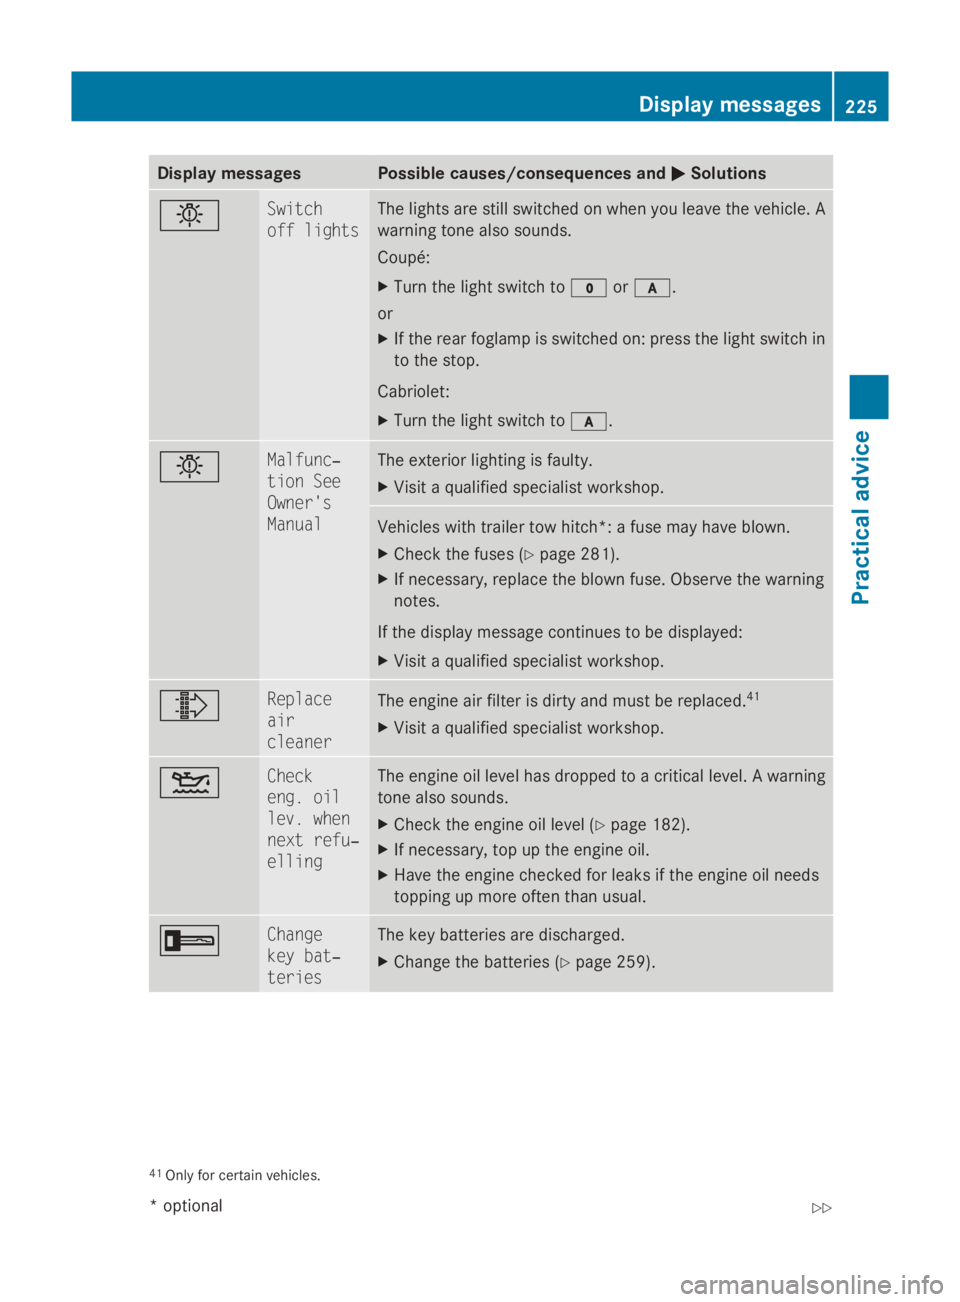
Display messages Possible causes/consequences and
0050
0050 Solutions 0055 Switch
off lights The lights are still switched on when you leav
ethe vehicle. A
warnin gtonea lso sounds.
Coupé:
X Tur nthe ligh tswitch to 0027or0066.
or
X If th erear foglam pisswitched on :press th eligh tswitch in
to th estop.
Cabriolet:
X Tur nthe ligh tswitch to 0066. 0055 Malfunc‐
tio
nS ee
Owner's
Manual The exterio
rlighting is faulty.
X Visit aqualified specialist workshop. Vehicles wit
htrailer to whitch*: afusem ay hav eblown.
X Chec kthe fuses (Y page 281).
X If necessary, replac ethe blown fuse. Observ ethe warning
notes.
If th edisplay message continues to be displayed:
X Visit aqualified specialist workshop. 00A0 Replace
air
cleaner
The engin
eair filte risdirty and mus tbereplaced. 41
X Visit aqualified specialist workshop. 00B4 Check
eng
.o il
lev .w hen
nex tr efu‐
elling The engin
eoil level has dropped to acriticallevel. Awarning
tone also sounds.
X Chec kthe engin eoil level ( Ypage 182).
X If necessary, to puptheengin eoil.
X Hav ethe engin echecked forl eak sift heengin eoil needs
toppin gupm oreo ften than usual. 0039 Change
key bat‐
teries The ke
ybatterie sare discharged.
X Change th ebatterie s(Ypage 259). 41
Only fo rcertai nvehicles. Display
messages
225Practical advice
*optional
207_AKB; 2; 3, en-GB
mkalafa
,V ersion: 2.11.8.1
2009-07-23T10:23:49+02:00
-Seite 225 Z
Page 246 of 313

Automati
ctransmission* Problem Possible causes/consequences and
0050
0050Solutions The transmission has
problem
sshifting gear. The transmission is losing oil.
X
Hav ethe transmission checke dataqualified specialist work-
sho pimmediately. The acceleration ability
is deteriorating.
The transmission no
longer changes gear. The transmission is in emergenc
ymode.
It is only possible to shif tinto second gear and revers egear.
X Stop th evehicle.
X Mov ethe transmission to position P.
X Turn th ekeyin th eignition to position 0(Y page 65 )orpress
th eS tart/Sto pbutton* repeatedly until all indicator lamp sin
th ei nstrumen tcluste rgoo ut.
X Wait at least 10 seconds before restarting th eengine.
X Mov ethe transmission to position Dor R.
If D is selected, th etransmission shifts into secondgear;ifRis
selected, th etransmission shifts int orevers egear.
X Hav ethe transmission checke dataqualified specialist work-
sho pimmediately. PARKTRONIC*
Problem Possible causes/consequences and
0050 0050Solutions Only th
ered segments
in th ePARKTRONIC
warning display are lit.
You also hear awarning
tone for approximately
two seconds.
PARKTRONI Cisdeacti-
vated after approx-
imately 20 seconds and
th ei ndicator lamp in
th eP ARKTRONI Cbut-
to nl ights up. PARKTRONI
Chas malfunctioned and has switched itself off.
X If problem spersist, hav ePARKTRONI Cchecked ataq ualified
specialist workshop. Only th
ered segments
in th ePARKTRONIC
warning display are lit.
PARKTRONI Cisdeacti-
vated after approx-
imately 20 seconds. The PARKTRONI
Csensor sare dirt yorthere is interference.
X Clean th ePARKTRONI Csensor s(Ypage 202).
X Switc hthe ignition bac kon. Troubleshooting
243Practical advice
*optional
207_AKB; 2; 3, en-GB
mkalafa,
Version: 2.11.8.1 2009-07-23T10:23:49+02:00-Seite 243 Z