Page 193 of 313

Once you have fitted the winter tyres:
X
Check the tyre pressures (Y page 186).
X Restart the tyre pressure loss warning sys-
tem (Y page 187). G
Risk of accident
If you fit the spare wheel* when driving with
winter tyres, bear in mind that driving stability
will be impaired owing to unstable cornering
characteristics caused by the different tyres.
You should therefore adapty our driving style
and drive carefully.
Have the spare wheel* replaced at the near-
est qualified specialist workshop which has
the necessary specialist knowledge and tools
to carry out the work required. Mercedes-
Benz recommends that you use aMercedes-
Benz Service Centre for this purpose. In par-
ticular, work relevant to safety or on safety-
related systems must be carried out at aquali-
fied specialist workshop. Snow chains
For safety reasons, Mercedes-Benz recom-
mends that you only use snow chains which
have been speciallya pproved for your vehicle
by Mercedes-Benz,ora re ofacorresponding
standard of quality.
If you intend to fit snow chains, pleaseb ear
the following points in mind:
R you may not attach snow chains to all
wheel-tyre combinations; see the "Tyres
and wheels" section in the "Technical data"
chapter.
R snow chains must not be fitted to emer-
gency spare wheels, e.g. a"Minispare"
emergency spare wheel.
R Fit snow chains only in pairs and only to the
rear wheels. Comply with the manufactur-
er's installation instructions.
Do not exceed the maximum permissible
speed of 50 km/h.
i You may wish to deactivate ESP ®
when
pulling awayw ith snow chains fitted (Y
page 54). This way,y ou can allowthe
wheels to spin in acontrolled manner, ach-
ieving an increased driving force (cutting
action). Winter driving
G
Risk of accident
Do not shift down for additional engine brak-
ing on aslippery road surface. This could
cause the drive wheels to lose their grip and
the vehicle could skid.
You should drive particularly carefully on slip-
pery road surfaces. Avoid sudden accelera-
tion, steering and braking manoeuvres.
If the vehicle threatens to skid or cannot be
stopped when moving at low speed:
X Vehicles with manual transmission: engage
neutral.
X Vehicles with automatic transmission*:
shift the selector lever to N.
X Try to bring the vehicle under control by
using corrective steering. Driving tips
Rolling with the engines
witchedoff G
Risk of accident
Never switch the engine off while the vehicle
is in motion.
There is no power assistance for the steering
and the service brake when the engine is not
running.
You will require considerably more effort to
steer and brake and you could therefore lose
control of the vehicle and cause an accident. 190
Driving tipsOperation
*o
ptional
207_AKB;2;3,e
n-GB
mkalafa, Version: 2.11.8.1 2009-07-23T10:23:49+02:00-Seite 190
Page 194 of 313

Brakes
G
Ris
kofa ccident
Do not change down for additional engine
braking on aslipper yroads urface. Thi scould
cause the drive wheels to lose thei rgripa nd
the vehicl ecould skid. G
Ris
kofa ccident
Make sure tha tothe rroa du sers are not
endangere dbyyourb raking.
Downhil lgradients On long and stee
pdownhil lstretches ,espe-
ciall yift he vehicl eisladen or towing atrailer,
yo um usts hift to alower gearing oodtime or,
on vehicles with automatic transmission*,
select shift range 1,2or 3.
i Thisalsoa pplies if youhavea ctivated
cruis econtrol, SPEEDTRONIC or DIS-
TRONIC PLUS*.
Thi sw illu se the braking effect of the engine,
so less braking will be required to maintain
the speed .Thisr elieves the load on the brake
system and prevents the brakes from over-
heating and wearing too quickly. If yo uneed
additional braking ,depress the brake pedal
repeatedly rather tha ncontinuously.
Heavy and light loads If the brakes have been subjected to
aheavy
load ,don ot stop the vehicl eimmediately, but
drive on for ashort while. Thi sallow sthe air-
flo wtoc oolthe brakes more quickly. G
Ris
kofa ccident
Never depress the brake peda lcontinuously
whil ethe vehicl eisinmotion, e.g .neve rcause
the brakes to ru bbyapplyingconstant slight
peda lpressure. Thi scauses the brake system
to overheat, increases the braking distance
and can lead to the brakes failing completely.
If the brakes have been used onl ymoderately,
yo us houl doccasionall ytest thei reffective-
ness .Todot his, brake more firmly from a highe
rspeed .Thisi mprove sthe gri pofthe
brakes.
Wet roads If driving in heavy rain for
aprolonged period
of time withou tbraking ,ther em aybe a
delaye dreactio nfrom the brakes when brak-
ing for the first time .Thism ayalso occu rafter
the vehicl ehasbeen washed.
Yo uh avetod epress the brake peda lmore
firmly .Maintain agreate rdistance from the
vehicl einfront.
After driving on awetroa dorh aving the vehi-
cle washed, brake firmly whil epayin gatten-
tio ntot he traffic conditions. Thi swaythe
brake discs will become warm, drying more
quickly, which will protect them against cor-
rosion.
Limite dbraking performanc eonsalt
treate droads G
Ris
kofa ccident
The laye rofsaltont he brake discs and the
brake pads/lining smaycause adelay in the
braking effect, resulting in asignificantly lon-
ger braking distance, which could lead to an
accident.
To avoid thi sdanger ,you should:
R occasionall ybrake carefully, withou tput-
ting othe rroa du sers at risk, when yo uare
driving on salte droads. Thi shelps to
remove any salt tha tmayhave started to
buil dupont he brake discs and the brake
pads/linings.
R maintain agreate rdistance to the vehicle
ahea dand drive with particula rcare.
R carefull yapply the brakes at the end of a
trip and immediatel yaftercommencing a
new trip ,sothats altr esidue sare removed
from the brake discs. Driving tips
191Operation
*optional
207_AKB; 2; 3, en-GB
mkalafa,
Version: 2.11.8.1 2009-07-23T10:23:49+02:00-Seite 191 Z
Page 195 of 313

New brak
epads/linings For safety reasons, Mercedes-Benz recom-
mend
stha tyou onl yhaveb rake pads/linings
fitted to your vehicl ewhich have been
approved for Mercedes-Benz vehicles or
which correspond to an equivalent quality
standard. Brake pads/lining swhich have not
been approved for Mercedes-Benz vehicles or
which ar enot of an equivalent quality could
affec tyou rv ehicle' soperating safety. G
Ris
kofa ccident
New brake pads/lining sonlyr each their opti-
mu mb raking effect after several hundred kil-
ometres of driving. Before thi soptimum brak-
ing effect is reached, yo ushoul dcompensate
for the reduced braking effect by applying
greate rpressure when braking .Thisa lso
applie safter the brake discs or the brake
pads/lining shaveb eenr eplaced. Tyre grip
G
Ris
kofa ccident
Whil ethe vehicl ecan be full ycontrolle data
certai nspeed on dry roads ,you must reduce
your spee donwetor icy roads to achieve the
same roa dsafety .Otherwise, yo ucould cause
an accident.
Pa yp articula rattentio ntothe roa dconditions
at temperatures around freezing point.
If ice ha sformed on the roa dsurface (e.g.
fro mf og), athinf ilmofw ater rapidl yforms on
the ice when yo ubrake, considerabl yreduc-
ing tyr egrip. Drive with particula rcareins uch
weather conditions. Driving on we
troads
If water ha saccumulate dtoacertaindepth
on the roa dsurface, there is adangerofa qua-
planing occurring, eve nif:
R yo ud rive at lo wspeeds
R the tyres have adequate trea ddepth For thi
sreason, do not drive in tyr eruts, and
brake carefully. Driving on flooded roads
If yo uhavetod rive on stretche sofroadon
which water ha scollected ,pleas ebearin
mind that:
R the maximum permissibl estill water depth
is 25 cm.
R yo us houl ddrive no faste rtha natw alking
pace.
! Bea rinm indt hatv ehicles travelling in
front or in the opposite directio ncreate
waves .Thism aycause the maximum per-
missibl ewater depth to be exceeded.
Failur etoo bserve these note smayresult
in damage to the engine ,electrica lsys tems
and transmission. Driving abroad
Points to remember
An extensive Mercedes-Benz Service network
is also availabl einother countries .The
Service Hotline's current telephone numbers
for us ewheny ou area broa da reto be found
in the "Service24h" chapte rofthe Service
Booklet.
Onl ylow -octan efuelisa vailable in certain
countries.
Yo uc an find furthe rinformation abou tfuel
grade son(Ypage 178). Symmetrical dipped beam
If your journey take syou to countries where
vehicles ar edriven on the opposite side of the
roa dtot he country in which the vehicl eis
registered, your headlamps must be switched
to symmetrical dipped beam .Thisp revents
oncoming traffi cfromb eing dazzled.
Have the headlamps converte dasclose as
possibl etothe borde rbefor ed riving in these 192
Driving ab
roadOperation
207_AKB; 2; 3, en-GB
mkalafa, Version: 2.11.8.1 2009-07-23T10:23:49+02:00-Seite 192
Page 196 of 313

countries. Whe
nusing symmetrical lights, the
edg eoft he carriageway is not illuminated as
widel yand as far ahea dasnormal.
On vehicle swithI ntelligent Light System*,
yo uc an switch the headlamp susing the "Tou-
ris tm ode" function in the on-board computer
(Y page 119).
Converting dipped-beam headlamps on
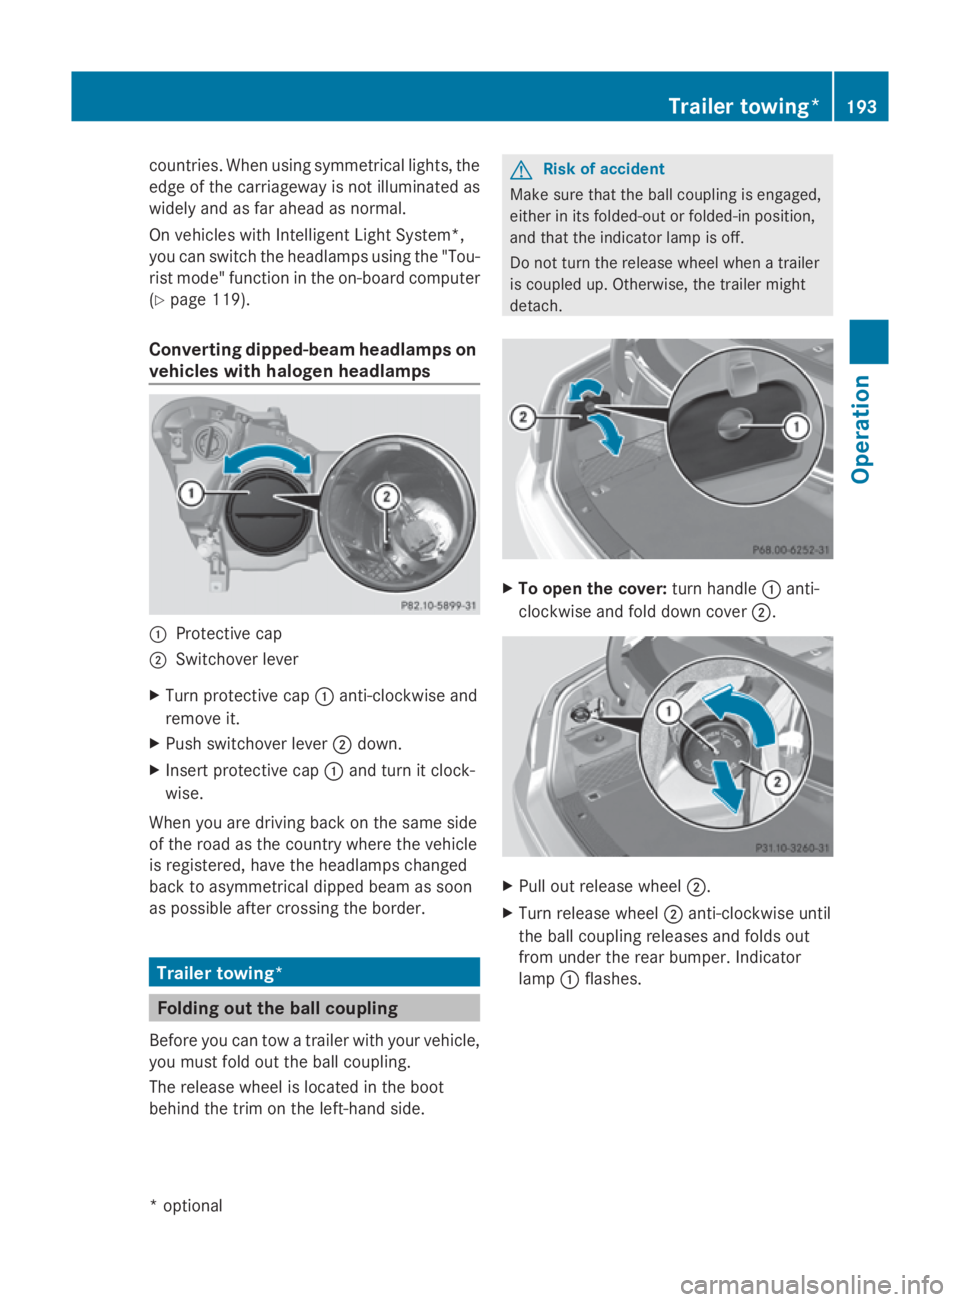
vehicle swithh aloge nheadlamps 0046
Protective cap
0047 Switchove rlev er
X Turn protective cap 0046anti-clockwise and
remove it.
X Push switchove rlev er 0047 down.
X Inser tprotective cap 0046and turn it clock-
wise.
Whe nyou are driving back on the same side
of the roa dasthe country where the vehicle
is registered ,havet he headlamp schanged
back to asymmetrical dippe dbeamass oon
as possible afte rcrossing the border. Trailer towing*
Folding out the bal
lcou pling
Before yo ucan tow atraile rwithy ourvehicle,
yo um ustfoldo utthe ball coupling.
The release wheel is locate dinthe boot
behind the trim on the left-hand side. G
Risk of accident
Make sure that the ball coupling is engaged,
either in its folded-ou torfolded-in position,
and that the indicator lamp is off.
Do not turn the release wheel whe natrailer
is coupled up .Otherwise, the traile rmight
detach. X
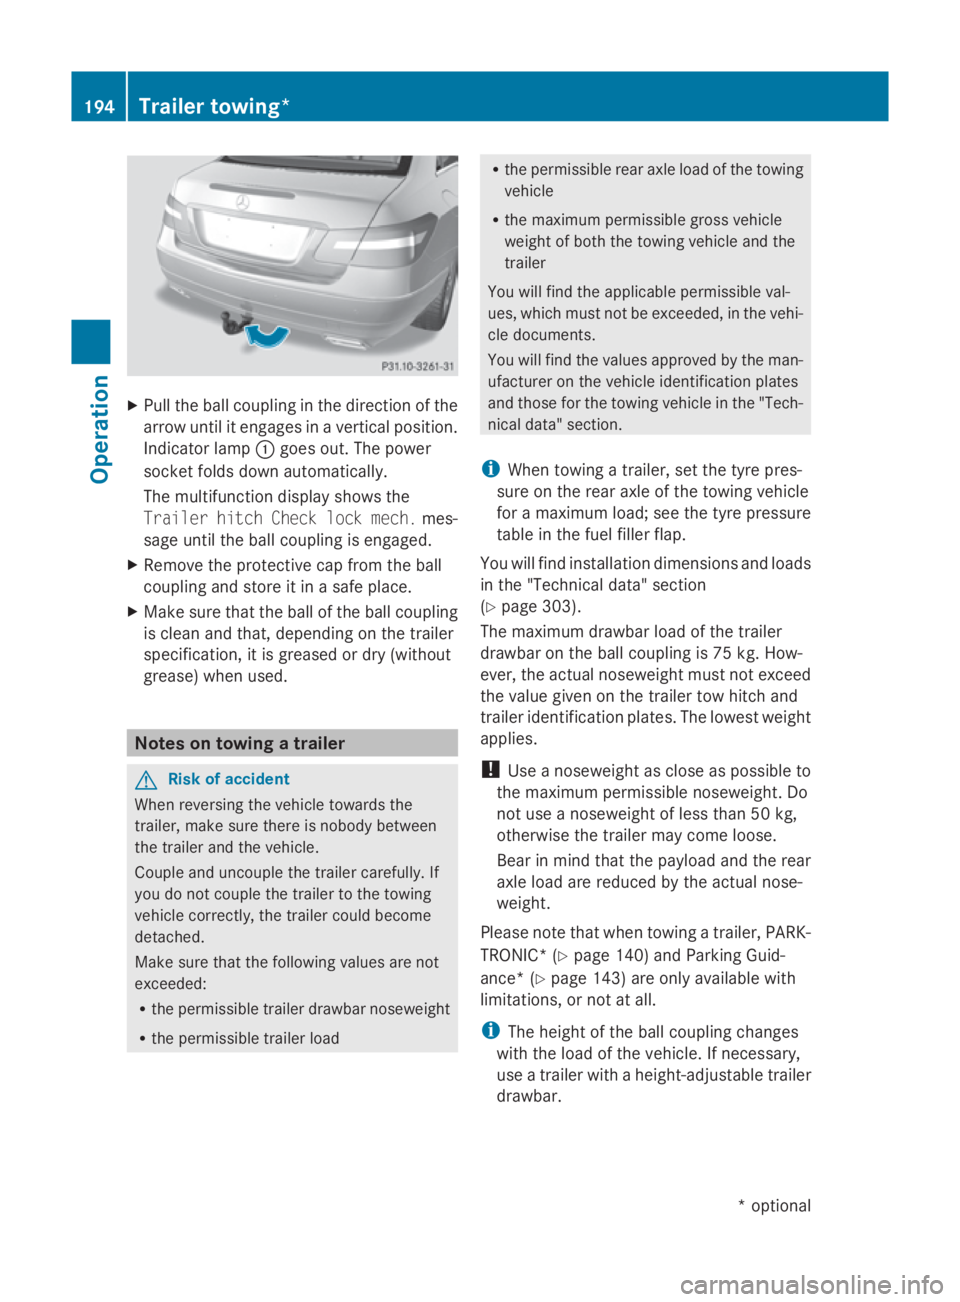
To ope nthe cover: turn handle 0046anti-
clockwise and fol ddownc over 0047. X
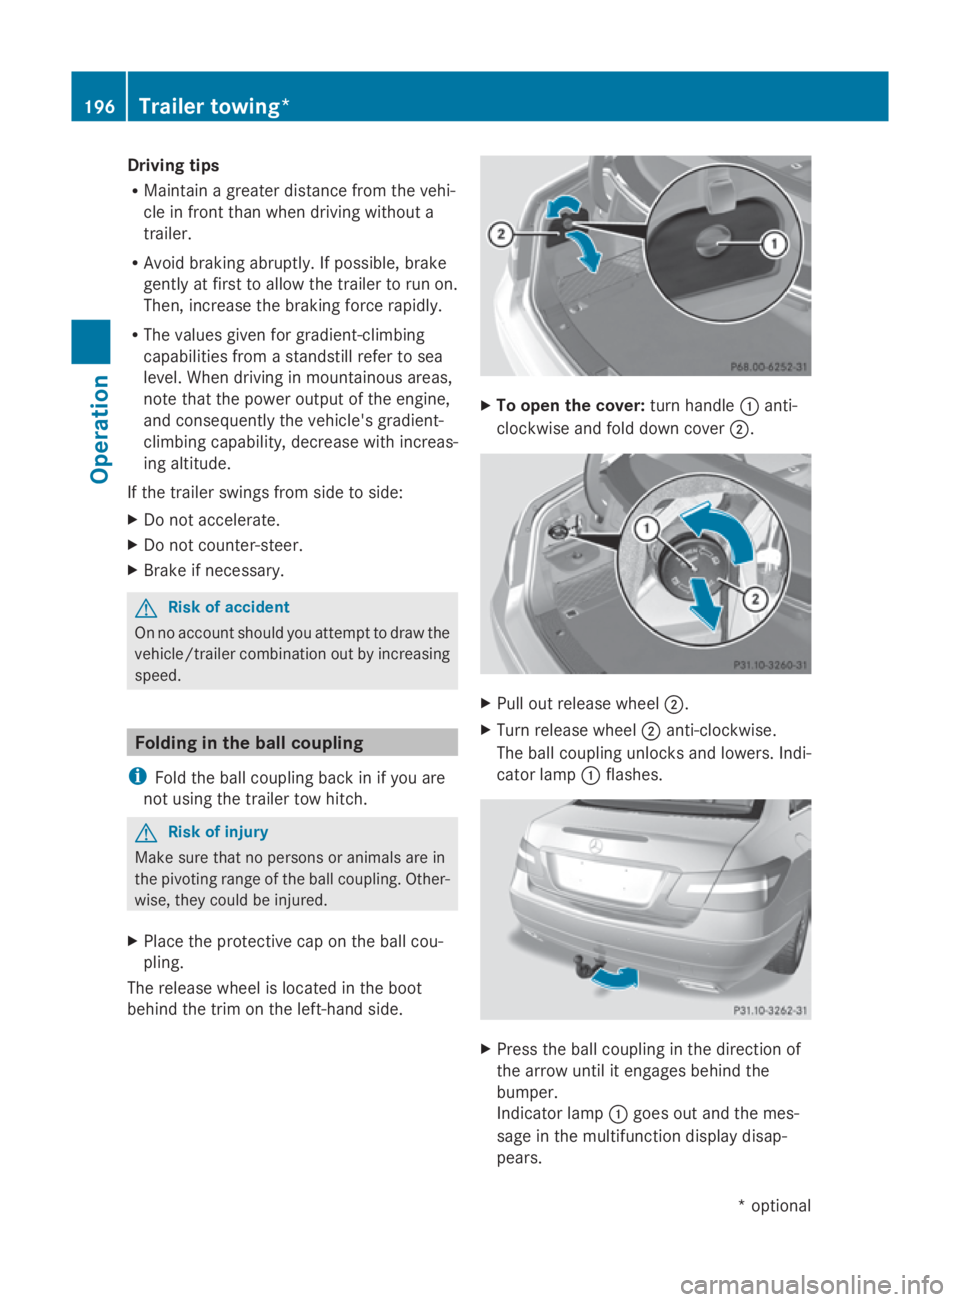
Pull ou trelease wheel 0047.
X Turn release wheel 0047anti-clockwise until
the ball coupling releases and folds out
from under the rea rbum per. Indicator
lamp 0046flashes. Traile
rtowing* 193Operation
*o
ptional
207_AKB; 2; 3, en-GB
mkalafa
,V ersion: 2.11.8.1
2009-07-23T10:23:49+02:00
-Seite 193 Z
Page 197 of 313

X
Pull the ball coupling in the direction of the
arrow until it engages in avertical position.
Indicator lamp 0046goes out. The power
socket folds down automatically.
The multifunction display shows the
Trailer hitch Check lock mech. mes-
sage until the ball coupling is engaged.
X Remove the protective cap from the ball
coupling and store it in asafe place.
X Make sure that the ball of the ball coupling
is clean and that, depending on the trailer
specification, it is greased or dry (without
grease) when used. Notes on towing
atrailer G
Risk of accident
When reversin gthe vehicle towards the
trailer, make sure there is nobody between
the trailer and the vehicle.
Couple and uncouple the trailer carefully. If
you do not couple the trailer to the towing
vehicle correctly, the trailer could become
detached.
Make sure that the following values are not
exceeded:
R the permissible trailer drawbar noseweight
R the permissible trailer load R
the permissible rear axle load of the towing
vehicle
R the maximum permissible gross vehicle
weight of both the towing vehicle and the
trailer
You will find the applicable permissible val-
ues, which must not be exceeded, in the vehi-
cle documents.
You will find the values approved by the man-
ufacturer on the vehicle identification plates
and those for the towing vehicle in the "Tech-
nical data" section.
i When towing atrailer, set the tyre pres-
sure on the rear axle of the towing vehicle
for am aximum load; see the tyre pressure
table in the fuel filler flap.
You will find installation dimensions and loads
in the "Technical data" section
(Y page 303).
The maximum drawbar load of the trailer
drawbar on the ball coupling is 75 kg. How-
ever, the actual noseweight must not exceed
the value given on the trailer tow hitch and
trailer identification plates. The lowest weight
applies.
! Use anoseweight as close as possible to
the maximum permissible noseweight. Do
not use anoseweight of less than 50 kg,
otherwise the trailer may come loose.
Bear in mind that the payloa dand the rear
axle load are reduced by the actual nose-
weight.
Please notet hat when towing atrailer, PARK-
TRONIC* (Y page 140) and Parking Guid-
ance* (Y page 143) are only availabl ewith
limitations ,ornot at all.
i The height of the ball coupling changes
with the load of the vehicle. If necessary,
use atrailer with aheight-adjustable trailer
drawbar. 194
Trailer towing*Operation
*optional
207_AKB; 2; 3, en-GB
mkalafa,
Version: 2.11.8.1 2009-07-23T10:23:49+02:00-Seite 194
Page 198 of 313

Coupling up
atrailer G
Ris
kofi njury
Do no tdisconnect atrailer wit hanengaged
overrun brake. Otherwise, your han dcould
become trapped between th ebumpe rand
trailer drawbar.
! Do no tdisconnect atrailer wit han
engaged overrun brake. Otherwise, your
vehicle could be damaged by th erebound-
ing of th eoverrun brake.
X Positio nthe trailer leve lbehin dthe vehicle.
X Couple up th etrailer.
X Establish th eelectrical connection
between th evehicle and th etrailer.
Driving tips G
Ris
kofa ccident
If the Check traile rhitch locking
mechanism message appear sinthemulti-
function display while th evehicle is in motion,
pull ove rimmediately and check whether the
ball couplin giscorrectly engaged.
i Observ ethe note sonE SP®
trailer stabi-
lisation (Y page 55).
In Germany, th emaximum permissible speed
for vehicle/trailer combinations depends on
th et ype of trailer and is either 80 km/h or
10 0k m/ h. In som ecountries ,higher maxi-
mum speeds are permissible for vehicle/
trailer combinations .Before beginnin gthe
journey, check th etrailer' sdocuments to see
what th emaximum permitted spee dis.
For certain Mercedes-Ben zvehicles, th emax-
imum permissible rear axle load is increased
when towing atrailer. Refer to th e"Technical
data" sectio ntofindo ut whether this applies
to your vehicle .Ifyou utilise any of th eadded
maximum rear axle load when towing atrailer,
th ev ehicle/trailer combinatio nmay not
excee damaximum spee dof100km/h for
reason sconcernin gthe operatin gpermit. This also applies in countries in whic
hthe
permissible maximum spee dfor vehicle/
trailer combinations is abov e100 km/h. G
Ris
kofa ccident
Always observ ethe maximum spee dpermit-
te dinG ermany for vehicle/traile rcombina-
tions ,eveninc ountries wher ehigher speeds
are permitted. This lower sthe riskofana cci-
dent.
When towing atrailer, your vehicle's handling
characteristic swill be different in comparison
to when driving without atrailer.
The vehicle/trailer combination:
R is heavier
R is restricted in its acceleratio nand gradi-
ent-climbin gcapability
R has an increased braking distance
R is affected mor ebystron gc rosswinds
R demands mor esensitive steering
R consumes mor efuel
On lon gand steep downhill gradients ,you
must selec talower gear in good time, or on
vehicle switha utomatic transmission*, select
shif trange 1,2or 3.
i This also applies if you have activated
cruise control, SPEEDTRONI CorDIS-
TRONIC PLUS*.
This will use th ebraking effect of th eengine,
so less braking will be required to maintain
th es peed. This relieves th eload on th ebrake
system and prevents th ebrakes from over-
heating and wearin gtoo quickly. If you need
additional braking ,depress th ebrak epedal
repeatedly rather than continuously. G
Ris
kofa ccident
Never depress th ebrak epedal continuously
while th evehicle is in motion ,e.g.n ever cause
th eb rakes to rub by applyin gconstant slight
pedal pressure .This causes th ebrak esystem
to overheat, increases th ebraking distance
and can lead to th ebrakes failin gcompletely. Trailer towing*
195Operation
*o
ptional
207_AKB
;2;3,en-GB
mkalafa ,V ersion: 2.11.8.1
2009-07-23T10:23:49+02:00
-Seite 195 Z
Page 199 of 313

Driving tips
R
Maintai nagreate rdistanc efromt hevehi-
cle in fron ttha nw hen drivin gwithout a
trailer.
R Avoid brakin gabruptly. If possible, brake
gentl yatfirst to allow th etrailer to run on.
Then, increase th ebrakin gforce rapidly.
R The value sgiven fo rgradient-climbing
capabilities from astandstill refer to sea
level. Whe ndrivin ginm ountainous areas,
note that th epowe routput of th eengine,
and consequentl ythe vehicle's gradient-
climbing capability, decreas ewithi ncrea s-
in ga ltitude.
If th etrailer swings from side to side:
X Do no taccelerate.
X Do no tcounter-steer.
X Brake if necessary. G
Risk of accident
On no accoun tshould you attemp ttodraw the
vehicle/trailer combination out by increasing
speed. Folding in th
eballc oupling
i Fold th eball couplin gbackinify ou are
no tu sin gthe trailer to whitch. G
Risk of injury
Mak esuret hatnop ersonsoranimals are in
th ep ivotin grange of th eball coupling. Other-
wise ,the yc ould be injured.
X Plac ethe protective cap on th eball cou-
pling.
The release whee lislocate dintheboot
behin dthe trim on th eleft-han dside. X
To ope nthe cover: turnh andle 0046anti-
clockwise and fold down cover 0047. X
Pull out release wheel 0047.
X Tur nrelease wheel 0047anti-clockwise.
The ball couplin gunlocks and lowers .Ind i-
cator lamp 0046flashes. X
Press th eball couplin ginthedirection of
th ea rrow until it engage sbehin dthe
bumper.
Indicato rlamp 0046goe sout and th emes-
sage in th emultifunction display disap-
pears. 196
Trailer towing*Operation
*optional
207_AKB; 2; 3, en-GB
mkalafa,
Version: 2.11.8.1 2009-07-23T10:23:49+02:00-Seite196
Page 200 of 313

Trailer power supply
When it leaves the factory ,you rv ehicle's
trailer socket outle tise quippe dwithap er-
manent powe rsuppl yand apower supply that
is switched on via the ignition lock.
The permanent powe rsuppl yiss upplie dvia
trailer socket pi n9.
The powe rsuppl ythatiss witched on via the
ignition lock is supplied via trailer socket
pi n1 0.
! Youc an connect consumers with apower
rating of up to 240 Wtothe permanent
powe rsuppl yand up to 180 Wtothe power
supply tha tiss witched on via the ignition
lock.
Yo um ustn ot charge atrailer battery using
the powe rsupply.
The trailer' spermanent powe rsuppl yis
switched off in the event of lo wvehicl esupply
voltag eand after si xhours at the latest.
Yo uc an obtai nfurthe rinformatio nabout
installing the trailer electrics fro maqualified
specialis tworkshop ,e.g.aM ercedes-Benz
Service Centre.
X To switc hthe connected power supply
on or off: turnthe key in the ignition lock
to position 2or 0,r espectively. Bulb failure indicator fo
rLEDs
i If LED lamps ar efitte dint he trailer, an
error message ma yappea rinthe multi-
functio ndisplay –evenift hereisnof ault –
if the corresponding LED chain' scurrent
dra wd rops belo w50milliamperes (mA).
To ensur ereliabl eoperatio noft he bulb failure
indicator, aminimu mcurrent of 50 mA must
be guaranteed by the manufacturer of each
LED chain in the trailer lighting. Trailer with 7-pi
nconnect or
If your trailer ha sa7-pinc onnector, yo ucan
connect it to the 13-pin socket on the ball
coupling using an adapter or, if necessary ,an
adapter cable .Both of these can be obtained
at aq uali fied specialis tworkshop ,e.g.ata
Mercedes-Benz Service Centre.
Fittin gthe adapter X
Open the socket cover.
X Insert connector with lug 0046into
groove 0047on the socket and tur nthe con-
necto rclockwise to the stop.
X Make the cove rengage.
X If yo uareusing an adapter cable ,sec ure
the cable to the trailer with cable ties.
! Make sure tha tthere is sufficient cable
play so tha tthe cable canno tbecome
detached when cornering. Service
ASSYST PLUS service interval display
The ASSYST PLU Sservice interva ldisplay
informs yo uofthe next service du edate.
The service du edateiss hown in the multi-
functio ndisplay ,for example:
Nex tservic eAin..d ays
Nex tservic eAin. .. km
Servic eAdue
The letter indicates which service is due. A
stands for aminor service and Bfor am ajor Service
197Operation
207_AKB; 2; 3, en-GB
mkalafa,V ersion: 2.11.8.1
2009-07-23T10:23:49+02:00
-Seite 197 Z