2009 MERCEDES-BENZ CL COUPE instrument cluster
[x] Cancel search: instrument clusterPage 130 of 421

Units of measurement
The units of measurement in navigation mode
are identical to those displayed in the instru-
ment cluster. The units of measurement may
only be changed via the instrument cluster.
Input restrictions
On vehicles for certain countries, there is a
restriction on entering data.
The restriction is active above a vehicle speed
of about 5 km/h. The restriction is deactiva-
ted as soon as the vehicle speed drops below
about 3 km/h.
When the restriction is active it is not possible
to enter specific items, e.g. a town or street
name. You will recognise this because certain
menu items cannot be selected.
Switching to navigation mode
X Press the Sfunction button once or
twice.
or
X Select Naviin the main function bar.
The map view is displayed with the menu
system either shown or hidden. Map with route guidance inactive and showing the
menu system
:
Current vehicle position Map with route guidance inactive and with the
menu system hidden
:
Current vehicle position
; Map orientation (Y page 129)
= Map scale (Y page 127)
Hiding/showing the menu system X
To hide: slideÆVZ.
The Full screen menu item appears in
the main area of the display.
X Press the Wbutton.
The menu system is hidden. The map can
be seen in the full-screen display.
X To show: pressWin the full-screen map
display.
Adjusting the map scale i
It is only possible to adjust the map scale
with the menu system hidden (full-screen
map display).
X Turn cVd until the desired scale is set. :
Map scale selected
; Map scale selected on scale bar Navigation system* (introduction)
127COMAND
* optional
216_AKB; 2; 3, en-GB
bjanott
,V ersion: 2.11.7.7
2009-02-27T14:54:17+01:00 - Seite 127 Z
Dateiname: 6515230602_buchblock.pdf; erzeugt am 04. Mar 2009 11:15:12; WK
Page 153 of 421

D
Possible lane
E Recommended lane
COMAND displays lane recommendations
C, Dand Ebased on the next two changes
of direction.
i The instrument cluster also displays lane
recommendations. Only the recommended
lanes are displayed in the instrument clus-
ter.
Explanation of the lane recommenda-
tions R
Recommended lane E: in this lane, you
will be able to complete the next two
changes of direction without changing
lane.
R Possible lane D: in this lane, you will only
be able to complete the next change of
direction without changing lane.
R Lane not recommended C: you will not be
able to complete the next change of direc-
tion if you stay in this lane.
Lane recommendations display During the change of direction, there may be
additional lanes which are displayed differ-
ently: Display Meaning
With lower boundary
line (lane
C) Lane added due
to the change of
direction
Without lower boun-
dary line (lanes
D
or E) Lane leads past
change of direction
The colours used in the lane recommendation
display vary depending on whether day or
night design is switched on: Day design Night design
Recommended lane
E
= dark blue Recommended lane
E
= light blue Possible lane
D=
light blue Possible lane
D=
dark blue Lane not recom-
mended
C= grey Lane not recom-
mended
C= grey Example of a display without a
change of direction
:
O Main destination
; P Intermediate stop (only if an inter-
mediate stop has been entered)
= Route (highlighted in blue)
? Current vehicle position: the triangle indi-
cates the vehicle’s direction of travel
A Map orientation
B Map scale Destination or area of destination
reached
When you reach your destination, you will see
the following display, and route guidance is
automatically ended: 150
Navigation system* (route guidance)COMAND
* optional
216_AKB; 2; 3, en-GB
bjanott,
Version: 2.11.7.7 2009-02-27T14:54:17+01:00 - Seite 150
Dateiname: 6515230602_buchblock.pdf; erzeugt am 04. Mar 2009 11:15:19; WK
Page 180 of 421

Opening and closing
.........................178
Boot .................................................... 180
Key positions .................................... 182
Seats .................................................. 183
Steering wheel .................................. 187
Mirrors ............................................... 189
Memory function .............................. 190
Seat belts ........................................... 191
Lights ................................................. 194
Windscreen wipers ...........................199
Side windows .................................... 200
Driving and parking ..........................202
Automatic transmission ...................206
Instrument cluster ............................212
On-board computer ..........................213
Driving systems ................................ 227
Air conditioning ................................. 262
Sliding sunroof .................................. 274
Loading and stowing ........................275
Features ............................................. 280 177Controls
216_AKB; 2; 3, en-GB
bjanott,
Version: 2.11.7.7 2009-02-27T14:54:17+01:00 - Seite 177
Dateiname: 6515230602_buchblock.pdf; erzeugt am 04. Mar 2009 11:15:35; WK
Page 199 of 421

X
Pull the light switch out to the first detent.
The N green indicator lamp on the light
switch lights up.
X To switch off: press the light switch in as
far as it will go.
The N green indicator lamp on the light
switch goes out.
Rear foglamp X
Turn the key to position 2in the ignition
lock.
X To switch on: turn the light switch to
L orT. When the light switch is set
to c, you cannot switch on the rear fog-
lamp.
X Pull the light switch out to the second stop.
The R yellow indicator lamp on the light
switch lights up.
X To switch off: press the light switch in as
far as it will go.
The R yellow indicator lamp on the light
switch goes out. Combination switch (turn signals,
main-beam headlamps and headlamp
flasher) Turn signal lamp
X
To switch on: press the combination
switch in the direction of arrow ;or?.
The corresponding turn signal indicator
lamp ! or# in the instrument clus-
ter flashes.
i If you only wish to indicate a minor change
of direction, press the combination switch
briefly in the respective direction. The cor-
responding turn signal flashes three times.
Main-beam headlamps X
Turn the ignition key to position 2in the
ignition lock or start the engine.
X Turn the light switch to Lorc 26
.
X To switch on: press the combination
switch in the direction of arrow :.
The K indicator lamp in the instrument
cluster lights up.
X To deactivate: move the combination
switch back to its normal position.
The K indicator lamp in the instrument
cluster goes out.
Headlamp flasher X
To switch on: briefly pull the combination
switch in the direction of arrow =. Hazard warning lamps
26
In the cposition, the main-beam headlamps are only switched on when it is dark. 196
LightsControls
216_AKB; 2; 3, en-GB
bjanott,
Version: 2.11.7.7 2009-02-27T14:54:17+01:00 - Seite 196
Dateiname: 6515230602_buchblock.pdf; erzeugt am 04. Mar 2009 11:15:44; WK
Page 208 of 421

Electric parking brake
Releasing the electric parking brake man-
ually
X
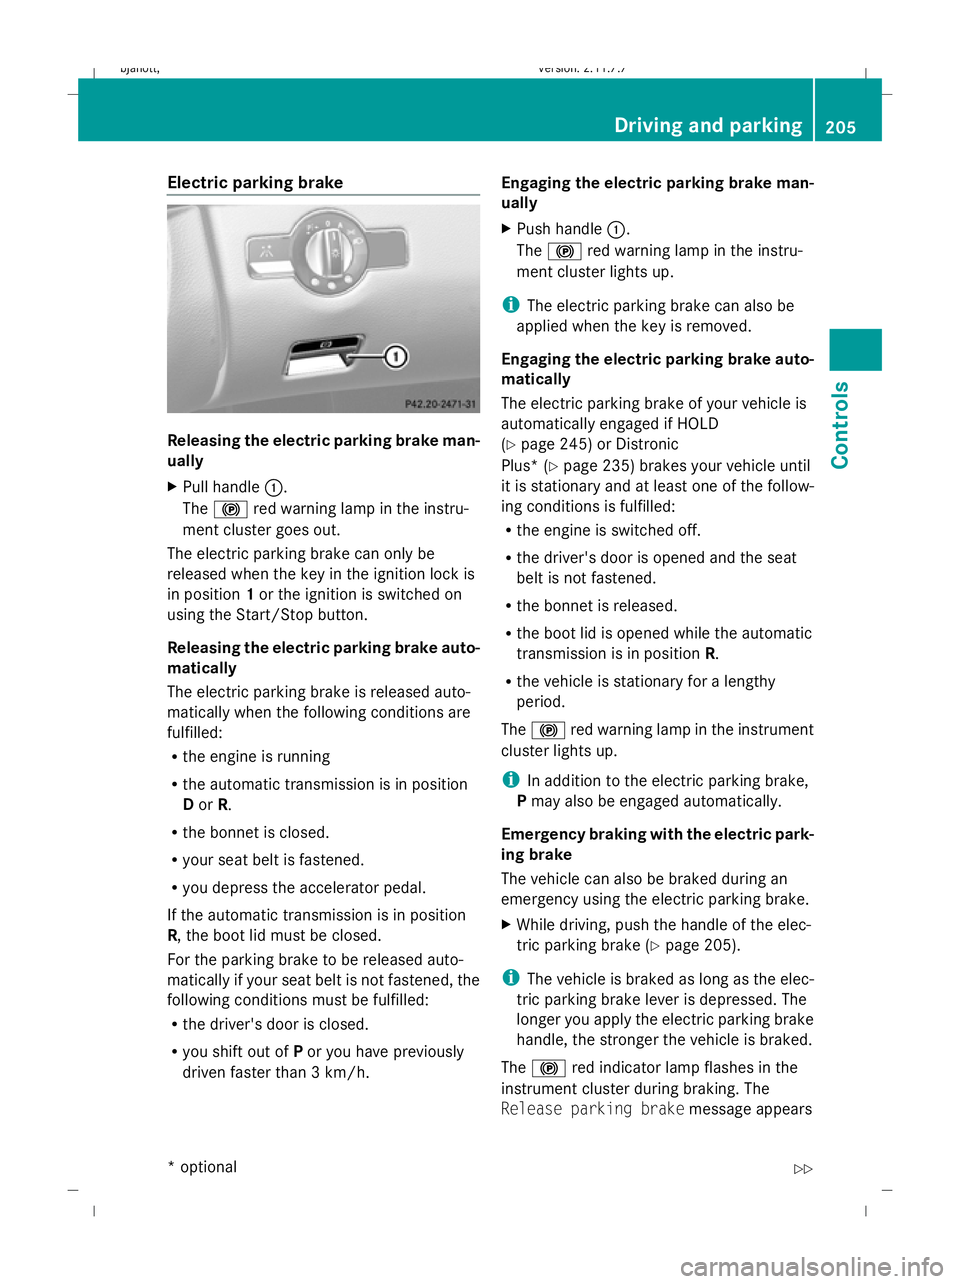
Pull handle :.
The ! red warning lamp in the instru-
ment cluster goes out.
The electric parking brake can only be
released when the key in the ignition lock is
in position 1or the ignition is switched on
using the Start/Stop button.
Releasing the electric parking brake auto-
matically
The electric parking brake is released auto-
matically when the following conditions are
fulfilled:
R the engine is running
R the automatic transmission is in position
D or R.
R the bonnet is closed.
R your seat belt is fastened.
R you depress the accelerator pedal.
If the automatic transmission is in position
R, the boot lid must be closed.
For the parking brake to be released auto-
matically if your seat belt is not fastened, the
following conditions must be fulfilled:
R the driver's door is closed.
R you shift out of Por you have previously
driven faster than 3 km/h. Engaging the electric parking brake man-
ually
X
Push handle :.
The ! red warning lamp in the instru-
ment cluster lights up.
i The electric parking brake can also be
applied when the key is removed.
Engaging the electric parking brake auto-
matically
The electric parking brake of your vehicle is
automatically engaged if HOLD
(Y page 245) or Distronic
Plus* ( Ypage 235) brakes your vehicle until
it is stationary and at least one of the follow-
ing conditions is fulfilled:
R the engine is switched off.
R the driver's door is opened and the seat
belt is not fastened.
R the bonnet is released.
R the boot lid is opened while the automatic
transmission is in position R.
R the vehicle is stationary for a lengthy
period.
The ! red warning lamp in the instrument
cluster lights up.
i In addition to the electric parking brake,
P may also be engaged automatically.
Emergency braking with the electric park-
ing brake
The vehicle can also be braked during an
emergency using the electric parking brake.
X While driving, push the handle of the elec-
tric parking brake (Y page 205).
i The vehicle is braked as long as the elec-
tric parking brake lever is depressed. The
longer you apply the electric parking brake
handle, the stronger the vehicle is braked.
The ! red indicator lamp flashes in the
instrument cluster during braking. The
Release parking brake message appears Driving and parking
205Controls
* option al
216_AKB; 2; 3, en-GB
bjanott
,V ersion: 2.11.7.7
2009-02-27T14:54:17+01:00 - Seite 205 Z
Dateiname: 6515230602_buchblock.pdf; erzeugt am 04. Mar 2009 11:15:48; WK
Page 209 of 421

in the multi-function display and a warning
tone sounds.
When the vehicle has been braked to a stand-
still, the electric parking brake is applied. Switching off the engine
G
Risk of accident
If the engine is not running, there is no power
assistance for the steering and brakes. Steer-
ing and braking will then require significantly
greater effort.
As a result, you might lose control of the vehi-
cle, cause an accident and injure yourself and
others.
Therefore, do not switch off the engine while
you are driving.
X Move the DIRECT SELECT lever to position
P.
Using the key
X Turn the key to position 0(Y page 182) in
the ignition lock and remove it.
The parking lock is activated.
i If you switch the engine off with the trans-
mission in position Ror D, the automatic
transmission automatically shifts to N.
If you then open the driver's door or the
front-passenger door or remove the key
from the ignition, the automatic transmis-
sion shifts to P.
If you shift the automatic transmission to
N before switching off the engine, the auto-
matic transmission remains in Neven when
a door is opened.
Using KEYLESS GO*
X Press the Start/Stop button (Y page 182).
The engine stops and all the indicator
lamps in the instrument cluster go out
(Y page 27).
i If you use the Start/Stop button to switch
off the engine, the automatic transmission automatically shifts to
N. If you open the
driver's or front-passenger door, the auto-
matic transmission shifts to P.
i The engine can be turned off while the
vehicle is in motion by pressing and holding
the Start/Stop button for three seconds. Automatic transmission
Notes on the transmission
G
Risk of accident
The movement of the pedals must not be
impaired in any way. Do not keep any objects
in the driver's footwell. Make sure that floor-
mats or carpets are correctly secured and
that there is sufficient clearance for the ped-
als.
Do not place several floormats on top of one
another. G
Risk of accident
Do not change down for additional engine
braking on a slippery road surface. This could
cause the drive wheels to lose their grip and
the vehicle could skid. This could cause you
to lose control of your vehicle and cause an
accident. Automatic transmission
! Warm up the engine quickly. Do not use
the engine's full performance until it has
reached operating temperature.
Only set the automatic transmission to the
respective drive positions when the vehicle
is stationary.
Where possible, avoid spinning the drive
wheels when pulling away on slippery
roads. Otherwise, you could damage the
drive train. 206
Automatic transmissionCont
rols
* option al
216_AKB; 2; 3, en-GB
bjanott
,V ersion: 2.11.7.7
2009-02-27T14:54:17+01:00 - Seite 206
Dateiname: 6515230602_buchblock.pdf; erzeugt am 04. Mar 2009 11:15:48; WK
Page 212 of 421

R
little throttle: early upshifts
R more throttle: late upshifts
Kickdown
Use kickdown for maximum acceleration.
X Depress the accelerator pedal beyond the
pressure point.
The transmission shifts to a lower gear
depending on the engine speed.
X Ease off the accelerator pedal once the
desired speed is reached.
The automatic transmission shifts back up. Steering wheel gearshift paddles and
manual drive program
You can restrict or derestrict the shift range
by using the steering wheel gearshift paddles.
You can change gear yourself by using the
steering wheel gearshift paddles in the man-
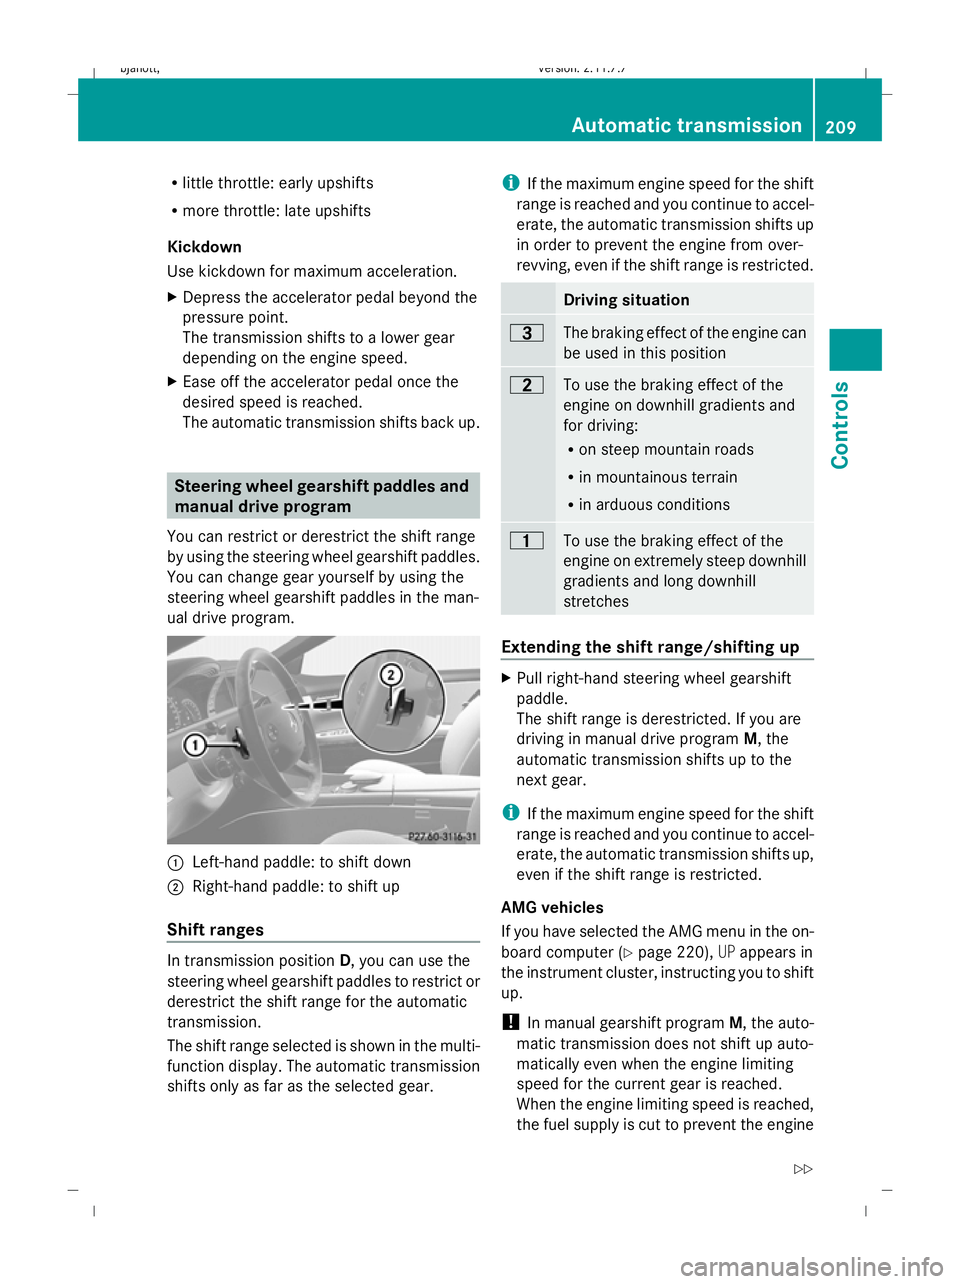
ual drive program. :
Left-hand paddle: to shift down
; Right-hand paddle: to shift up
Shift ranges In transmission position
D, you can use the
steering wheel gearshift paddles to restrict or
derestrict the shift range for the automatic
transmission.
The shift range selected is shown in the multi-
function display. The automatic transmission
shifts only as far as the selected gear. i
If the maximum engine speed for the shift
range is reached and you continue to accel-
erate, the automatic transmission shifts up
in order to prevent the engine from over-
revving, even if the shift range is restricted. Driving situation
=
The braking effect of the engine can
be used in this position
5
To use the braking effect of the
engine on downhill gradients and
for driving:
R
on steep mountain roads
R in mountainous terrain
R in arduous conditions 4
To use the braking effect of the
engine on extremely steep downhill
gradients and long downhill
stretches
Extending the shift range/shifting up
X
Pull right-hand steering wheel gearshift
paddle.
The shift range is derestricted. If you are
driving in manual drive program M, the
automatic transmission shifts up to the
next gear.
i If the maximum engine speed for the shift
range is reached and you continue to accel-
erate, the automatic transmission shifts up,
even if the shift range is restricted.
AMG vehicles
If you have selected the AMG menu in the on-
board computer (Y page 220),UPappears in
the instrument cluster, instructing you to shift
up.
! In manual gearshift program M, the auto-
matic transmission does not shift up auto-
matically even when the engine limiting
speed for the current gear is reached.
When the engine limiting speed is reached,
the fuel supply is cut to prevent the engine Automatic transmission
209Controls
216_AKB; 2; 3, en-GB
bjanott, Version: 2.11.7.7 2009-02-27T14:54:17+01:00 - Seite 209 Z
Dateiname: 6515230602_buchblock.pdf; erzeugt am 04. Mar 2009 11:15:49; WK
Page 215 of 421

X
Pull the left-hand steering wheel gearshift
paddle (Y page 210).
The automatic transmission shifts down to
the next gear.
i If you slow down or stop without shifting
down, the automatic transmission auto-
matically shifts down.
Kickdown
i Vehicles with an AMG engine: it is not
possible to use kickdown in manual drive
program M.
You can also use kickdown for maximum
acceleration in manual drive program M.
X Depress the accelerator pedal beyond the
pressure point.
The transmission shifts to a lower gear
depending on the engine speed.
X Shift back up once the desired speed is
reached.
i Vehicles without an AMG engine: if you
apply full throttle, the automatic transmis-
sion shifts up to the next gear at maximum
engine speed. This prevents the engine
from overrevving. Instrument cluster
Points to remember
You will find an illustration of the instrument
cluster in the "At a glance" section
(Y page 27). G
Risk of accident
If the instrument cluster or the multi-function
display fails, it can no longer show any display
messages.
You will not then be able to see information
about the vehicle status, such as speed, out-
side temperature, warning and indicator
lamps, display messages or the failure of sys-
tems. Handling characteristics may be affec-
ted. Adjust your driving style and speed
accordingly. Immediately consult a qualified specialist
workshop which has the necessary specialist
knowledge and tools to carry out the work
required. Mercedes-Benz recommends that
you use a Mercedes-Benz Service Centre for
this purpose. In particular, work relevant to
safety or on safety-related systems must be
carried out at a qualified specialist workshop. Coolant temperature display
The coolant temperature gauge is in the
instrument cluster on the left-hand side.
Under normal operating conditions and with
the specified coolant level, the coolant tem-
perature may rise to 120 †. Rev counter
The red band in the rev counter indicates the
engine's overrevving range. The fuel supply is
interrupted to protect the engine when the
red band is reached.
! Do not drive in the overrevving range.
Doing so will damage the engine. Outside temperature display
G
Risk of accident
If the temperature is slightly above freezing,
the road may be icy, especially in wooded
areas or on bridges. If you do not adjust your
driving style, the vehicle may start to skid. For
this reason, you should always adjust your
driving style and speed to the weather condi-
tions.
Changes in the outside temperature are dis-
played after a short delay. 212
Instrument clusterControls
216_AKB; 2; 3, en-GB
bjanott,
Version: 2.11.7.7 2009-02-27T14:54:17+01:00 - Seite 212
Dateiname: 6515230602_buchblock.pdf; erzeugt am 04. Mar 2009 11:15:50; WK