Page 207 of 506

7. High Beam IndicatorThis indicator shows that the high beam head-
lights are on. Pull the multifunction control lever
on the left side of the steering column toward you to
switch to low beam.
8. Front Fog Light Indicator — If Equipped This indicator will illuminate when the fog lights
are on.
9. Speedometer
Shows the vehicle speed.
10. Turn Signal Indicators The arrow will flash with the exterior turn signal
when the turn signal lever is operated.
If the vehicle electronics sense that the vehicle has
traveled about 1 mile (1.6 km) with the turn signals on, a continuous chime will sound to alert you to turn the
signals off. If either indicator flashes at a rapid rate, check
for a defective outside light bulb.
11. Electronic Stability Program (ESP) Indicator Light
/ Traction Control System (TCS) Indicator Light
If this indicator light flashes during accelera-
tion, apply as little throttle as possible. While
driving, ease up on the accelerator. Adapt your
speed and driving to the prevailing road con-
ditions, and do not switch off the Electronic Stability
Program (ESP), or Traction Control System (TCS).
12. Charging System Light This light shows the status of the electrical charg-
ing system. The light should come on when the
ignition switch is first turned ON and remain on briefly
as a bulb check. If the light stays on or comes on while
driving, turn off some of the vehicle’s non-essential
electrical devices or increase engine speed (if at idle). If
UNDERSTANDING YOUR INSTRUMENT PANEL 205
4
Page 218 of 506

This system conveniently allows the driver to select a
variety of useful information by pressing the switches
mounted on the steering wheel. The EVIC consists of the
following:
•System Status
•Vehicle information warning message displays
•Tire Pressure Monitor System (if equipped)
•Personal Settings (Customer-Programmable Features)
•Compass display
•Outside temperature display
•Trip computer functions
•Navigation system screens (if equipped)
•Audio mode displayThe system allows the driver to select information by
pressing the following buttons mounted on the steering
wheel:
Press and release the MENU button and the
mode displayed will change between Trip
Functions, Navigation (if equipped), System
Status, Personal Settings.
Press the SCROLL button to scroll through Trip
Functions, Navigation (if equipped), System
Status Messages, and Personal Settings
(Customer-Programmable Features).
Press and release the COMPASS/TEMPERA-
TURE button to display one of eight compass
readings and the outside temperature.
MENUButton
SCROLL Button
216 UNDERSTANDING YOUR INSTRUMENT PANEL
Page 226 of 506
 transmitter UNLOCK button. When Driver
Door 1st Press")
Remote Key Unlock
WhenDriver Door 1st Press is selected, only the driver’s
door will unlock on the first press of the Remote Keyless
Entry (RKE) transmitter UNLOCK button. When Driver
Door 1st Press is selected, you must press the RKE
transmitter UNLOCK button twice to unlock the passen-
ger’s doors. When All Doors 1st Press is selected, all of
the doors will unlock on the first press of the RKE
transmitter UNLOCK button. To make your selection,
press and release the FUNCTION SELECT button until
“Driver Door 1st Press” or “All Doors 1st Press” appears.
Recall Memory with Remote Key Unlock — If
Equipped
When on is selected, you can use your RKE transmitter to
recall one of two pre-programmed memory profiles. Each
memory profile contains desired position settings for the
driver seat, side mirror, adjustable pedals (if equipped),
power tilt and telescopic steering column (if equipped),
and a set of desired radio station presets. When OFF is selected, only the memory switch on the driver’s door
panel will recall memory profiles. To make your selec-
tion, press and release the FUNCTION SELECT button
until “ON” or “OFF” appears. Refer to “Driver Memory
Seat” in Section 3 of this manual for more information.
Sound Horn with Remote Key Lock
When on is selected, a short horn sound will occur when
the RKE transmitter LOCK button is pressed. This feature
may be selected with or without the Flash Lights with
Remote Key Lock feature. To make your selection, press
and release the FUNCTION SELECT button until “On”
or “Off” appears.
Rain Sensing Intermittent Wipers — If Equipped
When on is selected, the system will automatically acti-
vate the windshield wipers if it senses moisture on the
windshield. To make your selection, press and release the
FUNCTION SELECT button until “On” or “Off” appears.
When Off is selected, the system reverts to the standard
intermittent wiper operation.
224 UNDERSTANDING YOUR INSTRUMENT PANEL
Page 273 of 506
Operating Instructions — uconnect�phone (If
Equipped)
Refer to “uconnect� phone” in Section 3.
Operating Instructions — Video Entertainment
System (VES)™ (If Equipped)
Refer to separate “Video Entertainment System (VES)™
Guide.”
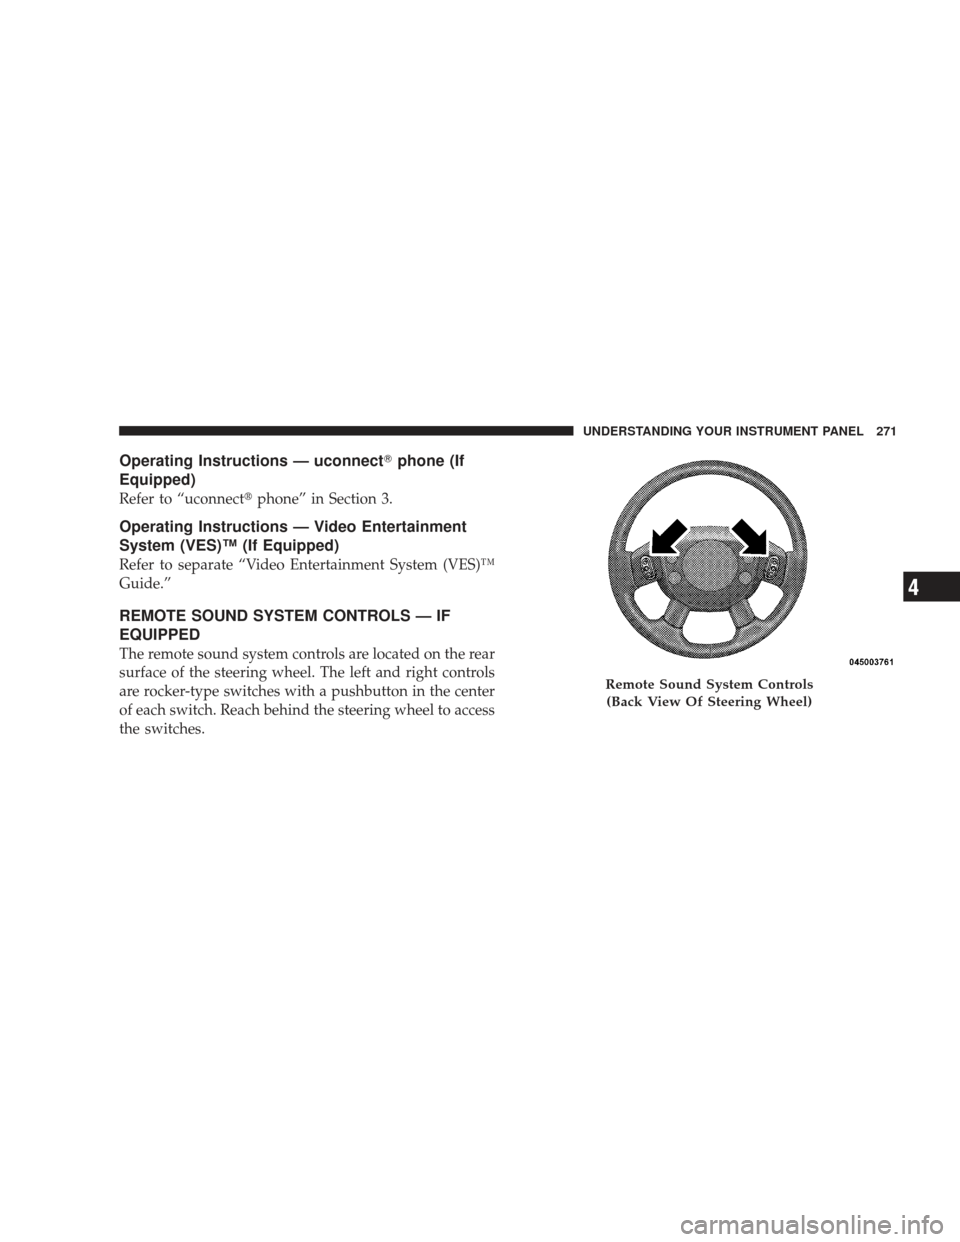
REMOTE SOUND SYSTEM CONTROLS — IF
EQUIPPED
The remote sound system controls are located on the rear
surface of the steering wheel. The left and right controls
are rocker-type switches with a pushbutton in the center
of each switch. Reach behind the steering wheel to access
the switches.
Remote Sound System Controls
(Back View Of Steering Wheel)
UNDERSTANDING YOUR INSTRUMENT PANEL 271
4
Page 290 of 506

�Off-Road Driving Tips .................. 314
▫ When To Use 4WD Low Range .......... 314
▫ Driving Through Water ................ 314
▫ Driving In Snow, Mud And Sand ......... 315
▫ Hill Climbing ....................... 316
▫ Traction Downhill .................... 317
▫ After Driving Off-Road ................ 317
� Power Steering ....................... 318
▫ Power Steering Fluid Check ............. 319
� Parking Brake ........................ 320
� Anti-Lock Brake System ................. 321
� Electronic Brake Control System ........... 324
▫ Anti-Lock Brake System (ABS) ........... 324▫
Traction Control System (TCS) ........... 325
▫ Brake Assist System (BAS) .............. 325
▫ Electronic Roll Mitigation (ERM) ......... 326
▫ Trailer Sway Control (TSC) —
If Equipped ........................ 327
▫ Hill Start Assist (HSA) ................ 328
▫ Hill Descent Control (HDC) —
If Equipped ........................ 331
▫ Electronic Stability Program (ESP) ........ 332
▫ ESP/BAS Warning Light And ESP/TCS
Indicator Light ...................... 336
� Tire Safety Information ................. 337
▫ Tire Markings ....................... 337
▫ Tire Identification Number (TIN) ......... 341
288 STARTING AND OPERATING
Page 319 of 506

Traction Downhill
Shift the transmission into a low gear and the transfer
case to 4WD LOW range. Let the vehicle go slowly down
the hill with all four wheels turning against engine
compression drag. This will permit you to control the
vehicle speed and direction.
When descending mountains or hills, repeated braking
can cause brake fade with loss of braking control. Avoid
repeated heavy braking by downshifting the transmis-
sion whenever possible.
After Driving Off-Road
Off-road operation puts more stress on your vehicle than
does most on-road driving. After going off-road, it is
always a good idea to check for damage. That way you
can get any problems taken care of right away and have
your vehicle ready when you need it.
•Completely inspect the underbody of your vehicle.
Check tires, body structure, steering, suspension, and
exhaust system for damage.
•Check threaded fasteners for looseness, particularly on
the chassis, drivetrain components, steering, and sus-
pension. Retighten them, if required, and torque to the
values specified in the Service Manual.
•Check for accumulations of plants or brush. These
things could be a fire hazard. They might hide damage
to fuel lines, brake hoses, axle pinion seals, and
propeller shafts.
•After extended operation in mud, sand, water, or
similar dirty conditions, have brake rotors, wheels,
brake linings, and axle yokes inspected and cleaned as
soon as possible.
STARTING AND OPERATING 317
5
Page 320 of 506

WARNING!
Abrasive material in any part of the brakes may cause
excessive wear or unpredictable braking. You might
not have full braking power when you need it to
prevent an accident. If you have been operating your
vehicle in dirty conditions, get your brakes checked
and cleaned as necessary.
•If you experience unusual vibration after driving in
mud, slush, or similar conditions, check the wheels for
impacted material. Impacted material can cause a
wheel imbalance and freeing the wheels of it will
correct the situation.
POWER STEERING
The standard power steering system will give you good
vehicle response and increased ease of maneuverability
in tight spaces. The system will provide mechanical
steering capability if power assist is lost.
If for some reason the power assist is interrupted, it will
still be possible to steer your vehicle. Under these condi-
tions, you will observe a substantial increase in steering
effort, especially at very low vehicle speeds and during
parking maneuvers.
NOTE:Increased noise levels at the end of the steering
wheel travel are considered normal and do not indicate
that there is a problem with the power steering system.
Upon initial start-up in cold weather, the power steering
pump may make noise for a short amount of time. This is
due to the cold, thick fluid in the steering system. This
noise should be considered normal, and it does not in any
way damage the steering system.
318 STARTING AND OPERATING
Page 321 of 506

WARNING!
Continued operation with reduced power steering
assist could pose a safety risk to yourself and others.
Service should be obtained as soon as possible.
CAUTION!
Prolonged operation of the steering system at the end
of the steering wheel travel will increase the steering
fluid temperature and it should be avoided when
possible. Damage to the power steering pump may
occur.
Power Steering Fluid Check
Checking the power steering fluid level at a defined
service interval is not required. The fluid should only be
checked if a leak is suspected, abnormal noises areapparent, and/or the system is not functioning as antici-
pated. Coordinate inspection efforts through an autho-
rized dealer.
No chemical flushes should be used in any power
steering system; only the approved lubricant may be
used.
WARNING!
Fluid level should be checked on a level surface and
with the engine off to prevent injury from moving
parts and to ensure accurate fluid level reading. Do
not overfill. Use only manufacturer’s recommended
power steering fluid.
If necessary, add fluid to restore to the proper indicated
level. With a clean cloth, wipe any spilled fluid from all
surfaces. Refer to “Fluids, Lubricants, and Genuine
Parts” in Section 7 for the correct fluid type.
STARTING AND OPERATING 319
5