Page 378 of 506
” under “Electronic
Brake Control System” in this section for information on
this system.
Trailer Sway Control — Mecha")
Trailer Sway Control — Electronic
Refer to “TSC (Trailer Sway Control)” under “Electronic
Brake Control System” in this section for information on
this system.
Trailer Sway Control — Mechanical
The trailer sway control is a telescoping link that can be
installed between the hitch receiver and the trailer tongue
that typically provides adjustable friction associated with
the telescoping motion to dampen any unwanted trailer
swaying motions while traveling.
Weight-Carrying Hitch
A weight-carrying hitch supports the trailer tongue
weight, just as if it were luggage located at a hitch ball or
some other connecting point of the vehicle. These kinds
of hitches are the most popular on the market today and
they are commonly used to tow small- and medium-
sized trailers.
Weight-Distributing Hitch
A weight-distributing system works by applying lever-
age through spring (load) bars. They are typically used
for heavier loads, to distribute trailer tongue weight to
the tow vehicle’s front axle and the trailer axle(s). When
used in accordance with the manufacturers’ directions, it
provides for a more level ride, offering more consistent
steering and brake control thereby enhancing towing
safety. The addition of a friction/hydraulic sway control
also dampens sway caused by traffic and crosswinds and
contributes positively to tow vehicle and trailer stability.
Trailer sway control and a weight distributing (load
equalizing) hitch are recommended for heavier Tongue
Weights (TW) and may be required depending on Vehicle
and Trailer configuration/loading to comply with Gross
Axle Weight Rating (GAWR) requirements.
376 STARTING AND OPERATING
Page 385 of 506

NOTE:Remember that everything put into or on the
trailer adds to the load on your vehicle. Also, additional
factory-installed options, or authorized dealer-installed
options, must be considered as part of the total load on
your vehicle. Refer to the “Tire and Loading Information”
placard for the maximum combined weight of occupants
and cargo for your vehicle.
Towing Requirements
To promote proper break-in of your new vehicle drive-
train components, the following guidelines are recom-
mended:
CAUTION!
•Avoid towing a trailer for the first 500 miles
(805 km) of vehicle operation. Doing so may dam-
age your vehicle.
•During the first 500 miles (805 km) of trailer
towing, limit your speed to 50 mph (80 km/h).
WARNING!
Improper towing can lead to an injury accident.
Follow these guidelines to make your trailer towing
as safe as possible:
Make certain that the load is secured in the trailer
and that is will not shift during travel. When traile-
ring cargo that is not fully secured, dynamic load
shifts can occur that may be difficult for the driver to
control. You could lose control of your vehicle and
have an accident.
•When hauling cargo, or towing a trailer, do not
overload your vehicle or trailer. Overloading can cause
a loss of control, poor performance, or damage to
brakes, axle, engine, transmission, steering, suspen-
sion, chassis structure, or tires.
STARTING AND OPERATING 383
5
Page 445 of 506
Cav-ity Car-
tridge Fuse Mini-
Fuse Description
M10 — 15 Amp BlueHands-Free Module
(HFM) – if equipped/
Universal Garage Door
Opener (UGDO) – if
equipped/Vanity Light
M11 — 10 Amp RedAutomatic Temperature
Control (ATC) - if
equipped
M12 — 30 Amp GreenRadio/Amplifier - if
equipped
M13 — 20 Amp YellowCabin Compartment
Node (CCN)/Wireless
Control Module (WCM)/
Multifunction Control
Switch
M14 — — —Cav- ity Car-
tridge Fuse Mini-
Fuse Description
M15 — 20 Amp YellowMultifunction Control
Switch/Cabin Compart-
ment Node (CCN)/
Steering Column Control
Module (SCM)/Rear
View Mirror/Tire Pres-
sure Monitor (TPM) - if
equipped/IR Sensor - if
equipped/Transfer Case
Module - if equipped
M16 — 10 Amp RedOccupant Restraint Con-
troller (ORC)
M17 — 15 Amp BlueExterior Lighting — Left
Front Park and Side
Marker, Left Tail and
Running, License Lights
MAINTAINING YOUR VEHICLE 443
7
Page 446 of 506
Cav-ity Car-
tridge Fuse Mini-
Fuse Description
M18 — 15 Amp BlueExterior Lighting —
Right Front Park and
Side Marker, Right Tail
and Running Lights
M19 — 25 Amp NaturalAuto Shut Down (ASD)
#1 and #2
M20 — 15 Amp BlueInterior Lighting/Steering
Wheel Switches - if
equipped/Switch Bank/
Electronic Vehicle Infor-
mation Center (EVIC) - if
equipped
M21 — 20 Amp YellowAuto Shut Down (ASD)
#3
M22 — 10 Amp RedRight Horn (Hi/Low)Cav-
ity Car-
tridge Fuse Mini-
Fuse Description
M23 — 10 Amp RedLeft Horn (Hi/Low)
M25 — 20 Amp YellowFuel Pump
M26 — 10 Amp RedPower Mirror Switch/
Driver Window Switch
M27 — 10 Amp RedIgnition Switch/Wireless
Control Module (WCM)/
Steering Column Lock - if
equipped
M28 — 10 Amp RedPowertrain Control Mod-
ule (PCM)
M29 — 10 Amp RedOccupant Classification
Module (OCM)
444 MAINTAINING YOUR VEHICLE
Page 450 of 506

Front Turn Signal and Front Side Marker Lights
1. Turn the steering wheel all the way to the right to
access the left front turn signal or side marker. Turn the
steering wheel all the way to the left to access the right
front turn signal or side marker.
2. Remove three push-pins from the wheel-well liner.
3. Gently flex the wheel-well liner forward to access the
bulb.
4. Rotate the bulb’s socket counterclockwise, and remove
the bulb and socket assembly from the housing.
5. Pull the bulb out of the socket and insert the replace-
ment bulb.
6. Install the bulb and socket assembly into the housing,
and rotate the socket clockwise to lock it in place.
7. Reposition the wheel-well liner and install the
push-pins.
Front Fog Light
1. Open the hood.
2. Reach behind the headlight housing to access the bulb.
3. Rotate the bulb’s socket counterclockwise, and remove
the bulb and socket assembly from the fog light housing.
4. Pull the bulb out of the socket and insert the replace-
ment bulb.
CAUTION!
Do not touch the new bulb with your fingers. Oil
contamination will severely shorten bulb life. If the
bulb comes in contact with any oily surface, clean the
bulb with rubbing alcohol.
5. Install the bulb and socket assembly into the into the
fog light housing, and rotate the connector clockwise to
lock it in place.
448 MAINTAINING YOUR VEHICLE
Page 454 of 506
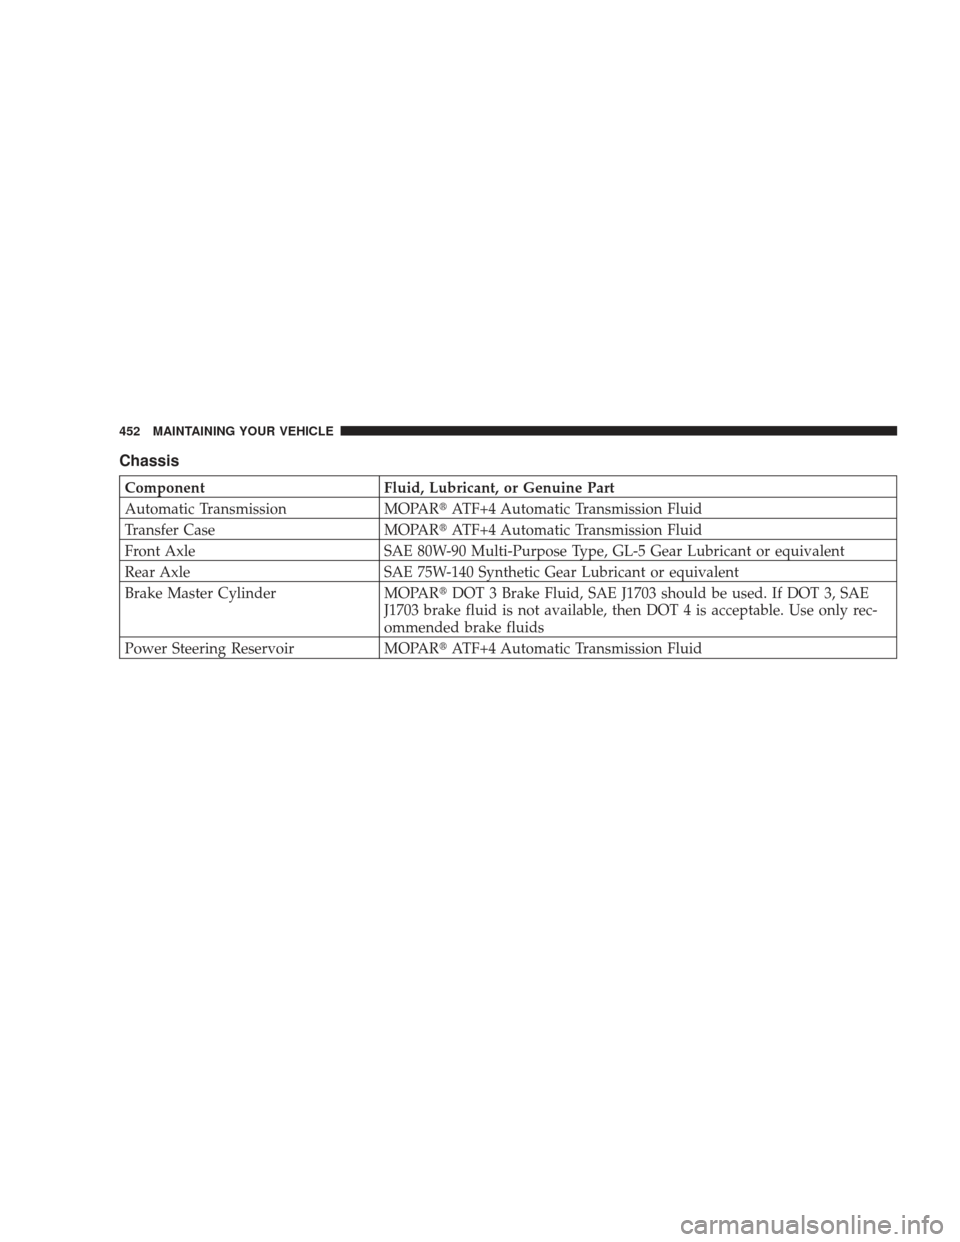
Chassis
ComponentFluid, Lubricant, or Genuine Part
Automatic Transmission MOPAR�ATF+4 Automatic Transmission Fluid
Transfer Case MOPAR�ATF+4 Automatic Transmission Fluid
Front Axle SAE 80W-90 Multi-Purpose Type, GL-5 Gear Lubricant or equivalent
Rear Axle SAE 75W-140 Synthetic Gear Lubricant or equivalent
Brake Master Cylinder MOPAR�DOT 3 Brake Fluid, SAE J1703 should be used. If DOT 3, SAE
J1703 brake fluid is not available, then DOT 4 is acceptable. Use only rec-
ommended brake fluids
Power Steering Reservoir MOPAR�ATF+4 Automatic Transmission Fluid
452 MAINTAINING YOUR VEHICLE
Page 484 of 506

Brakes............................... 429
Brake/Transmission Interlock ............... 295
Break-In Recommendations, New Vehicle ........ 80
Brightness, Interior Lights .................. 148
Bulb Replacement ..................... 446,447
Bulbs, Light .......................... 83,446
Calibration, Compass ..................... 221
Capacities, Fluid ........................ 450
Caps, Filler Fuel ............................... 370
Oil (Engine) .......................... 415
Power Steering ........................ 319
Radiator (Coolant Pressure) ............... 426
Car Washes ............................ 435
Carbon Monoxide Warning ...............81,369
Cargo Area Cover ....................... 190
Cargo Area Features ...................... 186
Cargo Compartment ...................... 186 Light
............................... 148
Cargo Light ............................ 148
Cargo Load Floor ........................ 186
Cargo Tie-Downs ........................ 188
Cargo (Vehicle Loading) ................... 371
Cellular Phone .......................... 94
Certification Label ....................... 371
Changing A Flat Tire ..................... 395
Chart, Tire Sizing ........................ 339
Check Engine Light
(Malfunction Indicator Light) .............204,411
Checking Your Vehicle For Safety ............. 81
Checks, Safety ........................... 81
Child Restraint .................... 71,72,76,78
Child Restraint Tether Anchors .............74,76
Child Safety Locks ........................ 33
Clean Air Gasoline ....................... 366
Cleaning Windshield Wiper Blades ................ 420
482 INDEX
Page 486 of 506
 .......................... 413
Power Steering ........................ 319
Disposal Antifreeze (Engine Coolant) ............... 427")
Dimmer Switch, Headlight................. 147
Dipsticks Oil (Engine) .......................... 413
Power Steering ........................ 319
Disposal Antifreeze (Engine Coolant) ............... 427
Engine Oil ........................... 415
Door Locks ............................. 29
Door Locks, Automatic .................... 31
Door Opener, Garage ..................... 165
Driving ............................ 313,314
Off-Pavement ......................... 314
Off-Road ............................ 314
On Hills ............................ 314
Through Flowing, Rising, or Shallow
Standing Water ........................ 314
When to Use Low Range ................. 314
Electric Remote Mirrors .................... 92 Electrical Outlet, Auxiliary (Power Outlet)
...... 180
Electrical Power Outlets ................... 180
Electronic Brake Control System ............. 324
Anti-Lock Brake System ................. 324
Brake Assist System .................... 325
Electronic Roll Mitigation ................ 326
Electronic Stability Program ............... 332
Traction Control System ................. 325
Electronic Roll Mitigation (ERM) ............. 326
Electronic Speed Control (Cruise Control) ...... 155
Electronic Stability Program (ESP) .........208,332
Electronic Vehicle Information Center (EVIC) .... 215
Emergency, In Case of Hazard Warning Flasher ................. 394
Jacking ............................. 395
Jump Starting ......................... 402
Overheating .......................... 394
Towing ............................. 404
Emission Control System Maintenance ...... 411,454
484 INDEX
 – if equipped/
Universal Garage Door
Opener (UGDO) – if
equipped/Vanity Light
M11 — 10 Amp RedAutomatic")

#1 a")