Page 72 of 521
Do not run the engine in a closed garage or in confined
areas any longer than needed to move your vehicle in or
out of the area.
If it is necessary to sit in a parked vehicle with the engine
running, adjust your heating or cooling controls to force
outside air into the vehicle. Set the blower at high speed.
If you are required to drive with the trunk/liftgate open,
make sure that all windows are closed and the climate
control BLOWER switch is set at high speed. DO NOT
use the recirculation mode.
The best protection against carbon monoxide entry into
the vehicle body is a properly maintained engine exhaust
system.
Whenever a change is noticed in the sound of the exhaust
system, when exhaust fumes can be detected inside the
vehicle, or when the underside or rear of the vehicle isdamaged, have a competent mechanic inspect the com-
plete exhaust system and adjacent body areas for broken,
damaged, deteriorated, or mispositioned parts. Open
seams or loose connections could permit exhaust fumes
to seep into the passenger compartment. In addition,
inspect the exhaust system each time the vehicle is raised
for lubrication or oil change. Replace as required.
Safety Checks You Should Make Inside The
Vehicle
Seat Belts
Inspect the belt system periodically, checking for cuts,
frays, and loose parts. Damaged parts must be replaced
immediately. Do not disassemble or modify the system.
Front seat belt assemblies must be replaced after a
collision. Rear seat belt assemblies must be replaced after
a collision if they have been damaged (i.e., bent retractor,
torn webbing, etc.). If there is any question regarding belt
or retractor condition, replace the belt.
70 THINGS TO KNOW BEFORE STARTING YOUR VEHICLE
Page 121 of 521
After turning the ignition ON, you can choose from a
High or Low heat setting. Illuminated LEDs on each
switch indicate the level of heat in use.
Press the switch once to select High-level heat-
ing. Press the switch a second time to select
Low-level heating. Press the switch a third time
to shut the heating elements Off. Two indica-
tors will illuminate for High, one for Low, and none for
Off.
When the High-level setting is selected, the heater will
provide a boosted heat level during the first four minutes
of operation. Then, the heat output will drop to the
normal High-level. If the High-level setting is selected,
the system will automatically switch to Low-level after
approximately 30 minutes of continuous operation. At
that time, the number of illuminated LEDs changes fromtwo to one, indicating the change. The Low-level setting
will turn Off automatically after approximately 30 min-
utes.
NOTE:Once a heat setting is selected, heat will be felt
within two to five minutes.
WARNING!
•Persons who are unable to feel pain to the skin
because of advanced age, chronic illness, diabetes,
spinal cord injury, medication, alcohol use, ex-
haustion or other physical condition must exercise
care when using the seat heater. It may cause burns
even at Low temperatures, especially if used for
long periods of time.
(Continued)
UNDERSTANDING THE FEATURES OF YOUR VEHICLE 119
3
Page 122 of 521
WARNING! (Continued)
•Do not place anything on the seat that insulates
against heat, such as a blanket or cushion. This
may cause the seat heater to overheat. To avoid
heated seat surfaces coming in contact with each
other and potential seat overheating, ALWAYS
ensure that the seat heater is in the Off position
(amber lights indicate High/Low/Off) before plac-
ing any of the seats into a folded flat position (if
equipped).
Rear Heated Seats — If Equipped
On vehicles equipped with rear heated seats, the seats
closest to the doors are heated. The controls for these
seats are located on the rear of the center console.Press the switch once to select High-level heat-
ing. Press the switch a second time to select
Low-level heating. Press the switch a third time
to shut the heating elements Off. Two indica-
tors will illuminate for High, one for Low, and none for
Off.Rear Heated Seat Switches
120 UNDERSTANDING THE FEATURES OF YOUR VEHICLE
Page 123 of 521
When the High-level setting is selected, the heater will
provide a boosted heat level during the first four minutes
of operation. Then, the heat output will drop to the
normal High-level. If the High-level setting is selected,
the system will automatically switch to Low-level after
approximately 30 minutes of continuous operation. At
that time, the number of illuminated LEDs changes from
two to one, indicating the change. The Low-level setting
will turn Off automatically after approximately 30 min-
utes.
NOTE:Once a heat setting is selected, heat will be felt
within two to five minutes.WARNING!
•Persons who are unable to feel pain to the skin
because of advanced age, chronic illness, diabetes,
spinal cord injury, medication, alcohol use, ex-
haustion or other physical condition must exercise
care when using the seat heater. It may cause burns
even at Low temperatures, especially if used for
long periods of time.
•Do not place anything on the seat that insulates
against heat, such as a blanket or cushion. This
may cause the seat heater to overheat. To avoid
heated seat surfaces coming in contact with each
other and potential seat overheating, always en-
sure that the seat heater is in the Off position
(amber lights indicate High/Low/Off) before plac-
ing any of the seats into a folded flat position (if
equipped).
UNDERSTANDING THE FEATURES OF YOUR VEHICLE 121
3
Page 160 of 521
Gate Operator/Canadian Programming
Canadian radio-frequency laws require transmitter sig-
nals to “time-out” (or quit) after several seconds of
transmission – which may not be long enough for
HomeLink�to pick up the signal during programming.
Similar to this Canadian law, some U.S. gate operators are
designed to “time-out” in the same manner.
It may be helpful to unplug the device during the cycling
process to prevent possible overheating of the garage
door or gate motor.
If you are having difficulties programming a garage door
opener or a gate operator, replace “Programming
HomeLink” Step 3 with the following:
3. Continue to press and hold the HomeLink�button
while you press and release - every two seconds
(“cycle”) your hand-held transmitter until HomeLink�has successfully accepted the frequency signal. The
EVIC display will change from “CHANNEL # TRAIN-
ING” to “CHANNEL # TRAINED.”
If you unplugged the device for training, plug it back in
at this time.
Then proceed with Step 4 under “Programming
HomeLink�” earlier in this section.
Using HomeLink�
To operate, simply press and release the programmed
HomeLink�button. Activation will now occur for the
trained device (i.e., garage door opener, gate operator,
security system, entry door lock, home/office lighting,
etc.) The hand-held transmitter of the device may also be
used at any time.
158 UNDERSTANDING THE FEATURES OF YOUR VEHICLE
Page 182 of 521
▫CD Player......................... 259
�CD/DVD Maintenance................. 260
�Radio Operation And Cellular Phones....... 260
�Climate Controls...................... 261
▫Manual Air Conditioning And Heating
System — If Equipped................. 261▫Automatic Temperature Control — If
Equipped.......................... 264
▫Operating Tips...................... 271
▫Operating Tips Chart................. 273
180 UNDERSTANDING YOUR INSTRUMENT PANEL
Page 263 of 521
CLIMATE CONTROLS
Manual Air Conditioning And Heating System —
If Equipped
The controls for the heating/air conditioning and venti-
lation system in this vehicle consist of a series of rotary
knobs. These comfort controls can be set to obtain desired
interior conditions.
The instrument panel features four dual-vane airflow
registers. Two registers are located on the outer ends of
the instrument panel and two are located in the center of
the instrument panel. These registers can be closed to
partially block airflow, and they can be adjusted to direct
airflow where the occupant desires.
Manual Air Conditioning And Heating Controls
UNDERSTANDING YOUR INSTRUMENT PANEL 261
4
Page 267 of 521
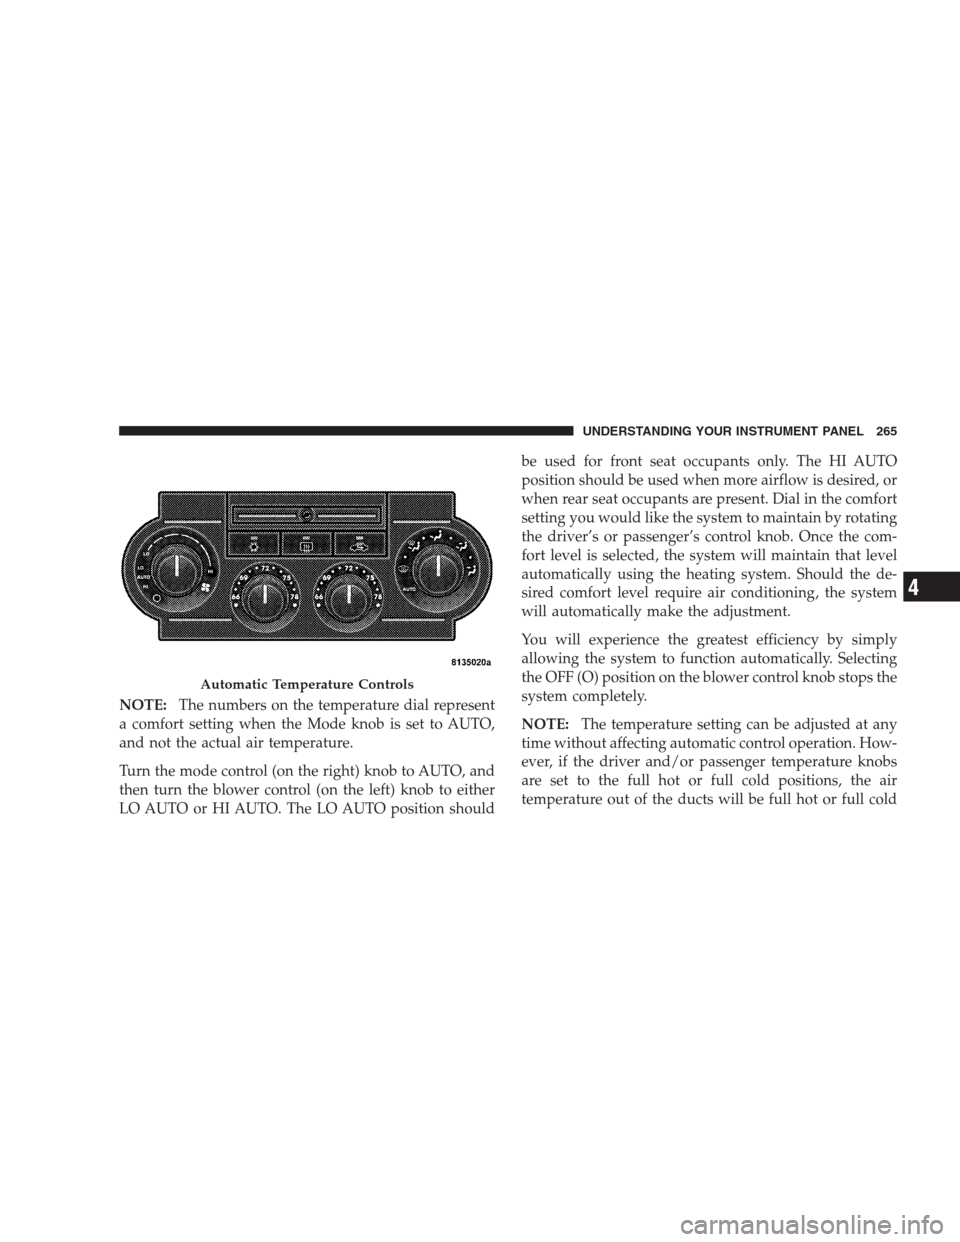
NOTE:The numbers on the temperature dial represent
a comfort setting when the Mode knob is set to AUTO,
and not the actual air temperature.
Turn the mode control (on the right) knob to AUTO, and
then turn the blower control (on the left) knob to either
LO AUTO or HI AUTO. The LO AUTO position shouldbe used for front seat occupants only. The HI AUTO
position should be used when more airflow is desired, or
when rear seat occupants are present. Dial in the comfort
setting you would like the system to maintain by rotating
the driver’s or passenger’s control knob. Once the com-
fort level is selected, the system will maintain that level
automatically using the heating system. Should the de-
sired comfort level require air conditioning, the system
will automatically make the adjustment.
You will experience the greatest efficiency by simply
allowing the system to function automatically. Selecting
the OFF (O) position on the blower control knob stops the
system completely.
NOTE:The temperature setting can be adjusted at any
time without affecting automatic control operation. How-
ever, if the driver and/or passenger temperature knobs
are set to the full hot or full cold positions, the air
temperature out of the ducts will be full hot or full cold
Automatic Temperature Controls
UNDERSTANDING YOUR INSTRUMENT PANEL 265
4