Page 53 of 521

•Airbag Warning Light
•Driver Airbag
•Passenger Airbag
•Side Curtain Airbags above Sid")
Airbag System Components
The airbag system consists of the following:
•Occupant Restraint Control (ORC)
•Airbag Warning Light
•Driver Airbag
•Passenger Airbag
•Side Curtain Airbags above Side Windows
•Side Remote Acceleration Sensors
•Driver Side Seat Track Position Sensor
•Steering Wheel and Column
•Instrument Panel
•Interconnecting Wiring
•Knee Impact Bolsters
•Front Acceleration Sensors
•Driver and Front Passenger Seat Belt Pretensioners
How the Airbag System Works
•
TheOccupant Restraint Control (ORC)determines if
a frontal, side, or rollover collision is severe enough to
require the front and/or side airbags to inflate. The
front airbag inflators are designed to provide different
rates of airbag inflation from direction provided by the
ORC. The ORC will detect roll overs, not rear impacts.
The ORC also monitors the readiness of the electronic
parts of the system whenever the ignition switch is in
the START or ON positions. These include all of the
items listed above except the knee bolster, the instru-
ment panel, and the steering wheel and column. If the
key is in the LOCK position, in the ACC position, or
not in the ignition, the airbags are not on and will not
inflate.
THINGS TO KNOW BEFORE STARTING YOUR VEHICLE 51
2
Page 140 of 521
contains both driver and passenger reading lights), read-
ing lights (located above the rear doors), and a rear cargo
light. Opening a door, pressing the UNLOCK button on
the Remote Keyless Entry (RKE) transmitter or turning
the center of the multifunction control lever to the
extreme up position, will activate all interior courtesy
lights.
Front Map/Reading Lights
These lights are mounted in the overhead console. Each
light can be turned on by pressing the recessed area of the
lens. To turn these lights off, press the recessed area of the
lens a second time. There are also reading lights located
above the rear doors. Each light can be turned on by
pressing the front recessed area of the lens. To turn these
lights off, press the recessed area of the lens a second
time.
Front Map/Reading Lights
138 UNDERSTANDING THE FEATURES OF YOUR VEHICLE
Page 156 of 521
The lights also turn on when a front door or rear door is
opened. The lights will also turn on when the UNLOCK
button on the remote keyless entry transmitter is pressed.
Sunglasses Storage
At the rear of the console a compartment is provided for
the storage of a pair of sunglasses.
The storage compartment access is a�push/push�design.
Push the finger depression on the overhead console to
open. Push the finger depression to close.
GARAGE DOOR OPENER — IF EQUIPPED
HomeLink�replaces up to three remote controls (hand-
held transmitters) that operate devices such as garage
door openers, motorized gates, lighting, or home security
systems. The HomeLink�unit operates off your vehicle’s
battery.The HomeLink�buttons are located in the overhead
console, and contain one, two, or three dots/lines desig-
nating the different HomeLink�channels.
NOTE:HomeLink�is disabled when the Vehicle Secu-
rity Alarm is active.
HomeLink�Buttons
154 UNDERSTANDING THE FEATURES OF YOUR VEHICLE
Page 181 of 521
 — If
Equipped............................ 247
▫Connecting The iPod�................. 248
▫Using This Feature................... 248
▫Controlling The iPod�Us")
�Universal Consumer Interface (UCI) — If
Equipped............................ 247
▫Connecting The iPod�................. 248
▫Using This Feature................... 248
▫Controlling The iPod�Using Radio
Buttons........................... 248
▫Play Mode......................... 249
▫List Or Browse Mode................. 250
�uconnect�studios (Satellite Radio) — If
Equipped (REN/REQ/RER/RES
Radios Only)......................... 252
▫System Activation.................... 252
▫Electronic Serial Number/Sirius
Identification Number (ESN/SID)......... 253▫Selecting uconnect�studios (Satellite)
Mode............................. 253
▫Satellite Antenna..................... 253
▫Reception Quality.................... 254
▫Operating Instructions - uconnect�studios
(Satellite) Mode..................... 254
▫Operating Instructions - uconnect�phone
(If Equipped)....................... 256
�uconnect studios�(Sirius Backseat TV™) —
If Equipped.......................... 257
�Video Entertainment System™ (Sales Code
XRV) — If Equipped.................... 257
�Remote Sound System Controls —
If Equipped.......................... 258
▫Radio Operation..................... 259
UNDERSTANDING YOUR INSTRUMENT PANEL 179
4
Page 214 of 521

Program Type16-Digit Character
Display
Personality Persnlty
Public Public
Rhythm and Blues R & B
Religious Music Rel Musc
Religious Talk Rel Talk
Rock Rock
Soft Soft
Soft Rock Soft Rck
Soft Rhythm and Blues Soft R & B
Sports Sports
Talk Talk
Top 40 Top 40
Weather Weather
By pressing the SEEK button when the Music Type icon
is displayed, the radio will be tuned to the next frequencystation with the same selected Music Type name. The
Music Type function only operates when in the FM
mode.
If a preset button is activated while in the Music Type
(Program Type) mode, the Music Type mode will be
exited and the radio will tune to the preset station.
SETUP Button
Pressing the SETUP button allows you to select between
the following items:
NOTE:Turn the TUNE/SCROLL control knob to scroll
through the entries. Push the AUDIO/SELECT button to
select an entry and make changes.
•DVD Enter -When the disc is in DVD Menu mode,
selecting DVD Enter will allow you to play the current
highlighted selection. Use the remote control to scroll
up and down the menu (if equipped).
212 UNDERSTANDING YOUR INSTRUMENT PANEL
Page 215 of 521
.
•DVD Play Options -Selecting the DVD Play Options
will display the followin")
•DISC Play/Pause -You can toggle between
playing the DVD and pausing the DVD by
pushing the SELECT button (if equipped).
•DVD Play Options -Selecting the DVD Play Options
will display the following:
•Subtitle – Repeatedly pressing SELECT will switch
subtitles to different subtitle languages that are
available on the disc (if equipped).
•Audio Stream – Repeatedly pressing SELECT will
switch to different audio languages (if supported on
the disc) (if equipped).
•Angle – Repeatedly pressing SELECT will change
the viewing angle if supported by the DVD disc (if
equipped).NOTE:
•The available selections for each of the above entries
varies depending upon the disc.
•These selections can only be made while playing a
DVD.
•VES™ Power -Allows you to turn VES™ ON and
OFF (if equipped).
•VES™ Lock -Locks out rear VES™ remote controls (if
equipped).
•VES™ CH1/CH2 -Allows the user to change the
mode of either the IR1 or IR2 wireless headphones by
pressing the AUDIO/SELECT button (if equipped).
•Set Home Clock -Pressing the SELECT button allows
you to set the clock. Turn the TUNE/SCROLL control
knob to adjust the hours and then press and turn the
UNDERSTANDING YOUR INSTRUMENT PANEL 213
4
Page 217 of 521

Aspect Ratio — If Equipped
Selecting this item allows you to choose between wide
screen, pan scan, and letter box.
AutoPlay — If Equipped
When this is set to On and a DVD video is inserted, it will
bypass the DVD menu screen and automatically play the
movie. In some rare cases, the DVD player may not
auto-play the main title. In such cases, use the MENU
button on the remote control to select desired title to play.
NOTE:The user will have to set these defaults before
loading a disc. If changes are made to these settings after
a disc is loaded, changes will not be effective. Also, the
defaults are effective only if the disc supports the
customer-preferred settings.
AM and FM Buttons
Press the buttons to select AM or FM mode.
SET Button — To Set the Pushbutton Memory
When you are receiving a station that you wish to
commit to pushbutton memory, press the SET button.
The symbol SET 1 will now show in the display window.
Select the button (1-6) you wish to lock onto this station
and press and release that button. If a button is not
selected within five seconds after pressing the SET but-
ton, the station will continue to play but will not be
stored into pushbutton memory.
You may add a second station to each pushbutton by
repeating the above procedure with this exception: Press
the SET button twice and SET 2 will show in the display
window. Each button can be set for SET 1 and SET 2 in
both AM and FM. This allows a total of 12 AM, 12 FM,
and 12 Satellite (if equipped) stations to be stored into
pushbutton memory. The stations stored in SET 2
memory can be selected by pressing the pushbutton
twice.
UNDERSTANDING YOUR INSTRUMENT PANEL 215
4
Page 259 of 521
uconnect studios�(SIRIUS BACKSEAT TV™) —
IF EQUIPPED
Satellite video uses direct satellite receiver broadcasting
technology to provide streaming video. The subscription
service provider is SIRIUS Satellite Radio. SIRIUS Back-
seat TV™ offers three video channels for family enter-
tainment, directly from its satellites and broadcasting
studios.
NOTE:SIRIUS service is not available in Hawaii and
has limited coverage in Alaska.
Refer to your Video Entertainment System (VES)™, RER
Navigation or REN Multimedia User Manuals for de-
tailed operating instructions.
VIDEO ENTERTAINMENT SYSTEM™ (SALES
CODE XRV) — IF EQUIPPED
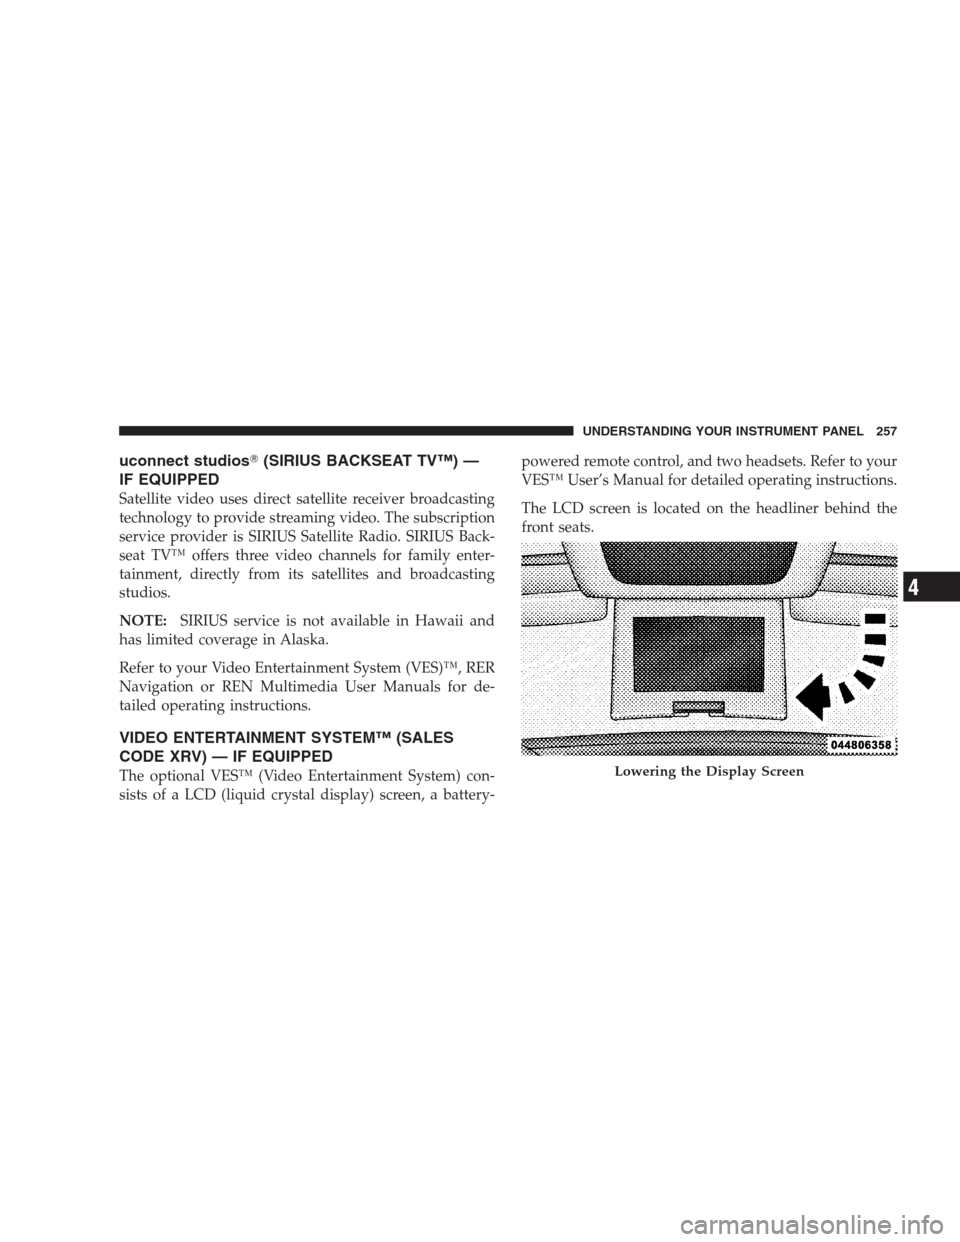
The optional VES™ (Video Entertainment System) con-
sists of a LCD (liquid crystal display) screen, a battery-powered remote control, and two headsets. Refer to your
VES™ User’s Manual for detailed operating instructions.
The LCD screen is located on the headliner behind the
front seats.Lowering the Display Screen
UNDERSTANDING YOUR INSTRUMENT PANEL 257
4
, read-
ing lights (located above the rear doors), and a rear cargo
light. Opening a door, pressing the UNLOCK button on
the Remote Keyless Entry (RKE")