2009 JEEP GRAND CHEROKEE low oil pressure
[x] Cancel search: low oil pressurePage 73 of 521

Airbag Warning Light
The light should come on and remain on for six to eight
seconds as a bulb check when the ignition switch is first
turned ON. If the light is not lit during starting, see your
authorized dealer. If the light stays on, flickers, or comes
on while driving, have the system checked by an autho-
rized dealer.
Defroster
Check operation by selecting the defrost mode and place
the blower control on high speed. You should be able to
feel the air directed against the windshield. See your
authorized dealer for service if your defroster is
inoperable.
Periodic Safety Checks You Should Make Outside
The Vehicle
Tires
Examine tires for excessive tread wear and uneven wear
patterns. Check for stones, nails, glass, or other objectslodged in the tread. Inspect the tread and sidewall for
cuts and cracks. Check the wheel nuts for tightness.
Check the tires (including spare) for proper pressure.
Lights
Have someone observe the operation of exterior lights
while you work the controls. Check turn signal and high
beam indicator lights on the instrument panel.
Door Latches
Check for positive closing, latching, and locking.
Fluid Leaks
Check area under vehicle after overnight parking for fuel,
engine coolant, oil, or other fluid leaks. Also, if gasoline
fumes are detected or if fuel, power steering fluid, or
brake fluid leaks are suspected, the cause should be
located and corrected immediately.
THINGS TO KNOW BEFORE STARTING YOUR VEHICLE 71
2
Page 189 of 521

8. Tachometer
Indicates the engine speed in revolutions per minute
(RPM).
9. Vehicle Security Light
This light will flash rapidly for approximately
15 seconds when the vehicle theft alarm is
arming. The light will flash at a slower speed
continuously after the alarm is set. The security
light will also come on for about three seconds when the
ignition is first turned on.
10. Oil Pressure Warning Light
This light indicates low engine oil pressure. The
light should turn on momentarily when the engine
is started. If the light turns on while driving, stop the
vehicle and shut off the engine as soon as possible. A
chime will sound for four minutes when this light turns
on.Do not operate the vehicle until the cause is corrected.
This light does not show how much oil is in the engine.
The engine oil level must be checked under the hood.
11. Electronic Stability Program (ESP) Indicator Light
/ Traction Control System (TCS) Indicator Light
If this indicator light flashes during accelera-
tion, apply as little throttle as possible. While
driving, ease up on the accelerator. Adapt your
speed and driving to the prevailing road con-
ditions, and do not switch off the Electronic Stability
Program (ESP), or Traction Control System (TCS).
12. Tire Pressure Monitoring Telltale Light
Each tire, including the spare (if provided),
should be checked monthly, when cold and
inflated to the inflation pressure recommended
by the vehicle manufacturer on the vehicle
placard or tire inflation pressure label. (If your vehicle
has tires of a different size than the size indicated on the
UNDERSTANDING YOUR INSTRUMENT PANEL 187
4
Page 192 of 521
WARNING!
A hot engine cooling system is dangerous. You or
others could be badly burned by steam or boiling
coolant. You may want to call an authorized dealer-
ship for service if your vehicle overheats. If you
decide to look under the hood yourself, see Section 7
of this manual. Follow the warnings under the Cool-
ing System Pressure Cap paragraph.
14. Electronic Vehicle Information Center (EVIC)
Display
When the appropriate conditions exist, this display
shows the Electronic Vehicle Information Center (EVIC)
messages. Refer to “Electronic Vehicle Information Cen-
ter” later in this section.15. TOW/HAUL Indicator Light — If Equipped
This light will illuminate when the TOW/
HAUL button has been selected. The TOW/
HAUL button is located in the center of the
instrument panel (below the climate controls).
16. Electronic Stability Program (ESP) Indicator Light
/ Brake Assist System (BAS) Warning Light
The malfunction lamp for the Electronic Stabil-
ity Program (ESP) is combined with Brake
Assist System (BAS). The yellow “ESP/BAS
Warning Lamp” comes on when the ignition
switch is turned to the “ON” position. They should go
out with the engine running. If the “ESP/BAS Warning
Lamp” comes on continuously with the engine running,
a malfunction has been detected in either the ESP or the
BAS system. If this light remains on after several ignition
cycles, and the vehicle has been driven several miles at
speeds greater than 30 mph (48 km/h), see an authorized
dealer as soon as possible.
190 UNDERSTANDING YOUR INSTRUMENT PANEL
Page 284 of 521
release it as soon as the starter engages. The starter motor
will disengage automatically in 10 seconds. Once this
occurs, release the accelerator pedal, turn the ignition
switch to the LOCK position, wait 10 to 15 seconds, then
repeat the normal starting procedure.
CAUTION!
To prevent damage to the starter, wait 10 to 15 sec-
onds before trying again.
After Starting
The idle speed is controlled automatically and it will
decrease as the engine warms up.
Normal Starting — Diesel Engines
Observe the following when the engine is operating.
•All message center lights are off.
•Malfunction Indicator Light (MIL) is off.
•Low Oil Pressure Light is off.
Cold Weather Precautions
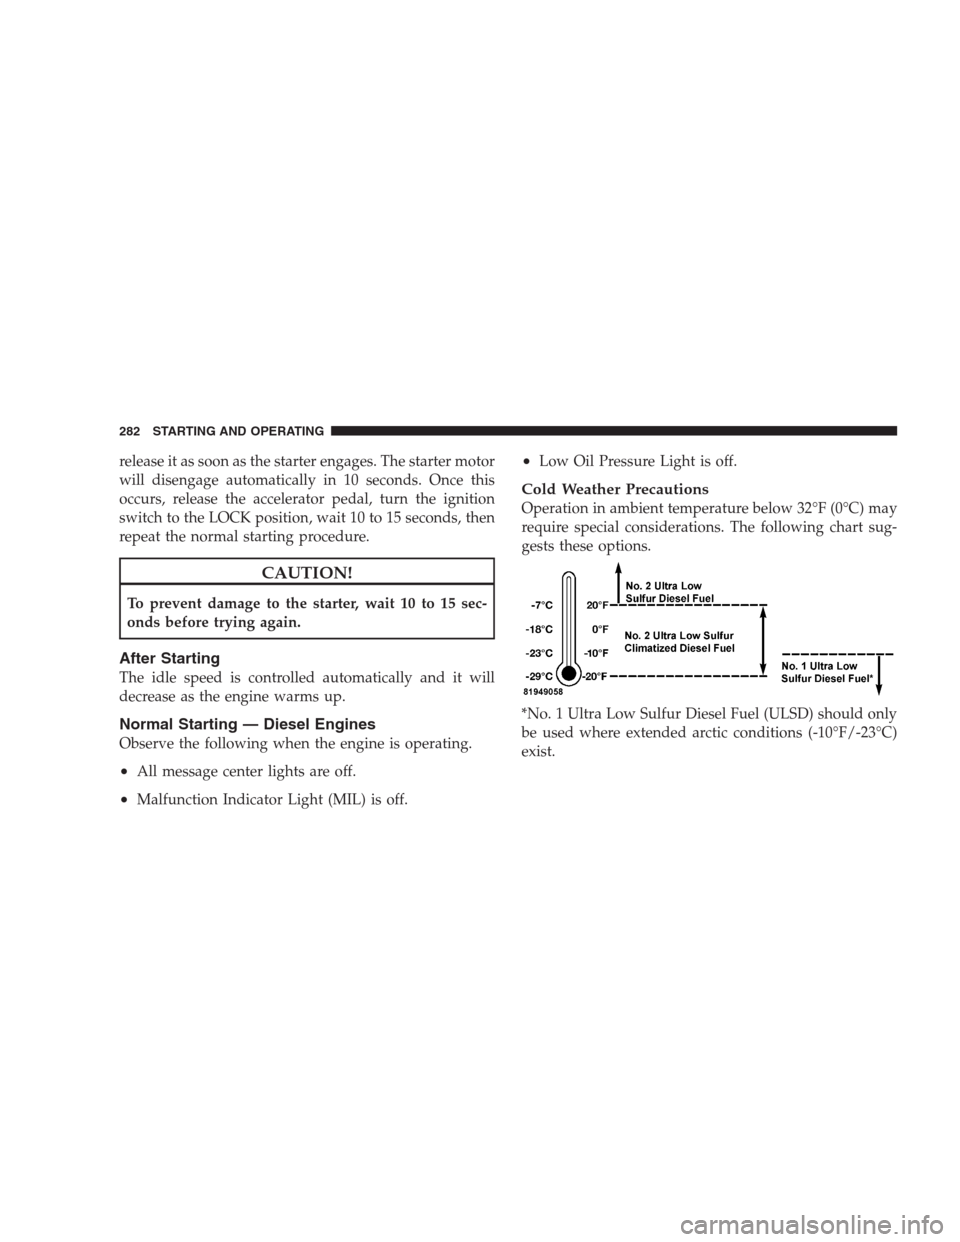
Operation in ambient temperature below 32°F (0°C) may
require special considerations. The following chart sug-
gests these options.
*No. 1 Ultra Low Sulfur Diesel Fuel (ULSD) should only
be used where extended arctic conditions (-10°F/-23°C)
exist.
282 STARTING AND OPERATING
Page 286 of 521

depending on engine temperature. When the “Wait To
Start” goes out, the engine is ready to start.
4. Tip Start Feature
Do notpress the accelerator. Use the Fob with Integrated
Key (FOBIK) to briefly turn the ignition switch to the
START position and then release it. The starter motor will
continue to run, and it will automatically disengage
when the engine is running. If the engine fails to start, the
starter will disengage automatically in 20 seconds. The
starter can be disengaged by turning the ignition key to
the OFF position, if required.
5. After the engine starts, allow it to idle for approxi-
mately 30 seconds before driving. This allows oil to
circulate and lubricate the turbocharger.
Avoid prolonged idling in ambient temperatures below
0°F (-18°C). Long periods of idling may be harmful to
your engine because combustion chamber temperatures
can drop so low that the fuel may not burn completely.Incomplete combustion allows carbon and varnish to
form on piston rings and injector nozzles. Also, the
unburned fuel can enter the crankcase, diluting the oil
and causing rapid wear to the engine.
Engine Warm-Up
Avoid full throttle operation when the engine is cold.
When starting a cold engine, bring the engine up to
operating speed slowly to allow the oil pressure to
stabilize as the engine warms up.
NOTE:High-speed, no-load running of a cold engine
can result in excessive white smoke and poor engine
performance. No-load engine speeds should be kept
under 1,200 RPM during the warm-up period, especially
in cold ambient temperature conditions.
If temperatures are below 32°F (0°C), operate the engine
at moderate speeds for five minutes before full loads are
applied.
284 STARTING AND OPERATING
Page 416 of 521
operate satisfactorily without periodic maintenance.
However, if a malfunction of these items does occur, it
could adversely affect the engine or vehicle performance.
These items should be inspected if a malfunction is
observed or suspected.
Engine Oil
Checking Oil Level
To assure proper engine lubrication, the engine oil must
be maintained at the correct level. Check the oil level at
regular intervals, such as every fuel stop. The best time to
check the engine oil level is about five minutes after a
fully warmed engine is shut off, or before starting the
engine after it has sat overnight.
Checking the oil while the vehicle is on level ground will
improve the accuracy of the oil level readings. Maintain
the oil level in the SAFE level range. Adding 1 U.S. Quart(0.95L) of oil when the level is at the bottom of the SAFE
range will result in the level being at the top of the SAFE
range.
CAUTION!
Overfilling or underfilling the crankcase will cause
aeration or loss of oil pressure. This could damage
your engine.
3.0L Diesel Engine Only
Before checking the engine oil level, turn the engine off
and wait 15 minutes to allow for the oil to return to the oil
pan.
Change Engine Oil
Refer to the “Maintenance Schedule” in Section 8 for
proper maintenance intervals.
414 MAINTAINING YOUR VEHICLE
Page 465 of 521
if it has been 6 months since your last oil change even
if the oil change indicator message is NOT illumi-
nated.
•Change your engine oil more often if you drive your
vehicle off-road for an extended period of time.
•Under no circumstances should oil change intervals
exceed 6,000 miles (10,000 km) or 6 months, whichever
comes first.
Your authorized dealer will reset the oil change indicator
message after completing the scheduled oil change. If this
scheduled oil change is performed by someone other
than your authorized dealer the message can be reset by
referring to the steps described under ”Electronic Vehicle
Information Center” in Section 4 of this manual.
At Each Stop for Fuel
•Check the engine oil level about 5 minutes after a fully
warmed engine is shut off. Checking the oil level whilethe vehicle is on level ground will improve the accu-
racy of the oil level reading. Add oil only when the
level is at or below the ADD or MIN mark.
•Check the windshield washer solvent and add if
required.
Once a Month
•Check tire pressure and look for unusual wear or
damage.
•Inspect the battery and clean and tighten the terminals
as required.
•Check the fluid levels of the coolant reservoir, brake
master cylinder, power steering and transmission
(4.7L and 5.7L only) and add as needed.
•Check all lights and other electrical items for correct
operation.
MAINTENANCE SCHEDULES 463
8
M
A
I
N
T
E
N
A
N
C
E
S
C
H
E
D
U
L
E
S
Page 479 of 521
•Check the windshield washer solvent and add if
required.
Once a Month
•Check tire pressure and look for unusual wear or
damage.
•Inspect the battery and clean and tighten the terminals
as required.
•Check the fluid levels of the coolant reservoir, brake
master cylinder, and power steering and add as
needed.
•Check all lights and other electrical items for correct
operation.
At Each Oil Change
•Change the engine oil filter.
•Inspect the brake hoses and lines.
•Inspect for the presence of water in the fuel filter/
water separator unit.
CAUTION!
Failure to perform the required maintenance items
may result in damage to the vehicle.
Required Maintenance Intervals
Refer to the Maintenance Schedules on the following
pages for the required maintenance intervals.
MAINTENANCE SCHEDULES 477
8
M
A
I
N
T
E
N
A
N
C
E
S
C
H
E
D
U
L
E
S