2009 INFINITI QX56 transmission
[x] Cancel search: transmissionPage 3639 of 4171
STR-10
< COMPONENT DIAGNOSIS >
B TERMINAL CIRCUIT
COMPONENT DIAGNOSIS
B TERMINAL CIRCUIT
DescriptionINFOID:0000000003771792
Terminal "2" (B) is constantly supplied with battery power.
Diagnosis ProcedureINFOID:0000000003771793
CAUTION:
Perform diagnosis under the condition that the engine cannot start by the following procedure.
1. Remove fuel pump fuse.
2. Crank or start the engine (where possible) until the fuel pressure is depleted.
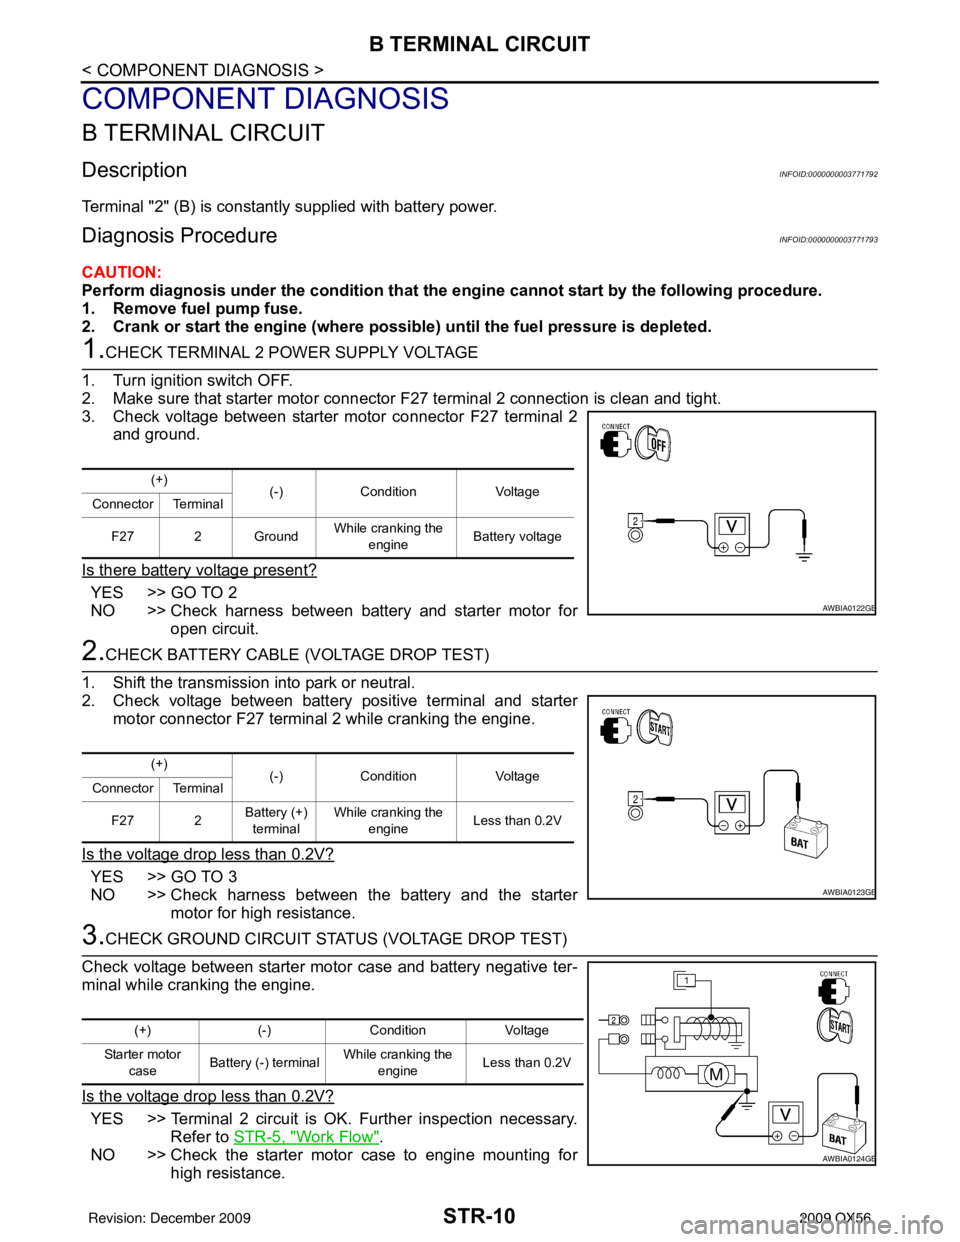
1.CHECK TERMINAL 2 POWER SUPPLY VOLTAGE
1. Turn ignition switch OFF.
2. Make sure that starter motor connector F27 terminal 2 connection is clean and tight.
3. Check voltage between starter motor connector F27 terminal 2
and ground.
Is there battery voltage present?
YES >> GO TO 2
NO >> Check harness between battery and starter motor for open circuit.
2.CHECK BATTERY CABLE (VOLTAGE DROP TEST)
1. Shift the transmission into park or neutral.
2. Check voltage between battery positive terminal and starter motor connector F27 terminal 2 while cranking the engine.
Is the voltage drop less than 0.2V?
YES >> GO TO 3
NO >> Check harness between the battery and the starter motor for high resistance.
3.CHECK GROUND CIRCUIT STATUS (VOLTAGE DROP TEST)
Check voltage between starter motor case and battery negative ter-
minal while cranking the engine.
Is the voltage drop less than 0.2V?
YES >> Terminal 2 circuit is OK. Further inspection necessary. Refer to STR-5, "
Work Flow".
NO >> Check the starter motor case to engine mounting for high resistance.
(+) (-)Condition Voltage
Connector Terminal
F27 2 Ground While cranking the
engine Battery voltage
AWBIA0122GB
(+)
(-)Condition Voltage
Connector Terminal
F27 2 Battery (+)
terminal While cranking the
engine Less than 0.2V
AWBIA0123GB
(+)
(-)Condition Voltage
Starter motor case Battery (-) terminal
While cranking the
engine Less than 0.2V
AWBIA0124GB
Revision: December 20092009 QX56
Page 3640 of 4171
S CONNECTOR CIRCUITSTR-11
< COMPONENT DIAGNOSIS >
C
DE
F
G H
I
J
K L
M A
STR
NP
O
S CONNECTOR CIRCUIT
DescriptionINFOID:0000000003771794
Terminal "1" (S) is the power supply for the starter mo
tor magnetic switch. Terminal 1 is supplied with power
when the ignition switch is turned to the START position while the selector lever is in the P or N position.
Diagnosis ProcedureINFOID:0000000003771795
CAUTION:
Perform diagnosis under the cond ition that engine cannot start by the following procedure.
1. Remove fuel pump fuse.
2. Crank or start the engine (where possi ble) until the fuel pressure is released.
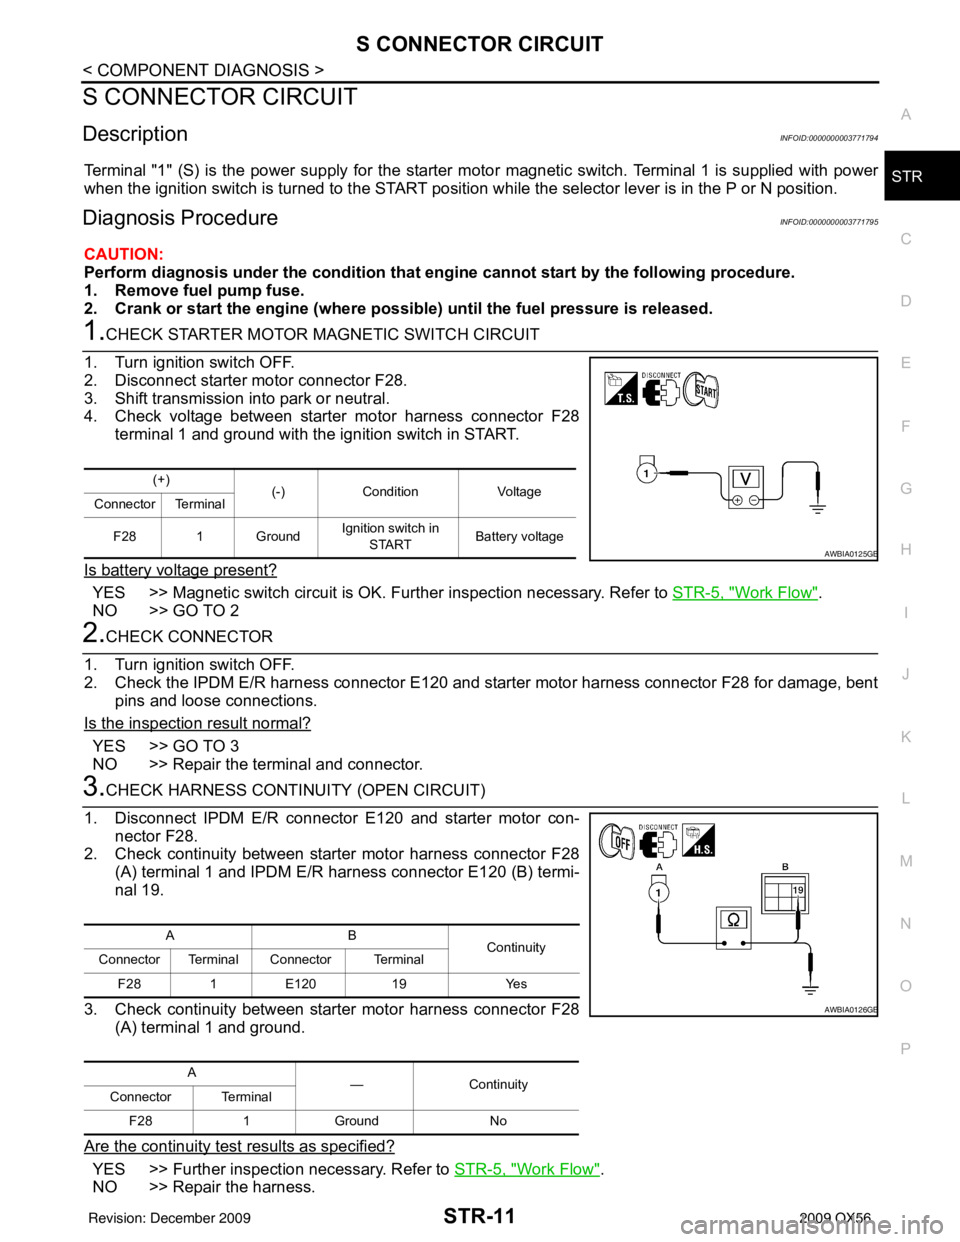
1.CHECK STARTER MOTOR MAGNETIC SWITCH CIRCUIT
1. Turn ignition switch OFF.
2. Disconnect starter motor connector F28.
3. Shift transmission into park or neutral.
4. Check voltage between starter motor harness connector F28 terminal 1 and ground with the ignition switch in START.
Is battery voltage present?
YES >> Magnetic switch circuit is OK. Further inspection necessary. Refer to STR-5, "Work Flow".
NO >> GO TO 2
2.CHECK CONNECTOR
1. Turn ignition switch OFF.
2. Check the IPDM E/R harness connector E120 and starter motor harness connector F28 for damage, bent pins and loose connections.
Is the inspection result normal?
YES >> GO TO 3
NO >> Repair the terminal and connector.
3.CHECK HARNESS CONTI NUITY (OPEN CIRCUIT)
1. Disconnect IPDM E/R connector E120 and starter motor con- nector F28.
2. Check continuity between starter motor harness connector F28 (A) terminal 1 and IPDM E/R harness connector E120 (B) termi-
nal 19.
3. Check continuity between starter motor harness connector F28 (A) terminal 1 and ground.
Are the continuity test results as specified?
YES >> Further inspection necessary. Refer to STR-5, "Work Flow".
NO >> Repair the harness.
(+) (-)Condition Voltage
Connector Terminal
F28 1 Ground Ignition switch in
START Battery voltage
AWBIA0125GB
AB
Continuity
Connector Terminal Connector Terminal
F28 1E120 19 Yes
A —Con tin uit y
Connector Terminal
F28 1Ground No
AWBIA0126GB
Revision: December 20092009 QX56
Page 3649 of 4171
TM-1
TRANSMISSION & DRIVELINE
CEF
G H
I
J
K L
M
SECTION TM
A
B
TM
N
O P
CONTENTS
TRANSAXLE & TRANSMISSION
BASIC INSPECTION ....... .............................5
DIAGNOSIS AND REPAIR WORKFLOW ..... .....5
Work Flow ........................................................... ......5
Diagnostic Work Sheet ..............................................6
FUNCTION DIAGNOSIS ...............................8
A/T CONTROL SYSTEM ................................ .....8
Cross-Sectional View (2WD models) .................. ......8
Cross-Sectional View (4WD models) ........................9
Shift Mechanism ........................................................9
TCM Function ..........................................................20
CAN Communication ...............................................21
Input/Output Signal of TCM .....................................22
Line Pressure Control .............................................22
Shift Control ............................................................24
Lock-up Control .......................................................25
Engine Brake Control ..............................................26
Control Valve ...........................................................26
Component Parts Location ......................................28
A/T SHIFT LOCK SYSTEM ............................ ....29
System Description ............................................. ....29
Component Parts Location ......................................29
ON BOARD DIAGNOSTIC (OBD) SYSTEM ......30
Introduction ......................................................... ....30
OBD-II Function for A/T System ..............................30
One or Two Trip Detection Logic of OBD-II ............30
OBD-II Diagnostic Trouble Code (DTC) ..................30
Malfunction Indicator Lamp (MIL) ............................31
DIAGNOSIS SYSTEM (TCM) .............................32
CONSULT-III Function (TRANSMISSION) ......... ....32
Diagnosis Procedure without CONSULT-III ............37
COMPONENT DIAGNOSIS .........................39
U1000 CAN COMM CIRCUIT ......................... ....39
Description .......................................................... ....39
On Board Diagnosis Logic ......................................39
Possible Cause .................................................... ....39
DTC Confirmation Procedure ..................................39
Diagnosis Procedure ...............................................39
P0615 STARTER RELAY .................................40
Description ...............................................................40
CONSULT-III Reference Value in Data Monitor
Mode ........................................................................
40
On Board Diagnosis Logic .......................................40
Possible Cause ........................................................40
DTC Confirmation Procedure ..................................40
Diagnosis Procedure ...............................................40
P0700 TRANSMISSION CONTROL .................43
Description ...............................................................43
On Board Diagnosis Logic .......................................43
Possible Cause ........................................................43
DTC Confirmation Procedure ..................................43
Diagnosis Procedure ...............................................43
P0705 TRANSMISSION RANGE SWITCH A ...44
Description ...............................................................44
CONSULT-III Reference Value in Data Monitor
Mode ........................................................................
44
On Board Diagnosis Logic .......................................44
Possible Cause ........................................................44
DTC Confirmation Procedure ..................................44
Diagnosis Procedure ...............................................44
P0717 INPUT SPEED SENSOR A ....................47
Description ...............................................................47
CONSULT-III Reference Value in Data Monitor
Mode ........................................................................
47
On Board Diagnosis Logic .......................................47
Possible Cause ........................................................47
DTC Confirmation Procedure ..................................47
Diagnosis Procedure ...............................................47
P0720 OUTPUT SPEED SENSOR ...................49
Description ...............................................................49
CONSULT-III Reference Value in Data Monitor
Mode ........................................................................
49
Revision: December 20092009 QX56
Page 3650 of 4171

TM-2
On Board Diagnosis Logic ......................................49
Possible Cause .......................................................49
DTC Confirmation Procedure .................................49
Diagnosis Procedure ..............................................50
P0725 ENGINE SPEED .....................................52
Description ........................................................... ...52
CONSULT-III Reference Value in Data Monitor
Mode .................................................................... ...
52
On Board Diagnosis Logic ......................................52
Possible Cause .......................................................52
DTC Confirmation Procedure .................................52
Diagnosis Procedure ..............................................52
P0731 1GR INCORRECT RATIO ......................54
Description ........................................................... ...54
On Board Diagnosis Logic ......................................54
Possible Cause .......................................................54
DTC Confirmation Procedure .................................54
Diagnosis Procedure ..............................................55
P0732 2GR INCORRECT RATIO ......................56
Description ........................................................... ...56
On Board Diagnosis Logic ......................................56
Possible Cause .......................................................56
DTC Confirmation Procedure .................................56
Diagnosis Procedure ..............................................57
P0733 3GR INCORRECT RATIO ......................58
Description ........................................................... ...58
On Board Diagnosis Logic ......................................58
Possible Cause .......................................................58
DTC Confirmation Procedure .................................58
Diagnosis Procedure ..............................................59
P0734 4GR INCORRECT RATIO ......................60
Description ........................................................... ...60
On Board Diagnosis Logic ......................................60
Possible Cause .......................................................60
DTC Confirmation Procedure .................................60
Diagnosis Procedure ..............................................61
P0735 5GR INCORRECT RATIO ......................62
Description ........................................................... ...62
On Board Diagnosis Logic ......................................62
Possible Cause .......................................................62
DTC Confirmation Procedure .................................62
Diagnosis Procedure ..............................................63
P0740 TORQUE CONVERTER .........................64
Description ........................................................... ...64
CONSULT-III Reference Value in Data Monitor
Mode .................................................................... ...
64
On Board Diagnosis Logic ......................................64
Possible Cause .......................................................64
DTC Confirmation Procedure .................................64
Diagnosis Procedure ..............................................64
P0744 TORQUE CONVERTER .........................66
Description ........................................................... ...66
CONSULT-III Reference Value in Data Monitor
Mode .................................................................... ...
66
On Board Diagnosis Logic ......................................66
Possible Cause .......................................................66
DTC Confirmation Procedure ..................................66
Diagnosis Procedure ...............................................67
P0745 PRESSURE CONTROL SOLENOID A ...68
Description ........................................................... ...68
CONSULT-III Reference Value in Data Monitor
Mode .......................................................................
68
On Board Diagnosis Logic ......................................68
Possible Cause .......................................................68
DTC Confirmation Procedure ..................................68
Diagnosis Procedure ...............................................68
P1705 TP SENSOR ...........................................70
Description ........................................................... ...70
CONSULT-III Reference Value in Data Monitor
Mode .......................................................................
70
On Board Diagnosis Logic ......................................70
Possible Cause .......................................................70
DTC Confirmation Procedure ..................................70
Diagnosis Procedure ...............................................70
P1710 TRANSMISSION FLUID TEMPERA-
TURE SENSOR .................................................
72
Description ........................................................... ...72
CONSULT-III Reference Value in Data Monitor
Mode .......................................................................
72
On Board Diagnosis Logic ......................................72
Possible Cause .......................................................72
DTC Confirmation Procedure ..................................72
Diagnosis Procedure ...............................................72
Component Inspection ............................................73
P1721 VEHICLE SPEED SIGNAL ....................74
Description ........................................................... ...74
CONSULT-III Reference Value in Data Monitor
Mode .......................................................................
74
On Board Diagnosis Logic ......................................74
Possible Cause .......................................................74
DTC Confirmation Procedure ..................................74
Diagnosis Procedure ...............................................74
P1730 INTERLOCK ...........................................76
Description ........................................................... ...76
On Board Diagnosis Logic ......................................76
Possible Cause .......................................................76
DTC Confirmation Procedure ..................................76
Judgement of Interlock ............................................76
Diagnosis Procedure ...............................................76
P1731 1ST ENGINE BRAKING .........................78
Description ........................................................... ...78
CONSULT-III Reference Value in Data Monitor
Mode .......................................................................
78
On Board Diagnosis Logic ......................................78
Possible Cause .......................................................78
DTC Confirmation Procedure ..................................78
Revision: December 20092009 QX56
Page 3652 of 4171

TM-4
Precaution for Supplemental Restraint System
(SRS) "AIR BAG" and "SEAT BELT PRE-TEN-
SIONER" ................................................................
174
Precaution Necessary for Steering Wheel Rota-
tion After Battery Disconnect .................................
174
Precaution for On Board Diagnosis (OBD) System
of A/T and Engine ..................................................
175
Precaution .............................................................175
Service Notice or Precaution .................................176
PREPARATION ..........................................177
PREPARATION .............................................. .177
Special Service Tool ............................................ ..177
Commercial Service Tool ......................................178
ON-VEHICLE MAINTENANCE ..................179
A/T FLUID ....................................................... .179
Checking the A/T Fluid (ATF) .............................. ..179
Changing the A/T Fluid (ATF) ................................181
A/T FLUID COOLER ........................................183
A/T Fluid Cooler Cleaning ................................... ..183
Inspection ..............................................................185
STALL TEST ....................................................186
Inspection and Judgment .................................... ..186
LINE PRESSURE TEST ..................................188
Inspection and Judgment .................................... ..188
ROAD TEST .....................................................190
Description ........................................................... ..190
Check Before Engine Is Started ............................190
Check At Idle .........................................................190
Cruise Test - Part 1 ...............................................191
Cruise Test - Part 2 ...............................................193
Cruise Test - Part 3 ...............................................194
Vehicle Speed When Shifting Gears .....................194
Vehicle Speed When Performing and Releasing
Complete Lock-up .................................................
194
A/T POSITION .................................................195
Adjustment of A/T Position .................................. ..195
Checking of A/T Position .......................................195
ON-VEHICLE REPAIR ............................. ..196
SHIFT CONTROL SYSTEM ........................... .196
A/T Shift Selector Removal and Installation ........ ..196
AIR BREATHER HOSE ...................................197
2WD ........................................................................ ..197
2WD : Removal and Installation ............................197
4WD ........................................................................ ..197
4WD : Removal and Installation ............................197
OIL PAN ...........................................................201
Oil Pan ................................................................. .201
CONTROL VALVE WITH TCM ........................203
Control Valve with TCM and A/T Fluid Tempera-
ture Sensor 2 ....................................................... .
203
REAR OIL SEAL ..............................................212
Rear Oil Seal ........................................................ .212
FLUID COOLER SYSTEM ...............................213
Exploded View ..................................................... .213
Removal and Installation .......................................213
REMOVAL AND INSTALLATION .............214
TRANSMISSION ASSEMBLY ........................ ..214
Removal and Installation (2WD) .......................... .214
Removal and Installation (4WD) ...........................216
DISASSEMBLY AND ASSEMBLY ...........220
OVERHAUL .................................................... ..220
Component .......................................................... .220
Oil Channel ...........................................................227
Location of Adjusting Shims, Needle Bearings,
Thrust Washers and Snap Rings ......................... .
229
DISASSEMBLY .............................................. ..232
Disassembly ......................................................... .232
REPAIR FOR COMPONENT PARTS ..............249
Oil Pump .............................................................. .249
Front Sun Gear, 3rd One-Way Clutch ...................251
Front Carrier, Input Clutch, Rear Internal Gear .....253
Mid Sun Gear, Rear Sun Gear, High and Low Re-
verse Clutch Hub ..................................................
258
High and Low Reverse Clutch ..............................263
Direct Clutch .........................................................265
ASSEMBLY .................................................... ..268
Assembly (1) ........................................................ .268
Adjustment ............................................................281
Assembly (2) .........................................................283
SERVICE DATA AND SPECIFICATIONS
(SDS) ............... ..........................................
290
SERVICE DATA AND SPECIFICATIONS
(SDS) .............................................................. ..
290
General Specification ........................................... .290
Vehicle Speed at Which Gear Shifting Occurs .....290
Vehicle Speed at Which Lock-up Occurs/Releas-
es ..........................................................................
291
Stall Speed ............................................................291
Line Pressure ........................................................291
Input Speed Sensor ..............................................291
Output Speed Sensor ...........................................291
Reverse Brake ......................................................291
Total End Play .......................................................292
Torque Converter .................................................
Revision: December 20092009 QX56
Page 3653 of 4171
DIAGNOSIS AND REPAIR WORKFLOWTM-5
< BASIC INSPECTION >
CEF
G H
I
J
K L
M A
B
TM
N
O P
BASIC INSPECTION
DIAGNOSIS AND REPAIR WORKFLOW
Work FlowINFOID:0000000003771803
INTRODUCTION
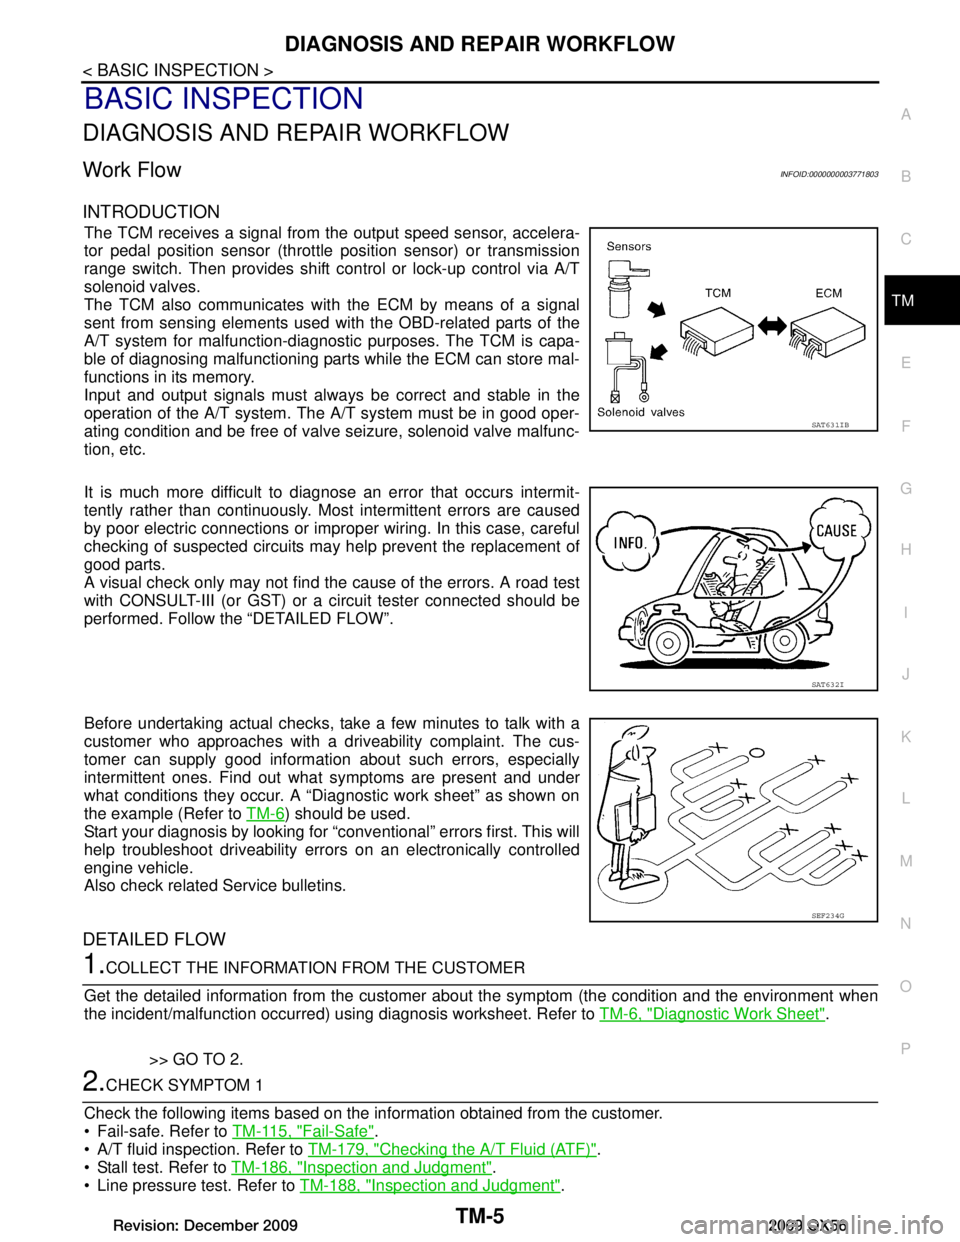
The TCM receives a signal from the output speed sensor, accelera-
tor pedal position sensor (throttle position sensor) or transmission
range switch. Then provides shift c ontrol or lock-up control via A/T
solenoid valves.
The TCM also communicates with the ECM by means of a signal
sent from sensing elements used wit h the OBD-related parts of the
A/T system for malfunction-diagnostic purposes. The TCM is capa-
ble of diagnosing malfunctioning parts while the ECM can store mal-
functions in its memory.
Input and output signals must always be correct and stable in the
operation of the A/T system. T he A/T system must be in good oper-
ating condition and be free of valve seizure, solenoid valve malfunc-
tion, etc.
It is much more difficult to diagnose an error that occurs intermit-
tently rather than continuously. Most intermittent errors are caused
by poor electric connections or impr oper wiring. In this case, careful
checking of suspected circuits may help prevent the replacement of
good parts.
A visual check only may not find t he cause of the errors. A road test
with CONSULT-III (or GST) or a circuit tester connected should be
performed. Follow the “DETAILED FLOW”.
Before undertaking actual checks, take a few minutes to talk with a
customer who approaches with a driveability complaint. The cus-
tomer can supply good information about such errors, especially
intermittent ones. Find out what symptoms are present and under
what conditions they occur. A “Diagnostic work sheet” as shown on
the example (Refer to TM-6
) should be used.
Start your diagnosis by looking for “conventional” errors first. This will
help troubleshoot driveability errors on an electronically controlled
engine vehicle.
Also check related Service bulletins.
DETAILED FLOW
1.COLLECT THE INFORMATION FROM THE CUSTOMER
Get the detailed information from the customer about the symptom (the condition and the environment when
the incident/malfunction occurred) using diagnosis worksheet. Refer to TM-6, "Diagnostic Work Sheet"
.
>> GO TO 2.
2.CHECK SYMPTOM 1
Check the following items based on the in formation obtained from the customer.
Fail-safe. Refer to TM-115, "Fail-Safe"
.
A/T fluid inspection. Refer to TM-179, "Checking the A/T Fluid (ATF)"
.
Stall test. Refer to TM-186, "Inspection and Judgment"
.
Line pressure test. Refer to TM-188, "Inspection and Judgment"
.
SAT631IB
SAT632I
SEF234G
Revision: December 20092009 QX56
Page 3657 of 4171
A/T CONTROL SYSTEMTM-9
< FUNCTION DIAGNOSIS >
CEF
G H
I
J
K L
M A
B
TM
N
O P
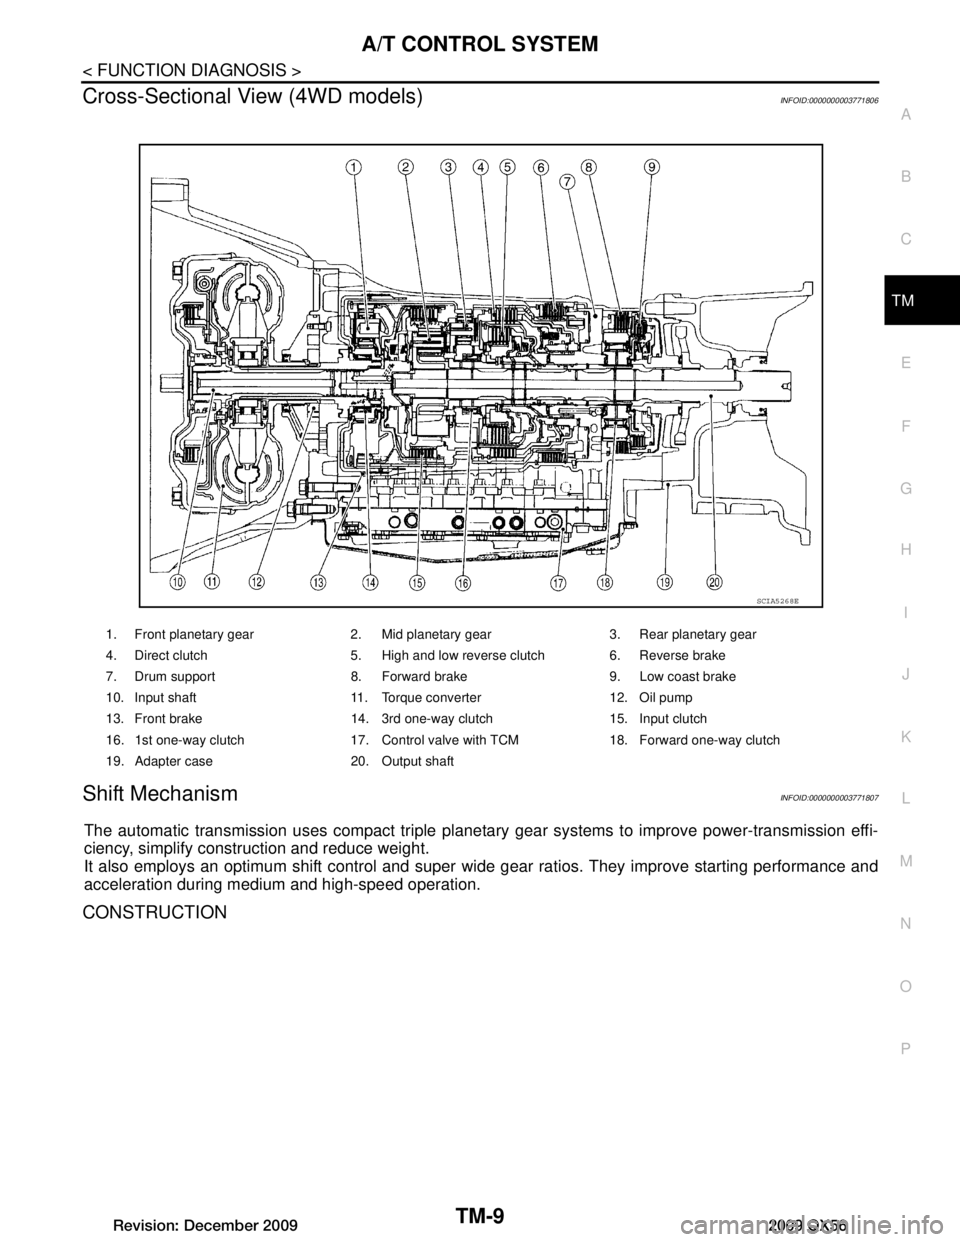
Cross-Sectional View (4WD models)INFOID:0000000003771806
Shift MechanismINFOID:0000000003771807
The automatic transmission uses compact triple planet ary gear systems to improve power-transmission effi-
ciency, simplify construction and reduce weight.
It also employs an optimum shift control and super wide gear ratios. They improve starting performance and
acceleration during medium and high-speed operation.
CONSTRUCTION
1. Front planetary gear 2. Mid planetary gear 3. Rear planetary gear
4. Direct clutch 5. High and low reverse clutch 6. Reverse brake
7. Drum support 8. Forward brake 9. Low coast brake
10. Input shaft 11. Torque converter 12. Oil pump
13. Front brake 14. 3rd one-way clutch 15. Input clutch
16. 1st one-way clutch 17. Control valve with TCM 18. Forward one-way clutch
19. Adapter case 20. Output shaft
SCIA5268E
Revision: December 20092009 QX56
Page 3659 of 4171
A/T CONTROL SYSTEMTM-11
< FUNCTION DIAGNOSIS >
CEF
G H
I
J
K L
M A
B
TM
N
O P
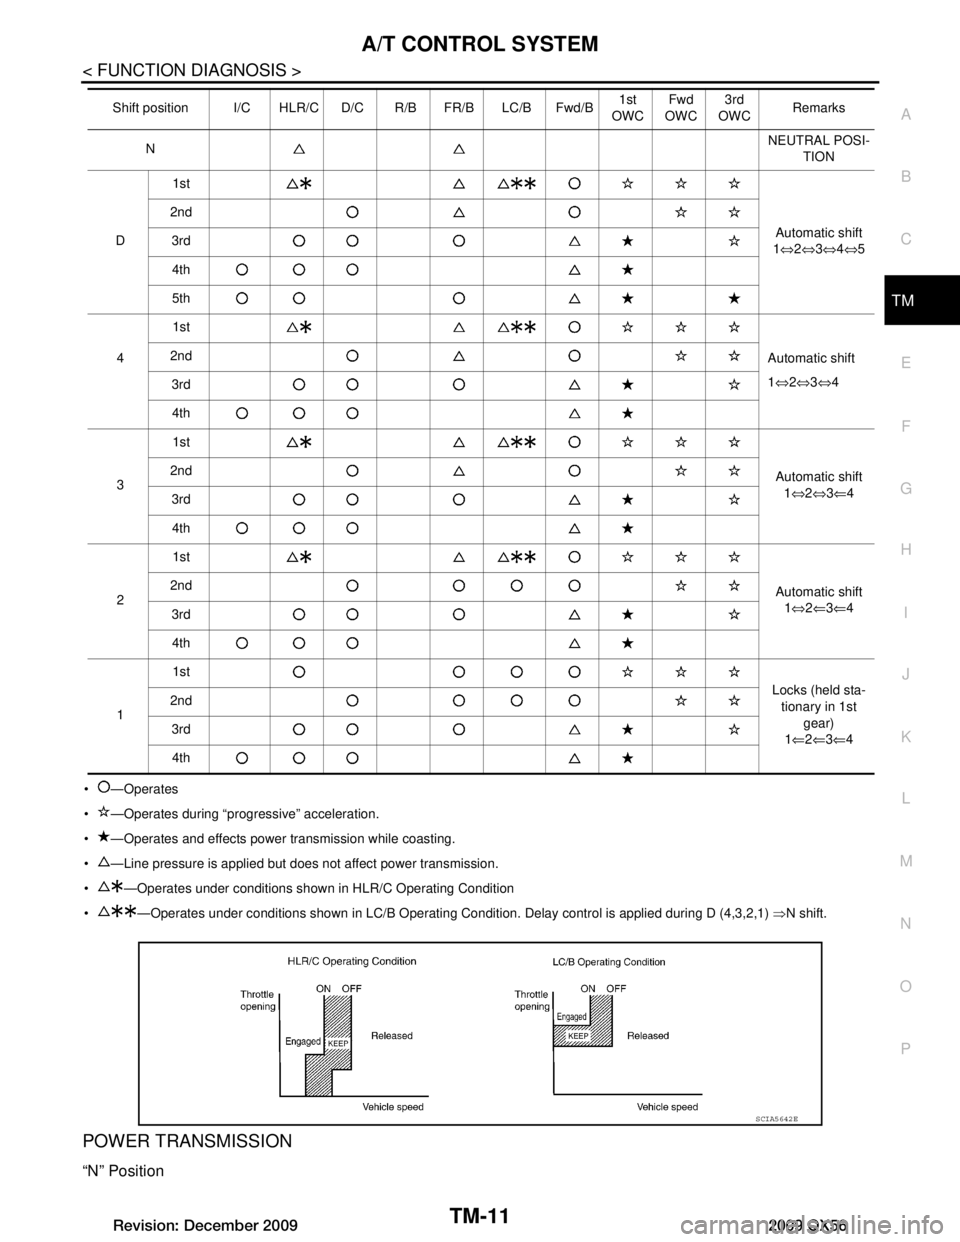
—Operates
—Operates during “pro gressive” acceleration.
—Operates and effects power transmission while coasting.
—Line pressure is applied but does not affect power transmission.
—Operates under conditions shown in HLR/C Operating Condition
—Operates under conditions shown in LC/B Operating Condition. Delay control is applied during D (4,3,2,1) ⇒N shift.
POWER TRANSMISSION
“N” Position
N NEUTRAL POSI-
TION
D 1st
Automatic shift
1 ⇔ 2⇔ 3⇔ 4⇔ 5
2nd
3rd
4th
5th1st
4 2nd
Automatic shift
3rd 1
⇔ 2⇔ 3⇔ 4
4th
3 1st
Automatic shift1⇔ 2⇔ 3⇐ 4
2nd
3rd 4th
2 1st
Automatic shift1⇔ 2⇐ 3⇐ 4
2nd
3rd
4th
1 1st
Locks (held sta-tionary in 1st gear)
1 ⇐ 2⇐ 3⇐ 4
2nd
3rd4th
Shift position I/C HLR/C D/C R/B FR/B LC/B Fwd/B
1st
OWC Fwd
OWC 3rd
OWC Remarks
SCIA5642E
Revision: December 20092009 QX56