2009 Hyundai Santa Fe sensor
[x] Cancel search: sensorPage 44 of 269
1
FEATURES OF YOUR HYUNDAI
33
!
o Although it is harmless, the fine
dust may cause skin irritation and should not be breathed for pro- longed periods. Wash your hands and face thoroughly after an acci-dent in which the pre-tensioner seat belts were activated.
!
AIR
BAG
CAUTION:
o Because the sensor that activates the SRS airbag is connected with pre-tensioner seat belt, the SRS airbag warning light on the instrument panel will illuminatefor approximately 6 seconds after the ignition key has been turned to the "ON" position, and then itshould turn off.
o If pre-tensioner seat belt is not
working properly, this warninglight will illuminate even if there is no malfunction of the SRS airbag. If the SRS airbag warning lightdoes not illuminate when the igni- tion key is turned to "ON", or if it blinks for a second and remainsilluminated after illuminating for approximately 6 seconds, or if it illuminates while the vehicle isbeing driven, please have an authorised Hyundai dealer inspect the pre-tensioner seat belt or SRSairbag system as soon as pos- sible. WARNING:
o Pre-tensioners are designed to operate once only. After activa-tion, pre-tensioner seat belts must be replaced. All seat belts, of anytype, should always be replaced after they have been worn during a collision.
o The pre-tensioner seat belt assem- bly mechanisms become hot dur-ing activation. Do not touch thepre-tensioner seat belt assemblies for several minutes after they have been activated.
o Do not attempt to inspect or re- place the pre-tensioner seat beltsyourself. This must be done by anauthorised Hyundai dealer.
o Do not strike the pre-tensioner seat
belt assemblies.
o Do not attempt to service or repair the pre-tensioner seat belt systemin any manner.
CM-aust-1a.p65 5/21/2008, 2:05 PM
33
Page 51 of 269
1FEATURES OF YOUR HYUNDAI
40
!
OCM052212L
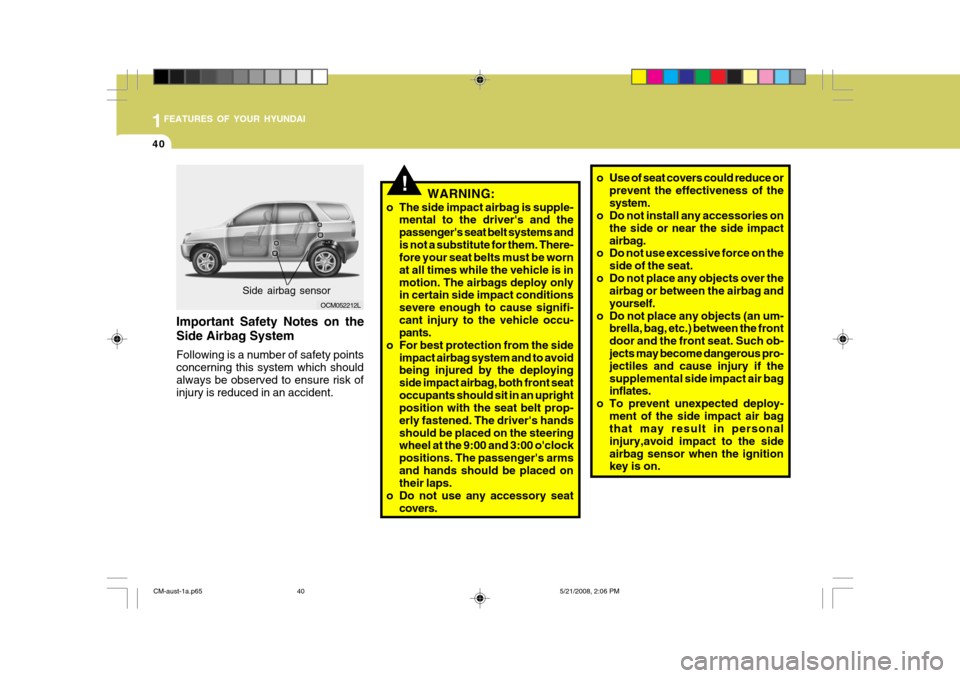
Side airbag sensor
Important Safety Notes on the Side Airbag System Following is a number of safety points concerning this system which shouldalways be observed to ensure risk of injury is reduced in an accident. WARNING:
o The side impact airbag is supple- mental to the driver's and the passenger's seat belt systems andis not a substitute for them. There- fore your seat belts must be worn at all times while the vehicle is inmotion. The airbags deploy only in certain side impact conditions severe enough to cause signifi-cant injury to the vehicle occu- pants.
o For best protection from the side impact airbag system and to avoidbeing injured by the deploying side impact airbag, both front seatoccupants should sit in an upright position with the seat belt prop- erly fastened. The driver's handsshould be placed on the steering wheel at the 9:00 and 3:00 o'clock positions. The passenger's armsand hands should be placed on their laps.
o Do not use any accessory seat covers. o Use of seat covers could reduce or
prevent the effectiveness of the system.
o Do not install any accessories on
the side or near the side impactairbag.
o Do not use excessive force on the
side of the seat.
o Do not place any objects over the airbag or between the airbag andyourself.
o Do not place any objects (an um- brella, bag, etc.) between the frontdoor and the front seat. Such ob- jects may become dangerous pro- jectiles and cause injury if thesupplemental side impact air bag inflates.
o To prevent unexpected deploy-
ment of the side impact air bagthat may result in personal injury,avoid impact to the sideairbag sensor when the ignition key is on.
CM-aust-1a.p65 5/21/2008, 2:06 PM
40
Page 73 of 269
1FEATURES OF YOUR HYUNDAI
62
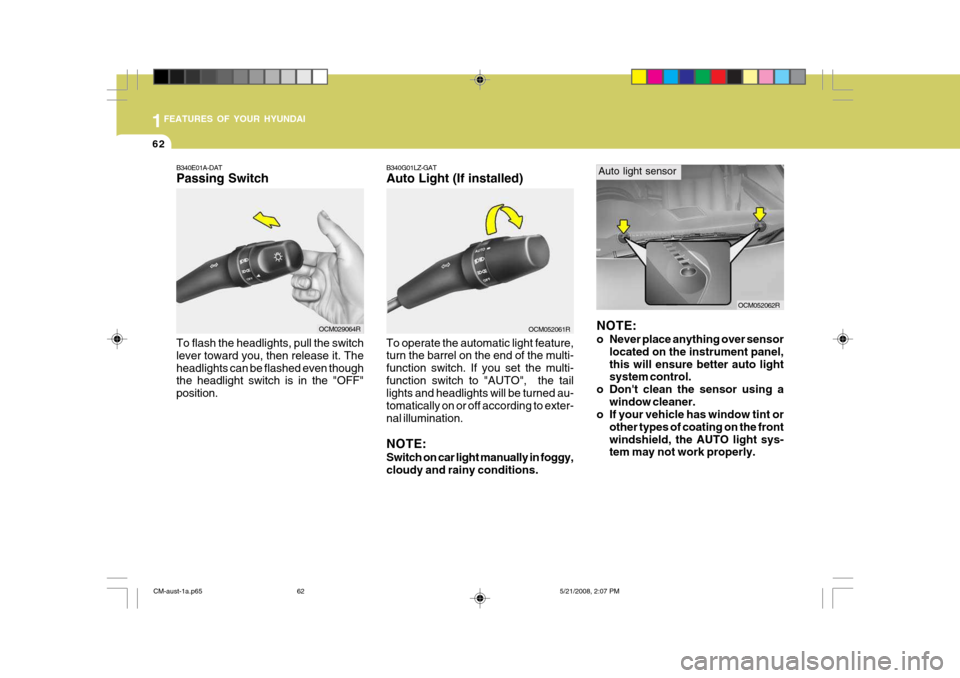
B340E01A-DAT Passing Switch
B340G01LZ-GAT Auto Light (If installed)
OCM052061R
To operate the automatic light feature, turn the barrel on the end of the multi- function switch. If you set the multi-function switch to "AUTO", the tail lights and headlights will be turned au- tomatically on or off according to exter-nal illumination. NOTE: Switch on car light manually in foggy, cloudy and rainy conditions.
NOTE:
o Never place anything over sensor located on the instrument panel, this will ensure better auto light system control.
o Don't clean the sensor using a window cleaner.
o If your vehicle has window tint or
other types of coating on the front windshield, the AUTO light sys- tem may not work properly. OCM052062R
Auto light sensor
To flash the headlights, pull the switch lever toward you, then release it. Theheadlights can be flashed even though the headlight switch is in the "OFF" position.
OCM029064R
CM-aust-1a.p65 5/21/2008, 2:07 PM
62
Page 92 of 269
1
FEATURES OF YOUR HYUNDAI
81
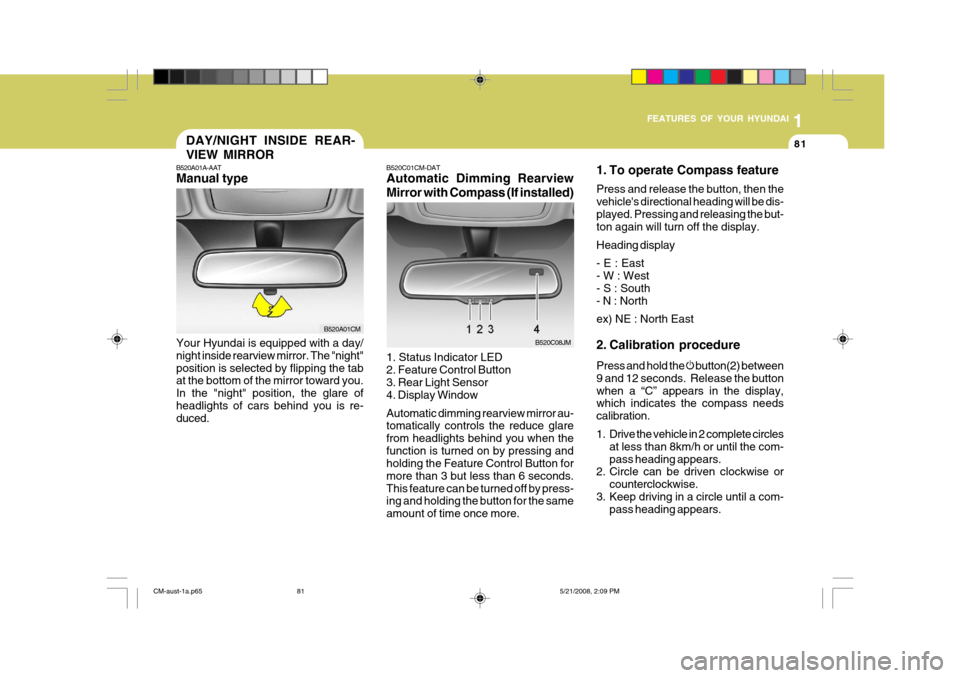
B520C01CM-DAT Automatic Dimming Rearview Mirror with Compass (If installed) 1. Status Indicator LED 2. Feature Control Button3. Rear Light Sensor 4. Display Window Automatic dimming rearview mirror au- tomatically controls the reduce glare from headlights behind you when thefunction is turned on by pressing and holding the Feature Control Button for more than 3 but less than 6 seconds.This feature can be turned off by press- ing and holding the button for the same amount of time once more.
B520C08JM 1. To operate Compass feature Press and release the button, then the vehicle's directional heading will be dis-played. Pressing and releasing the but- ton again will turn off the display. Heading display - E : East - W : West - S : South - N : North ex) NE : North East
2. Calibration procedure Press and hold the
button(2) between
9 and 12 seconds. Release the button when a “C” appears in the display, which indicates the compass needs calibration.
1. Drive the vehicle in 2 complete circles at less than 8km/h or until the com- pass heading appears.
2. Circle can be driven clockwise or
counterclockwise.
3. Keep driving in a circle until a com- pass heading appears.
DAY/NIGHT INSIDE REAR- VIEW MIRROR
B520A01A-AAT Manual type Your Hyundai is equipped with a day/ night inside rearview mirror. The "night"position is selected by flipping the tab at the bottom of the mirror toward you. In the "night" position, the glare ofheadlights of cars behind you is re- duced.
B520A01CM
CM-aust-1a.p65 5/21/2008, 2:09 PM
81
Page 120 of 269
1
FEATURES OF YOUR HYUNDAI
109
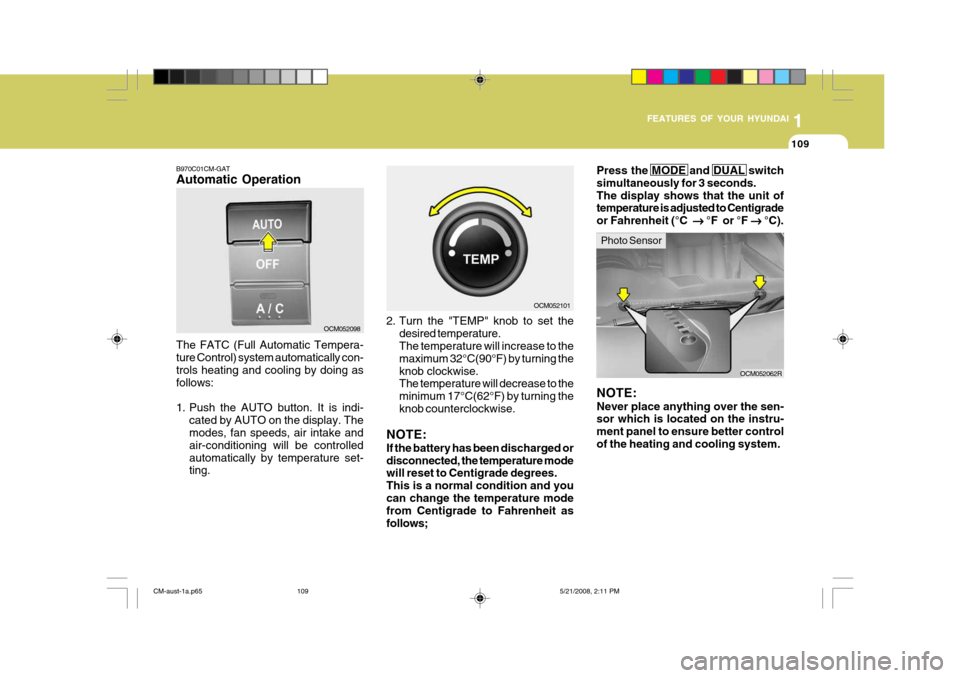
B970C01CM-GAT Automatic Operation The FATC (Full Automatic Tempera- ture Control) system automatically con- trols heating and cooling by doing asfollows:
1. Push the AUTO button. It is indi-
cated by AUTO on the display. The modes, fan speeds, air intake and air-conditioning will be controlledautomatically by temperature set- ting. 2. Turn the "TEMP" knob to set the
desired temperature.The temperature will increase to the maximum 32°C(90°F) by turning theknob clockwise. The temperature will decrease to the minimum 17°C(62°F) by turning theknob counterclockwise.
NOTE: If the battery has been discharged or disconnected, the temperature mode will reset to Centigrade degrees. This is a normal condition and youcan change the temperature mode from Centigrade to Fahrenheit as follows;
OCM052098
OCM052101
OCM052062R
NOTE: Never place anything over the sen- sor which is located on the instru- ment panel to ensure better controlof the heating and cooling system.Press the MODE and DUAL switch simultaneously for 3 seconds.The display shows that the unit of temperature is adjusted to Centigrade or Fahrenheit (°C ��
��
� °F or °F
��
��
� °C).
Photo Sensor
CM-aust-1a.p65 5/21/2008, 2:11 PM
109
Page 245 of 269
6DO-IT-YOURSELF MAINTENANCE
38FUSE PANEL DESCRIPTION
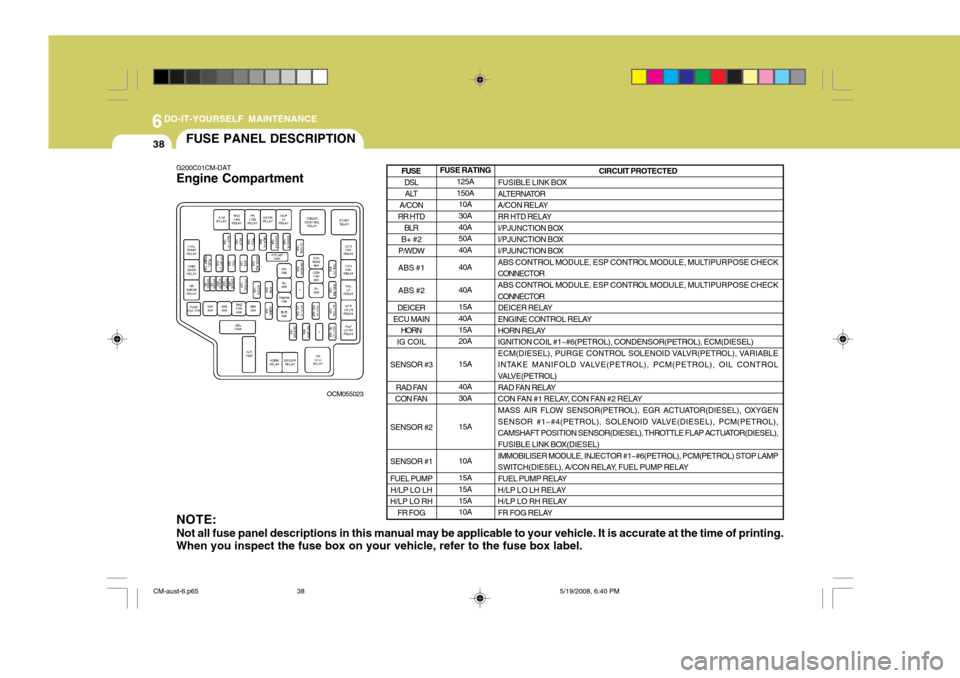
G200C01CM-DAT Engine Compartment
OCM055023
NOTE: Not all fuse panel descriptions in this manual may be applicable to your vehicle. It is accurate at the time of printing. When you inspect the fuse box on your vehicle, refer to the fuse box label.
FUSE RATING 125A 150A10A 30A 40A50A 40A 40A 40A 15A 40A 15A20A 15A40A 30A 15A 10A 15A 15A 15A10A CIRCUIT PROTECTED
FUSIBLE LINK BOX
ALTERNATOR
A/CON RELAY
RR HTD RELAY
I/PJUNCTION BOX
I/PJUNCTION BOX
I/PJUNCTION BOX
ABS CONTROL MODULE, ESP CONTROL MODULE, MULTIPURPOSE CHECK CONNECTOR
ABS CONTROL MODULE, ESP CONTROL MODULE, MULTIPURPOSE CHECK CONNECTOR
DEICER RELAY
ENGINE CONTROL RELAY
HORN RELAY IGNITION COIL #1~#6(PETROL), CONDENSOR(PETROL), ECM(DIESEL)
ECM(DIESEL), PURGE CONTROL SOLENOID VALVR(PETROL), VARIABLE
INTAKE MANIFOLD VALVE(PETROL), PCM(PETROL), OIL CONTROL
VALVE(PETROL)
RAD FAN RELAY
CON FAN #1 RELAY, CON FAN #2 RELAY
MASS AIR FLOW SENSOR(PETROL), EGR ACTUATOR(DIESEL), OXYGEN
SENSOR #1~#4(PETROL), SOLENOID VALVE(DIESEL), PCM(PETROL),
CAMSHAFT POSITION SENSOR(DIESEL), THROTTLE FLAP ACTUATOR(DIESEL),
FUSIBLE LINK BOX(DIESEL) IMMOBILISER MODULE, INJECTOR #1~#6(PETROL), PCM(PETROL) STOP LAMP
SWITCH(DIESEL), A/CON RELAY, FUEL PUMP RELAY
FUEL PUMP RELAY
H/LP LO LH RELAY
H/LP LO RH RELAY
FR FOG RELAY
DSL ALT
A/CON
RR HTD BLR
B+ #2
P/WDW ABS #1 ABS #2
DEICER
ECU MAIN HORN
IG COIL
SENSOR #3 RAD FAN
CON FAN
SENSOR #2 SENSOR #1 FUEL PUMP H/LP LO LH
H/LP LO RH
FR FOG
FUSE
CM-aust-6.p65 5/19/2008, 6:40 PM
38
Page 246 of 269
6
DO-IT-YOURSELF MAINTENANCE
39
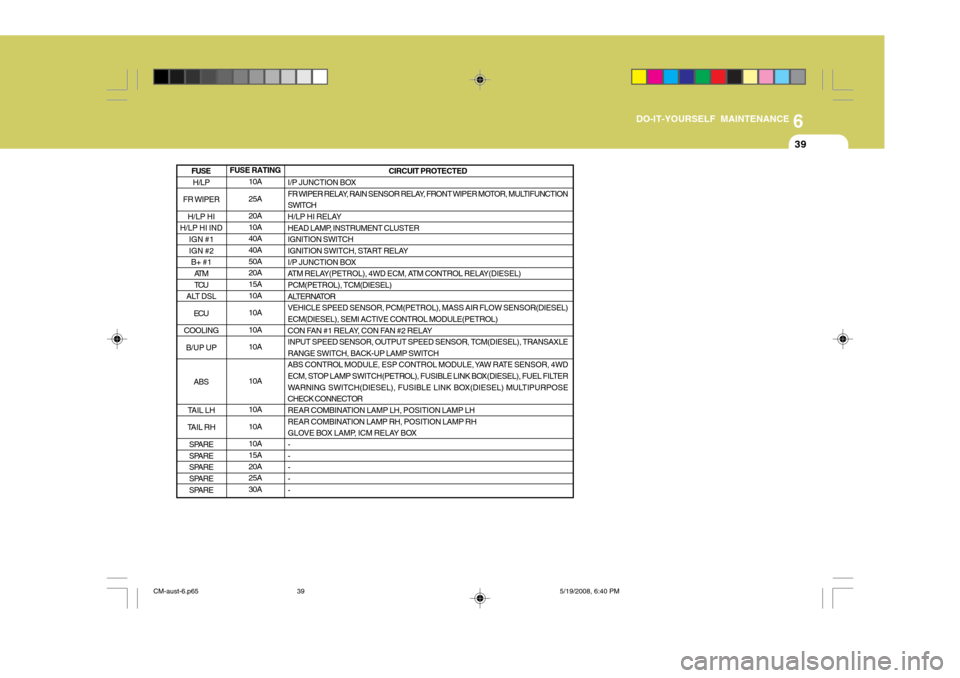
FUSE RATING 10A 25A20A 10A40A 40A 50A20A 15A 10A 10A10A10A 10A 10A 10A10A 15A 20A25A 30A CIRCUIT PROTECTED
I/P JUNCTION BOX
FR WIPER RELAY, RAIN SENSOR RELAY, FRONT WIPER MOTOR, MULTIFUNCTION
SWITCH
H/LP HI RELAY
HEAD LAMP, INSTRUMENT CLUSTER IGNITION SWITCH
IGNITION SWITCH, START RELAY
I/P JUNCTION BOX
ATM RELAY(PETROL), 4WD ECM, ATM CONTROL RELAY(DIESEL)PCM(PETROL), TCM(DIESEL)
ALTERNATOR VEHICLE SPEED SENSOR, PCM(PETROL), MASS AIR FLOW SENSOR(DIESEL)ECM(DIESEL), SEMI ACTIVE CONTROL MODULE(PETROL)
CON FAN #1 RELAY, CON FAN #2 RELAY INPUT SPEED SENSOR, OUTPUT SPEED SENSOR, TCM(DIESEL), TRANSAXLERANGE SWITCH, BACK-UP LAMP SWITCH
ABS CONTROL MODULE, ESP CONTROL MODULE, YAW RATE SENSOR, 4WD
ECM, STOP LAMP SWITCH(PETROL), FUSIBLE LINK BOX(DIESEL), FUEL FILTER
WARNING SWITCH(DIESEL), FUSIBLE LINK BOX(DIESEL) MULTIPURPOSECHECK CONNECTOR
REAR COMBINATION LAMP LH, POSITION LAMP LH
REAR COMBINATION LAMP RH, POSITION LAMP RH
GLOVE BOX LAMP, ICM RELAY BOX - -- - -
H/LP
FR WIPER H/LP HI
H/LP HI IND IGN #1 IGN #2B+ #1
AT MTCU
ALT DSL
ECU
COOLING B/UP UP
ABS
TAIL LH
TAIL RH SPARE
SPARE
SPARE
SPARE
SPARE
FUSE
CM-aust-6.p65 5/19/2008, 6:40 PM
39
Page 247 of 269
6DO-IT-YOURSELF MAINTENANCE
40
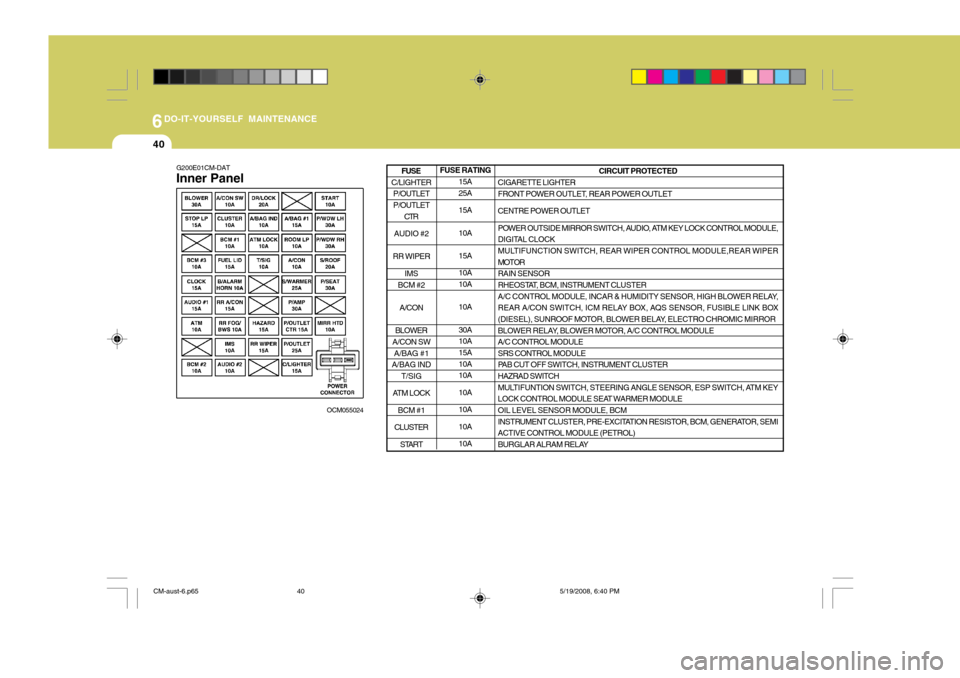
G200E01CM-DAT Inner Panel
OCM055024
FUSE RATING15A 25A 15A 10A 15A 10A 10A 10A 30A 10A 15A 10A10A 10A10A10A10A CIRCUIT PROTECTED
CIGARETTE LIGHTER
FRONT POWER OUTLET, REAR POWER OUTLET CENTRE POWER OUTLET
POWER OUTSIDE MIRROR SWITCH, AUDIO, ATM KEY LOCK CONTROL MODULE,
DIGITAL CLOCK
MULTIFUNCTION SWITCH, REAR WIPER CONTROL MODULE,REAR WIPER MOTOR RAIN SENSOR
RHEOSTAT, BCM, INSTRUMENT CLUSTER
A/C CONTROL MODULE, INCAR & HUMIDITY SENSOR, HIGH BLOWER RELAY,
REAR A/CON SWITCH, ICM RELAY BOX, AQS SENSOR, FUSIBLE LINK BOX
(DIESEL), SUNROOF MOTOR, BLOWER BELAY, ELECTRO CHROMIC MIRROR
BLOWER RELAY, BLOWER MOTOR, A/C CONTROL MODULE A/C CONTROL MODULESRS CONTROL MODULE
PAB CUT OFF SWITCH, INSTRUMENT CLUSTER HAZRAD SWITCH
MULTIFUNTION SWITCH, STEERING ANGLE SENSOR, ESP SWITCH, ATM KEY
LOCK CONTROL MODULE SEAT WARMER MODULE OIL LEVEL SENSOR MODULE, BCM
INSTRUMENT CLUSTER, PRE-EXCITATION RESISTOR, BCM, GENERATOR, SEMIACTIVE CONTROL MODULE (PETROL)
BURGLAR ALRAM RELAY
C/LIGHTER P/OUTLET P/OUTLET
CTR
AUDIO #2
RR WIPER IMS
BCM #2
A/CON
BLOWER
A/CON SW
A/BAG #1
A/BAG IND T/SIG
ATM LOCK BCM #1
CLUSTER START
FUSE
CM-aust-6.p65 5/19/2008, 6:40 PM
40