Page 325 of 578

�Û�Ý
�Û
�Û
�Ý
�Ý �Ý�Û
�Û�Ý
While the overhead screen is closed,
you can see the XM radio
inf ormation in the subsidiary display
in the ceiling. Pressing the DISP
MODE button repeatedly changes
the subsidiary display f rom the
channel number, to the category
name, to the music title, to the artist
name, and to the channel name, and
then back to the channel number.
To change mode, press and hold the
DISP MODE button f or 5 seconds.
Usethe,,,or
button to highlight REPEAT,
RANDOM, SCAN, , (skip), , or (cue) on the overhead
screen. You can enter the
highlighted f unction by pressing the
ENT button. These f unctions have
the same features as those of the
f ront audio system. If discs are loaded in the disc
changer, select them by pressing the
CD button.
To change the disc currently playing,
usethe,,,or button to highlight your
selected disc icon, and press ENT.
If CDs are loaded in the CD changer
and the overhead screen is not open,
pressing the or button changes
the discs. If an iPod
or USB f lash memory
device is connected to the USB
adapter cable in the console
compartment, you can select f iles to
play.
For an iPod
,usethe , ,
, or button to highlight
REPEAT, RANDOM, , (skip), , or (cue) on
the overhead screen.
For a USB f lash memory device, use
the,,,or button to highlight REPEAT,
RANDOM, SCAN, , (skip), , or (cue) on the overhead
screen.
Rear Entertainment System
To Play a Disc in the 6-Disc
Changer f rom the Rear Control
Panel To Play an iPodor USB Flash
Memory Device f rom the Rear
Control Panel
Features
321
�����—�����—�
���y�
����
��������y���
�(�/���������y���������y
2009 Pilot
Page 328 of 578
�Û�Ý
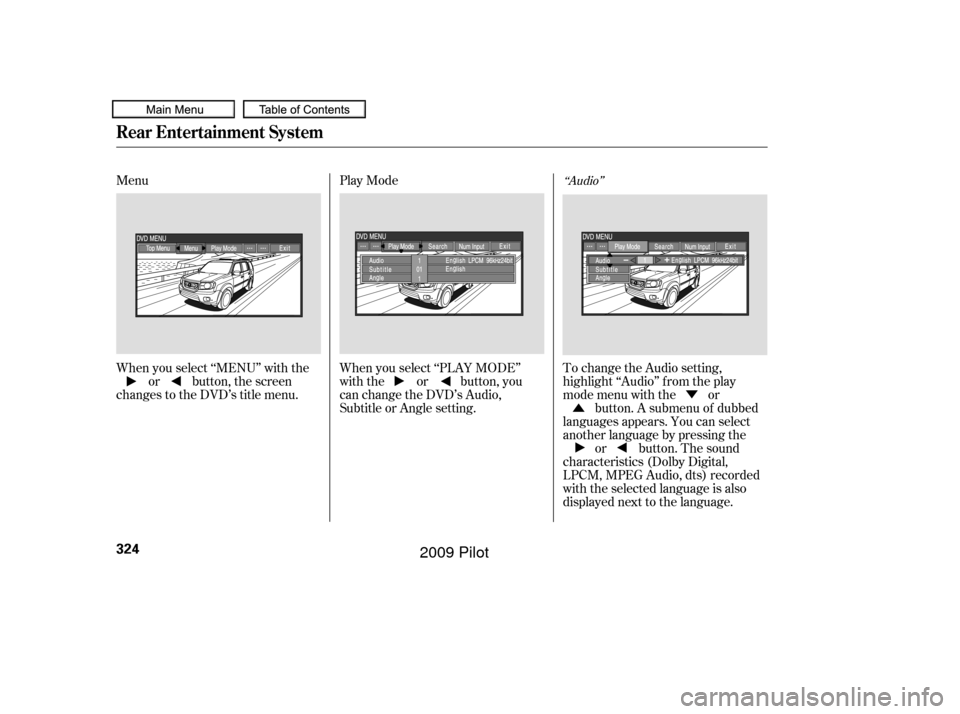
Menu
Play Mode
When you select ‘‘MENU’’ with the or button, the screen
changes to the DVD’s title menu. When you select ‘‘PLAY MODE’’
with the or button, you
can change the DVD’s Audio,
Subtitle or Angle setting.To change the Audio setting,
highlight ‘‘Audio’’ f rom the play
mode menu with the or
button. A submenu of dubbed
languages appears. You can select
another language by pressing the or button. The sound
characteristics (Dolby Digital,
LPCM, MPEG Audio, dts) recorded
with the selected language is also
displayed next to the language.
‘‘Audio’’
Rear Entertainment System
324
�����—�����—�
���y�
����
��������y���
�(�/���������y���������y
2009 Pilot
Page 338 of 578

�Ý�Û
Audio Language
If you select ‘‘Yes,’’ the display
changes to the language code input
mode. Select the f irst number digit
usingthe,,,or button, and press the ENT
button to enter it. Repeat this until all
f our digits are f illed. When the
f ourth digit is entered, the cursor
automatically moves to ‘‘ENT’’ on the
display. Press the ENT button on the
control panel to enter the new
language code. If you made a mistake entering a
number digit, select ‘‘DEL’’ on the
display with the , , ,
or button, and press the ENT
buttononthecontrolpanel.Then
select and enter the correct number
digit as described. The display
returns to the initial ‘‘Language’’
menu screen.
You can select the dubbed language
bef ore playing DVDs.
Select ‘‘Audio Language’’ by pressing
the or button. You will see the
submenu next to ‘‘Audio Language.’’
Follow the same instructions you
used to set the menu language.
Rear Entertainment System
334
�����—�����—�
���y�
����
��������y���
�(�/���������y���������y
2009 Pilot
Page 351 of 578

The security system automatically
sets 15 seconds after you lock the
doors, the hood, the tailgate, and the
glass hatch. For the system to
activate, you must lock the doors,
thetailgateandtheglasshatchfrom
the outside with the key, driver’s
lock tab, door lock master switch, or
remote transmitter. The security
system indicator on the instrument
panel starts blinking immediately to
show you the system is setting itself . The security system helps to protect
your vehicle and valuables f rom thef t.
The horn sounds and a combination
of headlights, parking lights, side
marker lights and taillights f lashes if
someone attempts to break into your
vehicle or remove the audio unit.
This alarm continues for two
minutes, then the system resets. To
reset an alarming system bef ore the
two minutes have elapsed, unlock
the driver’s door with the key or the
remote transmitter.Once the security system is set,
opening any door, the tailgate, the
glass hatch, or the hood without
using the key or the remote
transmitter will cause the alarm to
sound. It will also sound if the radio
is removed f rom the dashboard or
the wiring is cut.The security system will not set if
the hood, the tailgate, the glass
hatch, or any door is not f ully closed.
If the system will not set, check that
thedoors,thetailgateandthehood
are f ully closed.
Do not attempt to alter this system
or add other devices to it.
Except LX models
Security System
Features
347
SECURITY SYSTEM INDICATOR
�����—�����—�
���y�
����
��������y���
�(�/���������y���������y
2009 Pilot
Page 355 of 578

CONT INUED
The compass may need to be
manually calibrated af ter exposure to
a strong magnetic field. If the
compassseemstobecontinually
showing the wrong direction and is
not self -calibrating, or the compass
display is blinking with the CAL
indicator on, do the f ollowing.Turn the ignition switch to the ON
(II) position. Press and hold the MENU button
f or about 5 seconds until you hear
a beep. The display shows you the
compass setting menu items.
Compass operation can be af f ected
by driving near power lines or
stations, across bridges, through
tunnels, over railroad crossings, past
large vehicles, or driving near large
objects that can cause a magnetic
disturbance. It can also be af f ected
by accessories such as antennas and
roof racks that are mounted by
magnets.
If the compass display is blinking
and the CAL indicator is shown, the
compassisself-calibrating.
Press and hold the RPT button
and TUNE/SOUND knob f or
about 2 seconds until you hear a
beep. The display shows you the
compass setting menu items.
1. 2.
Except Touring models
On EX and EX-L modelsOn LX models
Compass
Compass Calibration
Compass Operation
Features
351
COMPASS COMPASS SETTING MENU ITEMS
�����—�����—�
���y�
�������������y���
�(�/���������y���������y
2009 Pilot
Page 357 of 578

In most areas, there is a variation
between magnetic north and true
north. Zone selection is required so
the compass can compensate f or this
variation. To check and select the
zone, do this:Turn the ignition switch to the ON
(II) position.
Find the zone f or your area on the
map (see page ). If the correct
zone is not shown, turn the
selector or TUNE/SOUND knob
to cycle the zone lists up or down.
Press and hold the MENU button
f or about 5 seconds until you hear
a beep. The display shows you the
compass setting menu items.
Press and hold the RPT button
and TUNE/SOUND knob f or
about 2 seconds until you hear a
beep. The display shows you the
compass setting menu items.
Turn the selector or TUNE/
SOUND knob to select ‘‘ZONE.’’
Press the selector knob to enter
your selection. The display shows
you the currently selected zone
number.
If necessary, press the RETURN
button(onEXandEX-Lmodels)
to return to the previous display.
Pressing the MENU button will
cancel the compass setting mode.
Once the correct zone is displayed,
press the selector or TUNE/
SOUND knob. The display then
returns to normal.
4.
1.
2.
3.
354 5.
On EX and EX-L models
On LX models
Compass
Compass Zone Selection
Features
353
ZONE NUMBER
�����—�����—�
���y�
����
��������y���
�(�/���������y���������y
2009 Pilot
Page 364 of 578

HFL recognizes simple voice
commands, such as phone numbers
and names. It uses these commands
to automatically dial, receive, and
store numbers. For more
inf ormation on voice control, see
UsingVoiceControlonpage .
Here are the main features of the
HFL. Instructions f or using the HFL
begin on page . Bluetooth
is a registered trademark
of Bluetooth SIG, Inc.
Bluetooth is the wireless technology
that links your phone to the HFL.
TheHFLusesaClass2Bluetooth,
which means the maximum range
between your phone and vehicle is
30 f eet (10 meters).
Your vehicle is equipped with the
Bluetooth
HandsFreeLink(HFL).
HFL uses Bluetooth
technology to
link your cellphone to your vehicle.
With HFL, you can place and receive
calls through your vehicle’s audio
system, without the distraction of
handling your cellphone. To use this
f eature, you need a Bluetooth-
compatible cellphone with the Hands
Free Prof ile. For more inf ormation,
and a list of compatible cellphones,
visit , or call
(888) 528-7876. In Canada, visit , or call (888) 9-HONDA-9.
The HFL is available in both English
and French (Canadian models only).
To change the language, see page . To use the HFL, your phone must
have approved Bluetooth capability
along with the Hands Free Prof ile.
This type of phone is available
through many phone makers and
cellular carriers. You can also find an
approved phone by visiting , or by calling
the Hands Free Link
consumer
support at (888) 528-7876. In Canada,
visit , or call (888)
9- HONDA-9.
The Bluetooth
word mark and
logos are registered trademarks
owned by Bluetooth SIG, Inc. and
any use of such marks by Honda
Motor Co., Ltd. is under license.
Other trademarks and trade names
are those of their respective owners.
With a linked phone, the HFL allows
you to send and receive calls in your
vehicle without holding the phone.
The HFL can store up to 50 names
and phone numbers in its phonebook.
Withalinkedphone,youcanthen
automatically dial any name or
number in the phonebook.
102
372 364
handsf reelink.honda.com
www.
honda.ca handsf reelink.honda.com
www.honda.ca
On Touring models
BluetoothHandsFreeL ink
Voice Control
Bluetooth
Wireless Technology
Incoming/Outgoing Calls
Phonebook
360
�����—�����—�
���y�
����
������
�y���
�(�/���������y���������y
2009 Pilot
Page 392 of 578

�»�¼�»
�¼ Press and release the Talk button.
Af ter the beep, say ‘‘Yes’’ or ‘‘Oui.’’
If there are no paired phones
without English name tags, the
HFL response is ‘‘Please wait
while the language is changed.
Venillez attendre que le systeme
change de langue.’’ ‘‘The language
has been changed. Returning to
the main menu.’’
If there are paired phones
without English name tags, the
f ollowing prompts will continue.
If there are paired phones without
English name tags, the HFL
response is ‘‘The language has
been changed. For the system to
identif y phones that were paired
while in another language, the
phone names need to be re-
recorded.’’
Press and release the Talk button.
Af ter the beep, say ‘‘Changer
Langue.’’ The HFL response is,
‘‘Anglais ou Français?’’
Press and release the Talk button.
Af ter the beep, say ‘‘Anglais.’’ The
HFL response is, ‘‘You have
selected English. Name tags that
were stored while in French mode
will not be accessible in English
mode. Would you like to continue?
Vous avez selectionne Anglais. Les
noms enregistres en mode
Français ne seront pas accessible
en mode Anglais. Voulez-vous
contnuez?’’
The HFL response is, f or example,
‘‘Quel est le nom Français pour
Paul’s phone ?’’ Press and
release the Talk button. After the
beep, say ‘‘Téléphone de Paul.’’
The HFL response is, ‘‘Quel est le
nom Français pour Pat’s
phone ?’’ Press and release the
Talk button. Say ‘‘Téléphone de
Pat.’’ Af ter all paired phones
missing a French name tag are re-
recorded, the HFL will prompt,
‘‘Retour au menu principal.’’
4.
1.
2.3.
To change f rom French to English, do
this:
BluetoothHandsFreeL ink
388
NOTE:
�����—�����—�
���y�
����
��������y���
�(�/���������y���������y
2009 Pilot