Page 429 of 532
Unscrew and remove the engine oil
fill cap on top of the valve cover.
Pour in the oil slowly and caref ully so
you do not spill. Clean up any spills
immediately. Spilled oil could
damage components in the engine
compartment.Oil is a major contributor to your
engine’s perf ormance and longevity.
Always use a premium-grade 5W-20
detergent oil displaying the API
Certif ication Seal. This seal indicates
the oil is energy conserving, and that
it meets the American Petroleum
Institute’s latest requirements.
Reinstall the engine oil f ill cap, and
tighten it securely. Wait a f ew
minutes, and recheck the oil level on
the engine oil dipstick. Do not f ill
above the upper mark; you could
damage the engine.
A dding Engine Oil
Recommended Engine Oil
426
ENGINE OIL FILL CAP
API CERTIFICATION SEAL
�\f���—�\f���—���
�y�
����
����
���y���
�(���������\f�y�\f�����
�y
2009 Odyssey
Page 431 of 532

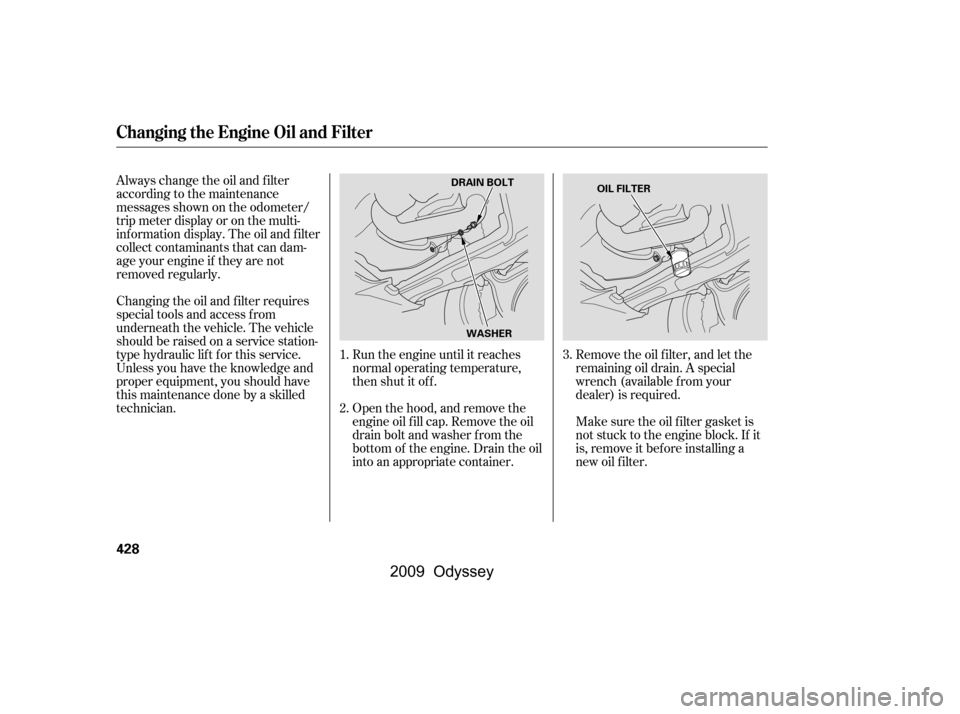
Always change the oil and f ilter
according to the maintenance
messages shown on the odometer/
trip meter display or on the multi-
inf ormation display. The oil and f ilter
collect contaminants that can dam-
age your engine if they are not
removed regularly.
Changing the oil and f ilter requires
special tools and access f rom
underneath the vehicle. The vehicle
should be raised on a service station-
type hydraulic lif t f or this service.
Unless you have the knowledge and
proper equipment, you should have
this maintenance done by a skilled
technician.Run the engine until it reaches
normal operating temperature,
then shut it off.
Open the hood, and remove the
engine oil f ill cap. Remove the oil
drain bolt and washer f rom the
bottom of the engine. Drain the oil
into an appropriate container.Remove the oil f ilter, and let the
remaining oil drain. A special
wrench (available from your
dealer) is required.
Make sure the oil f ilter gasket is
not stuck to the engine block. If it
is, remove it bef ore installing a
new oil f ilter.
1.
2.
3.
Changing the Engine Oil and Filter
428
WASHER
DRAIN BOLT
OIL FILTER
�\f���—�\f���—���
�y�
����
��������y���
�(���������\f�y�\f�������y
2009 Odyssey
Page 434 of 532
When the radiator and engine are
cool, relieve any pressure in the
cooling system by turning the
radiator cap counterclockwise,
without pressing down.
Remove the radiator cap by
pushing down and turning
counterclockwise.The coolant level should be up to
the base of the f iller neck. Add
coolant if it is low.Pour coolant into the reserve tank.
Fill it to half way between the MAX
and MIN marks. Put the cap back
on the reserve tank.
Do not add any rust inhibitors or
other additives to your vehicle’s
cooling system. They may not be
compatible with the coolant or
engine components. Put the radiator cap back on, and
tighten it fully.
Pourthecoolantslowlyand
caref ully so you do not spill. Clean
up any spill immediately; it could
damage components in the engine
compartment.
3. 4.
5.
1.
2.
Engine Coolant
Maint enance
431
RADIATOR CAP FILLER NECK
Fill up to here
�\f���—�\f���—���
�y�
����
������
�y���
�(���������\f�y�\f�������y
2009 Odyssey
Page 436 of 532
CONT INUED
Insert the dipstick all the way into
the transmission securely as
shown in the illustration.
Remove the dipstick, and check
the f luid level. It should be
between the upper and lower
marks.
Remove the dipstick (yellow loop)
f rom the transmission, and wipe it
with a clean cloth.
Check the f luid level with the engine
at normal operating temperature.
Park the vehicle on level ground.
Start the engine, let it run until the
radiator f an comes on, then shut
of f the engine. For accurate
results, wait about 60 seconds (but
no longer than 90 seconds) bef ore
doing step 2.
1.
2.3.
4.
Automatic Transmission Fluid
Maint enance
433
DIPSTICK HOT
MARK
UPPER MARK
LOWER MARK
�\f���—�\f���—���
�y�
����
����\f���y���
�(���������\f�y�\f�������y
2009 Odyssey
Page 440 of 532

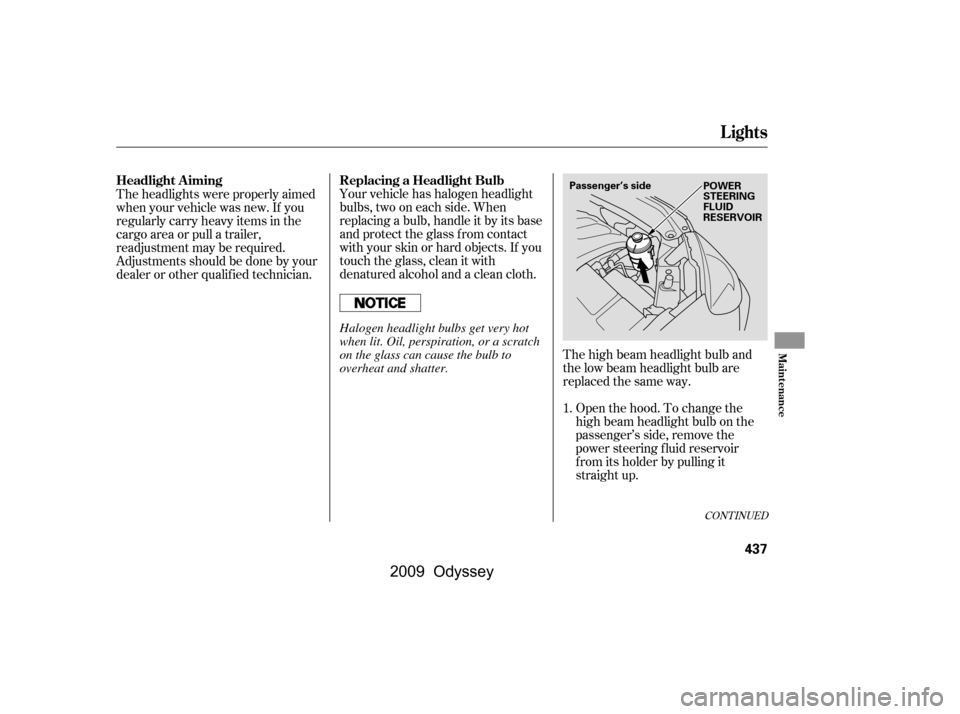
Your vehicle has halogen headlight
bulbs, two on each side. When
replacing a bulb, handle it by its base
and protect the glass from contact
with your skin or hard objects. If you
touch the glass, clean it with
denaturedalcoholandacleancloth.The high beam headlight bulb and
the low beam headlight bulb are
replaced the same way.Open the hood. To change the
high beam headlight bulb on the
passenger’s side, remove the
power steering f luid reservoir
f rom its holder by pulling it
straight up.
Theheadlightswereproperlyaimed
when your vehicle was new. If you
regularly carry heavy items in the
cargo area or pull a trailer,
readjustment may be required.
Adjustmentsshouldbedonebyyour
dealer or other qualif ied technician.
1.
CONT INUED
Lights
Headlight A imingReplacing a Headlight Bulb
Maint enance
437
POWER
STEERING
FLUID
RESERVOIR
Passenger’s side
Halogen headlight bulbs get very hot
when lit. Oil, perspiration, or a scratch
on the glass can cause the bulb to
overheat and shatter.
�\f���—�\f���—���
�y�
����
��������y���
�(���������\f�y�\f�������y
2009 Odyssey
Page 441 of 532
Remove the electrical connector
f rom the bulb by pushing on the
tab and pulling the connector
down.
Remove the bulb by turning it one-
quarter turn counterclockwise.Open the hood. Remove the
socket f rom the headlight
assembly by turning it one-quarter
turn counterclockwise.
Pull the burned out bulb straight
out of its socket.
Push the new bulb straight into
the socket until it bottoms.
Push the electrical connector back
onto the bulb. Make sure it is on
all the way.
Turn on the headlights to test the
new bulb.
If you replaced the high beam
headlight bulb on the passenger’s
side, reinstall the power steering
f luid reservoir.
Insert the new bulb into the hole,
and turn it one-quarter turn clock-
wise to lock it in place. 5.
6.
7.
2.
3.
4. 2.
1.
Lights
Replacing a Front T urn Signal
Bulb
438
TAB
BULB
CONNECTOR BULB SOCKET
Driver’s side
�\f���—�\f���—���
�y�
����
��������y���
�(���������\f�y�\f�������y
2009 Odyssey
Page 442 of 532
Insert the socket back into the
headlight assembly. Turn it
clockwise to lock it in place.
Turn on the lights to make sure
the new bulb is working.Open the hood. Remove the
socket f rom the headlight
assembly by turning it one-quarter
turn counterclockwise.
Pull the bulb straight out of its
socket. Push the new bulb straight
into the socket until it bottoms.Insert the socket back into the
headlight assembly. Turn it
clockwise to lock it in place.
Turn on the lights to make sure
the new bulb is working.
3.
4.
1.
2.
3.
4.
Lights
Replacing a Front Parking/Side
Marker Bulb
Maint enance
439
BULB
SOCKET
�\f���—�\f���—���
�y�
����
��������y���
�(���������\f�y�\f�������y
2009 Odyssey
Page 443 of 532
Push the electrical connector onto
the new bulb.
Turn on the f og lights to test the
new bulb.
Insert the new bulb into the
assembly and turn it one-quarter
turn clockwise to lock it in place.
Reinstall the f og light assembly,
then tighten the screw.
Use a Phillips-head screwdriver to
remove the screw.
Remove the f og light assembly
f rom the bumper by pulling its
inner edge f irst, then the whole
assembly out of the bumper. Remove the electrical connector
f rom the bulb by pushing on the
tab and pulling the connector
down.
Remove the bulb f rom the f og
light assembly by turning it one-
quarter turn counterclockwise.
1.
2.
3.
4.5.
6.
7.
8.
Touring models only
Lights
ReplacingaFogLightBulb
440
TAB
BULB
CONNECTOR
SCREW
Halogen bulbs get very hot when lit. Oil,
perspiration, or a scratch on the glass
can cause the bulb to overheat and
shatter.
�\f���—�\f���—���
�y�
����
����\f���y���
�(���������\f�y�\f�������y
2009 Odyssey