Page 258 of 449
will remain ON. At this time, reduce speed and stop
spinning the wheels to complete the shift. There may be
a delay up to 10 seconds for the shift to complete after the
wheels have stopped spinning.
4WD LOCK-to-4WD LOW or 4WD LOW-to-4WD
LOCK
NOTE:When shifting into or out of 4WD LOW, some
gear noise may be heard. This noise is normal and is not
detrimental to the vehicle or occupants.
Shifting can be performed with the vehicle rolling 2 to
3 mph (3 to 5 km/h), or completely stopped. USE
EITHER OF THE FOLLOWING PROCEDURES:
Preferred Procedure
1. With engine RUNNING, slow vehicle to 2 to 3 mph (3
to 5 km/h).2. Shift the transmission into NEUTRAL (depress clutch
on manual transmissions).
3. While still rolling, rotate the transfer case control
switch to the desired position.
4. After the desired position indicator light is ON (not
flashing), shift transmission back into gear (release clutch
on manual transmissions).
Alternate Procedure
1. Bring the vehicle to complete stop.
2. With the key ON and the engine either OFF or
RUNNING, shift the transmission into NEUTRAL (de-
press clutch on manual transmissions).
3. Rotate the transfer case control switch to the desired
position.
256 STARTING AND OPERATING
Page 260 of 449
roads. This feature provides the safety, security, and
convenience of operating in all-wheel drive at all times
regardless of road conditions.
When additional traction is required, the 4WD LOCK
and 4WD LOW positions can be used to lock the front
and rear driveshafts together, through the transfer case
inter-axle differential, and force the front and rear wheels
to rotate at the same speed. This is accomplished by
rotating the 4WD Control Switch to these positions. The
4WD LOCK and 4WD LOW positions are intended for
loose, slippery road surfaces only. Driving in the 4WD
LOCK and 4WD LOW positions on dry, hard-surfaced
roads may cause increased tire wear and damage to the
driveline components.
The transfer case NEUTRAL position is selected by
depressing the recessed button located on the lower left
hand corner of the 4WD Control Switch.NOTE:The transfer case NEUTRAL position is to be
used for recreational towing only. Refer to ªRecreational
Towingº in Section 5 for specific procedures on shifting
into and out of NEUTRAL.
Transfer Case Position Indicator Lights
Transfer case position indicator lights are located on the
instrument cluster. If there are no indicator lights on or
flashing, the transfer case position is 4-wheel drive
(4WD) and indicates the current and desired transfer case
selection (4WD,4WD LOCK).
The ªSVC 4WDº warning light monitors the electric shift
4WD system. If this light remains on after engine start up
or illuminates during driving, it means that the 4WD
system is not functioning properly and that service is
required. See your authorized dealer for service.
258 STARTING AND OPERATING
Page 261 of 449
WARNING!
Always engage the parking brake when powering
down the vehicle if the(SVC 4WD(light is illumi-
nated. Not engaging the parking brake may allow the
vehicle to roll, which may cause personal injury.
NOTE:Do not attempt to make a shift while only the
front or rear wheels are spinning. The NV 244 Generation
II transfer case is not equipped with a synchronizer and
therefore the front and rear driveshaft speeds must be
equal for the shift to take place. Shifting while only the
front or rear wheels are spinning can cause damage to the
transfer case.
When operating your vehicle in 4WD LOW, the engine
speed is approximately three times that of the 4WD or
4WD LOCK positions at a given road speed. Take care
not to overspeed the engine and do not exceed 25 mph
(40 km/h).Proper operation of 4-wheel drive vehicles depends on
tires of equal size, type and circumference on each wheel.
Any difference in tire size can cause damage to the
transfer case.
Because 4-wheel drive provides improved traction, there
is a tendency to exceed safe turning and stopping speeds.
Do not go faster than road conditions permit.
WARNING!
You or others could be injured if you leave the
vehicle unattended with the transfer case in the
NEUTRAL position without first fully engaging the
parking brake. The transfer case NEUTRAL position
disengages both the front and rear driveshafts from
the powertrain and will allow the vehicle to move,
regardless of the transmission position. The parking
brake should always be applied when the driver is
not in the vehicle.
STARTING AND OPERATING 259
5
Page 263 of 449
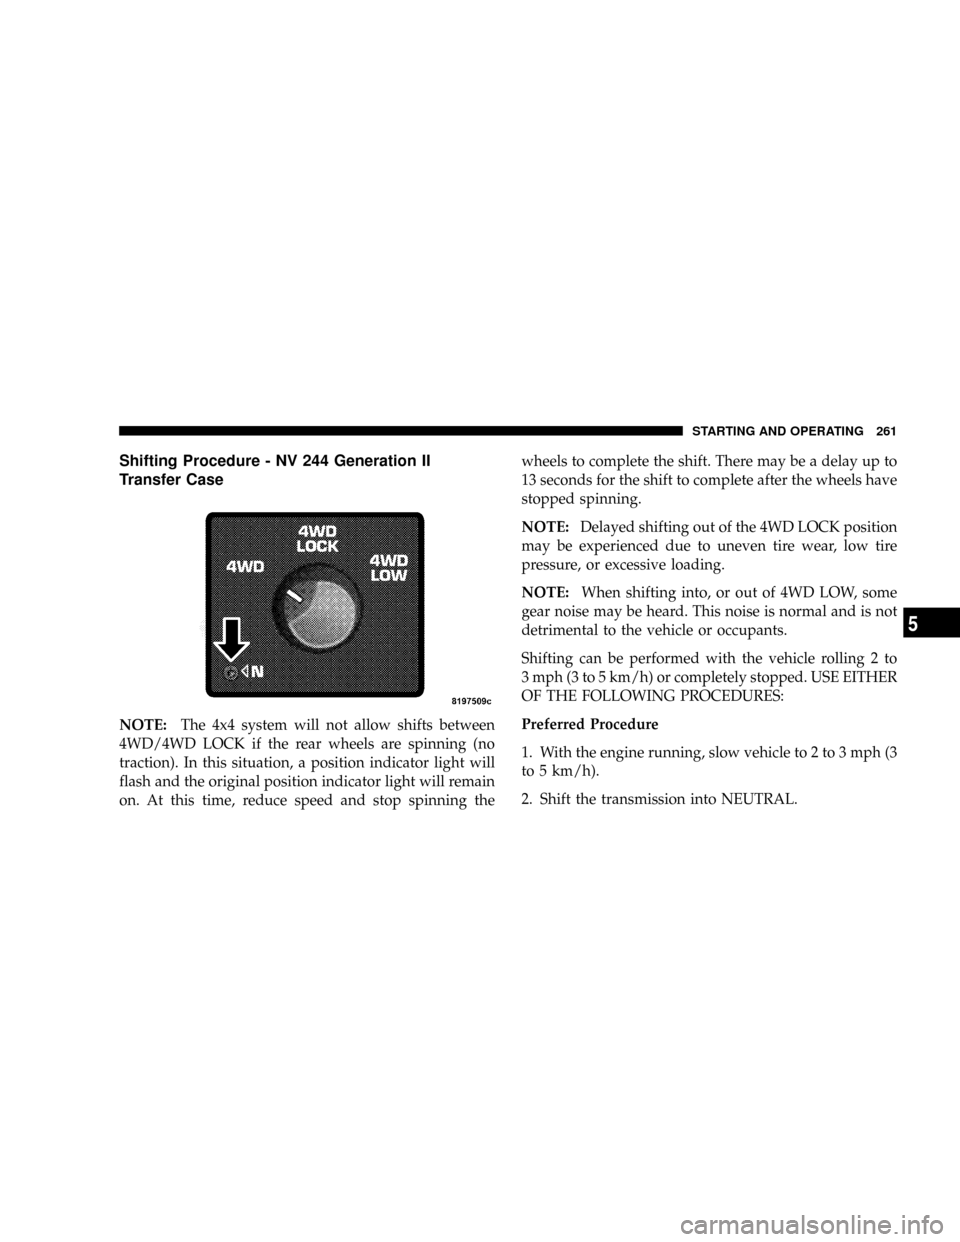
Shifting Procedure - NV 244 Generation II
Transfer Case
NOTE:The 4x4 system will not allow shifts between
4WD/4WD LOCK if the rear wheels are spinning (no
traction). In this situation, a position indicator light will
flash and the original position indicator light will remain
on. At this time, reduce speed and stop spinning thewheels to complete the shift. There may be a delay up to
13 seconds for the shift to complete after the wheels have
stopped spinning.
NOTE:Delayed shifting out of the 4WD LOCK position
may be experienced due to uneven tire wear, low tire
pressure, or excessive loading.
NOTE:When shifting into, or out of 4WD LOW, some
gear noise may be heard. This noise is normal and is not
detrimental to the vehicle or occupants.
Shifting can be performed with the vehicle rolling 2 to
3 mph (3 to 5 km/h) or completely stopped. USE EITHER
OF THE FOLLOWING PROCEDURES:
Preferred Procedure
1. With the engine running, slow vehicle to 2 to 3 mph (3
to 5 km/h).
2. Shift the transmission into NEUTRAL.
STARTING AND OPERATING 261
5
Page 264 of 449
3. While still rolling, rotate the transfer case control
switch to the desired position.
4. After the position indicator light has stopped flashing,
shift the transmission back into gear.
Alternate Procedure
1. Bring the vehicle to a complete stop.
2. With the key ON and the engine either OFF or
running, shift the transmission into NEUTRAL.
3. Rotate the transfer case control switch to the desired
position.
4. After the position indicator light has stopped flashing,
shift the transmission back into gear.
NOTE:
²The ignition key must be ON for a shift to take place
and for the position indicator lights to be operable. Ifthe key is not ON then the shift will not take place and
no position indicator lights will be on or flashing.
²If any of the requirements to select a new transfer case
position have not been met, the transfer case will not
shift. The indicator light will flash and the current
transfer case position will be maintained. To retry the
selection, turn the control knob back to the current
position, wait five seconds, and retry the shift.
LIMITED-SLIP REAR AXLE DIFFERENTIAL Ð IF
EQUIPPED
The limited-slip differential provides additional traction
on snow, ice, mud, sand and gravel. It improves traction
when there is a difference between the characteristics of
the surface under the right and left rear wheels. During
normal driving and cornering, the limited-slip unit is
similar to a conventional differential. But on a slippery
surface, the differential delivers more of the driving effort
to the wheel having the better traction.
262 STARTING AND OPERATING
Page 265 of 449
WARNING!
On vehicles equipped with a limited-slip differen-
tial, never run the engine with one rear wheel off the
ground. The vehicle may drive through the rear
wheel remaining on the ground and cause you to lose
control of the vehicle.
Care should be taken to avoid sudden accelerations when
both rear wheels are on a slippery surface. This could
cause both rear wheels to spin, and allow the vehicle to
slide sideways on the crowned surface of a road or in a
turn.
DRIVING ON SLIPPERY SURFACES
When driving on wet or slushy roads, it is possible for a
wedge of water to build up between the tire and road
surface. This is known as hydroplaning and may cause
partial or complete loss of vehicle control and stopping
ability. To reduce this possibility, the following precau-
tions should be observed:
1. Slow down during rainstorms or when roads are
slushy.
2. Slow down if road has standing water or puddles.
3. Replace tires when tread wear indicators first become
visible.
4. Keep tires properly inflated.
5. Maintain sufficient distance between your vehicle and
the car in front to avoid a collision in a sudden stop.
STARTING AND OPERATING 263
5
Page 267 of 449
CAUTION! (Continued)
²Driving through standing water may cause dam-
age to your vehicle's drivetrain components. Al-
ways inspect your vehicle's fluids (i.e., engine oil,
transmission/transaxle, axle, etc.) for signs of con-
tamination (i.e., fluid that is milky or foamy in
appearance) after driving through standing water.
Do not continue to operate the vehicle if any fluid
appears contaminated, as this may result in further
damage. Such damage is not covered by the New
Vehicle Limited Warranty.
²Getting water inside your vehicle's engine can
cause it to lock up and stall out, and cause serious
internal damage to the engine. Such damage is not
covered by the New Vehicle Limited Warranty.
WARNING!
²Driving through standing water limits your vehi-
cle's traction capabilities. Do not exceed 5 mph
(8 km/h) when driving through standing water.
²Driving through standing water limits your vehi-
cle's braking capabilities, which increases stop-
ping distances. Therefore, after driving through
standing water, drive slowly and lightly press on
the brake pedal several times to dry the brakes.
²Getting water inside your vehicle's engine can
cause it to lock up and stall out, and leave you
stranded.
²Failure to follow these warnings may result in
injuries that are serious or fatal to you, your
passengers, and others around you.
STARTING AND OPERATING 265
5
Page 269 of 449
apparent, and/or the system is not functioning as antici-
pated. Coordinate inspection efforts through an autho-
rized dealer.
WARNING!
Fluid level should be checked on a level surface and
with the engine off to prevent injury from moving
parts and to ensure accurate fluid level reading. Do
not overfill. Use only manufacturers recommended
power steering fluid.
If necessary, add fluid to restore to the proper indicated
level. With a clean cloth, wipe any spilled fluid from all
surfaces. For correct fluid type, refer to ºPower Steering
Reservoirº under ªFluids, Lubricants, and Genuine
Partsº in this section.
PARKING BRAKE
The foot-operated parking brake is positioned below the
lower left corner of the instrument panel. To release the
parking brake, pull the parking brake release handle.
NOTE:The instrument cluster Brake Warning Light
indicates only that the parking brake is applied. You must
be sure the parking brake is fully applied before leaving
the vehicle.
STARTING AND OPERATING 267
5