Page 330 of 449

NOTE:
²Steps 1 through 5 are requirements that must be met
prior to depressing the NEUTRAL selection button,
and must continue to be met until 1 second elapses
and the shift has been completed. If any of these
requirements (with the exception of 3 - key ON) are
not met prior to depressing the NEUTRAL button or
are no longer met during the 1 second time, then all of
the mode position indicator lights will flash continu-
ously until all requirements are met or until the
NEUTRAL button is released.
²The ignition key must be ON for a shift to take place
and for the position indicator lights to be operable. If
the key is not ON, the shift will not take place and no
position indicator lights will be on or flashing.
²Flashing NEUTRAL position indicator light indicates
that shift requirements have not been met.
WARNING!
You or others could be injured if you leave the
vehicle unattended with the transfer case in the
NEUTRAL position without first fully engaging the
parking brake. The transfer case NEUTRAL position
disengages both the front and rear driveshafts from
the powertrain and will allow the vehicle to move
despite the transmission position. The parking brake
should always be applied when the driver is not in
the vehicle.
328 STARTING AND OPERATING
Page 334 of 449
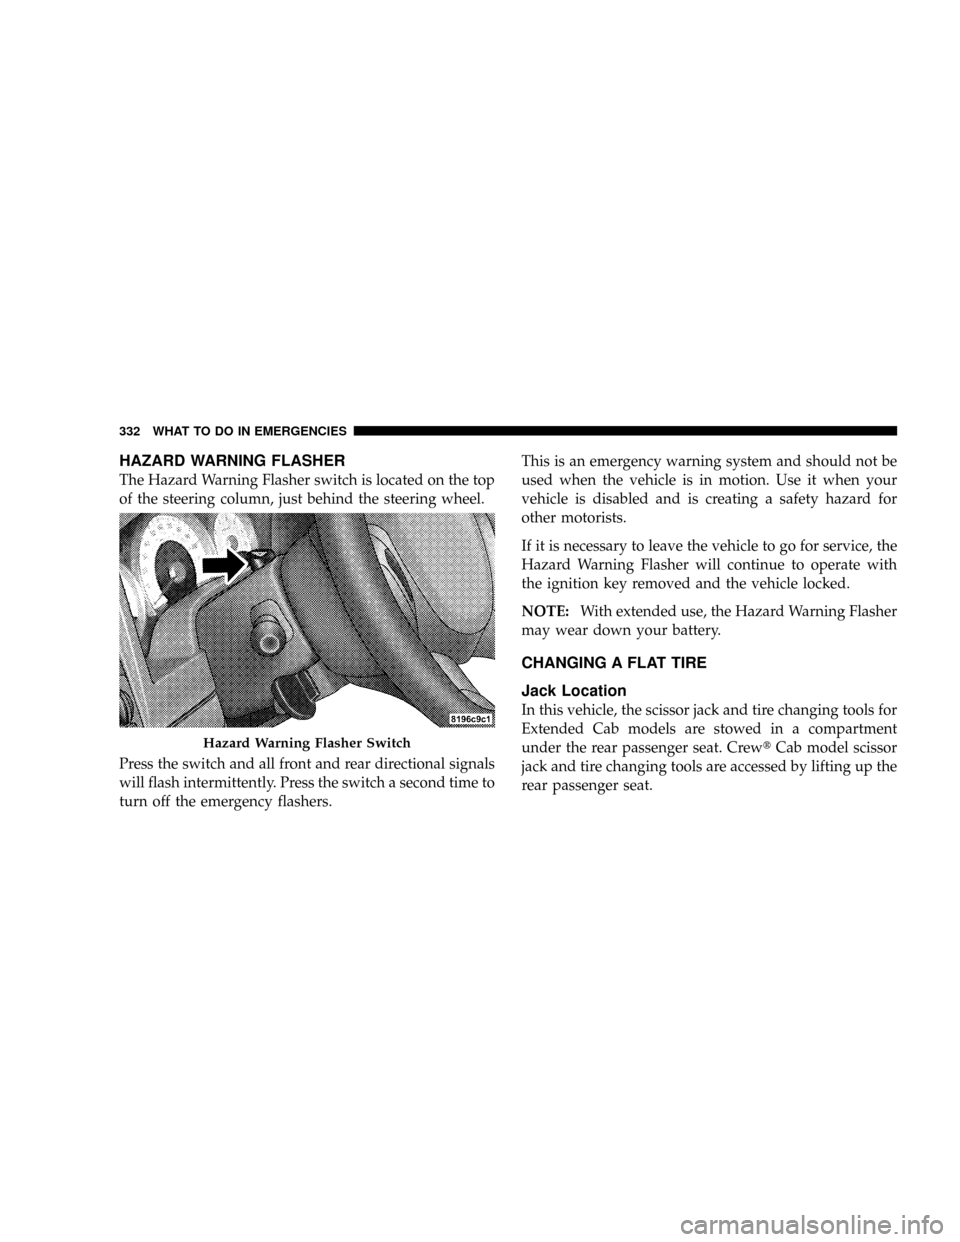
HAZARD WARNING FLASHER
The Hazard Warning Flasher switch is located on the top
of the steering column, just behind the steering wheel.
Press the switch and all front and rear directional signals
will flash intermittently. Press the switch a second time to
turn off the emergency flashers.This is an emergency warning system and should not be
used when the vehicle is in motion. Use it when your
vehicle is disabled and is creating a safety hazard for
other motorists.
If it is necessary to leave the vehicle to go for service, the
Hazard Warning Flasher will continue to operate with
the ignition key removed and the vehicle locked.
NOTE:With extended use, the Hazard Warning Flasher
may wear down your battery.
CHANGING A FLAT TIRE
Jack Location
In this vehicle, the scissor jack and tire changing tools for
Extended Cab models are stowed in a compartment
under the rear passenger seat. CrewtCab model scissor
jack and tire changing tools are accessed by lifting up the
rear passenger seat.
Hazard Warning Flasher Switch
332 WHAT TO DO IN EMERGENCIES
Page 339 of 449
Tire Changing Procedure
WARNING!
Getting under a jacked-up vehicle is dangerous. The
vehicle could slip off the jack and fall on you. You
could be crushed. Never get any part of your body
under a vehicle that is on a jack. Never start or run
the engine while the vehicle is on a jack. If you need
to get under a raised vehicle, take it to a service center
where it can be raised on a lift.
Do not raise this vehicle using a bumper jack. The scissor
jack is designed as a tool for changing tires on this vehicle
only. It is not recommended that the jack be used for
service purposes or to lift more than one wheel at a time.
Preparations
1. Park the vehicle on a firm level surface. Avoid icy or
slippery areas.
WARNING!
Do not attempt to change a tire on the side of the
vehicle close to moving traffic. Pull far enough off
the road to avoid the danger of being hit when
operating the jack or changing the wheel.
2. Set the parking brake.
3. Place the shift lever in PARK (automatic transmission).
On 4-Wheel Drive vehicles, shift the transfer case to the
4L position.
4. Turn the ignition OFF.
5. Turn on the Hazard Warning Flasher.
WHAT TO DO IN EMERGENCIES 337
6
Page 346 of 449

If the indicator is dark or shows a green dot, proceed as
follows:
1. Wear eye protection and remove all metal jewelry such
as watch bands or bracelets, which might make an
unintended electrical contact.
2. Park the booster vehicle within cable reach but with-
out letting the vehicles touch. Set the parking brake, place
the automatic transmission in PARK and turn the ignition
OFF on both vehicles.
3. Turn off the heater, radio and all unnecessary electrical
loads.
4. Connect one end of a jumper cable to the positive
terminal of the booster battery. Connect the other end of
the same cable to the positive terminal of the discharged
battery.WARNING!
Do not permit vehicles to touch each other as this
could establish a ground connection and personal
injury could result.
5. Connect the other cable, first to the negative terminal
of the booster battery and then to the engine of the
vehicle with the discharged battery. Make sure you have
a good contact to a metal surface of the engine block.
WARNING!
²Do not connect the cable to the negative post of the
discharge battery. The resulting electrical spark
could cause the battery to explode.
(Continued)
344 WHAT TO DO IN EMERGENCIES
Page 350 of 449
Two-Wheel Drive Vehicles
Provided that the transmission is operable, tow with the
transmission in NEUTRAL and the ignition key in the
OFF position, along with the front wheels raised and the
rear wheels on the ground. The speed must not exceed
30 mph (50 km/h), and the distance must not exceed
15 miles (25 km).If the vehicle is to be towed more than 15 miles (25 km)
or faster than 30 mph (50 km/h), it must be towed on a
flatbed, or with the rear wheels raised and the front
wheels on the ground, or with the front end raised and
the rear wheels on a towing dolly.
NOTE:Towing the vehicle with the rear wheels on the
ground at more than 30 mph (50 km/h) or for more than
15 miles (25 km), can cause severe transmission damage.
348 WHAT TO DO IN EMERGENCIES
Page 356 of 449
problem persists, the message will appear the next time
the vehicle is started. This might indicate a damaged cap.
If the problem is detected twice in a row, the system will
turn on the MIL. Resolving the problem will turn the MIL
off.
EMISSIONS INSPECTION AND MAINTENANCE
PROGRAMS
In some localities, it may be a legal requirement to pass
an inspection of your vehicle's emissions control system.
Failure to pass could prevent vehicle registration.
For states that require an Inspection and Mainte-
nance (I/M), this check verifies the Malfunction
Indicator Light (MIL) is functioning and is not on
when the engine is running, and that the OBD II system
is ready for testing.
Normally, the OBD II system will be ready. The OBD II
system maynotbe ready if your vehicle was recentlyserviced, recently had a dead battery, or a battery replace-
ment. If the OBD II system should be determined not
ready for the I/M test, your vehicle may fail the test.
Your vehicle has a simple ignition key-actuated test,
which you can use prior to going to the test station. To
check if your vehicle's OBD II system is ready, you must
do the following:
1. Insert your ignition key into the ignition switch.
2. Turn the ignition to the ON position, but do not crank
or start the engine.
3. If you crank or start the engine, you will have to start
this test over.
4. As soon as you turn your key to the ON position, you
will see the MIL symbol come on as part of a normal bulb
check.
354 MAINTAINING YOUR VEHICLE
Page 357 of 449
5. Approximately 15 seconds later, one of two things will
happen:
a. The MIL will flash for about 10 seconds and then
return to being fully illuminated until you turn OFF
the ignition or start the engine. This means that your
vehicle's OBD II system isnot readyand you should
notproceed to the I/M station.
b. The MIL will not flash at all and will remain fully
illuminated until you turn OFF the ignition or start the
engine. This means that your vehicle's OBD II system
isready, and you can proceed to the I/M station.
If your OBD II system isnot ready,you should see your
authorized dealer or repair facility. If your vehicle was
recently serviced or had a battery failure or replacement,
you may need to do nothing more than drive your
vehicle as you normally would in order for your OBD II
system to update. A recheck with the above test routine
may then indicate that the system is now ready.Regardless of whether your vehicle's OBD II system is
ready or not ready, if the MIL is illuminated during
normal vehicle operation, you should have your vehicle
serviced before going to the I/M station. The I/M station
can fail your vehicle because the MIL is on with the
engine running.
REPLACEMENT PARTS
Use of genuine MOPARtparts for normal/scheduled
maintenance and repairs is highly recommended to en-
sure the designed performance. Damage or failures
caused by the use of non-MOPARtparts for maintenance
and repairs will not be covered by the manufacturer's
warranty.
MAINTAINING YOUR VEHICLE 355
7
Page 367 of 449
WARNING!
A hot exhaust system can start a fire if you park over
materials that can burn. Such materials might be
grass or leaves coming into contact with your exhaust
system. Do not park or operate your vehicle in areas
where your exhaust system can contact anything that
can burn.
In unusual situations involving grossly malfunctioning
engine operation, a scorching odor may indicate severe
and abnormal catalyst overheating. If this occurs, the
vehicle should be stopped, the engine shut off and the
vehicle allowed to cool. Thereafter, service, including a
tune-up to manufacturer's specifications, should be ob-
tained immediately.To minimize the possibility of catalyst damage:²Do not shut off the engine or interrupt the ignition
when the transmission is in gear and the vehicle is in
motion.
²Do not try to start the engine by pushing or towing the
vehicle.
²Do not idle the engine with any spark plug wires
disconnected or removed, such as when diagnostic
testing, or for prolonged periods during very rough
idling or malfunctioning operating conditions.
MAINTAINING YOUR VEHICLE 365
7