Page 423 of 543
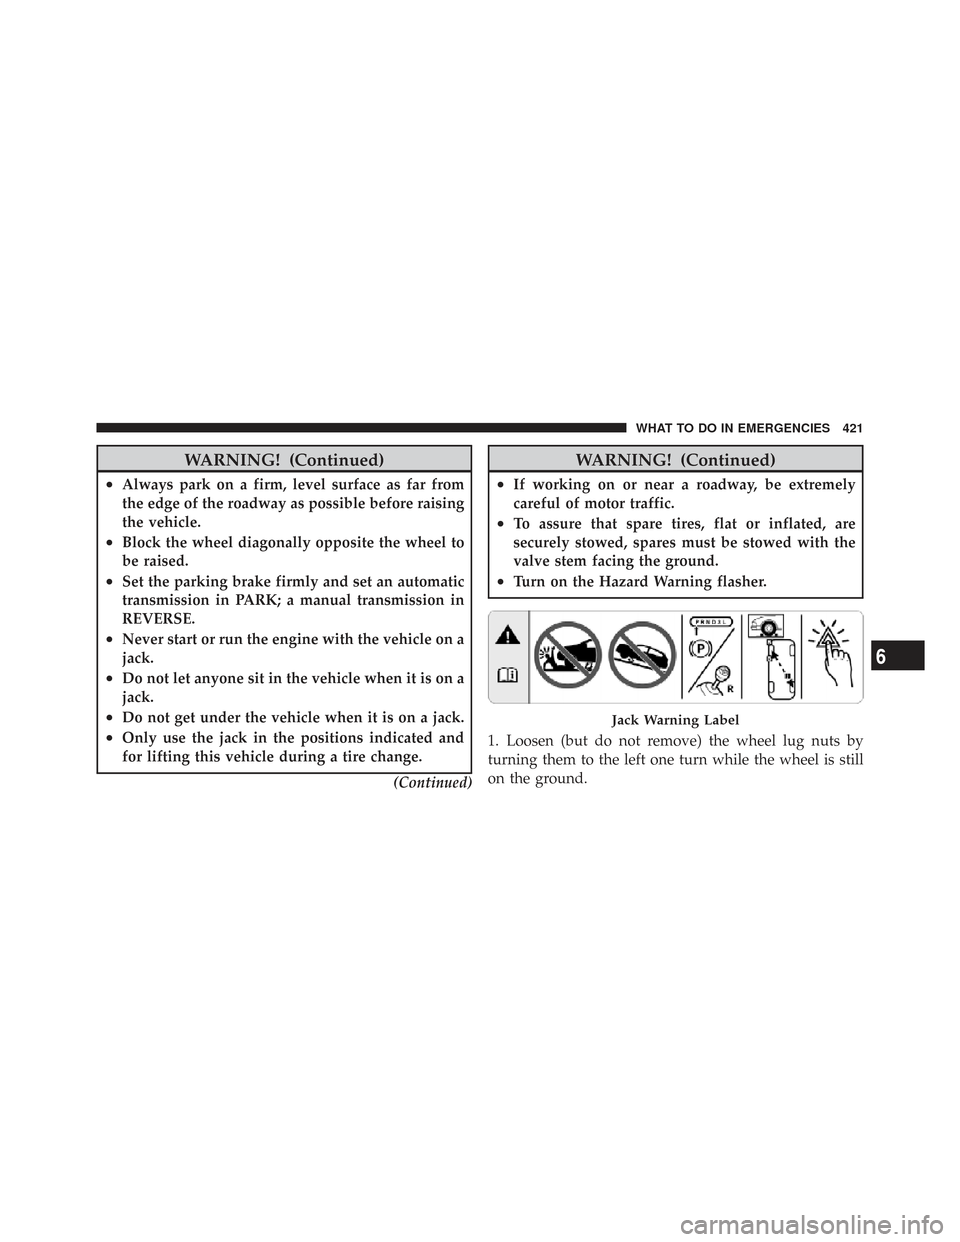
WARNING! (Continued)
•Always park on a firm, level surface as far from
the edge of the roadway as possible before raising
the vehicle.
•Block the wheel diagonally opposite the wheel to
be raised.
•Set the parking brake firmly and set an automatic
transmission in PARK; a manual transmission in
REVERSE.
•Never start or run the engine with the vehicle on a
jack.
•Do not let anyone sit in the vehicle when it is on a
jack.
•Do not get under the vehicle when it is on a jack.
•Only use the jack in the positions indicated and
for lifting this vehicle during a tire change.(Continued)
WARNING! (Continued)
•If working on or near a roadway, be extremely
careful of motor traffic.
•To assure that spare tires, flat or inflated, are
securely stowed, spares must be stowed with the
valve stem facing the ground.
•Turn on the Hazard Warning flasher.
1. Loosen (but do not remove) the wheel lug nuts by
turning them to the left one turn while the wheel is still
on the ground.
Jack Warning Label
6
WHAT TO DO IN EMERGENCIES 421
Page 429 of 543
10. Lower the vehicle by turning the jack screw to the
left.
11. Finish tightening the lug nuts. Push down on the
wrench while tightening for increased leverage. Alternate
lug nuts until each nut has been tightened twice. The
correct wheel nut tightness is 95 ft lbs (130 N·m). If in
doubt about the correct tightness, have them checked
with a torque wrench by your authorized dealer or at a
service station.
12. Lower the jack to its fully-closed position.
WARNING!
A loose tire or jack thrown forward in a collision or
hard stop could endanger the occupants of the ve-
hicle. Always stow the jack parts and the spare tire in
the places provided. Have the deflated (flat) tire
repaired or replaced immediately.13. Place the deflated (flat) tire and compact spare tire
cover assembly. in the rear cargo area.
Do not stow the
deflated tire in the spare tire location. Have the full-
sized tire repaired or replaced, as soon as possible.
14. Stow the cable and wheel spacer before driving the
vehicle. Reassemble the winch handle extensions to form
a “T” and fit the winch “T” handle over the drive nut.
Rotate the nut to the right until the winch mechanism
clicks at least three times.
15. Stow the jack, jack handle and winch handle tools.
16. Check the compact spare tire pressure as soon as
possible. Correct the tire pressure, as required.Wheel Nuts
All wheel nuts should be tightened occasionally, to
eliminate the possibility of wheel studs being sheared or
the bolt holes in the wheels becoming elongated. This is
especially important during the first few hundred miles
6
WHAT TO DO IN EMERGENCIES 427
Page 430 of 543
of operation, and after each time a tire is changed, to
allow the wheel nuts to become properly set. All nuts
should first be firmly seated against the wheel. The nuts
should then be tightened to recommended torque.
Tighten the nuts to final torque in increments. Progress
around the bolt circle, tightening the nut opposite to the
nut just previously tightened until final torque is
achieved. Recommended torque is 95 ft lbs (130 N·m).
Secure The Spare Tire As Follows:
1. Assemble the winch handle extensions to form a “T”
and fit the winch “T” handle over the drive nut. Rotate
the nut to the left until the winch mechanism stops
turning freely. This will allow enough slack in the cable to
allow you to pull the wheel spacer out from under the
vehicle.
WARNING!
A loose compact spare tire/cover assembly, thrown
forward in a collision or hard stop could endanger
the occupants of the vehicle. Always stow the com-
pact spare tire with the cover assembly in the place
provided.
CAUTION!
The winch mechanism is designed for use with the
winch “T” handle only. Use of an air wrench or other
power tools is not recommended and can damage the
winch.
2. Assemble the winch handle extensions to form the
spare tire hook, and pull the wheel spacer from under the
vehicle.
428 WHAT TO DO IN EMERGENCIES
Page 432 of 543
CAUTION!
The winch mechanism is designed specifically to
stow a compact spare tire only. Do not attempt to use
the winch to stow the full size flat tire, or any other
full-size tire. Vehicle damage may result.
JUMP-STARTING PROCEDURE
WARNING!
•Do not attempt to push or tow the vehicle to get it
started. Vehicles equipped with an automatic
transmission cannot be started this way. Unburned
fuel could enter the catalytic converter and once
the engine has started, ignite and damage the
converter and vehicle.(Continued)
WARNING! (Continued)
•If the vehicle has a discharged battery, booster
cables may be used to obtain a start from another
vehicle. This type of start can be dangerous if done
improperly, so follow this procedure carefully.
•Battery fluid is a corrosive acid solution; do not
allow battery fluid to contact eyes, skin or cloth-
ing. Do not lean over a battery when attaching
booster cables, or allow the clamps to touch each
other. If acid splashes in eyes or on skin, flush the
contaminated area immediately with large quanti-
ties of water.
•Battery gas is flammable and explosive. Keep
flame or sparks away from the battery. Do not use
a booster battery or any other booster source with
an output greater than 12-Volts. Do not allow
booster cable clamps to touch each other.(Continued)
430 WHAT TO DO IN EMERGENCIES
Page 435 of 543
NOTE:To improve the vehicle’s traction when starting
off in deep snow, sand or gravel, it may be desirable to
switch the Electronic Stability Control (ESC) to “Partial
Off” mode. For further information on ESC refer to
“Electronic Brake Control System” in Section 5.
WARNING!
Fast spinning tires can be dangerous. Forces gener-
ated by excessive wheel speeds may cause tire dam-
age or failure. A tire could explode and injure some-
one. Do not spin your vehicle’s wheels faster than
35 mph (55 km/h) when you are stuck. Do not let
anyone near a spinning wheel, no matter what the
speed.
CAUTION!
Revving the engine or spinning the wheels too fast
may lead to transmission overheating and failure. It
can also damage the tires. Do not spin the wheels
above 35 mph (55 km/h).
TOWING A DISABLED VEHICLE
Towing With The Ignition Key
Your vehicle may be towed under the following condi-
tions:
•The shift lever must be in NEUTRAL.
•The distance to be traveled must not exceed 100 miles
(160 km).
•The towing speed must not exceed 44 mph (72 km/h).
6
WHAT TO DO IN EMERGENCIES 433
Page 436 of 543
CAUTION!
Exceeding these towing limits may cause a transmis-
sion gear failure.
If the transmission is inoperative, or if the vehicle is to be
towed more than 100 miles (160 km), the vehicle must be
towed with the front wheels off the ground.
CAUTION!
•Do not attempt to tow this vehicle from the front
with sling-type towing equipment. Damage to the
front fascia will result.
•Always use wheel lift equipment when towing
from the front. The only other approved method of
towing is with a flatbed truck. (Continued)
CAUTION! (Continued)
•Do not tow the vehicle from the rear. Damage to
the rear sheet metal, liftgate and fascia will occur.
•Do not push or tow this vehicle with another
vehicle as damage to the bumper fascia and trans-
mission may result.
•If the vehicle being towed requires steering, the
ignition switch must be in the ON position, not in
the LOCK or ACC positions.
If it is necessary to use the accessories while being towed
(wipers, defrosters, etc.), the key must be in the ON
position, not the ACC position. Make certain the trans-
mission remains in NEUTRAL.
434 WHAT TO DO IN EMERGENCIES
Page 437 of 543
Towing Without The Ignition Key
Special care must be taken when the vehicle is towed
with the ignition in the OFF position. The only approved
method of towing without the ignition key is with a
flatbed truck. Proper towing equipment is necessary to
prevent damage to the vehicle.
Towing This Vehicle Behind Another Vehicle (Flat
Towing With All Four Wheels On The Ground)
Flat towing of vehicles equipped with an automatic
transmission, is only permitted within the limitations
described in this section.
Towing This Vehicle Behind Another Vehicle With
A Tow Dolly
The manufacturerdoes not recommend that you tow a
front wheel drive vehicle on a tow dolly. Vehicle damage
may occur.
6
WHAT TO DO IN EMERGENCIES 435
Page 443 of 543
ONBOARD DIAGNOSTIC SYSTEM — OBD II
Your vehicle is equipped with a sophisticated onboard
diagnostic system called OBD II. This system monitors
the performance of the emissions, engine, and automatic
transmission control systems. When these systems are
operating properly, your vehicle will provide excellent
performance and fuel economy, as well as engine emis-
sions well within current government regulations.
If any of these systems require service, the OBD II system
will turn on the “Malfunction Indicator Light.” It will
also store diagnostic codes and other information to
assist your service technician in making repairs. Al-
though your vehicle will usually be drivable and not
need towing, see your authorized dealer for service as
soon as possible.CAUTION!
•Prolonged driving with the “Malfunction Indica-
tor Light” on could cause further damage to the
emission control system. It could also affect fuel
economy and driveability. The vehicle must be
serviced before any emissions tests can be per-
formed.
•If the “Malfunction Indicator Light” is flashing
while the engine is running, severe catalytic con-
verter damage and power loss will soon occur.
Immediate service is required.
Loose Fuel Filler Cap Message — gASCAP
Should the “Loose Fuel Filler Cap” or “gASCAP” mes-
sage appear, there may be a problem in the evaporative
system. Before taking the vehicle into an authorized
dealer, check first to see if the fuel filler cap is possibly
loose, improperly installed, or damaged. A loose fuel
7
MAINTAINING YOUR VEHICLE 441