Page 308 of 410

▫Exhaust System ..................... 321
▫ Cooling System ..................... 323
▫ Brake System ....................... 329
▫ Automatic Transaxle .................. 331
▫ Manual Transaxle .................... 334
▫ Appearance Care And Protection From
Corrosion .......................... 334
� Fuses .............................. 340
▫ Integrated Power Module (IPM) .......... 340
� Vehicle Storage ....................... 344
� Replacement Bulbs .................... 344 �
Bulb Replacement ..................... 345
▫ Headlights ......................... 345
▫ Front Parking, Turn Signal, And Side Marker
Lights ............................ 346
▫ Front Fog Lights — If Equipped .......... 347
▫ Tail/Stop Lights And Rear
Turn Signal Lights .................... 347
▫ Backup Lights ...................... 348
▫ Center High-Mounted Stop Light (CHMSL) . . 348
� Fluids And Capacities .................. 349
� Fluids, Lubricants And Genuine Parts ....... 350
▫ Engine ............................ 350
▫ Chassis ........................... 351
306 MAINTAINING YOUR VEHICLE
Page 312 of 410
” is functioning and is not on when
the engine is running, and that the OBD II system is
ready for testing.
Normally, the OBD II system will be ready. The OBD II
system maynotbe")
Indicator Light (MIL)” is functioning and is not on when
the engine is running, and that the OBD II system is
ready for testing.
Normally, the OBD II system will be ready. The OBD II
system maynotbe ready if your vehicle was recently
serviced, recently had a dead battery or a battery replace-
ment. If the OBD II system should be determined not
ready for the I/M test, your vehicle may fail the test.
Your vehicle has a simple ignition key-actuated test,
which you can use prior to going to the test station. To
check if your vehicle’s OBD II system is ready, you must
do the following:
1. Insert your ignition key into the ignition switch.
2. Turn the ignition to the ON position, but do not crank
or start the engine.
3. If you crank or start the engine, you will have to start
this test over. 4. As soon as you turn your key to the ON position, you
will see the MIL symbol come on as part of a normal bulb
check.
5. Approximately 15 seconds later, one of two things will
happen:
a. The MIL will flash for about 10 seconds and then
return to being fully illuminated until you turn OFF
the ignition or start the engine. This means that your
vehicle’s OBD II system is not readyand you should
not proceed to the I/M station.
b. The MIL will not flash at all and will remain fully
illuminated until you turn OFF the ignition or start the
engine. This means that your vehicle’s OBD II system
is ready and you can proceed to the I/M station.
If your OBD II system is not ready,you should see your
authorized dealer or repair facility. If your vehicle was
recently serviced or had a battery failure or replacement,
310 MAINTAINING YOUR VEHICLE
Page 346 of 410

CAUTION!
•When installing the Integrated Power Module
cover, it is important to ensure the cover is prop-
erly positioned and fully latched. Failure to do so
may allow water to get into the Integrated Power
Module, and possibly result in an electrical system
failure.
•When replacing a blown fuse, it is important to use
only a fuse having the correct amperage rating. The
use of a fuse with a rating other than indicated may
result in a dangerous electrical system overload. If
a properly rated fuse continues to blow, it indicates
a problem in the circuit that must be corrected.
VEHICLE STORAGE
If you will not be using your vehicle for more than
21 days, you may want to take steps to preserve your
battery.
•Disengage the mini-fuse in the Power Distribution
Center labeled IOD (Ignition Off-Draw).
•Disconnect the negative cable from the battery.
REPLACEMENT BULBS
LIGHT BULBS — InteriorBulb No.
Center Console Floor Lamp ................. T37
Climate Controls ...................... 6233137
Console Gear Selector ................... PC194
Dome Light (Sedan) ...................... T579
Instrument Cluster Illumination ............... 74
Overhead Reading Light (Overhead Console) . . . T1037
Overhead Reading Light (Rearview Mirror) .....T192
Rear Cargo ............................ T906
Visor Vanity ......................... 6501966
All the interior bulbs are brass or glass wedge base.
Aluminum base bulbs are not approved and should not
be used for replacement.
344 MAINTAINING YOUR VEHICLE
Page 347 of 410
LIGHTS BULBS — ExteriorBulb No.
Low Beam Headlight ................... 9006XS
High Beam Headlight ................... 9005XS
Front Park/Turn Signal/
Side Marker Light ................... 4157NAKX
Front Fog Light ......................... 9145
Center High-Mounted Stop Light
(CHMSL) (Sedan) ................... 921–W16W
Rear Tail/Stop .......................... 3157
Rear Turn Signal ....................... 3757A
Backup Light ..................... 3157-P27/7W
License Light ........................... 168BULB REPLACEMENT
Headlights
CAUTION!
Do not touch the new headlight bulb with your
fingers. Oil contamination will severely shorten bulb
life.
1. Remove the headlight access cover splash shield,
located in the front wheel well opening.
7
MAINTAINING YOUR VEHICLE 345
Page 348 of 410
2. Disconnect the electrical connector(s).
3. Rotate the socket to the left one-quarter turn, and
replace the bulb.Front Parking, Turn Signal, and Side Marker
Lights
1. Remove the headlight access cover splash shield,
located in the front wheel well opening.
2. Disconnect the electrical connector.
346 MAINTAINING YOUR VEHICLE
Page 349 of 410
3. Rotate the socket to the left one-quarter turn, and
replace the bulb.
Front Fog Lights — If Equipped
1. Remove the fasteners attaching the lower splash
shield to gain access to the fog light.
2. Twist and remove the bulb from the fog light housing.
3. Disconnect the electrical connector and replace bulb.
Tail/Stop Lights and Rear Turn Signal Lights
1. Remove the screw attaching the tail light housing and
remove the housing from the vehicle.
2. Twist the bulb socket one—quarter turn to remove it
from the housing.3. Pull the bulb out of the socket and replace.
7
MAINTAINING YOUR VEHICLE 347
Page 350 of 410
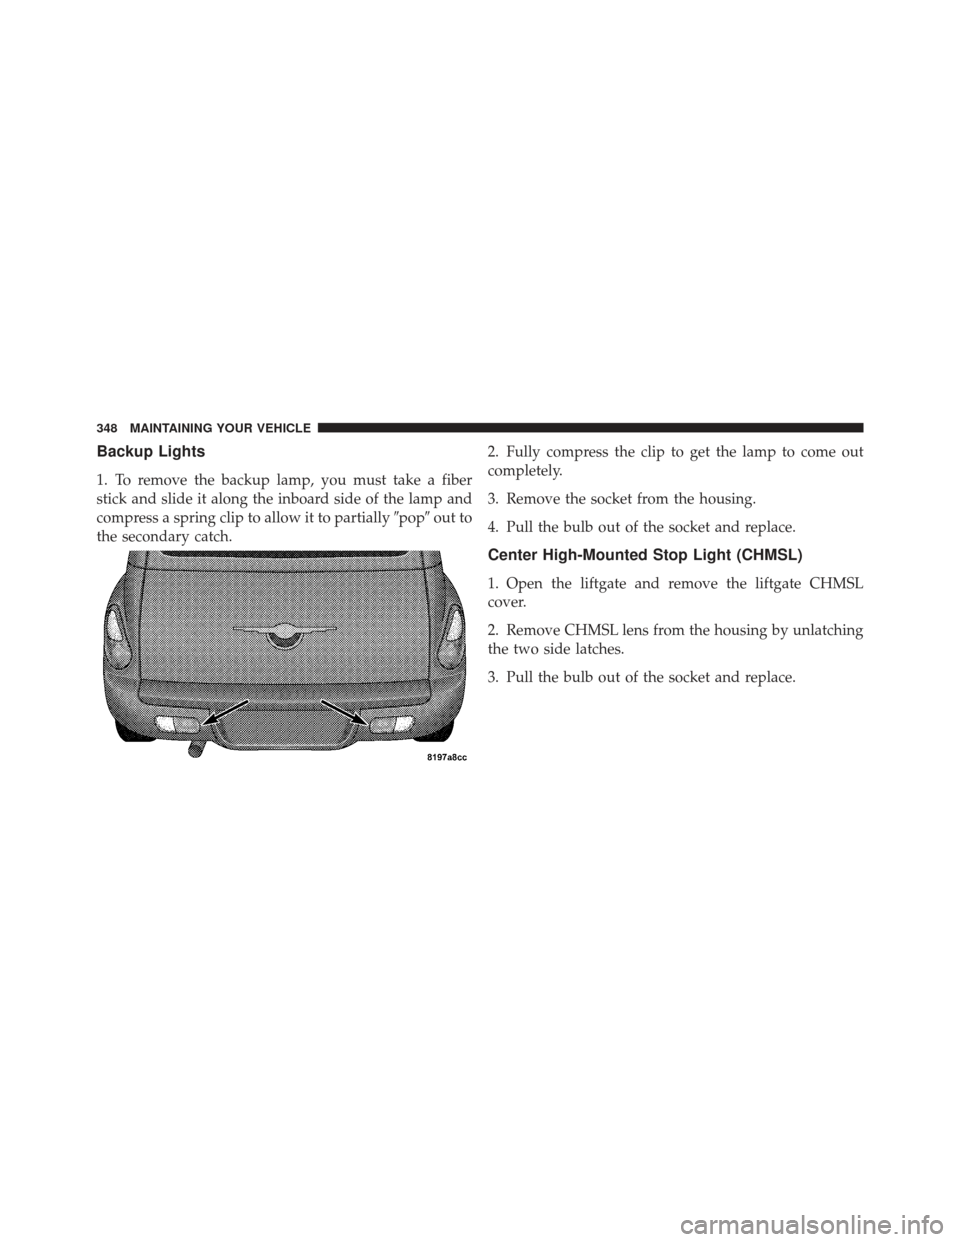
Backup Lights
1. To remove the backup lamp, you must take a fiber
stick and slide it along the inboard side of the lamp and
compress a spring clip to allow it to partially�pop�out to
the secondary catch. 2. Fully compress the clip to get the lamp to come out
completely.
3. Remove the socket from the housing.
4. Pull the bulb out of the socket and replace.
Center High-Mounted Stop Light (CHMSL)
1. Open the liftgate and remove the liftgate CHMSL
cover.
2. Remove CHMSL lens from the housing by unlatching
the two side latches.
3. Pull the bulb out of the socket and replace.
348 MAINTAINING YOUR VEHICLE
Page 393 of 410

Special Additives...................... 333
Autostick ............................. 234
Back-Up Lights ......................... 348
Battery ............................... 317
Keyless Transmitter Replacement (RKE) ....... 26
Belts, Seat .............................. 72
Body Mechanism Lubrication ............... 319
B-Pillar Location ........................ 252
Brake, Parking .......................... 241
Brake System ........................ 243,329
Anti-Lock (ABS) ....................... 244
Fluid Check .......................... 329
Master Cylinder ....................... 329
Parking ............................. 241
Warning Light ........................ 169
Brakes ............................. 243,329
Brake/Transmission Interlock ............... 230
Break-In Recommendations, New Vehicle ........ 70Bulb Replacement
..................... 344,345
Bulbs, Light .......................... 73,344
Calibration, Compass .................. 176,185
Capacities, Antifreeze (Engine Coolant) ........ 349
Capacities, Fluid ........................ 349
Caps, Filler Fuel ............................... 274
Oil (Engine) .................... 307,308,315
Power Steering ........................ 241
Radiator (Coolant Pressure) ............... 326
Car Washes ............................ 335
Carbon Monoxide Warning ...............71,273
CD (Compact Disc) Player ...............187,201
Cellular Phone ........................ 82,213
Center High Mounted Stop Light ............ 348
Chains, Tire ............................ 263
Changing A Flat Tire ..................... 294
Chart, Tire Sizing ........................ 249
10
INDEX 391

.
3. Rotate the socket to the left one-quarter turn, and
replace the bulb.Front Parking, Turn Signal, and Side Marker
Lights
1. Remove the headlight access cov")