2009 CHEVROLET MALIBU ECO mode
[x] Cancel search: ECO modePage 173 of 420
Here are four things that some owners ask about.
These are normal and do not indicate a problem with
the fuel gage:
At the service station, the gas pump shuts off
before the gage reads full.
It takes a little more or less fuel to �ll up than the
gage indicated. For example, the gage may have
indicated the fuel tank was half full, but it actually
took a little more or less than half the fuel tank’s
capacity to �ll it.
The indicator moves a little while turning a corner or
speeding up.
The gage goes back to empty when the ignition is
turned off.
Driver Information Center (DIC)
Your vehicle has a Driver Information Center (DIC).
The DIC display gives you the status of many of your
vehicle’s systems. The DIC is also used to display driver
personalization menu modes and warning/status
messages. All messages will appear in the DIC display,
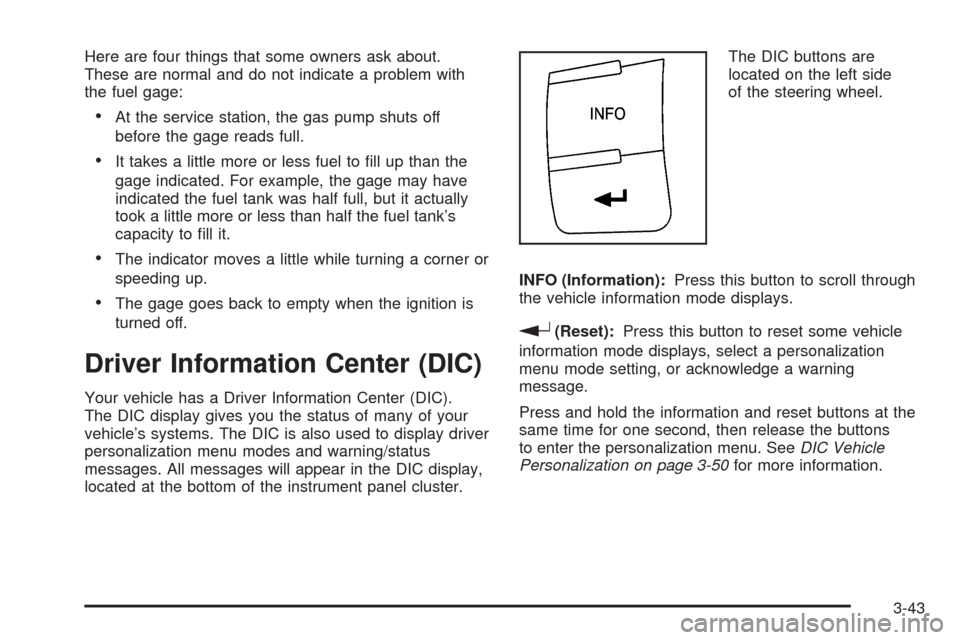
located at the bottom of the instrument panel cluster.The DIC buttons are
located on the left side
of the steering wheel.
INFO (Information):Press this button to scroll through
the vehicle information mode displays.
r(Reset):Press this button to reset some vehicle
information mode displays, select a personalization
menu mode setting, or acknowledge a warning
message.
Press and hold the information and reset buttons at the
same time for one second, then release the buttons
to enter the personalization menu. SeeDIC Vehicle
Personalization on page 3-50for more information.
3-43
Page 174 of 420
DIC Operation and Displays
The DIC comes on when the ignition is on. The DIC has
different modes which can be accessed by pressing the
DIC buttons. The button functions are detailed in the
following.
Information Modes
INFO (Information):Press this button to scroll through
the following vehicle information modes:
Outside Air Temperature
The outside air temperature will be displayed at the
same time as the Odometer and the Trip Odometer. The
temperature outside of the vehicle will be displayed in
either degrees Fahrenheit (°F) or degrees Celsius (°C).
The outside air temperature appears on the left side of
the DIC display and the odometer, or trip odometer,
appears on the right side of the display.
Odometer
Press the information button until the outside air
temperature and the odometer displays. This mode
shows the total distance the vehicle has been driven
in either miles (mi) or kilometers (km).
To change the DIC display to English or metric units,
see “UNITS” underDIC Vehicle Personalization on
page 3-50.
Trip Odometer
Press the information button until the outside air
temperature along with A or B displays. These modes
show the current distance traveled since the last
reset for each trip odometer in either miles (mi) or
kilometers (km). Both odometers can be used at
the same time.
To reset the trip odometer to zero, press and hold the
reset button for a few seconds while the desired
trip odometer is displayed.
FUEL RANGE
Press the information button until FUEL RANGE displays.
This mode shows the remaining distance you can drive
without refueling in either miles (mi) or kilometers (km).
It is based on fuel economy and the fuel remaining in
the tank.
When the fuel level is low, FUEL RANGE LOW displays.
The fuel economy data used to determine fuel range
is an average of recent driving conditions. As your
driving conditions change, this data is gradually updated.
The FUEL RANGE mode cannot be reset.
3-44
Page 175 of 420
MPG (L/100 KM) AVG (Average)
Press the information button until MPG (L/100 KM) AVG
displays. This mode shows how many miles per
gallon (mpg) or liters per 100 kilometers (L/100 km)
your vehicle is getting based on current and past
driving conditions.
To reset the average fuel economy, press and hold the
reset button while MPG (L/100 KM) AVG is displayed.
Average fuel economy is then calculated starting from
that point. If the average fuel economy is not reset, it is
continually updated each time you drive.
MPG (L/100 KM) INST (Instantaneous)
Press the information button until MPG (L/100 KM) INST
displays. This mode shows the current fuel economy at
a particular moment and changes frequently as driving
conditions change. This mode shows the instantaneous
fuel economy in miles per gallon (mpg) or liters per
100 kilometers (L/100 km). Unlike average fuel economy,
this screen cannot be reset.
AV (Average) SPEED
Press the information button until AV SPEED displays.
This mode shows the vehicle’s average speed in
miles per hour (mph) or kilometers per hour (km/h).
To reset the average vehicle speed, press and hold the
reset button while AV SPEED is displayed.
OIL LIFE
Press the information button until OIL LIFE displays.
The engine oil life system shows an estimate of the oil’s
remaining useful life. It shows 100% when the system
is reset after an oil change. It alerts you to change the oil
on a schedule consistent with your driving conditions.
In addition to the engine oil life system monitoring the
oil life, additional maintenance is recommended in
the Maintenance Schedule in this manual. SeeEngine
Oil on page 5-21andScheduled Maintenance on
page 6-4.
Always reset the engine oil life system after an oil
change. See “How to Reset the Engine Oil Life System”
underEngine Oil Life System on page 5-24.
Tire Pressure
On vehicles with the Tire Pressure Monitor System
(TPMS), the pressure for each tire can be viewed in
the DIC. The tire pressure is shown in either pounds
per square inch (psi) or kilopascals (kPa). Press the
information button until LF ## PSI (kPa) ## RF displays
for the front tires. Press the information button again until
LR ## PSI (kPa) ## RR displays for the rear tires.
If a low tire pressure condition is detected by the system
while driving, a message advising you to check the tire
pressure appears in the display. SeeInflation - Tire
Pressure on page 5-59andDIC Warnings and Messages
on page 3-46for more information.
3-45
Page 180 of 420
TRACTION OFF
If your vehicle has the Traction Control System (TCS),
this message displays and the ESC/TCS light on the
instrument panel cluster comes on solid when the system
is turned off. Adjust your driving accordingly. SeeTraction
Control System (TCS) on page 4-8andElectronic
Stability Control (ESC)/Traction Control System (TCS)
Indicator/Warning Light on page 3-35for more
information.
TRUNK AJAR
This message displays when the trunk is not closed
completely. Make sure that the trunk is closed
completely. SeeTrunk on page 2-12for more
information.
DIC Vehicle Personalization
Your vehicle has personalization capabilities that allow
you to program certain features to a preferred setting.
All of the features listed may not be available on your
vehicle. Only the features available will be displayed on
the DIC.
The default settings for the features were set when your
vehicle left the factory, but may have been changed from
their default state since that time.To change feature settings, use the following procedure:
Entering Personalization Menu
1. Turn the ignition on while the vehicle is stopped.
To avoid excessive drain on the battery, it is
recommended that the headlamps are turned off.
2. Press and hold the information and reset buttons at
the same time for one second, then release to enter
the personalization menu.
If the vehicle speed is greater than 2 mph (3 km/h),
only the UNITS menu will be accessible.
3. Press the information button to scroll through the
available personalization menu modes.
Press the reset button to scroll through the available
settings for each mode.
If you do not make a selection within ten seconds,
the display will go back to the previous information
displayed.
3-50
Page 181 of 420

Personalization Menu Modes
OIL LIFE RESET
When this feature is displayed, you can reset the engine
oil life system. To reset the system, seeEngine Oil Life
System on page 5-24. See “OIL LIFE” underDIC
Operation and Displays on page 3-44for more
information.
UNITS
This feature allows you to select the units of
measurement in which the DIC will display the vehicle
information. When UNITS appears on the display, press
and hold the reset button for at least one second to
scroll through the available settings:
ENGLISH (default in United States):All information
will be displayed in English units.
METRIC (default in Canada):All information will be
displayed in metric units.
To select a setting and move on to the next feature,
press the information button while the desired setting is
displayed on the DIC.
REMOTE START
If your vehicle has remote start, this feature allows
remote start to be turned off or on. Remote start allows
you to start the engine from outside of the vehicle using
your Remote Keyless Entry (RKE) transmitter. When
REMOTE START appears on the display, press and hold
the reset button for at least one second to scroll through
the available settings:
OFF:The remote start feature will be disabled.
ON (default):The remote start feature will be enabled.
SeeRemote Vehicle Start on page 2-7for more
information.
To select a setting and move on to the next feature,
press the information button while the desired setting is
displayed on the DIC.
3-51
Page 185 of 420
EXT (Exterior) LIGHTS
This feature, which allows the vehicle’s exterior perimeter
lighting to turn on each time the unlock button on the
Remote Keyless Entry (RKE) transmitter is pressed, can
be enabled or disabled. When EXT LIGHTS appears on
the display, press and hold the reset button for at least
one second to scroll through the available settings:
OFF:The exterior perimeter lighting will not turn on when
the unlock button on the RKE transmitter is pressed.
ON (default):The exterior perimeter lighting will turn on
when the unlock button on the RKE transmitter is
pressed.
SeeRemote Keyless Entry (RKE) System Operation on
page 2-5for more information.
To select a setting and move on to the next feature,
press the information button while the desired setting is
displayed on the DIC.
LANGUAGE
This feature allows you to select the language in which
the DIC will display. When LANGUAGE appears on
the display, press and hold the reset button for at least
one second to scroll through the available settings:
ENGLISH (default):All messages will appear in
English.
FRENCH:All messages will appear in French.
SPANISH:All messages will appear in Spanish.
GERMAN:All messages will appear in German.
To select a setting and exit out of the personalization
menu mode, press the information button while the
desired setting is displayed on the DIC.
Exiting Personalization Menu
The personalization menu will be exited when any of the
following conditions occur:
A ten second time period has elapsed.
The ignition is turned off.
The end of the personalization menu list is reached.
3-55
Page 194 of 420
Setting the Tone
(Bass/Midrange/Treble)
BASS/MID/TREB (Bass, Midrange, or Treble):The
radio may display some or all tones such as BASS, MID,
and TREB.
To adjust the tone settings on the Radio with CD (Base):
Press
funtil the tone control labels display, then turnf
to change the setting.
To adjust the tone settings on the Radio with CD (MP3)
and USB Port, Radio with CD (MP3), or Radio with
Six-Disc CD (MP3):
1. Press
funtil the tone control tabs display.
2. Press the softkey below the desired tab to be
adjusted.
3. To increase the level of the bass, midrange, or
treble:
Press¨SEEK, or\FWD.
Turnfclockwise.4. To decrease the level of the bass, midrange, or
treble:
Press©SEEK, orsREV.
Turnfcounterclockwise.
The radio may be capable of adjusting bass, midrange,
or treble to the middle position by pressing the
softkey below the BASS, MID, or TREB tab for more
than two seconds. The radio beeps once and the level
adjusts to the middle position.
The radio may also be capable of adjusting all tone and
speaker controls to the middle position by pressing
ffor
more than two seconds until the radio beeps once.
If a station’s frequency is weak, or has static, decrease
the treble.
EQ (Equalization):Press this button to select preset
equalization settings.
To return to the manual mode, press EQ until Manual
displays or start to manually adjust the bass, midrange,
or treble by pressing
f.
3-64
Page 204 of 420
To listen to �les by another artist, press the softkey
located below either arrow tab. The disc goes to the next
or previous artist in alphabetical order. Continue pressing
either softkey below the arrow tab until the desired artist
displays.
To change from playback by artist to playback by album:
1. Press the softkey located below the Sort By tab.
2. Press one of the softkeys below the album tab from
the sort screen.
3. Press the softkey below the back tab to return to
the main music navigator screen.
The album name displays on the second line between the
arrows and songs from the current album begins to play.
Once all songs from that album have played, the player
moves to the next album in alphabetical order on the CD
and begins playing MP3 �les from that album.
To exit music navigator mode, press the softkey below
the Back tab to return to normal MP3 playback.Connecting a USB Storage Device
or iPod®
The USB Port can be used to control an iPod or a USB
storage device.
To connect a USB storage device, connect the device
to the USB port located on the front of the radio.
To connect an iPod, connect one end of the USB cable
that came with the iPod to the iPod’s dock connector and
connect the other end to the USB port located on the front
of the radio. If the vehicle is on and the USB connection
works, “OK to disconnect” and a GM logo may appear on
the iPod and iPod appears on the radio’s display. The
iPod music appears on the radio’s display and begins
playing.
The iPod charges while it is connected to the vehicle
if the vehicle is in the ACC/ACCESSORY or ON/RUN
position. When the vehicle is turned off, the iPod
automatically powers off and will not charge or draw
power from the vehicle’s battery.
If you have an older iPod model that is not supported, it
can still be used by connecting it to the Auxiliary Input
Jack using a standard 3.5 mm (1/8 inch) stereo cable.
See “Using the Auxiliary Input Jack” earlier for more
information.
3-74