2009 CHEVROLET MALIBU cruise control
[x] Cancel search: cruise controlPage 4 of 420
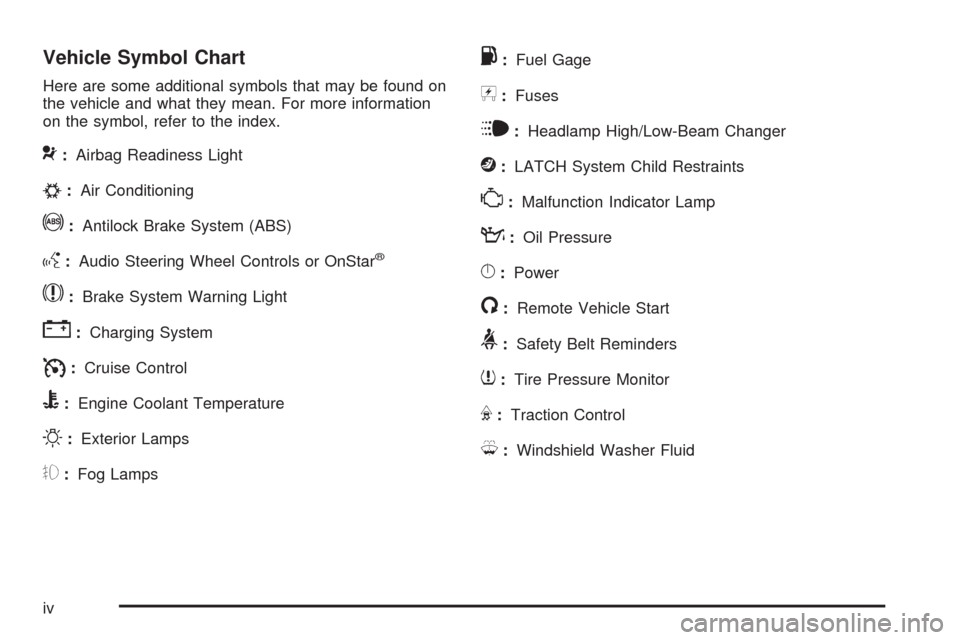
Vehicle Symbol Chart
Here are some additional symbols that may be found on
the vehicle and what they mean. For more information
on the symbol, refer to the index.
9:Airbag Readiness Light
#:Air Conditioning
!:Antilock Brake System (ABS)
g:Audio Steering Wheel Controls or OnStar®
$:Brake System Warning Light
":Charging System
I:Cruise Control
B:Engine Coolant Temperature
O:Exterior Lamps
#:Fog Lamps
.:Fuel Gage
+:Fuses
i:Headlamp High/Low-Beam Changer
j:LATCH System Child Restraints
*:Malfunction Indicator Lamp
::Oil Pressure
}:Power
/:Remote Vehicle Start
>:Safety Belt Reminders
7:Tire Pressure Monitor
F:Traction Control
M:Windshield Washer Fluid
iv
Page 131 of 420
Instrument Panel Overview...............................3-4
Hazard Warning Flashers................................3-6
Horn .............................................................3-6
Tilt and Telescopic Steering Wheel...................3-6
Turn Signal/Multifunction Lever.........................3-7
Turn and Lane-Change Signals........................3-7
Headlamp High/Low-Beam Changer..................3-8
Flash-to-Pass.................................................3-8
Windshield Wipers..........................................3-8
Windshield Washer.........................................3-9
Cruise Control..............................................3-10
Headlamps..................................................3-13
Headlamps on Reminder................................3-14
Headlamps Off in Park..................................3-14
Delayed Headlamps......................................3-14
Daytime Running Lamps (DRL).......................3-14
Automatic Headlamp System..........................3-15
Fog Lamps ..................................................3-15
Instrument Panel Brightness...........................3-16
Dome Lamps ...............................................3-16
Entry/Exit Lighting.........................................3-16
Parade Dimming...........................................3-16
Reading Lamps............................................3-16Electric Power Management...........................3-17
Battery Run-Down Protection..........................3-18
Accessory Power Outlet(s).............................3-18
Power Outlet 115 Volt Alternating Current........3-19
Climate Controls............................................3-20
Climate Control System.................................3-20
Automatic Climate Control System...................3-24
Outlet Adjustment.........................................3-27
Warning Lights, Gages, and Indicators............3-28
Instrument Panel Cluster................................3-29
Speedometer and Odometer...........................3-30
Trip Odometer.............................................
.3-30
Tachometer.................................................3-30
Safety Belt Reminders...................................3-30
Airbag Readiness Light..................................3-31
Passenger Airbag Status Indicator...................3-32
Charging System Light..................................3-33
Brake System Warning Light..........................3-34
Antilock Brake System (ABS) Warning Light.....3-35
Electronic Stability Control (ESC)/Traction
Control System (TCS) Indicator/Warning
Light........................................................3-35
Section 3 Instrument Panel
3-1
Page 132 of 420
Engine Coolant Temperature Warning Light......3-36
Engine Coolant Temperature Gage..................3-37
Tire Pressure Light.......................................3-37
Malfunction Indicator Lamp.............................3-38
Oil Pressure Light.........................................3-41
Security Light...............................................3-41
Cruise Control Light......................................3-42
Highbeam On Light.......................................3-42
Fuel Gage...................................................3-42
Driver Information Center (DIC).......................3-43
DIC Operation and Displays...........................3-44
DIC Warnings and Messages.........................3-46
DIC Vehicle Personalization............................3-50Audio System(s).............................................3-56
Setting the Clock..........................................3-57
Radio(s)......................................................3-59
Using an MP3..............................................3-71
XM Radio Messages.....................................3-77
Bluetooth
®...................................................3-78
Theft-Deterrent Feature..................................3-89
Audio Steering Wheel Controls.......................3-89
Radio Reception...........................................3-91
Backglass Antenna.......................................3-92
XM™ Satellite Radio Antenna System.............3-92
Chime Level Adjustment................................3-92
Section 3 Instrument Panel
3-2
Page 135 of 420
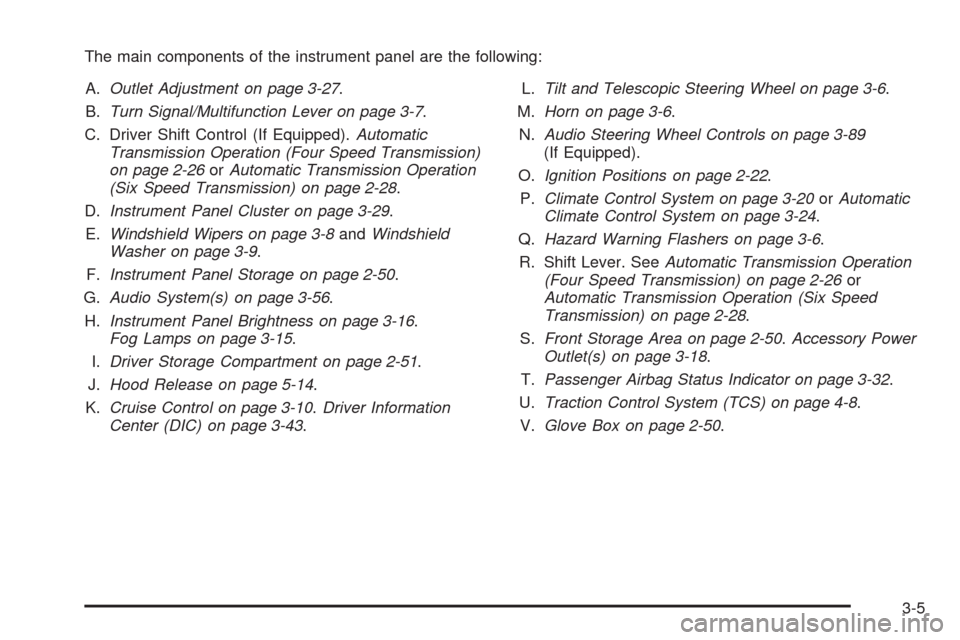
The main components of the instrument panel are the following:
A.Outlet Adjustment on page 3-27.
B.Turn Signal/Multifunction Lever on page 3-7.
C. Driver Shift Control (If Equipped).Automatic
Transmission Operation (Four Speed Transmission)
on page 2-26orAutomatic Transmission Operation
(Six Speed Transmission) on page 2-28.
D.Instrument Panel Cluster on page 3-29.
E.Windshield Wipers on page 3-8andWindshield
Washer on page 3-9.
F.Instrument Panel Storage on page 2-50.
G.Audio System(s) on page 3-56.
H.Instrument Panel Brightness on page 3-16.
Fog Lamps on page 3-15.
I.Driver Storage Compartment on page 2-51.
J.Hood Release on page 5-14.
K.Cruise Control on page 3-10.Driver Information
Center (DIC) on page 3-43.L.Tilt and Telescopic Steering Wheel on page 3-6.
M.Horn on page 3-6.
N.Audio Steering Wheel Controls on page 3-89
(If Equipped).
O.Ignition Positions on page 2-22.
P.Climate Control System on page 3-20orAutomatic
Climate Control System on page 3-24.
Q.Hazard Warning Flashers on page 3-6.
R. Shift Lever. SeeAutomatic Transmission Operation
(Four Speed Transmission) on page 2-26or
Automatic Transmission Operation (Six Speed
Transmission) on page 2-28.
S.Front Storage Area on page 2-50.Accessory Power
Outlet(s) on page 3-18.
T.Passenger Airbag Status Indicator on page 3-32.
U.Traction Control System (TCS) on page 4-8.
V.Glove Box on page 2-50.
3-5
Page 140 of 420
Cruise Control
Cruise control lets a speed of about 25 mph (40 km/h) or
more be maintained without keeping your foot on the
accelerator. This can really help on long trips. Cruise
control does not work at speeds below 25 mph (40 km/h).
{CAUTION:
Cruise control can be dangerous where you
cannot drive safely at a steady speed. So, do not
use the cruise control on winding roads or in
heavy traffic.
Cruise control can be dangerous on slippery roads.
On such roads, fast changes in tire traction can
cause excessive wheel slip, and you could lose
control. Do not use cruise control on slippery roads.
Setting Cruise Control
{CAUTION:
If you leave your cruise control on when you are
not using cruise, you might hit a button and go
into cruise when you do not want to. You could be
startled and even lose control. Keep the cruise
control switch off until you want to use cruise
control.
3-10
Page 141 of 420
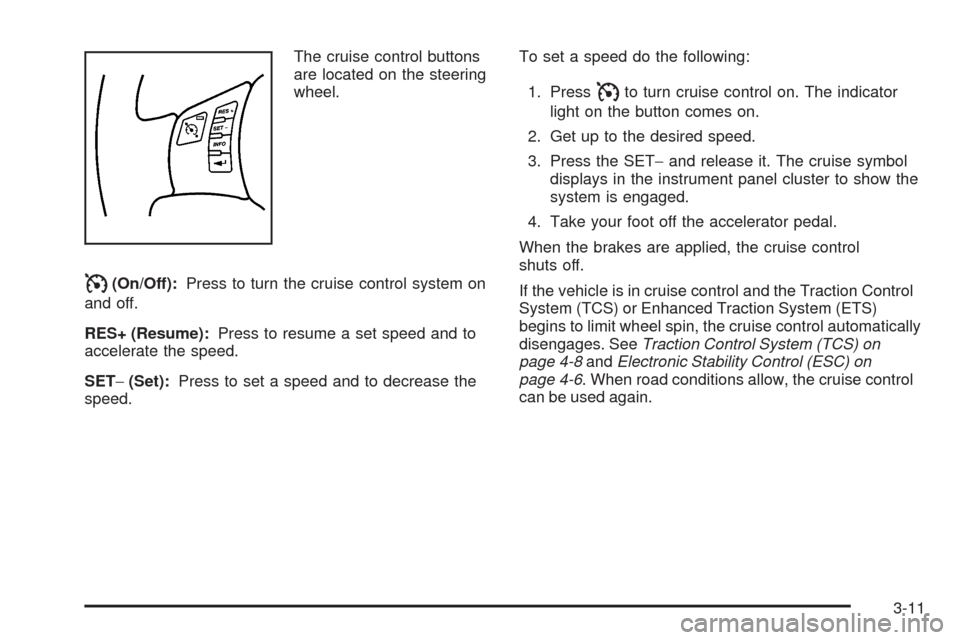
The cruise control buttons
are located on the steering
wheel.
I(On/Off):Press to turn the cruise control system on
and off.
RES+ (Resume):Press to resume a set speed and to
accelerate the speed.
SET−(Set):Press to set a speed and to decrease the
speed.To set a speed do the following:
1. Press
Ito turn cruise control on. The indicator
light on the button comes on.
2. Get up to the desired speed.
3. Press the SET−and release it. The cruise symbol
displays in the instrument panel cluster to show the
system is engaged.
4. Take your foot off the accelerator pedal.
When the brakes are applied, the cruise control
shuts off.
If the vehicle is in cruise control and the Traction Control
System (TCS) or Enhanced Traction System (ETS)
begins to limit wheel spin, the cruise control automatically
disengages. SeeTraction Control System (TCS) on
page 4-8andElectronic Stability Control (ESC) on
page 4-6. When road conditions allow, the cruise control
can be used again.
3-11
Page 142 of 420
Resuming a Set Speed
If the cruise control is set at a desired speed and then
the brakes are applied, the cruise control is disengaged.
The cruise symbol in the instrument panel cluster also
goes out indicating cruise is no longer engaged. To
return to the previously set speed, you do not need to
repeat the set process again. Once at a speed of about
25 mph (40 km/h) or more, brie�y press the RES+.
This takes the vehicle back up to the previously chosen
speed and stays there.
Increasing Speed While Using Cruise
Control
There are two ways to go to a higher speed.
If the cruise control system is already engaged,
press the RES+. Hold it there until the desired
speed is reached and then release the button.
To increase the vehicle speed in very small
amounts, brie�y press the RES+ and then release
it. Each time this is done, the vehicle goes about
1 mph (1.6 km/h) faster.
Reducing Speed While Using Cruise
Control
If the cruise control system is already engaged:
Push and hold the SET−until the desired lower
speed is reached, then release it.
To slow down in very small amounts, brie�y push
the SET−. Each time this is done, the vehicle
goes about 1 mph (1.6 km/h) slower.
Passing Another Vehicle While Using
Cruise Control
Use the accelerator pedal to increase the vehicle’s
speed. When you take your foot off the pedal, the vehicle
slows down to the previously set cruise control speed.
Using Cruise Control on Hills
How well the cruise control works on hills depends upon
the vehicle’s speed, load, and the steepness of the hills.
When going up steep hills, you might have to step on the
accelerator pedal to maintain the vehicle’s speed. When
going downhill, you might have to brake or shift to a lower
gear to keep the vehicle at a lower speed. When the
brakes are applied this ends the cruise control.
3-12
Page 143 of 420
Ending Cruise Control
There are two ways to disengage the cruise control:
Step lightly on the brake pedal to disengage
the cruise control.
Press the on/off button, to turn off the cruise
control.
Erasing Speed Memory
The cruise control set speed memory is erased when
the cruise control or the ignition are turned off.
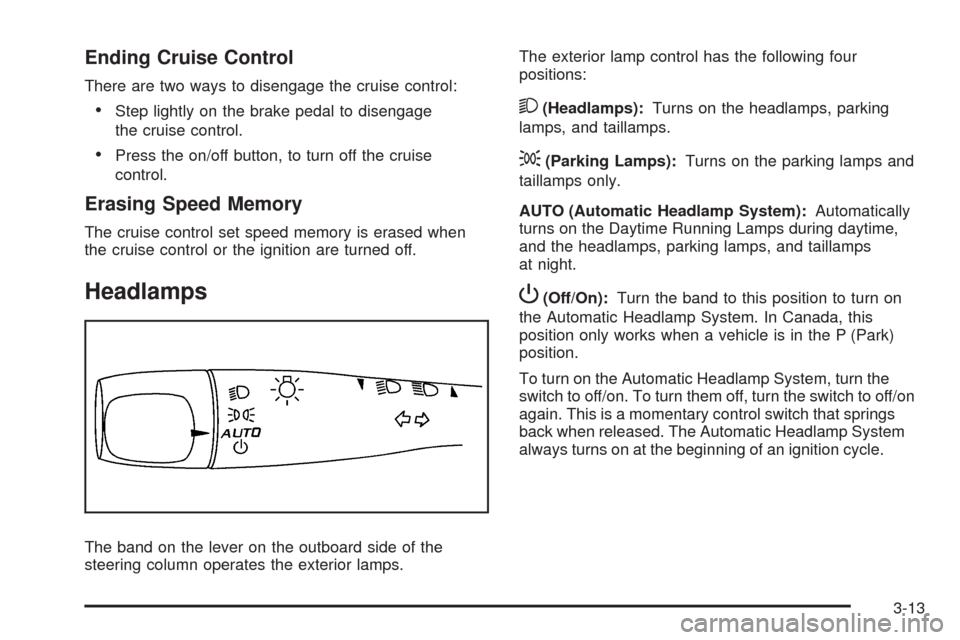
Headlamps
The band on the lever on the outboard side of the
steering column operates the exterior lamps.The exterior lamp control has the following four
positions:
2(Headlamps):Turns on the headlamps, parking
lamps, and taillamps.
;(Parking Lamps):Turns on the parking lamps and
taillamps only.
AUTO (Automatic Headlamp System):Automatically
turns on the Daytime Running Lamps during daytime,
and the headlamps, parking lamps, and taillamps
at night.
P(Off/On):Turn the band to this position to turn on
the Automatic Headlamp System. In Canada, this
position only works when a vehicle is in the P (Park)
position.
To turn on the Automatic Headlamp System, turn the
switch to off/on. To turn them off, turn the switch to off/on
again. This is a momentary control switch that springs
back when released. The Automatic Headlamp System
always turns on at the beginning of an ignition cycle.
3-13