Page 1074 of 1903
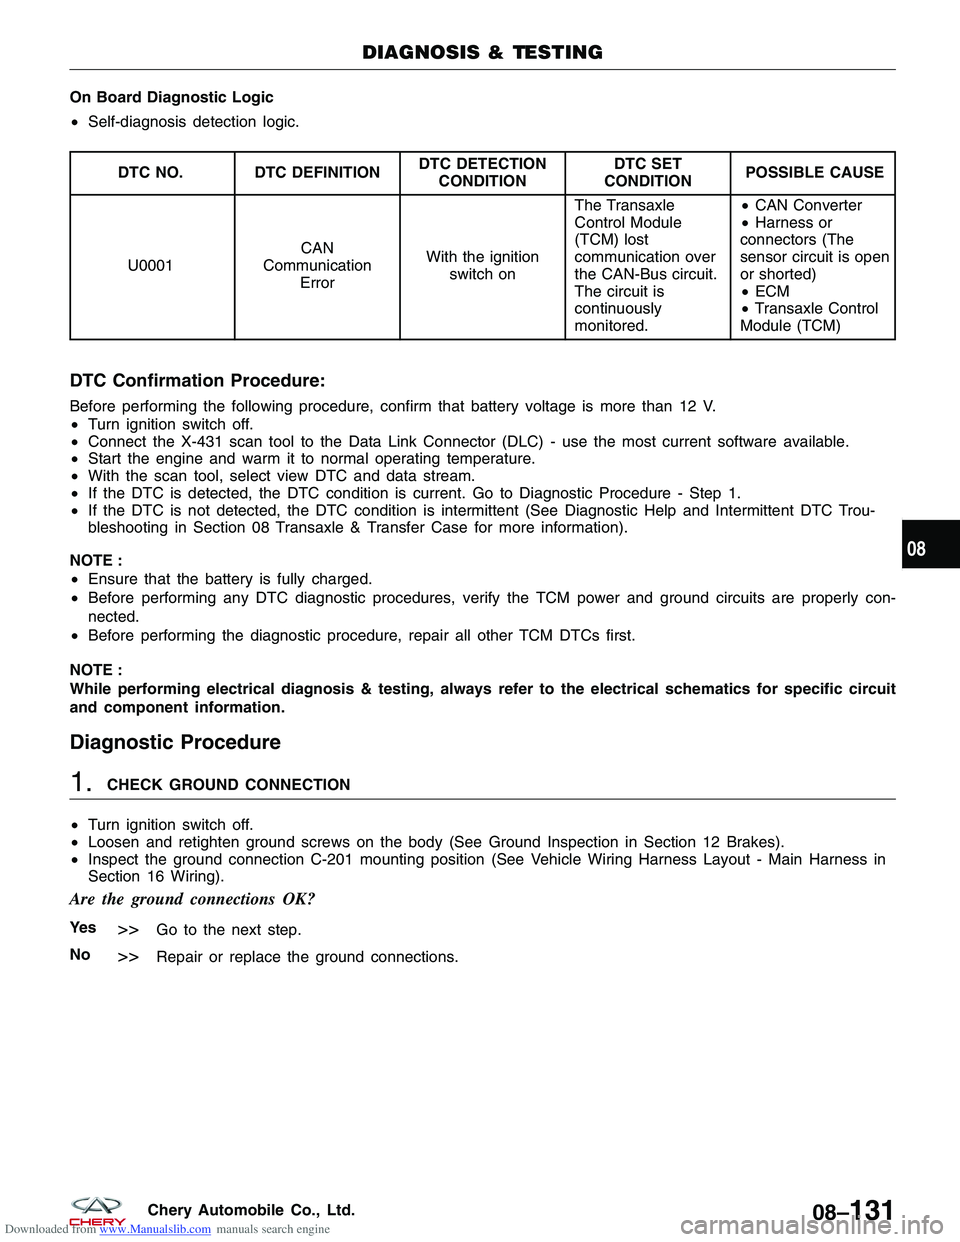
Downloaded from www.Manualslib.com manuals search engine On Board Diagnostic Logic
•Self-diagnosis detection logic.
DTC NO. DTC DEFINITION DTC DETECTION
CONDITION DTC SET
CONDITION POSSIBLE CAUSE
U0001 CAN
Communication Error With the ignition
switch on The Transaxle
Control Module
(TCM) lost
communication over
the CAN-Bus circuit.
The circuit is
continuously
monitored. •
CAN Converter
• Harness or
connectors (The
sensor circuit is open
or shorted)
• ECM
• Transaxle Control
Module (TCM)
DTC Confirmation Procedure:
Before performing the following procedure, confirm that battery voltage is more than 12 V.
• Turn ignition switch off.
• Connect the X-431 scan tool to the Data Link Connector (DLC) - use the most current software available.
• Start the engine and warm it to normal operating temperature.
• With the scan tool, select view DTC and data stream.
• If the DTC is detected, the DTC condition is current. Go to Diagnostic Procedure - Step 1.
• If the DTC is not detected, the DTC condition is intermittent (See Diagnostic Help and Intermittent DTC Trou-
bleshooting in Section 08 Transaxle & Transfer Case for more information).
NOTE :
• Ensure that the battery is fully charged.
• Before performing any DTC diagnostic procedures, verify the TCM power and ground circuits are properly con-
nected.
• Before performing the diagnostic procedure, repair all other TCM DTCs first.
NOTE :
While performing electrical diagnosis & testing, always refer to the electrical schematics for specific circuit
and component information.
Diagnostic Procedure
1.CHECK GROUND CONNECTION
• Turn ignition switch off.
• Loosen and retighten ground screws on the body (See Ground Inspection in Section 12 Brakes).
• Inspect the ground connection C-201 mounting position (See Vehicle Wiring Harness Layout - Main Harness in
Section 16 Wiring).
Are the ground connections OK?
Ye s>>Go to the next step.
No
>>Repair or replace the ground connections.
DIAGNOSIS & TESTING
08
08–131Chery Automobile Co., Ltd.
Page 1075 of 1903
Downloaded from www.Manualslib.com manuals search engine 2.CHECK DTC
• Turn ignition switch on.
• With the scan tool, select view TCM DTC and data stream.
Is DTC U0001 present?
Ye s>>Go to the next step.
No
>>The condition that caused this DTC is intermittent (See Diagnostic Help in Section 08 Transaxle &
Transfer Case).
Erase all codes and test drive the vehicle to verify the repair is complete.
3.CHECK OTHER MODULE DTC
• With the scan tool X-431, attempt to enter all the other CAN communication modules such as ECM, CAN con-
verter module.
• Read the CAN DTCs.
Were other modules DTCs found?
Ye s>>If all of the other modules have the same DTC �CAN Communication�, go to the next step.
If all of the other modules have the DTC �Lost communication with TCM�, and do not have the �CAN
Communication�, replace and program the TCM module.
No
>>Go to step 8.
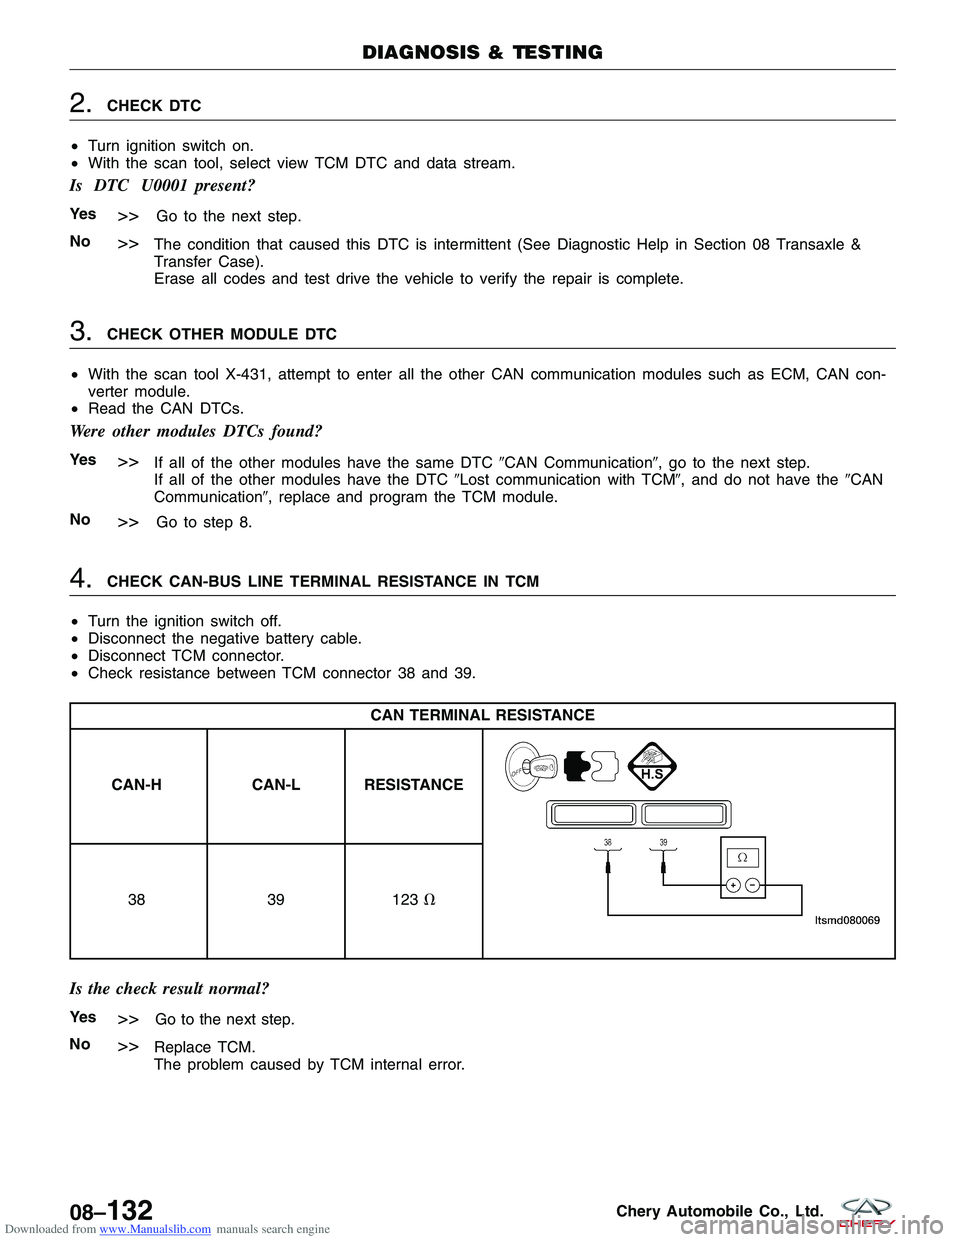
4.CHECK CAN-BUS LINE TERMINAL RESISTANCE IN TCM
• Turn the ignition switch off.
• Disconnect the negative battery cable.
• Disconnect TCM connector.
• Check resistance between TCM connector 38 and 39.
CAN TERMINAL RESISTANCE
CAN-H CAN-L RESISTANCE
3839123�
Is the check result normal?
Ye s>>Go to the next step.
No
>>Replace TCM.
The problem caused by TCM internal error.
DIAGNOSIS & TESTING
08–132Chery Automobile Co., Ltd.
Page 1077 of 1903
Downloaded from www.Manualslib.com manuals search engine 6.CHECK CAN-BUS LINE
• Connect the negative battery cable.
• Connect TCM and ECM connectors.
• Turn the ignition switch on.
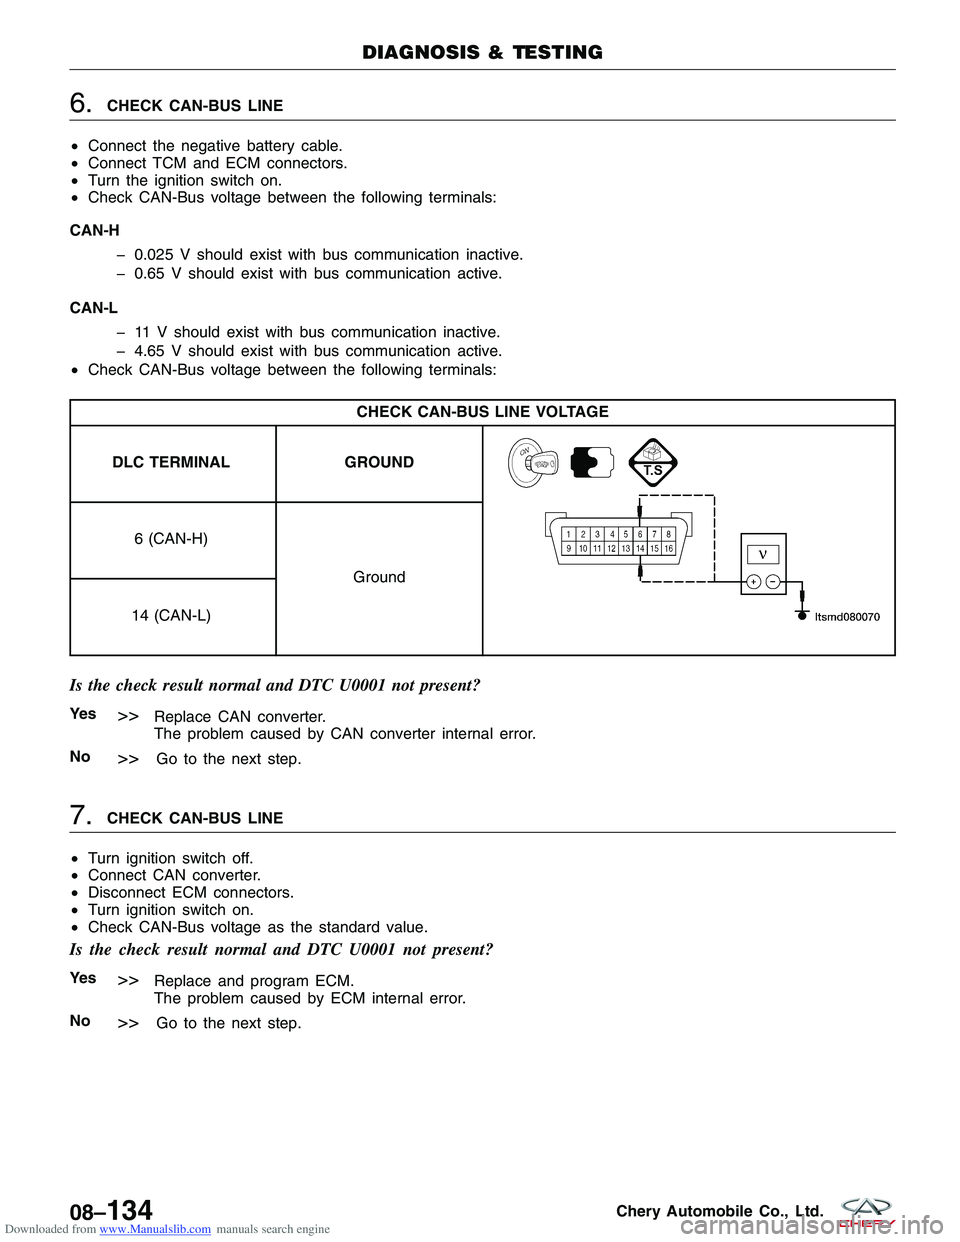
• Check CAN-Bus voltage between the following terminals:
CAN-H � 0.025 V should exist with bus communication inactive.
� 0.65 V should exist with bus communication active.
CAN-L � 11 V should exist with bus communication inactive.
� 4.65 V should exist with bus communication active.
• Check CAN-Bus voltage between the following terminals:
CHECK CAN-BUS LINE VOLTAGE
DLC TERMINAL GROUND
6 (CAN-H)
Ground
14 (CAN-L)
Is the check result normal and DTC U0001 not present?
Ye s>>Replace CAN converter.
The problem caused by CAN converter internal error.
No
>>Go to the next step.
7.CHECK CAN-BUS LINE
• Turn ignition switch off.
• Connect CAN converter.
• Disconnect ECM connectors.
• Turn ignition switch on.
• Check CAN-Bus voltage as the standard value.
Is the check result normal and DTC U0001 not present?
Ye s>>Replace and program ECM.
The problem caused by ECM internal error.
No
>>Go to the next step.
DIAGNOSIS & TESTING
08–134Chery Automobile Co., Ltd.
Page 1082 of 1903
Downloaded from www.Manualslib.com manuals search engine Installation Notes:
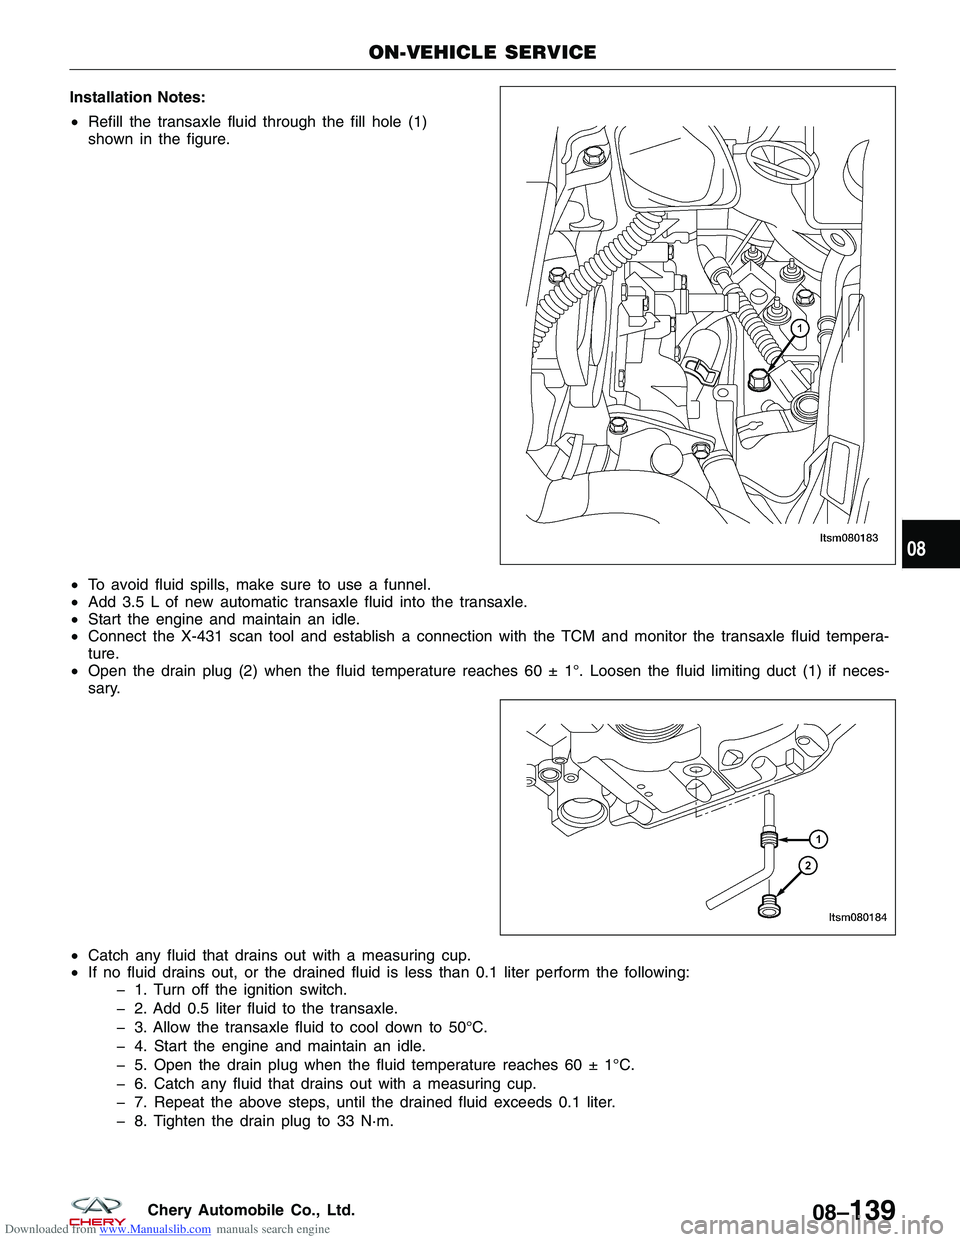
•Refill the transaxle fluid through the fill hole (1)
shown in the figure.
• To avoid fluid spills, make sure to use a funnel.
• Add 3.5 L of new automatic transaxle fluid into the transaxle.
• Start the engine and maintain an idle.
• Connect the X-431 scan tool and establish a connection with the TCM and monitor the transaxle fluid tempera-
ture.
• Open the drain plug (2) when the fluid temperature reaches 60 ± 1°. Loosen the fluid limiting duct (1) if neces-
sary.
• Catch any fluid that drains out with a measuring cup.
• If no fluid drains out, or the drained fluid is less than 0.1 liter perform the following:
� 1. Turn off the ignition switch.
� 2. Add 0.5 liter fluid to the transaxle.
� 3. Allow the transaxle fluid to cool down to 50°C.
� 4. Start the engine and maintain an idle.
� 5. Open the drain plug when the fluid temperature reaches 60 ± 1°C.
� 6. Catch any fluid that drains out with a measuring cup.
� 7. Repeat the above steps, until the drained fluid exceeds 0.1 liter.
� 8. Tighten the drain plug to 33 N·m.
ON-VEHICLE SERVICE
LTSM080183
LTSM080184
08
08–139Chery Automobile Co., Ltd.
Page 1100 of 1903
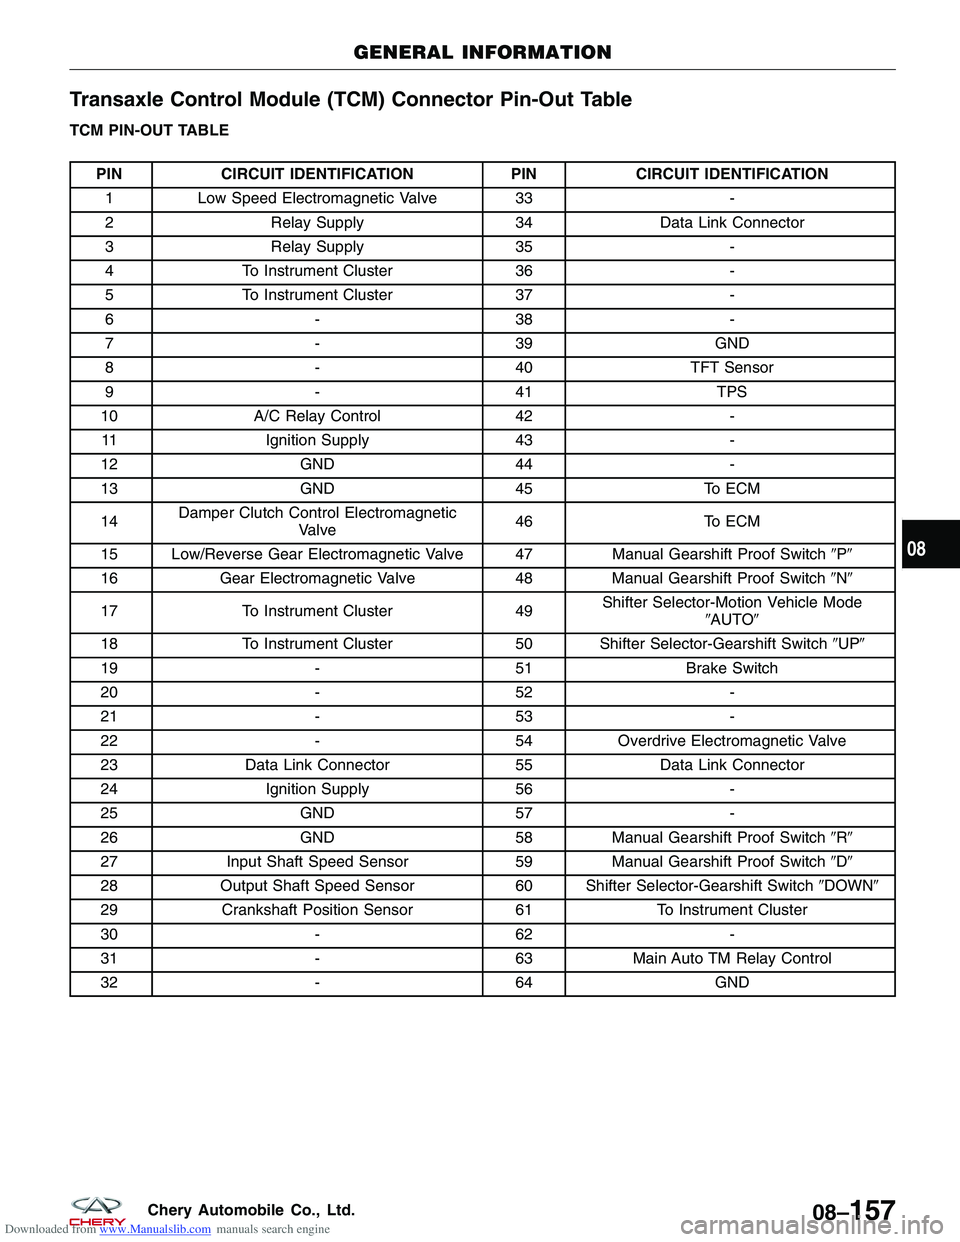
Downloaded from www.Manualslib.com manuals search engine Transaxle Control Module (TCM) Connector Pin-Out Table
TCM PIN-OUT TABLE
PINCIRCUIT IDENTIFICATION PINCIRCUIT IDENTIFICATION
1 Low Speed Electromagnetic Valve 33 -
2 Relay Supply 34Data Link Connector
3 Relay Supply 35-
4 To Instrument Cluster 36-
5 To Instrument Cluster 37-
6 -38 -
7 -39GND
8 -40TFT Sensor
9 -41 TPS
10 A/C Relay Control 42-
11 Ignition Supply 43-
12 GND 44-
13 GND 45To ECM
14 Damper Clutch Control Electromagnetic
Valve 46
To ECM
15 Low/Reverse Gear Electromagnetic Valve 47 Manual Gearshift Proof Switch�P�
16 Gear Electromagnetic Valve 48Manual Gearshift Proof Switch �N�
17 To Instrument Cluster 49Shifter Selector-Motion Vehicle Mode
�AUTO�
18 To Instrument Cluster 50 Shifter Selector-Gearshift Switch �UP�
19 -51Brake Switch
20 -52 -
21 -53 -
22 -54Overdrive Electromagnetic Valve
23 Data Link Connector 55Data Link Connector
24 Ignition Supply 56-
25 GND 57-
26 GND 58Manual Gearshift Proof Switch �R�
27 Input Shaft Speed Sensor 59Manual Gearshift Proof Switch �D�
28 Output Shaft Speed Sensor 60 Shifter Selector-Gearshift Switch �DOWN�
29 Crankshaft Position Sensor 61To Instrument Cluster
30 -62 -
31 -63Main Auto TM Relay Control
32 -64GND
GENERAL INFORMATION
08
08–157Chery Automobile Co., Ltd.
Page 1104 of 1903
Downloaded from www.Manualslib.com manuals search engine On Board Diagnostic Logic
•Self-diagnosis detection logic.
DTC NO. DTC DEFINITION DTC DETECTION
CONDITION DTC SET
CONDITION POSSIBLE CAUSES
15 TFT sensor open
circuit Vehicle is driving The Transaxle
Control Module
(TCM) will set this
DTC when the TCM
received voltage
signal is more than
2.6 V form the
sensor after the
vehicle has driven
for 10 minutes. •
TFT sensor
• Harness or
connectors (The
sensor circuit is open
or shorted)
• TCM
DTC Confirmation Procedure:
Before performing the following procedure, confirm that battery voltage is more than 12 V.
• Turn ignition switch off.
• Connect the X-431 scan tool to the Data Link Connector (DLC) - use the most current software available.
• Turn ignition switch on, with the scan tool, view and erase stored DTCs in the TCM.
• Start the engine and warm it to normal operating temperature.
• Drive the vehicle up to 10 km/h or more.
• With the scan tool, select view DTC and data stream.
• If the DTC is detected, the DTC condition is current. Go to Diagnostic Procedure - Step 1.
• If the DTC is not detected, the DTC condition is intermittent (See Diagnostic Help and Intermittent DTC Trou-
bleshooting in Section 08 Transaxle & Transfer Case for more information).
NOTE :
While performing electrical diagnosis & testing, always refer to the electrical schematics for specific circuit
and component information.
Diagnostic Procedure
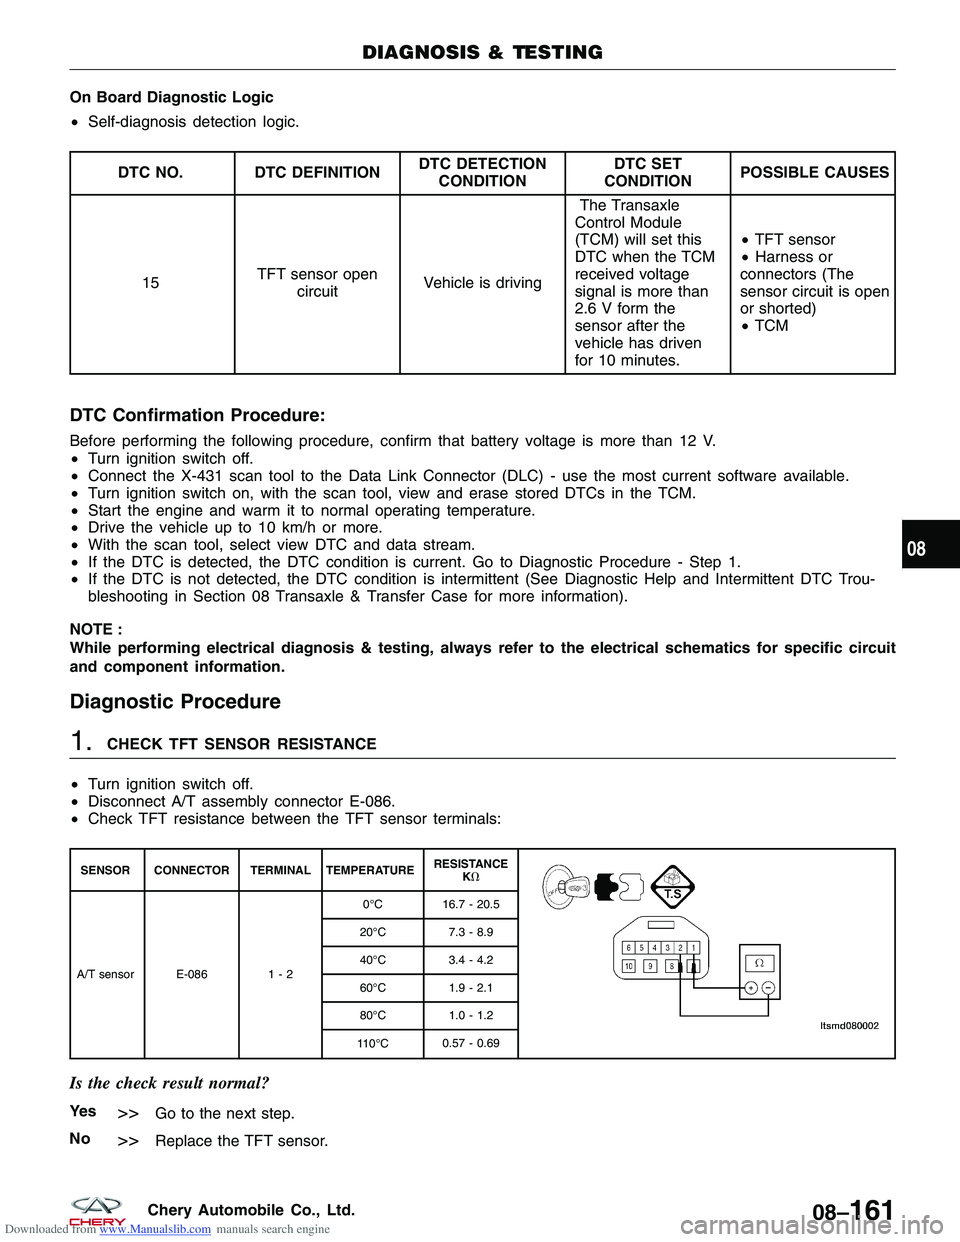
1.CHECK TFT SENSOR RESISTANCE
• Turn ignition switch off.
• Disconnect A/T assembly connector E-086.
• Check TFT resistance between the TFT sensor terminals:
SENSOR CONNECTOR TERMINAL TEMPERATURE RESISTANCE
K�
A/T sensor E-086 1 - 20°C
16.7 - 20.5
20°C 7.3 - 8.9
40°C 3.4 - 4.2
60°C 1.9 - 2.1
80°C 1.0 - 1.2
110°C 0.57 - 0.69
Is the check result normal?
Ye s>>Go to the next step.
No
>>Replace the TFT sensor.
DIAGNOSIS & TESTING
08
08–161Chery Automobile Co., Ltd.
Page 1107 of 1903

Downloaded from www.Manualslib.com manuals search engine On Board Diagnostic Logic
•Self-diagnosis detection logic.
DTC NO. DTC DEFINITION DTC DETECTION
CONDITION DTC SET
CONDITION POSSIBLE CAUSES
22 Input speed sensor Vehicle is driving •
The Transaxle
Control Module
(TCM) will set this
DTC when the TCM
didn’t received pulse
signal from the input
shaft speed sensor
for above 1 seconds
when the vehicle is
driving for 30 km/h
at 3 or 4 gear.
• If the DTC was
set for 4 times, then
the A/T will be
locked in 3rd gear
(D gear) or shifted
to low gear when in
sports mode. •
Input shaft speed
sensor
• The retainer of
deceleration clutch
• Harness or
connectors (The
sensor circuit is open
or shorted)
• TCM
DTC Confirmation Procedure:
Before performing the following procedure, confirm that battery voltage is more than 12 V.
• Turn ignition switch off.
• Connect the X-431 scan tool to the Data Link Connector (DLC) - use the most current software available.
• Turn ignition switch on, with the scan tool, view and erase stored DTCs in the TCM.
• Start the engine and warm it to normal operating temperature.
• Drive the vehicle up to 10 km/h or more.
• With the scan tool, select view DTC and data stream.
• If the DTC is detected, the DTC condition is current. Go to Diagnostic Procedure - Step 1.
• If the DTC is not detected, the DTC condition is intermittent (See Diagnostic Help and Intermittent DTC Trou-
bleshooting in Section 08 Transaxle & Transfer Case for more information).
NOTE :
While performing electrical diagnosis & testing, always refer to the electrical schematics for specific circuit
and component information.
DIAGNOSIS & TESTING
08–164Chery Automobile Co., Ltd.
Page 1108 of 1903
Downloaded from www.Manualslib.com manuals search engine Diagnostic Procedure
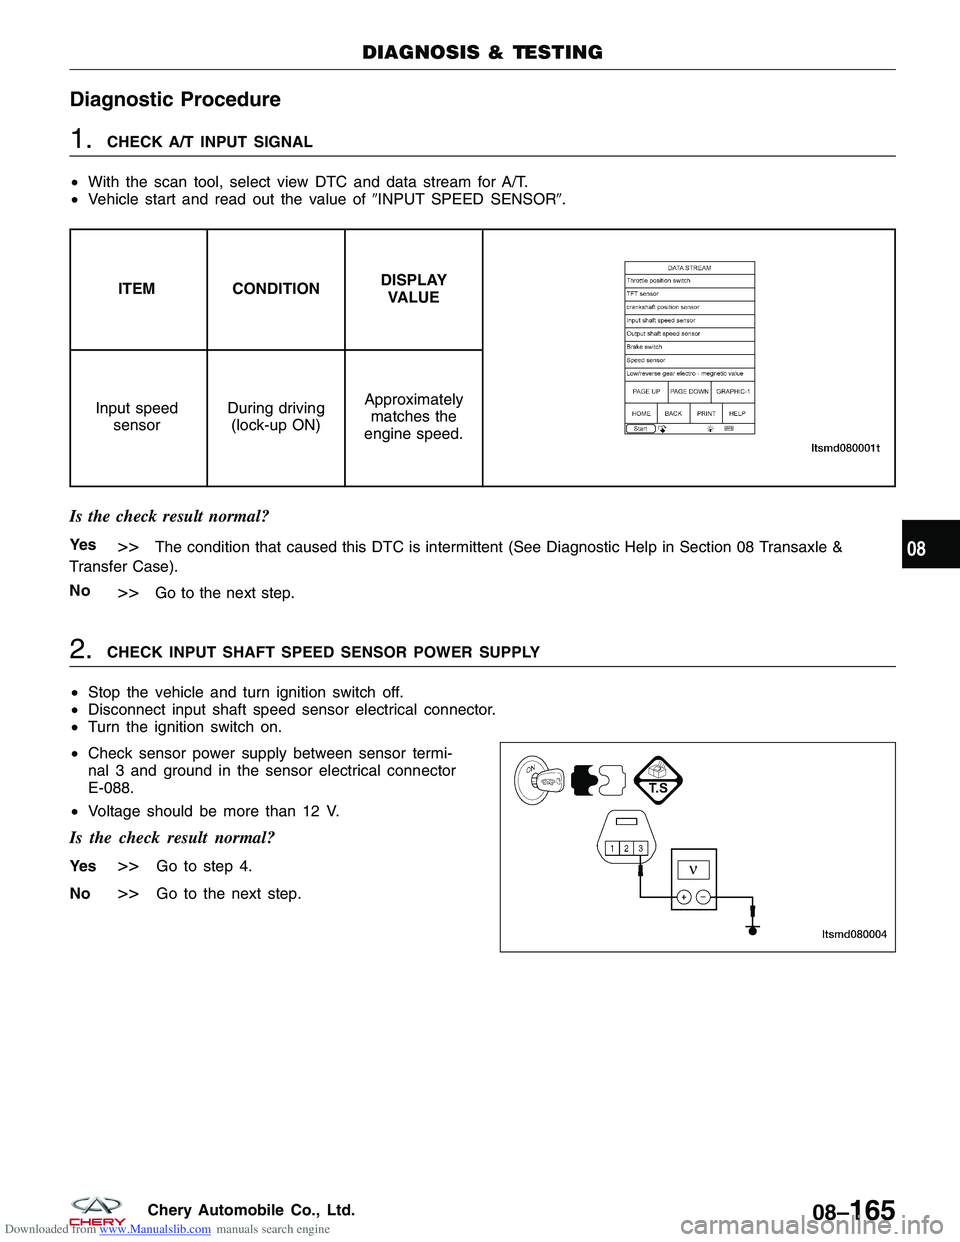
1.CHECK A/T INPUT SIGNAL
• With the scan tool, select view DTC and data stream for A/T.
• Vehicle start and read out the value of �INPUT SPEED SENSOR�.
ITEM CONDITIONDISPLAY
VALUE
Input speed sensor During driving
(lock-up ON) Approximately
matches the
engine speed.
Is the check result normal?
Ye s>>The condition that caused this DTC is intermittent (See Diagnostic Help in Section 08 Transaxle &
Transfer Case).
No
>>Go to the next step.
2.CHECK INPUT SHAFT SPEED SENSOR POWER SUPPLY
• Stop the vehicle and turn ignition switch off.
• Disconnect input shaft speed sensor electrical connector.
• Turn the ignition switch on.
• Check sensor power supply between sensor termi-
nal 3 and ground in the sensor electrical connector
E-088.
• Voltage should be more than 12 V.
Is the check result normal?
Ye s>>Go to step 4.
No
>>Go to the next step.
DIAGNOSIS & TESTING
LTSMD080004
08
08–165Chery Automobile Co., Ltd.