Page 1033 of 1903
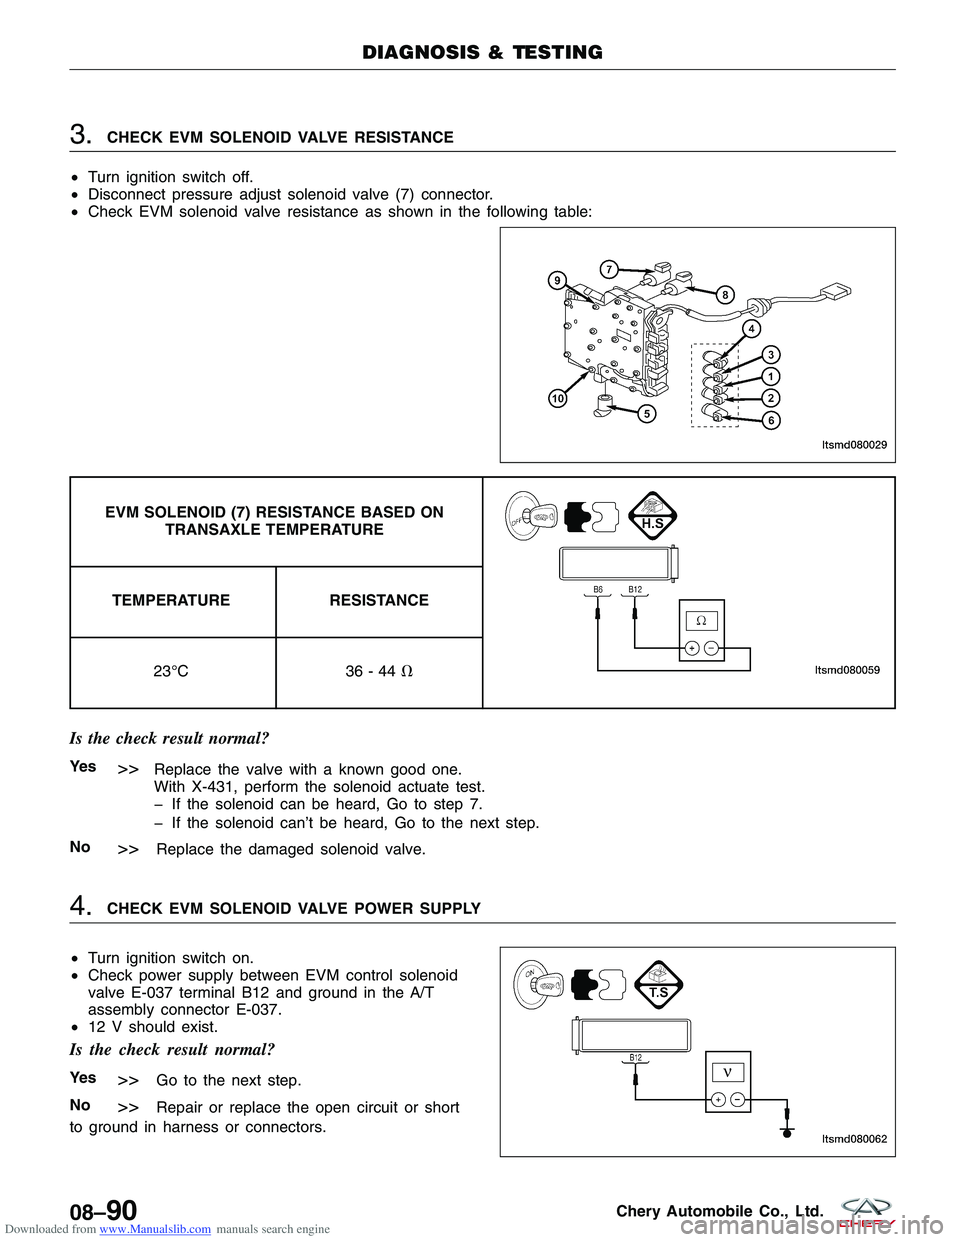
Downloaded from www.Manualslib.com manuals search engine 3.CHECK EVM SOLENOID VALVE RESISTANCE
• Turn ignition switch off.
• Disconnect pressure adjust solenoid valve (7) connector.
• Check EVM solenoid valve resistance as shown in the following table:
EVM SOLENOID (7) RESISTANCE BASED ON
TRANSAXLE TEMPERATURE
TEMPERATURE RESISTANCE
23°C 36 - 44�
Is the check result normal?
Ye s>>Replace the valve with a known good one.
With X-431, perform the solenoid actuate test.
� If the solenoid can be heard, Go to step 7.
� If the solenoid can’t be heard, Go to the next step.
No
>>Replace the damaged solenoid valve.
4.CHECK EVM SOLENOID VALVE POWER SUPPLY
• Turn ignition switch on.
• Check power supply between EVM control solenoid
valve E-037 terminal B12 and ground in the A/T
assembly connector E-037.
• 12 V should exist.
Is the check result normal?
Ye s>>Go to the next step.
No
>>Repair or replace the open circuit or short
to ground in harness or connectors.
DIAGNOSIS & TESTING
LTSMD080029
LTSMD080062
08–90Chery Automobile Co., Ltd.
Page 1034 of 1903
Downloaded from www.Manualslib.com manuals search engine 5.CHECK EVM SOLENOID VALVE CONTROL CIRCUIT
• Turn ignition switch off.
• Disconnect TCM connector.
• Turn ignition switch on.
• Check if voltage is present between E-037, terminal B8 and ground.
• Check the harness for short to power supply circuits.
Is the check results normal?
Ye s>>Go to the next step.
No
>>Repair or replace the open circuit or short to ground or short to power supply in harness or connec-
tors.
6.CHECK EVM SIGNAL
• Connect TCM and EVM connector.
• With the engine running, move the shifter to �N�position, check the voltage of the EVM valve between the
TCM pin 26 and pin 19.
Is the voltage approximately 2.5 V with the engine running and the transaxle in the �N�position?
Ye s>>Go to the next step.
No
>>Go to step 8.
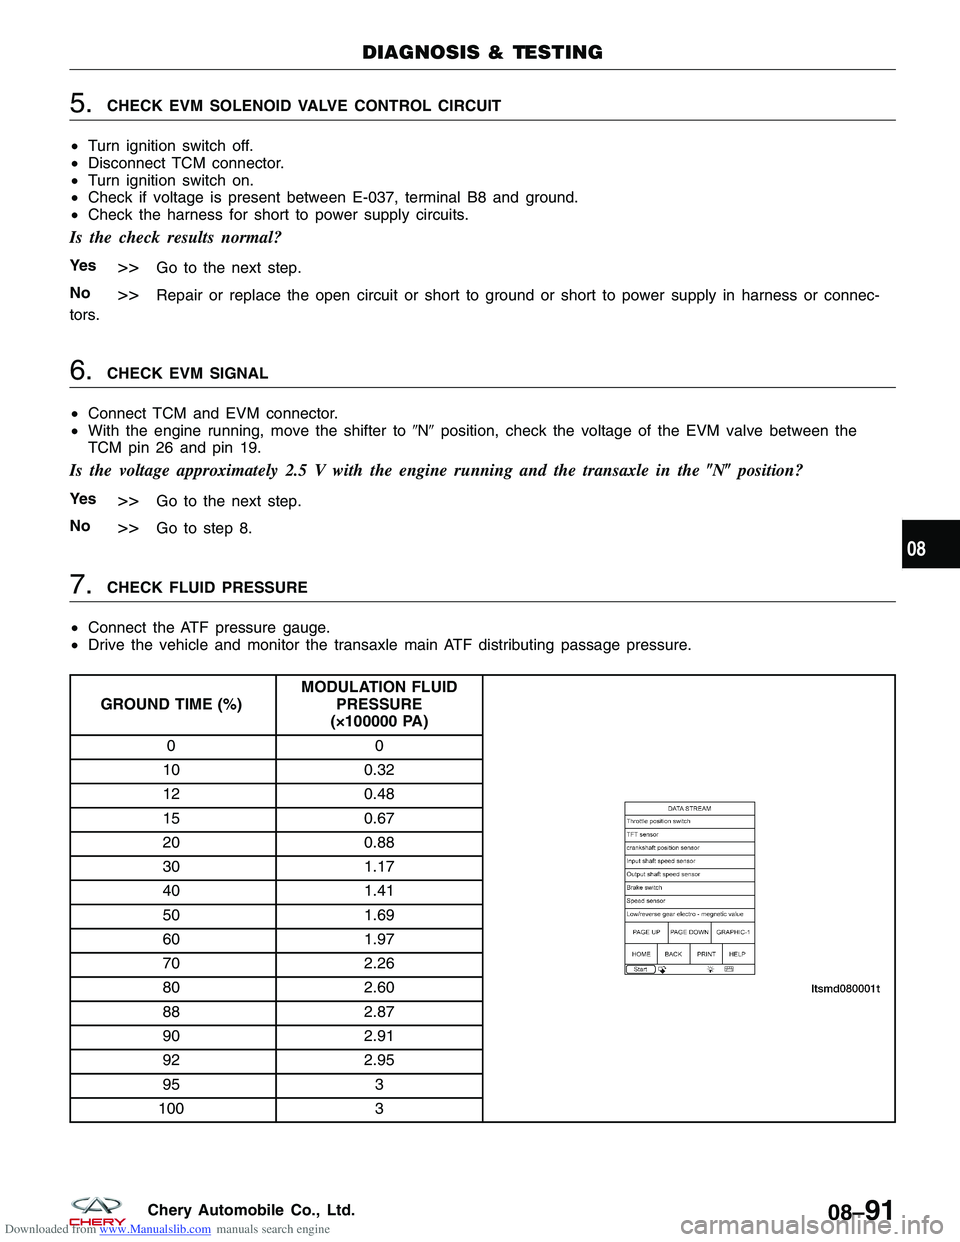
7.CHECK FLUID PRESSURE
• Connect the ATF pressure gauge.
• Drive the vehicle and monitor the transaxle main ATF distributing passage pressure.
GROUND TIME (%) MODULATION FLUID
PRESSURE
(×100000 PA)
00
10 0.32
12 0.48
15 0.67
20 0.88
30 1.17
40 1.41
50 1.69
60 1.97
70 2.26
80 2.60
88 2.87
90 2.91
92 2.95
95 3
100 3
DIAGNOSIS & TESTING
08
08–91Chery Automobile Co., Ltd.
Page 1039 of 1903
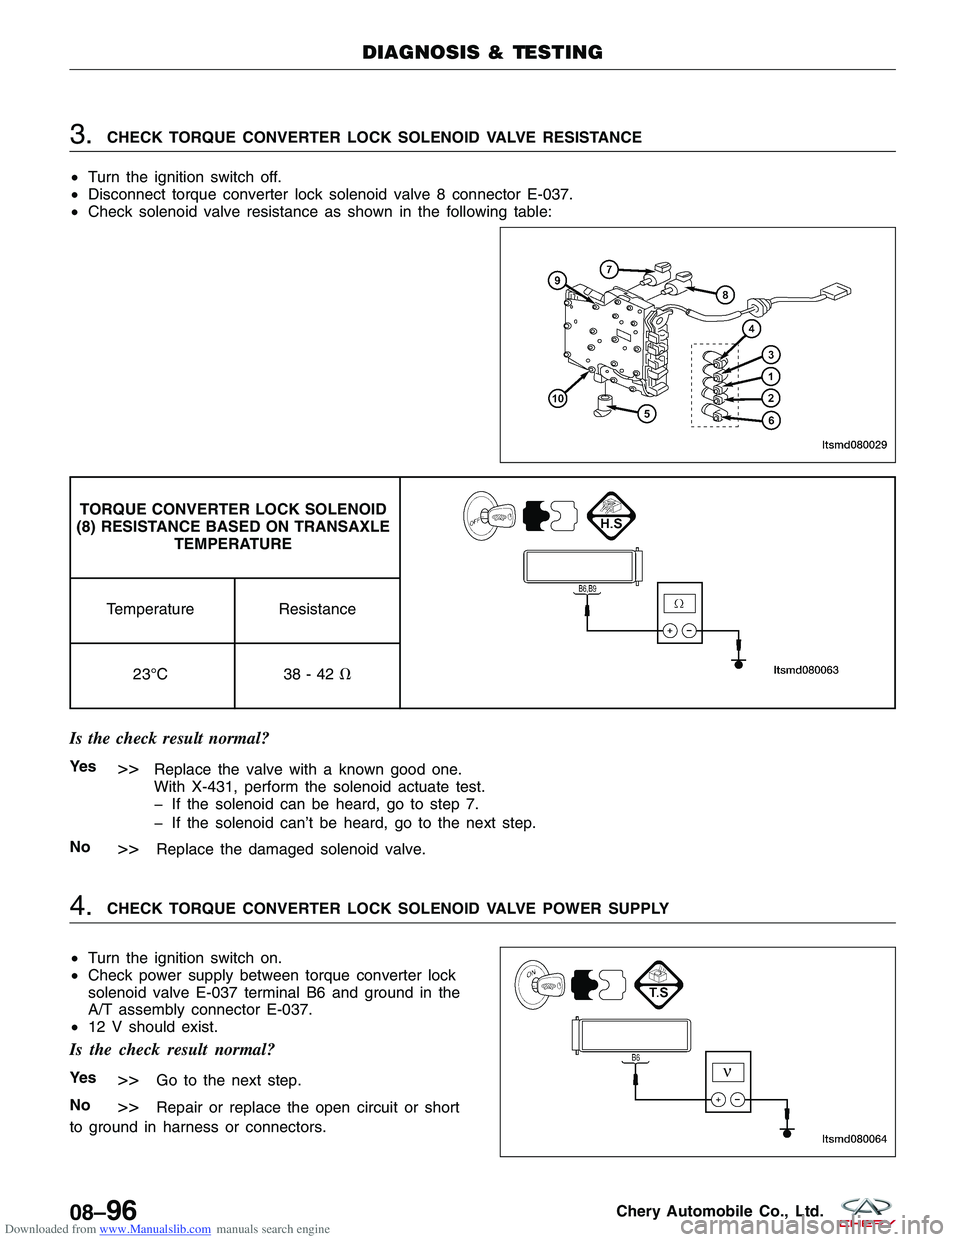
Downloaded from www.Manualslib.com manuals search engine 3.CHECK TORQUE CONVERTER LOCK SOLENOID VALVE RESISTANCE
• Turn the ignition switch off.
• Disconnect torque converter lock solenoid valve 8 connector E-037.
• Check solenoid valve resistance as shown in the following table:
TORQUE CONVERTER LOCK SOLENOID
(8) RESISTANCE BASED ON TRANSAXLE TEMPERATURE
Temperature Resistance
23°C 38 - 42�
Is the check result normal?
Ye s>>Replace the valve with a known good one.
With X-431, perform the solenoid actuate test.
� If the solenoid can be heard, go to step 7.
� If the solenoid can’t be heard, go to the next step.
No
>>Replace the damaged solenoid valve.
4.CHECK TORQUE CONVERTER LOCK SOLENOID VALVE POWER SUPPLY
• Turn the ignition switch on.
• Check power supply between torque converter lock
solenoid valve E-037 terminal B6 and ground in the
A/T assembly connector E-037.
• 12 V should exist.
Is the check result normal?
Ye s>>Go to the next step.
No
>>Repair or replace the open circuit or short
to ground in harness or connectors.
DIAGNOSIS & TESTING
LTSMD080029
LTSMD080064
08–96Chery Automobile Co., Ltd.
Page 1040 of 1903
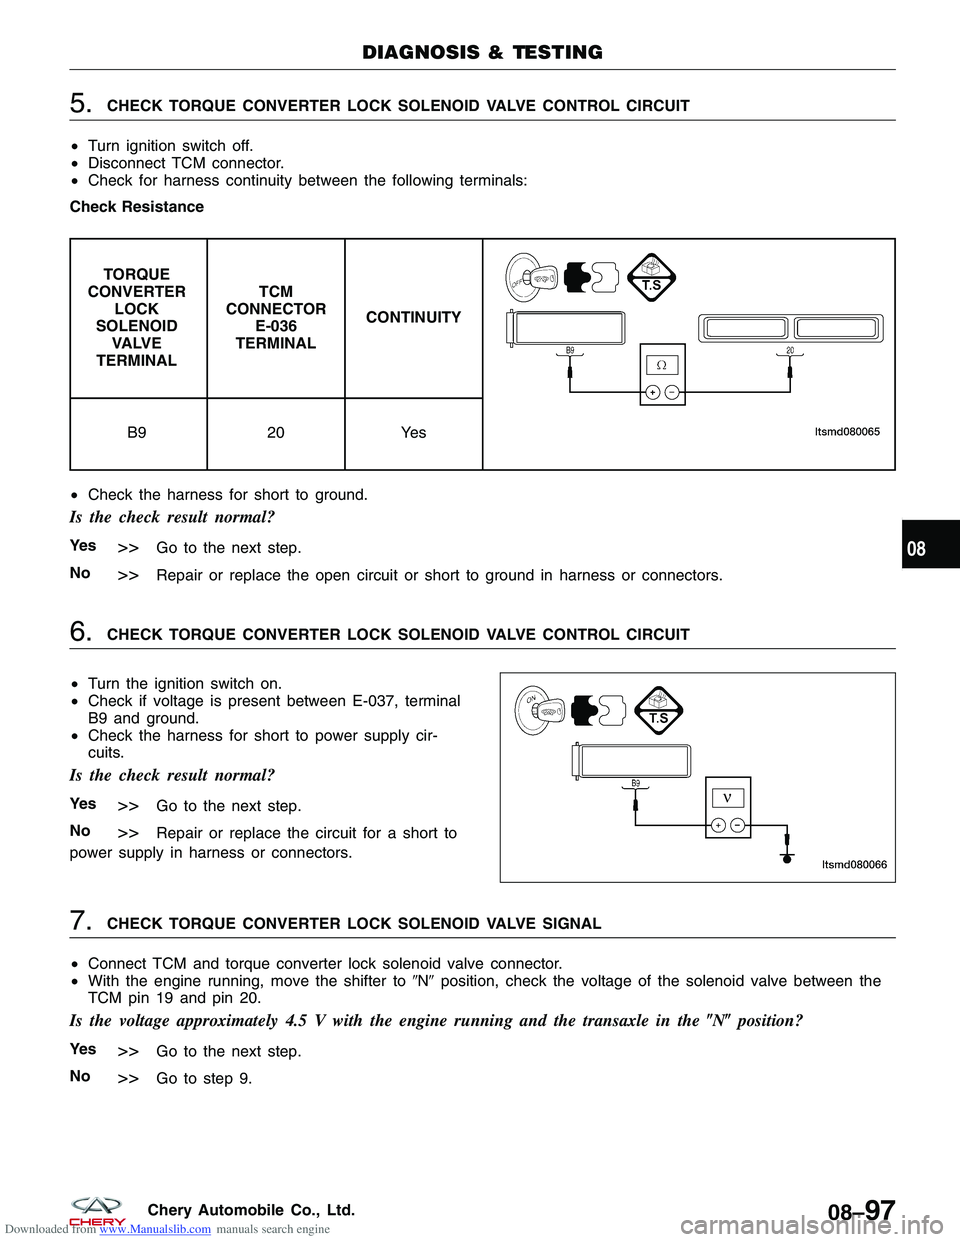
Downloaded from www.Manualslib.com manuals search engine 5.CHECK TORQUE CONVERTER LOCK SOLENOID VALVE CONTROL CIRCUIT
• Turn ignition switch off.
• Disconnect TCM connector.
• Check for harness continuity between the following terminals:
Check Resistance
TORQUE
CONVERTER LOCK
SOLENOID VA LV E
TERMINAL TCM
CONNECTOR E-036
TERMINAL CONTINUITY
B9
20Yes
• Check the harness for short to ground.
Is the check result normal?
Ye s>>Go to the next step.
No
>>Repair or replace the open circuit or short to ground in harness or connectors.
6.CHECK TORQUE CONVERTER LOCK SOLENOID VALVE CONTROL CIRCUIT
• Turn the ignition switch on.
• Check if voltage is present between E-037, terminal
B9 and ground.
• Check the harness for short to power supply cir-
cuits.
Is the check result normal?
Ye s>>Go to the next step.
No
>>Repair or replace the circuit for a short to
power supply in harness or connectors.
7.CHECK TORQUE CONVERTER LOCK SOLENOID VALVE SIGNAL
• Connect TCM and torque converter lock solenoid valve connector.
• With the engine running, move the shifter to �N�position, check the voltage of the solenoid valve between the
TCM pin 19 and pin 20.
Is the voltage approximately 4.5 V with the engine running and the transaxle in the �N�position?
Ye s>>Go to the next step.
No
>>Go to step 9.
DIAGNOSIS & TESTING
LTSMD080066
08
08–97Chery Automobile Co., Ltd.
Page 1043 of 1903
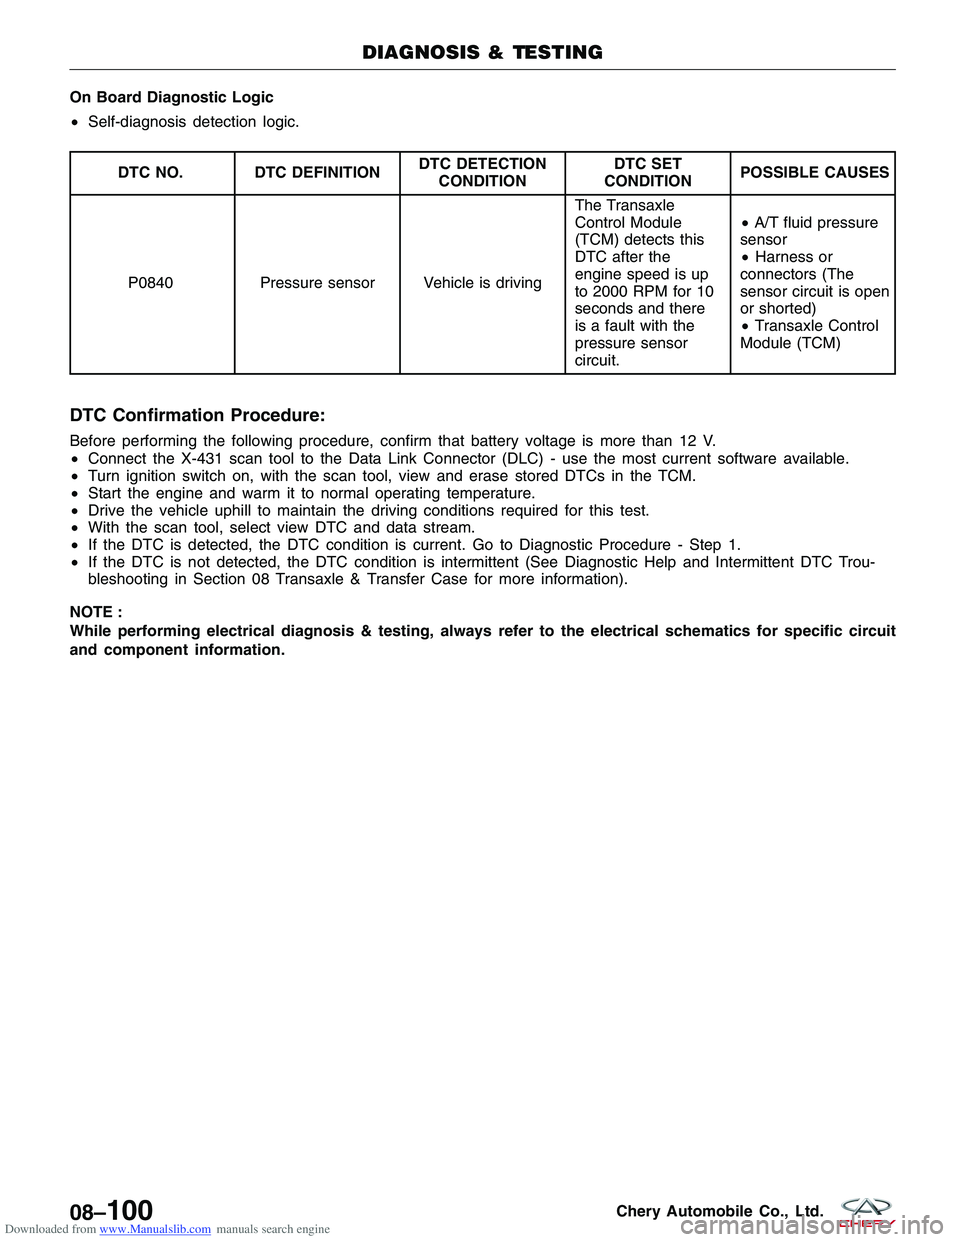
Downloaded from www.Manualslib.com manuals search engine On Board Diagnostic Logic
•Self-diagnosis detection logic.
DTC NO. DTC DEFINITION DTC DETECTION
CONDITION DTC SET
CONDITION POSSIBLE CAUSES
P0840 Pressure sensor Vehicle is driving The Transaxle
Control Module
(TCM) detects this
DTC after the
engine speed is up
to 2000 RPM for 10
seconds and there
is a fault with the
pressure sensor
circuit.•
A/T fluid pressure
sensor
• Harness or
connectors (The
sensor circuit is open
or shorted)
• Transaxle Control
Module (TCM)
DTC Confirmation Procedure:
Before performing the following procedure, confirm that battery voltage is more than 12 V.
• Connect the X-431 scan tool to the Data Link Connector (DLC) - use the most current software available.
• Turn ignition switch on, with the scan tool, view and erase stored DTCs in the TCM.
• Start the engine and warm it to normal operating temperature.
• Drive the vehicle uphill to maintain the driving conditions required for this test.
• With the scan tool, select view DTC and data stream.
• If the DTC is detected, the DTC condition is current. Go to Diagnostic Procedure - Step 1.
• If the DTC is not detected, the DTC condition is intermittent (See Diagnostic Help and Intermittent DTC Trou-
bleshooting in Section 08 Transaxle & Transfer Case for more information).
NOTE :
While performing electrical diagnosis & testing, always refer to the electrical schematics for specific circuit
and component information.
DIAGNOSIS & TESTING
08–100Chery Automobile Co., Ltd.
Page 1044 of 1903
Downloaded from www.Manualslib.com manuals search engine Diagnostic Procedure
1.CHECK A/T FLUID PRESSURE SENSOR SIGNAL
• With the scan tool, select view DTC and data stream for A/T.
• Start vehicle and monitor the value of �INPUT SPEED SENSOR�.
ITEM CONDITIONDISPLAY
VALUE
Fluid Pressure Ignition switch
on, not running
Below 0.2 bar
• Engine: Idle
• TFT: 31°C
• ECT: 30°C Approximately
0.05 bar
Is the check result normal?
Ye s>>The condition that caused this DTC is intermittent (See Diagnostic Help in Section 08 Transaxle &
Transfer Case).
No
>>Go to the next step.
2.CHECK FLUID PRESSURE SENSOR ELECTRICAL CONNECTOR
• Stop vehicle and turn ignition switch off.
• Disconnect fluid pressure sensor 2 connector.
• Inspect the electrical connector for damage.
Is the electrical connector OK?
Ye s>>Go to the next step.
No
>>Repair or replace the electrical connector
as necessary.
DIAGNOSIS & TESTING
LTSMD080021
08
08–101Chery Automobile Co., Ltd.
Page 1045 of 1903
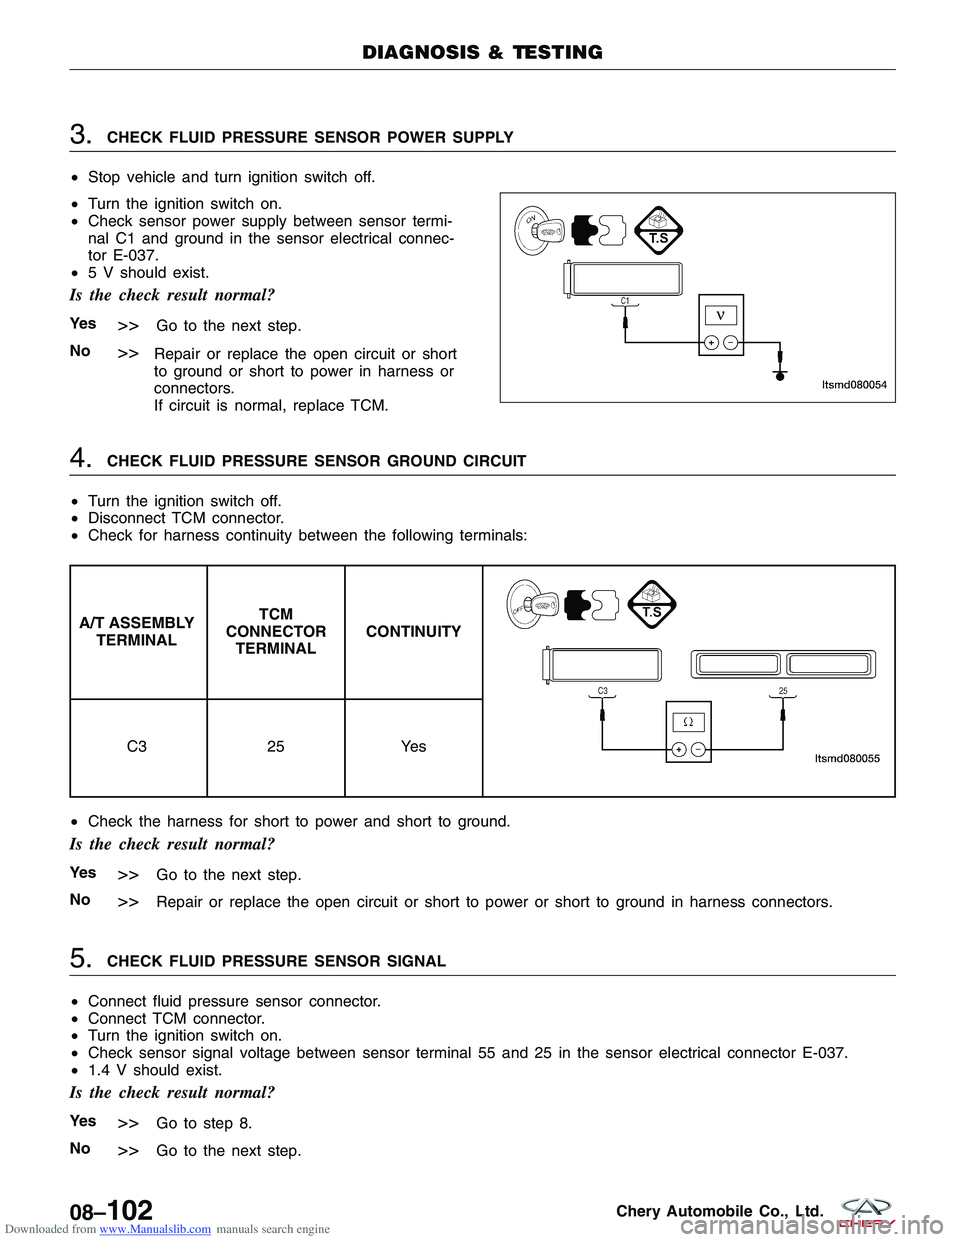
Downloaded from www.Manualslib.com manuals search engine 3.CHECK FLUID PRESSURE SENSOR POWER SUPPLY
• Stop vehicle and turn ignition switch off.
• Turn the ignition switch on.
• Check sensor power supply between sensor termi-
nal C1 and ground in the sensor electrical connec-
tor E-037.
• 5 V should exist.
Is the check result normal?
Ye s>>Go to the next step.
No
>>Repair or replace the open circuit or short
to ground or short to power in harness or
connectors.
If circuit is normal, replace TCM.
4.CHECK FLUID PRESSURE SENSOR GROUND CIRCUIT
• Turn the ignition switch off.
• Disconnect TCM connector.
• Check for harness continuity between the following terminals:
A/T ASSEMBLY
TERMINAL TCM
CONNECTOR TERMINAL CONTINUITY
C3
25Yes
• Check the harness for short to power and short to ground.
Is the check result normal?
Ye s>>Go to the next step.
No
>>Repair or replace the open circuit or short to power or short to ground in harness connectors.
5.CHECK FLUID PRESSURE SENSOR SIGNAL
• Connect fluid pressure sensor connector.
• Connect TCM connector.
• Turn the ignition switch on.
• Check sensor signal voltage between sensor terminal 55 and 25 in the sensor electrical connector E-037.
• 1.4 V should exist.
Is the check result normal?
Ye s>>Go to step 8.
No
>>Go to the next step.
DIAGNOSIS & TESTING
LTSMD080054
08–102Chery Automobile Co., Ltd.
Page 1046 of 1903

Downloaded from www.Manualslib.com manuals search engine 6.CHECK FLUID PRESSURE SENSOR SIGNAL CIRCUIT
• Turn the ignition switch off.
• Disconnect TCM and sensor connector.
• Check harness continuity between fluid pressure sensor terminal C2 and TCM terminal 55.
• Check short to ground and short to power supply.
Is the check result normal?
Ye s>>Go to the next step.
No
>>Check harness for an open or short to ground or short to power supply in harness or connectors.
7.CHECK THE FLUID PRESSURE SENSOR
• Check fluid pressure sensor resistance between sensor terminal C2 and C3 in A/T assembly connector E-037.
• Approximately 20 K� should exist.
Is the check result normal?
Ye s>>Go to the next step.
No
>>Replace the fluid pressure sensor.
8.CHECK DTC
• With the X-431 scan tool, read TCM DTCs.
• Refer to �DTC Confirmation Procedure�.
Is DTC P0840 present?
Ye s>>The system is now operating properly.
Reassemble the vehicle and road test to verify the customers complaint is repaired.
No
>>Replace the TCM.
DIAGNOSIS & TESTING
08
08–103Chery Automobile Co., Ltd.