Page 167 of 514

Cleaning the System
The radar can become blocked by snow, ice, or dirt.
If so, you may need to turn off the engine and clean
the lens. See “Cleaning the System” underAdaptive
Cruise Control on page 3-20.
Flash-to-Pass
This feature allows you to use the high-beam
headlamps to signal the driver in front of you that
you want to pass.
Pull and hold the turn signal/multifunction lever toward
you to use this feature. When this is done the following
will occur:
If the headlamps are off, in low-beam or in
Daytime Running Lamps (DRL) mode, the
high-beam headlamps will turn on. They will
stay on as long as the lever is held there.
Release the lever to turn them off.
If the headlamps are in high-beam mode, they will
switch to low beam. To return to high-beam, push the
lever forward.
Windshield Wipers
The windshield wiper lever is located on the right side of
the steering column.
Move the lever to one of the following positions:
7(Mist):Move to mist for a single wiping cycle
and then release it. The lever will return to its original
position. Hold the lever in this position for continuous
wiping cycles.
9(Off):Turns off the wipers.
&(Delay):For a delayed wiping cycle. Turn the delay
adjustment band to set the length of the delay.
3-13
Page 169 of 514

Notice:Going through an automatic car wash with
the wipers on can damage them. Turn the wipers
off when going through an automatic car wash.
The mist and wash cycles operate as normal and are
not affected by the Rainsense function. The Rainsense
system can be overridden at any time by manually
turning the wiper band to low or high speed.
When Rainsense is active, the headlamps turn on
automatically. The headlamps will turn off again once
the wipers turn off if it is light enough outside. If it
is dark, they will remain on. SeeWiper Activated
Headlamps on page 3-36.
Notice:Do not place stickers or other items on
the exterior glass surface directly in front of
the moisture sensor. Doing this could cause
the moisture sensor to malfunction.
Windshield Washer
The windshield washer button is located at the end
of the windshield wiper lever on the right side of
the steering column.
K(Washer Fluid):Press and hold to spray
windshield washer �uid on the windshield. The washer
will spray until the button is released. The wipers will
continue to clear the window for about six seconds after
the button is released and then stop or return to the
preset speed.
{CAUTION:
In freezing weather, do not use your washer until
the windshield is warmed. Otherwise the washer
�uid can form ice on the windshield, blocking your
vision.
If the �uid in the windshield washer �uid reservoir is
low, the message CHECK WASHER FLUID will appear
on the Driver Information Center (DIC) display. It will
take 60 seconds after the bottle is re�lled for this
message to turn off. For information on the correct
washer �uid mixture to use, seeWindshield Washer
Fluid on page 5-38andRecommended Fluids and
Lubricants on page 6-13.
3-15
Page 171 of 514

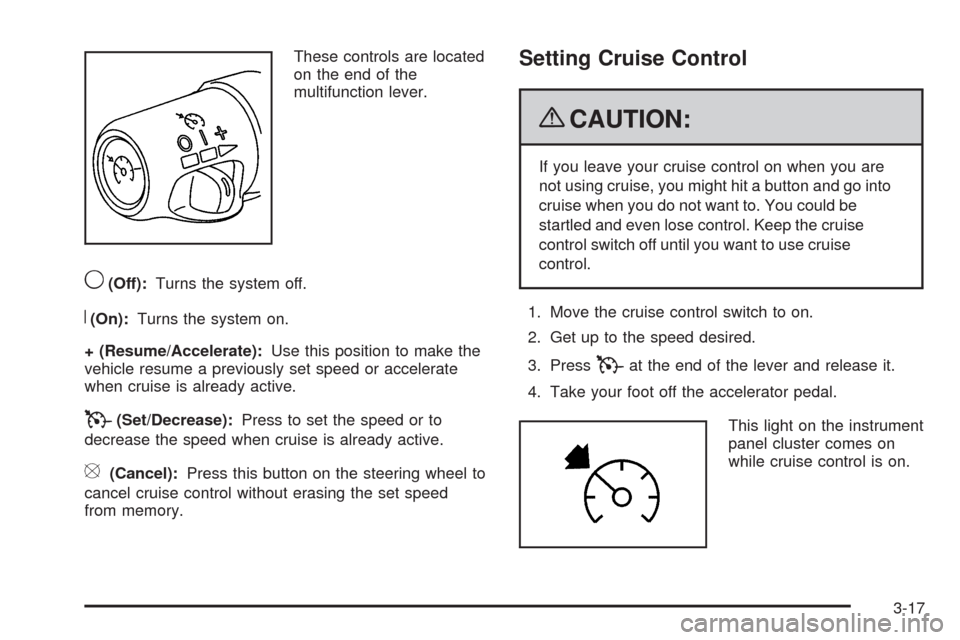
These controls are located
on the end of the
multifunction lever.
9(Off):Turns the system off.
R(On):Turns the system on.
+ (Resume/Accelerate):Use this position to make the
vehicle resume a previously set speed or accelerate
when cruise is already active.
T(Set/Decrease):Press to set the speed or to
decrease the speed when cruise is already active.
[(Cancel):Press this button on the steering wheel to
cancel cruise control without erasing the set speed
from memory.
Setting Cruise Control
{CAUTION:
If you leave your cruise control on when you are
not using cruise, you might hit a button and go into
cruise when you do not want to. You could be
startled and even lose control. Keep the cruise
control switch off until you want to use cruise
control.
1. Move the cruise control switch to on.
2. Get up to the speed desired.
3. Press
Tat the end of the lever and release it.
4. Take your foot off the accelerator pedal.
This light on the instrument
panel cluster comes on
while cruise control is on.
3-17
Page 173 of 514

Reducing Speed While Using Cruise
Control
There are two ways to reduce your speed while using
cruise control:
PressTat the end of the lever until the lower
speed desired is reached, then release it.
To slow down in very small amounts, brie�y
press
T. Each time this is done, the vehicle
goes about 1 mph (1.6 km/h) slower.
Passing Another Vehicle While Using
Cruise Control
Use the accelerator pedal to increase your vehicle
speed. When you take your foot off the pedal, the
vehicle slows down to the cruise control speed you
set earlier.
Using Cruise Control on Hills
How well the cruise control works on hills depends upon
the vehicle speed, load, and the steepness of the hills.
When going up steep hills, you might have to step on the
accelerator pedal to maintain the vehicle’s speed. When
going downhill, you might have to brake to keep the
vehicle’s speed down. Applying the brake will turn off the
cruise control. If you need to apply the brake due to the
grade of the downhill slope, you might not want to attempt
to use the cruise control feature.
Ending Cruise Control
There are three ways to end cruise control.
Step lightly on the brake pedal. This will end the
current cruise control session.
Move the cruise control switch to9to turn off the
system completely.
Press the[button on the steering wheel.
Erasing Speed Memory
The cruise control set speed memory is erased when
the cruise control or the ignition is turned off.
3-19
Page 176 of 514

The Adaptive Cruise controls are located on the left side
of the steering wheel.
9(Off):Turns the system off.
R(On):Turns the system on.
S(Resume/Increase):Use this position to make the
vehicle resume a previously set speed or increase the set
speed when Adaptive Cruise Control is already active.
T(Set/Decrease):Press to set the speed or to
decrease the set speed when Adaptive Cruise Control
is already active.
[(Cancel):Press this button located on the steering
wheel to cancel adaptive cruise control.
Engaging Adaptive Cruise Control With
the Set Button
{CAUTION:
If you leave your Adaptive Cruise Control switch
on when you are not using cruise, you might hit a
button and go into cruise when you do not want
to. You could be startled and even lose control.
Keep the Adaptive Cruise Control switch off until
you want to use cruise control.
{CAUTION:
If you operate Adaptive Cruise Control without
your Head-up Display (HUD) properly adjusted,
your Adaptive Cruise Control settings may not be
visible. You could forget your settings and be
startled by Adaptive Cruise Control response and
even lose control. Keep your HUD on and properly
adjusted when using Adaptive Cruise Control.
3-22
Page 179 of 514

Selecting the Follow Distance (GAP)
When the system detects a slower moving vehicle, it will
adjust your vehicle’s speed and maintain the following
distance (gap) selected.
Use the GAP button on
the steering wheel to
adjust the follow distance
between your vehicle
and other vehicle’s.
Press the top of the button to increase the distance
or the bottom of the button to decrease the distance.
The �rst button press shows the current follow distance
setting on the HUD. The current following distance
setting is maintained until it is changed.There are six follow distances to choose from.
The follow distance selection ranges from near to far
(one second to two seconds follow time). The distance
maintained for a selected follow distance varies based
on vehicle speed. The faster the vehicle speed the further
back you will follow. Consider traffic and weather
conditions when selecting the follow distance. The range
of selectable distances may not be appropriate for all
drivers and driving conditions. If you prefer to travel at a
following distance farther than Adaptive Cruise Control
allows, disengage the system and drive manually.
A graphic on the HUD
indicates the selected
following distance.
This picture shows a
maximum follow distance.
The vehicles will move closer together as you select a
smaller following distance.
United States version
shown, Canada similar
3-25
Page 198 of 514

The HUD controls are located to the left of the steering
wheel on the DIC control panel.
Off:Turn the brightness control knob fully
counterclockwise to turn the HUD display off.
~(Head-Up Display):Press to move the HUD
display up or down on the windshield. HUD cannot be
adjusted side-to-side.Brightness Control:Press the knob on the center of
the DIC control panel to extend and then pull the knob
until is completely extended. Turn the knob clockwise or
counterclockwise to increase or decrease the brightness
of the HUD display.
To adjust the HUD so it can be seen properly:
1. Adjust the seat to a comfortable driving position,
before adjusting the HUD position.
2. Start the engine.
3. Adjust the position and brightness of the HUD
display.
The brightness of the HUD display is determined by the
light conditions in the direction the vehicle is facing and
where the HUD has been positioned on the windshield.
If the vehicle is facing a dark object or a heavily shaded
area, the HUD may begin to dim because it anticipates
the vehicle entering a dark area.
When sunlight enters the HUD it can make it difficult
to see the display. The display will return to normal
brightness when the sunlight no longer enters the HUD.
Wearing polarized sunglasses could also make the
HUD display harder to see.
3-44
Page 206 of 514

Sensors
The solar sensor located on the instrument panel, near
the windshield, monitors the solar heat.
The interior temperature sensor located on the
instrument panel to the right of the steering wheel,
measures the temperature of the air inside the vehicle.
The climate control system uses the information
from these sensors to adjust the temperature, the fan
speed and the air delivery, in order to maintain the
selected temperature. The system may also supply
cooler air to the side of the vehicle facing the sun.
Do not cover the sensors or the automatic climate
control system will not work properly.
Outlet Adjustment
Use the lever located in the center of each outlet to
change the direction of the air�ow, either side-to-side or
up and down. Use the thumbwheels to open or close
the outlets to adjust the air�ow.
Turn the thumbwheel towards the vehicle door to open
the outlets and allow the maximum amount of air to
enter your vehicle. Turn the thumbwheel towards
the center console to close the outlets and minimize
the amount of air entering the vehicle.
Operation Tips
Clear away any ice, snow or leaves from the air
inlets at the base of the windshield that may
block the �ow of air into your vehicle.
Use of non-GM approved hood de�ectors may
adversely affect the performance of the system.
Keep the path under the front seats clear of objects
to help circulate the air inside of your vehicle more
effectively.
If the air�ow seems low when the fan speed is at
the highest setting, the passenger compartment air
�lter may need to be replaced. For more information,
seePassenger Compartment Air Filter on page 3-54.
3-52