Page 65 of 116

7-16
1
2
3
4
5
67
8
9
10
11
to continue up the hill, dismount the ATV on the up-
hill side. Physically turn the ATV around and then
descend the hill.
If you start to roll backwards, DO NOT apply the
rear brake to stop or try to put the ATV in gear. The
ATV could easily tip over backwards. Instead, ap-
ply the front brake gradually, or dismount the ATV
immediately on the uphill side.
WARNING
EWB01761
Maintain a steady speed when climbing a hill.
If you lose all forward speed:
�
Keep weight uphill.
�
Apply the brakes.
�
Lock the parking brake after you are
stopped.
If you begin rolling backwards:
�
Keep weight uphill.
�
Never apply the rear brake while rolling
backwards. Apply the front brake.
�
When fully stopped, apply the rear brake as
well, and then lock the parking brake.
Dismount on uphill side or to a side if pointed
straight uphill. Turn the ATV around and re-
mount, following the procedure described in
the Owner’s Manual.RIDING DOWNHILL
When riding your ATV downhill, shift your weight
as far to the rear and uphill side of the ATV as pos-
sible. Move back on the seat and sit with your arms
straight. Allow the engine compression to do most
of the braking for you. Improper braking may cause
a loss of traction.
Use caution while descending a hill with loose or
slippery surfaces. Braking ability and traction may
be adversely affected by these surfaces. Improper
braking may also cause a loss of traction.
Whenever possible, ride your ATV straight down-
Page 66 of 116

7-17
1
2
3
4
5
67
8
9
10
11
hill. Avoid sharp angles which could allow the ATV
to tip or roll over. Carefully choose your path and
ride no faster than you will be able to react to ob-
stacles which may appear.
WARNING
EWB01620
Always follow proper procedures for going
down hills as described in this Owner’s Manu-
al.
Note: a special technique is required when
braking as you go down a hill.
�
Always check the terrain carefully before
you start down any hill.
�
Shift your weight backward.
�
Never go down a hill at high speed.
�
Avoid going down a hill at an angle that
would cause the ATV to lean sharply to one
side. Go straight down the hill where possi-
ble.CROSSING A SLOPE
Traversing a sloping surface on your ATV requires
you to properly position your weight to maintain
proper balance. Be sure that you have learned the
basic riding skills on flat ground before attempting
to cross a sloping surface. Avoid slopes with slip-
pery surfaces or rough terrain that may upset your
balance.
As you travel across a slope, lean your body in the
uphill direction. It may be necessary to correct the
steering when riding on loose surfaces by pointing
the front wheels slightly uphill. When riding onOK
Page 67 of 116

7-18
1
2
3
4
5
67
8
9
10
11
slopes, be sure not to make sharp turns either up
or down hill.
If your ATV does begin to tip over, gradually steer
in the downhill direction if there are no obstacles in
your path. As you regain proper balance, gradually
steer again in the direction you wish to travel.
WARNING
EWB01631
Never attempt to turn the ATV around on any
hill until you have mastered the turning tech-
nique as described in the Owner’s Manual on
level ground. Be very careful when turning on
any hill. Avoid crossing the side of a steep hill
if possible.
When crossing the side of a hill:
�
Always follow proper procedures as de-
scribed in the Owner’s Manual.
�
Avoid hills with excessively slippery or loose
surfaces.
�
Shift your weight to the uphill side of the
ATV.CROSSING THROUGH SHALLOW WATER
The ATV can be used to cross slow moving, shal-
low water of up to a maximum of 20 cm (8 in) in
depth. Before entering the water, choose your path
carefully. Enter where there is no sharp drop off,
and avoid rocks or other obstacles which may be
slippery or upset the ATV. Drive slowly and care-
fully.WARNING
EWB01640
Never operate this ATV in fast flowing water or
in water deeper than that specified in yourOK
Page 68 of 116
7-19
1
2
3
4
5
67
8
9
10
11
Owner’s Manual. Remember that wet brakes
may have reduced stopping ability. Test your
brakes after leaving water. If necessary, apply
them several times to let friction dry out the lin-
ings. If the ATV is operated through deep or
fast flowing water, the tires may float, causing
loss of traction and loss of control, which
could lead to an accident.
Test your brakes after leaving the water. Do not
continue to ride your ATV without verifying that you
have regained proper braking ability.CAUTION:
ECB00240
After riding your ATV in water, be sure to drain
the trapped water by removing the check hose
at the bottom of the air filter case. Wash the
ATV in fresh water if it has been operated in
salt water or muddy conditions.
Page 69 of 116
7-20
1
2
3
4
5
67
8
9
10
11
RIDING OVER ROUGH TERRAIN
Riding over rough terrain should be done with cau-
tion. Look out for obstacles which could cause
damage to the ATV or could lead to an upset or ac-
cident. Be sure to keep your feet firmly mounted on
the footboards at all times. Avoid jumping the ATV
as loss of control and damage to the ATV may re-
sult.
WARNING
EWB01650
Before operating in a new area, check for ob-
stacles. Never attempt to ride over large obsta-
cles, such as large rocks or fallen trees. Whenyou go over obstacles, always follow proper
procedures as described in the Owner’s Manu-
al.
SLIDING AND SKIDDING
Care should be used when riding on loose or slip-
pery surfaces since the ATV may slide. If unex-
pected and uncorrected, sliding could lead to an
accident.
To reduce the tendency for the front wheels to slide
in loose or slippery conditions, positioning your
weight over the front wheels will sometimes help.
1. Air filter case check hose
1
Page 70 of 116
 by steering in the direction of the
slide. Applyi")
7-21
1
2
3
4
5
67
8
9
10
11
If the rear wheels of your ATV start to slide side-
ways, control can usually be regained (if there is
room to do so) by steering in the direction of the
slide. Applying the brakes or accelerating is not
recommended until you have corrected the slide.
With practice, over a period of time, skill at con-
trolled sliding can be developed. The terrain
should be chosen carefully before attempting such
maneuvers, since both stability and control are re-
duced. Bear in mind that sliding maneuvers should
always be avoided on extremely slippery surfaces
such as ice, since all control may be lost.
WARNING
EWB01661
Learn to safely control skidding or sliding by
practicing at low speeds and on level, smooth
terrain.
On extremely slippery surfaces, such as ice,
go slowly and be very cautious in order to re-
duce the chance of skidding or sliding out of
control.
WHAT TO DO IF...
This section is designed to be a reference guide
only. Be sure to read each section on riding tech-
niques completely.
WHAT TO DO...
�
If your ATV doesn’t turn when you want it to:
Bring the ATV to a stop and practice the turning
maneuvers again. Be sure you are putting your
weight on the footboard to the outside of the
turn. Position your weight over the front wheels
for better control. (See page 7-12.)
�
If your ATV begins to tip while turning:
Lean more into the turn to regain balance. If nec-
essary, gradually let off the throttle and/or steer
to the outside of the turn. (See page 7-12.)
Page 71 of 116

7-22
1
2
3
4
5
67
8
9
10
11
�
If your ATV starts to slide sideways:
Steer in the direction of the slide if you have the
room. Applying the brakes or accelerating is not
recommended until you have corrected the
slide. (See page 7-20.)
�
If your ATV can’t make it up a hill you are trying
to climb:
Turn the ATV around if you still have forward
speed. If not, stop, dismount on the uphill side of
the ATV and physically turn the ATV around. If
the ATV starts to slip backwards, DO NOT USE
THE REAR BRAKE – the ATV may tip over on
top of you. Instead, apply the front brake or dis-
mount the ATV on the uphill side. (See
page 7-14.)
�
If your ATV is traversing a sloping surface:
Be sure to ride with your weight positioned to-
wards the uphill side of the ATV to maintain
proper balance. If the ATV starts to tip, steer
down the hill (if there are no obstacles in your
way) to regain balance. If you discover that the
ATV is going to tip over, dismount on the uphill
side. (See page 7-14.)
�
If your ATV encounters shallow water:
Ride slowly and carefully through slow moving
water, watching for obstacles. Be sure to let wa-ter drain from the ATV and CHECK YOUR
BRAKES FOR PROPER OPERATION when
you come out of the water. Do not continue to
ride your ATV until you have regained adequate
braking ability. (See page 7-18.)
Page 72 of 116

8-1
1
2
3
4
5
6
78
9
10
11
EBU28781
PERIODIC MAINTENANCE AND MINOR REPAIR
EBU21670
Safety is an obligation of the owner. Periodic in-
spection, adjustment and lubrication will keep your
ATV in the safest and best operating condition
possible. The most important points of inspection,
adjustment, and lubrication are explained on the
following pages.
The intervals given in the periodic maintenance
and lubrication chart should be considered as a
general guide under normal riding conditions.
However, DEPENDING ON THE WEATHER,
TERRAIN, GEOGRAPHICAL LOCATION, AND
INDIVIDUAL USE, THE MAINTENANCE INTER-
VALS MAY NEED TO BE SHORTENED.
WARNING
EWB01840
Never service an engine while it is running.
Moving parts can catch clothing or parts of the
body, causing injury. Electrical components
can cause shocks or start fires. Turn off the en-
gine when performing maintenance unless
otherwise specified. Have a Yamaha dealer
perform the service if you are not familiar with
maintenance work.
EBU27110
Owner’s manual and tool kit
Be sure to put this owner’s manual in the plastic
bag and to always carry it as well as the owner’s
tool kit and the low-pressure tire gauge in their re-
spective compartments under the seat.
1. Owner’s manual
2. Low-pressure tire gauge
3. Owner’s tool kit3
1
2
 1
1 2
2 3
3 4
4 5
5 6
6 7
7 8
8 9
9 10
10 11
11 12
12 13
13 14
14 15
15 16
16 17
17 18
18 19
19 20
20 21
21 22
22 23
23 24
24 25
25 26
26 27
27 28
28 29
29 30
30 31
31 32
32 33
33 34
34 35
35 36
36 37
37 38
38 39
39 40
40 41
41 42
42 43
43 44
44 45
45 46
46 47
47 48
48 49
49 50
50 51
51 52
52 53
53 54
54 55
55 56
56 57
57 58
58 59
59 60
60 61
61 62
62 63
63 64
64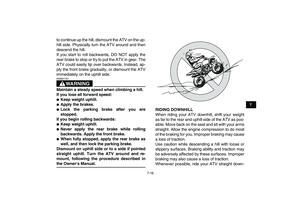 65
65 66
66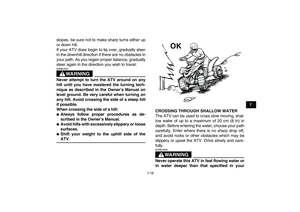 67
67 68
68 69
69 70
70 71
71 72
72 73
73 74
74 75
75 76
76 77
77 78
78 79
79 80
80 81
81 82
82 83
83 84
84 85
85 86
86 87
87 88
88 89
89 90
90 91
91 92
92 93
93 94
94 95
95 96
96 97
97 98
98 99
99 100
100 101
101 102
102 103
103 104
104 105
105 106
106 107
107 108
108 109
109 110
110 111
111 112
112 113
113 114
114 115
115
