Page 89 of 116

8-18
1
2
3
4
5
6
78
9
10
11
touching exhaust components.
EBU23940
Adjusting the carburetor
The carburetor should be checked and, if neces-
sary, adjusted at the intervals specified in the peri-
odic maintenance and lubrication chart. The
carburetor is an important part of the engine and
requires very sophisticated adjustment. Therefore,
most carburetor adjustments should be left to a
Yamaha dealer, who has the necessary profes-
sional knowledge and experience. The adjustment
described in the following section, however, may
be performed by the owner as part of routine main-
tenance.
CAUTION:
ECB00480
The carburetor has been set and extensively
tested at the Yamaha factory. Changing these
settings without sufficient technical knowl-
edge may result in poor performance of or
damage to the engine.
EBU24000
Adjusting the engine idling speed
The engine idling speed must be checked and, ifnecessary, adjusted as follows at the intervals
specified in the periodic maintenance and lubrica-
tion chart.
NOTE:
A diagnostic tachometer is needed to make this
adjustment.
1. Start the engine and warm it up.
NOTE:
The engine is warm when it quickly responds to the
throttle.
2. Attach the tachometer to the spark plug lead.
3. Check the engine idling speed and, if neces-
sary, adjust it to specification by turning the
throttle stop screw at the carburetor. To in-
crease the engine idling speed, turn the throt-
tle stop screw in direction (a), and to decrease
it, turn the screw in direction (b).
Page 90 of 116
8-19
1
2
3
4
5
6
78
9
10
11
NOTE:
If the specified idling speed cannot be obtained as
described above, have a Yamaha dealer make the
adjustment.
EBU27071
Checking the throttle cable free play
The throttle cable free play should be checked at
the intervals specified in the periodic maintenance
and lubrication chart.The throttle cable free play should measure 1.0–
3.0 mm (0.04–0.12 in) at the throttle lever. Period-
ically check the throttle cable free play and, if nec-
essary, have a Yamaha dealer adjust it.
EBU24060
Valve clearance
The valve clearance changes with use, resulting in
improper air-fuel mixture and/or engine noise. To
prevent this from occurring, the valve clearance
must be adjusted by a Yamaha dealer at the inter-
vals specified in the periodic maintenance and lu-
brication chart.
1. Throttle stop screw
Engine idling speed:
1750–1850 r/min
1 (a) (b)
1. Throttle lever free play
1
Page 91 of 116
8-20
1
2
3
4
5
6
78
9
10
11
EBU24090
Checking the front and rear brake
shoes
The front and rear brake shoes must be checked
for wear at the intervals specified in the periodic
maintenance and lubrication chart. Each brake is
provided with a wear indicator, which allows you to
check the brake shoe wear without having to dis-
assemble the brake. To check the brake shoe
wear, check the position of the wear indicator while
applying the brake. If a brake shoe has worn to the
point that the wear indicator reaches the wear limit
line or mark, have a Yamaha dealer replace the
brake shoes as a set.
Front brake
1. Wear limit line
2. Wear indicator
1
2
Page 92 of 116
8-21
1
2
3
4
5
6
78
9
10
11
Rear brake
EBU24330
Adjusting the front brake lever free
play
The brake lever free play must be checked and, if
necessary, adjusted at the intervals specified in
the periodic maintenance and lubrication chart.
NOTE:
Before adjusting the brake lever free play, check
the front brake shoes for wear.The brake lever free play should measure 10.0–
12.0 mm (0.39–0.47 in) as shown. If the free play
is incorrect, adjust it as follows.
1. Loosen the upper locknut and fully turn in the
upper adjusting bolt.
2. Loosen the lower locknut.
3. Turn the lower adjusting bolt in direction (a) to
increase the free play, and in direction (b) to
decrease it.
1. Wear limit mark
2. Wear indicator
1
2
1. Brake lever free play
1
Page 93 of 116
8-22
1
2
3
4
5
6
78
9
10
11
4. Tighten the lower locknut.
5. While applying the front brake, turn out the up-
per adjusting bolt until the upper and lower ca-
ble lengths are equal. The cable joint will
become vertical.6. Tighten the upper locknut.
WARNING
EWB02080
Operating with improperly serviced or adjust-
ed brakes could cause loss of braking ability,
which could lead to an accident.
After servicing:
�
Make sure the brakes operate smoothly and
that the free play is correct.
�
Make sure the brakes do not drag.
Replacement of brake components requires
professional knowledge. These procedures
1. Upper locknut
2. Upper adjusting bolt
3. Lower locknut
4. Lower adjusting bolt
1
2
4
3(a)(b)(a)
(b)
1. Cable joint
1
Page 94 of 116

8-23
1
2
3
4
5
6
78
9
10
11
should be performed by a Yamaha dealer.
EBU24451
Adjusting the rear brake lever free play
The brake lever free play must be checked and, if
necessary, adjusted at the intervals specified in
the periodic maintenance and lubrication chart.
NOTE:
Before adjusting the brake lever free play, check
the rear brake shoes for wear.
The brake lever free play should measure 7.0–
10.0 mm (0.28–0.39 in) as shown. If the free play
is incorrect, adjust it as follows.
1. Loosen the locknut at the brake lever.
2. Turn the brake lever free play adjusting bolt at
the brake lever in direction (a) to increase the
free play, and in direction (b) to decrease it.
3. Tighten the locknut at the brake lever.
If the specified free play cannot be obtained,
proceed with the following steps.
4. Loosen the locknut at the brake lever.
5. Fully turn the adjusting bolt at the brake lever
in direction (a) to loosen the brake cable.
6. To increase the brake lever free play, turn the
1. Locknut
2. Brake lever free play adjusting bolt
3. Brake lever free play
312
(a)
(b)
Page 95 of 116
, and to decrease it,
turn the nut in direction (b).
7. Tighten the locknut at the brake lever.")
8-24
1
2
3
4
5
6
78
9
10
11
adjusting nut on the brake cable at the rear
wheel hub in direction (a), and to decrease it,
turn the nut in direction (b).
7. Tighten the locknut at the brake lever.
NOTE:
If the specified free play cannot be obtained as de-
scribed above or if the rear brake does not operate
correctly, have a Yamaha dealer check the internal
rear brake mechanism.
WARNING
EWB02080
Operating with improperly serviced or adjust-
ed brakes could cause loss of braking ability,
which could lead to an accident.
After servicing:
�
Make sure the brakes operate smoothly and
that the free play is correct.
�
Make sure the brakes do not drag.
Replacement of brake components requires
professional knowledge. These procedures
should be performed by a Yamaha dealer.
EBU24900
Checking and lubricating the cables
The operation and the condition of all control ca-
bles should be checked before each ride, and the
cables and cable ends should be lubricated if nec-
essary. If a cable is damaged or does not move
smoothly, have a Yamaha dealer check or replace
it.
1. Brake lever free play adjusting nut
1
(a)(b)
Recommended lubricant:
Engine oil
Page 96 of 116

8-25
1
2
3
4
5
6
78
9
10
11
WARNING
EWB02130
Inspect cables frequently and replace if dam-
aged. Corrosion can result when the cable
sheaths become damaged, and cables can
also become frayed or kinked, which could re-
strict the operation of controls and lead to an
accident or injury.
EBU28701
Checking and lubricating the front and
rear brake levers
The operation of the front and rear brake levers
should be checked before each ride, and the lever
pivots should be lubricated if necessary.
EBU24962
Checking the wheel hub bearings
The front and rear wheel hub bearings must be
checked at the intervals specified in the periodic
maintenance and lubrication chart. If there is play
in a wheel hub or if a wheel does not turn smoothly,have a Yamaha dealer check the wheel hub bear-
ings.
EBU28821
Lubricating the front knuckle pivots
The front knuckle pivots must be lubricated at the
intervals specified in the periodic maintenance and
lubrication chart.
Lubricate the front knuckle pivots using a grease
gun.
Recommended lubricant:
Lithium-soap-based grease (all-purpose
grease)
Recommended lubricant:
Lithium-soap-based grease (all-purpose
grease)
1. Grease nipple
1
 1
1 2
2 3
3 4
4 5
5 6
6 7
7 8
8 9
9 10
10 11
11 12
12 13
13 14
14 15
15 16
16 17
17 18
18 19
19 20
20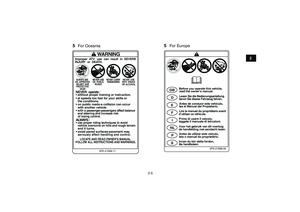 21
21 22
22 23
23 24
24 25
25 26
26 27
27 28
28 29
29 30
30 31
31 32
32 33
33 34
34 35
35 36
36 37
37 38
38 39
39 40
40 41
41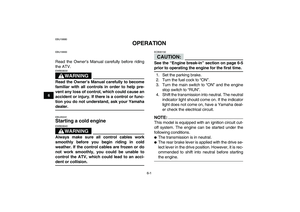 42
42 43
43 44
44 45
45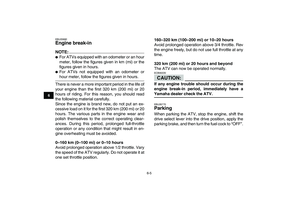 46
46 47
47 48
48 49
49 50
50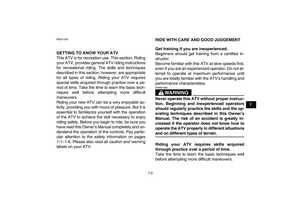 51
51 52
52 53
53 54
54 55
55 56
56 57
57 58
58 59
59 60
60 61
61 62
62 63
63 64
64 65
65 66
66 67
67 68
68 69
69 70
70 71
71 72
72 73
73 74
74 75
75 76
76 77
77 78
78 79
79 80
80 81
81 82
82 83
83 84
84 85
85 86
86 87
87 88
88 89
89 90
90 91
91 92
92 93
93 94
94 95
95 96
96 97
97 98
98 99
99 100
100 101
101 102
102 103
103 104
104 105
105 106
106 107
107 108
108 109
109 110
110 111
111 112
112 113
113 114
114 115
115


