Page 314 of 490
8-27 1. Maximum level mark 2. Minimum level mark
1. Repère de niveau maximum 2. Repère de niveau minimum
1. Marca de nivel máximo 2. Marca de nivel mínimo
1
2
5. Insert the dipstick completely into the oil filler
hole, and then remove it again to check the
oil level. The engine oil should be between
the minimum and maximum level marks.
6. If the engine oil is at or below the minimum
level mark, add sufficient oil of the recom-
mended type to raise it to the correct level.
7. Insert the dipstick completely into the oil filler
hole.
8. Reinstall the console.
EE.book Page 27 Wednesday, November 7, 2007 2:40 PM
Page 316 of 490
8-29 1. Engine oil drain bolt
1. Vis de vidange d’huile moteur
1. Tornillo de vaciado del aceite del motor
1
To change the engine oil (with or without oil fil-
ter cartridge replacement)
1. Park the vehicle on a level surface.
2. Remove the console. (See pages 8-21–8-23
for console removal and installation proce-
dures.)
3. Start the engine, warm it up for several min-
utes, and then turn it off.
4. Place an oil pan under the engine to collect
the used oil, and then remove the dipstick.
5. Remove the engine oil drain bolt to drain the
oil from the crankcase.
EE.book Page 29 Wednesday, November 7, 2007 2:40 PM
Page 320 of 490
8-33 1. O-ring
1. Joint torique
1. Junta tórica
1. Oil filter cartridge 2. Torque wrench
1. Cartouche de filtre à huile 2. Clé dynamométrique
1. Cartucho del filtro de aceite 2. Llave dinamométrica
1
2
8. Apply a light coat of clean engine oil to the O-
ring of the new oil filter cartridge. Make sure
the O-ring is seated properly.
9. Install the new oil filter cartridge with an oil fil-
ter wrench, and then tighten it to the specified
torque with a torque wrench.
Tightening torque:
Oil filter cartridge:
17 Nm (1.7 m·kgf, 12 ft·lbf)
EE.book Page 33 Wednesday, November 7, 2007 2:40 PM
Page 322 of 490
8-35
10. Lower the cargo bed.
11. Reinstall the engine oil drain bolt, and then
tighten it to the specified torque.
12. Refill with the specified amount of recom-
mended engine oil, and then insert the dip-
stick completely into the oil filler hole.
NOTICE: Be sure to wipe off spilled oil on
any parts after the engine and exhaust
system have cooled down. Tightening torque:
Engine oil drain bolt:
30 Nm (3.0 m·kgf, 22 ft·lbf)
Recommended engine oil:
See page 10-3.
Oil quantity:
Without oil filter cartridge replacement:
2.00 L (1.76 Imp qt, 2.11 US qt)
With oil filter cartridge replacement:
2.10 L (1.85 Imp qt, 2.22 US qt)
EE.book Page 35 Wednesday, November 7, 2007 2:40 PM
Page 324 of 490
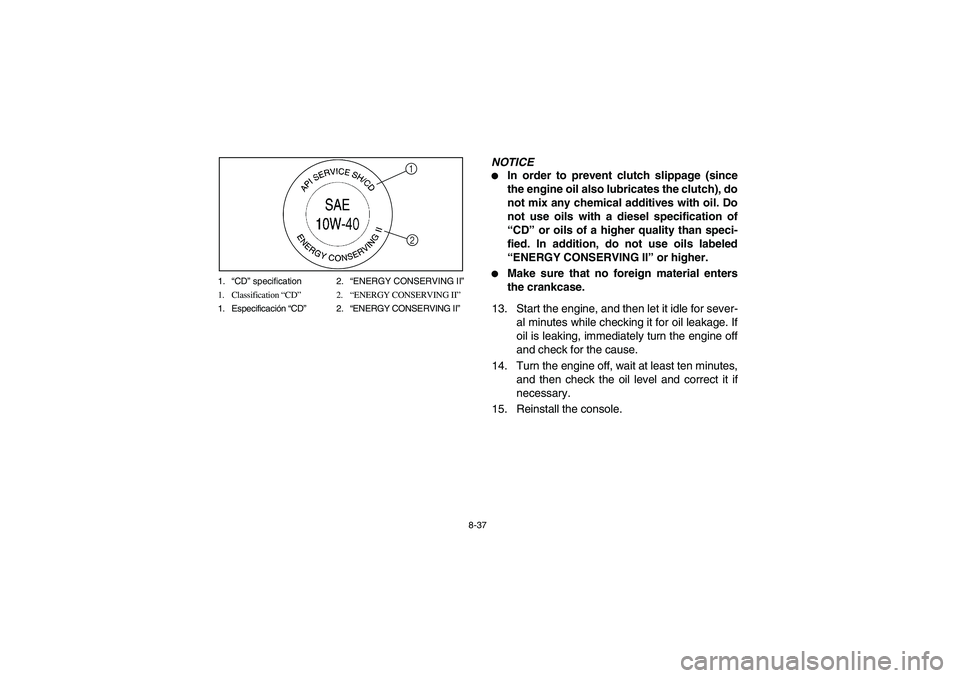
8-37 1.“CD” specification 2.“ENERGY CONSERVING II”
1. Classification “CD”2.“ENERGY CONSERVING II”
1. Especificación “CD”2.“ENERGY CONSERVING II”
1
2
NOTICE�
In order to prevent clutch slippage (since
the engine oil also lubricates the clutch), do
not mix any chemical additives with oil. Do
not use oils with a diesel specification of
“CD” or oils of a higher quality than speci-
fied. In addition, do not use oils labeled
“ENERGY CONSERVING II” or higher.
�
Make sure that no foreign material enters
the crankcase.
13. Start the engine, and then let it idle for sever-
al minutes while checking it for oil leakage. If
oil is leaking, immediately turn the engine off
and check for the cause.
14. Turn the engine off, wait at least ten minutes,
and then check the oil level and correct it if
necessary.
15. Reinstall the console.
EE.book Page 37 Wednesday, November 7, 2007 2:40 PM
Page 390 of 490
8-103
5B460004
Cable inspection and lubrication
WARNING
Damaged cables could restrict operation,
which may cause an accident or injury. Inspect
control cables frequently and replace dam-
aged cables. Corrosion can result when the
outer covering of control cables becomes
damaged. Cables can also become frayed or
kinked.Lubricate the cable ends. If the cables do not oper-
ate smoothly, ask a Yamaha dealer to replace
them.
Recommended lubricant:
Engine oil
EE.book Page 103 Wednesday, November 7, 2007 2:40 PM
Page 452 of 490
9-7
5B410025
B. Storage
Long term storage (60 days or more) of your vehi-
cle will require some preventive procedures to
guard against deterioration. Make any necessary
repairs before storing the vehicle.
After thoroughly cleaning the vehicle, prepare for
storage as follows:
1. Fill the fuel tank with fresh fuel and add the
specified amount of Yamaha Fuel Stabilizer
and Conditioner or equivalent product. Oper-
ate the vehicle for at least 5 minutes to dis-
tribute treated fuel through the fuel system.
2. Remove the spark plug, pour about one ta-
blespoon of SAE 10W-40 or 20W-50 motor
oil in the spark plug hole and reinstall the
spark plug. Ground the spark plug wire and
turn the engine over several times to coat the
cylinder wall with oil. Specified amount:
1 oz of stabilizer to each gallon of fuel
(or 7.5 ml of stabilizer to each liter of fuel)
EE.book Page 7 Wednesday, November 7, 2007 2:40 PM
Page 458 of 490
10-3
Engine oil:
Type:
Recommended engine oil classification API service SG type or higher, JASO standard MA
Quantity:
Without oil filter cartridge replacement 2.00 L (1.76 Imp qt, 2.11 US qt)
With oil filter cartridge replacement 2.10 L (1.85 Imp qt, 2.22 US qt)Model YXR70FSP2X
-20˚ -10˚ 0˚
10˚20˚ 30˚40˚50˚C
10W/30
15W/4020W/4020W/50
10W/40
5W/30
NOTICE
In order to prevent clutch slippage (since the en-
gine oil also lubricates the clutch), do not mix any
chemical additives with oil. Do not use oils with a
diesel specification of “CD” or oils of a higher qual-
ity than specified. In addition, do not use oils la-
beled “ENERGY CONSERVING II” or higher.
EE.book Page 3 Wednesday, November 7, 2007 2:40 PM
 8-27 1. Maximum level mark 2. Minimum level mark
1. Repère de niveau maximum 2. Repère de niveau minimum
1. Marca de nivel máximo 2. Marca de nivel mínimo
1
2
5. Insert the dipstick completely int")
 8-29 1. Engine oil drain bolt
1. Vis de vidange d’huile moteur
1. Tornillo de vaciado del aceite del motor
1
To change the engine oil (with or without oil fil-
ter cartridge replacement)
1. Park the")
 8-33 1. O-ring
1. Joint torique
1. Junta tórica
1. Oil filter cartridge 2. Torque wrench
1. Cartouche de filtre à huile 2. Clé dynamométrique
1. Cartucho del filtro de aceite 2. Llave dinamométri")
 8-35
10. Lower the cargo bed.
11. Reinstall the engine oil drain bolt, and then
tighten it to the specified torque.
12. Refill with the specified amount of recom-
mended engine oil, and then insert t")
 8-103
5B460004
Cable inspection and lubrication
WARNING
Damaged cables could restrict operation,
which may cause an accident or injury. Inspect
control cables frequently and replace dam-
aged cables.")
 9-7
5B410025
B. Storage
Long term storage (60 days or more) of your vehi-
cle will require some preventive procedures to
guard against deterioration. Make any necessary
repairs before storing the vehi")
 10-3
Engine oil:
Type:
Recommended engine oil classification API service SG type or higher, JASO standard MA
Quantity:
Without oil filter cartridge replacement 2.00 L (1.76 Imp qt, 2.11 US qt)
With oi")